
The Tragic Reality of the Wet Toast Appetizer
Welcome to another weekend kitchen therapy session. We need to have a serious, no-nonsense conversation about a culinary tragedy that unfolds at almost every dinner party, backyard barbecue, and holiday gathering across the globe. You know exactly what I am talking about. You are standing in a friend’s kitchen, sipping a glass of wine, and you reach for a beautiful, ruby-red piece of bruschetta. It looks like a rustic Italian masterpiece. But the moment you pick it up, the bread sags like a wet kitchen sponge, tomato juice runs down your forearm, and you are left chewing on a damp, disintegrating piece of toast that possesses the structural integrity of wet cardboard. It is a textural nightmare, and quite frankly, it is an insult to good produce.
But here is the incredibly good news: you absolutely do not need a degree from Le Cordon Bleu to fix this widespread problem. You just need a little bit of fundamental food science, some basic common sense, and the willingness to stop doing things the way you have always done them. Anyone can cook like an absolute expert in a standard home kitchen if they understand the “why” behind the process. Today, we are going to dive deep into the cellular biology of a tomato, the thermodynamics of toasted bread, and the brilliant, stress-free logistics of how to host a mindful crostini bar that will leave your guests completely blown away.
The Physics of Sogginess: Why Traditional Methods Fail
Let us get one scientific fact straight right out of the gate: fresh tomatoes are basically delicious, fragile water balloons. On average, a ripe tomato is composed of 94 to 95 percent water. When you leave them whole, sitting on your counter, that water is safely contained within microscopic cellular walls. But the second you take a knife to a tomato, you are unleashing absolute chaos on your cutting board.
Cutting a tomato physically ruptures those delicate cell walls. However, it is not just a mechanical release of liquid that you have to worry about; you are also triggering a rapid enzymatic reaction. Tomatoes contain an enzyme called pectinase, which activates the moment the fruit’s tissue is damaged. Pectinase rapidly degrades the pectin that holds the plant’s cell walls together. Within just eight to ten minutes of chopping a tomato, it begins to literally liquefy itself from the inside out.
If you take those freshly chopped, weeping tomatoes and immediately pile them onto a piece of toasted bread, physics takes over, and you lose the battle. Bread is a porous matrix of starches and gluten proteins. Through the process of capillary action, the bread acts as a highly efficient wick, pulling that enzymatic tomato water deep into its crumb. The water rapidly hydrates the starches, causing them to swell and burst, which in turn dissolves the gluten network that gives bread its chew. Within twenty minutes, your perfectly crispy toast is reduced to a gluey mush.
So, how do we fight this inevitable descent into sogginess? We use science. We control the moisture before it ever has a chance to touch the bread.
The Osmosis Hack: Salting Your Tomatoes
The single most important step in making bruschetta is one that the vast majority of weekend hobbyists skip because they are rushing to get food on the table. You must salt your tomatoes before you assemble anything. And I do not mean a dainty, aesthetic sprinkle of salt right before serving. I mean aggressively salting the chopped fruit and letting it sit to purge its moisture.
This is where the biological process of osmosis becomes your ultimate sous-chef. Osmosis is the movement of water across a semi-permeable membrane from an area of low solute concentration to an area of high solute concentration. When you toss your diced tomatoes with kosher salt, you create a high-salinity environment on the outside of the tomato pieces. The water trapped inside the tomato cells naturally rushes out to dilute the salt.
Here is the exact, non-negotiable protocol for prepping your tomatoes:
First, dice your tomatoes cleanly. If you are crushing the fruit and leaving a puddle of juice behind, your dull knife is to blame, and you need to sharpen it immediately.
Second, place the diced tomatoes in a fine-mesh strainer or a colander set over a large mixing bowl.
Third, toss them generously with kosher salt or coarse sea salt. Do not use iodized table salt unless you want your beautiful summer appetizer to taste like a high school chemistry lab.
Finally, walk away. Let the tomatoes drain undisturbed for at least 15 to 20 minutes.
During this crucial resting period, the salt will pull a shocking amount of liquid out of the tomatoes. The result is pure culinary magic. The tomatoes become slightly concentrated, their natural sweetness is dramatically amplified, and most importantly, the watery liquid that would have ruined your bread is now sitting harmlessly in the bowl underneath the strainer. As a bonus tip, do not throw that extracted tomato water away. It is culinary liquid gold, packed with umami. Drink it over ice, whisk it into a vinaigrette, or use it to deglaze a pan.
When it comes time to move those perfectly drained tomatoes into your serving bowl, do not drag your knife edge across the board to scoop up stray pieces. Grab a stainless bench scraper to lift the ingredients cleanly. It is the cheapest, most effective tool for protecting your expensive knife blades from premature dulling.
The Lipid Barrier: Waterproofing Your Bread
Now that we have successfully dehydrated the topping, we need to waterproof the foundation. Even a thoroughly drained, salted tomato retains some surface moisture. If you are setting up a self-serve crostini bar where the food might sit out for an hour or more, we need a robust insurance policy to keep that bread shattering-crisp.
Enter the lipid barrier.
Water and oil do not mix. By applying a layer of fat to the surface of your toasted bread, you are creating a hydrophobic shield that physically blocks residual water from entering the bread’s capillary network. This is a technique used in high-end catering, and it is entirely achievable in your kitchen. There are a few highly effective ways to achieve this lipid barrier:
The Olive Oil Paint Job: After toasting your bread, use a silicone pastry brush to apply a thin, even layer of high-quality extra virgin olive oil to the top surface of the crostini. Do not drown the bread; you just want to seal the microscopic pores. The oil acts as a raincoat against the tomato juices.
The Garlic Rub: This is a classic, old-school Italian nonna move, and it works brilliantly. Take a raw clove of peeled garlic, cut it in half to expose the center, and rub the cut side aggressively over the surface of the hot, freshly toasted bread. The residual heat of the bread melts the volatile oils in the garlic, leaving behind a microscopic layer of garlic oil that acts as a moisture barrier. It also imparts a punchy, fresh garlic flavor that is infinitely better and more balanced than mixing raw, harsh minced garlic directly into your delicate tomatoes.
The Dairy Shield: If you are serving alternative crostini toppings alongside your tomatoes, a smear of whole-milk ricotta, mascarpone, or a hard cheese barrier works wonders. The heavy milk fats block the moisture just as effectively as olive oil, while adding a rich, creamy textural contrast to the acidic topping.
The Bread Foundation: Choosing, Slicing, and Toasting
Let us talk about the vehicle itself. You cannot use flimsy, pre-sliced supermarket sandwich bread for bruschetta. It lacks the structural integrity, the crust development, and the gluten strength required to hold up to heavy, wet toppings. You need a rustic, artisan loaf. A traditional French baguette is the standard, foolproof choice because its narrow diameter yields perfect two-bite crostini. Ciabatta is also excellent if you want a wider, more substantial base that can hold a mountain of toppings. Sourdough boules work beautifully, provided you cut the large slices in half or into quarters so they are actually manageable for your guests to eat while standing and holding a drink.
When slicing the bread, always cut it on a bias (diagonally). This simple geometry trick increases the surface area of the slice, giving you more real estate for toppings without making the piece of bread too thick to bite through easily. Aim for a thickness of exactly half an inch. Any thinner, and the bread will shatter like glass when you bite into it, sending crumbs all over your floor. Any thicker, and your guests will look like they are aggressively gnawing on tree bark.
Now, we must discuss the toasting process, which brings me to one of my absolute biggest pet peeves. If you are toasting your bread in a cheap, peeling, scratched-up Teflon non-stick skillet, we are going to have words. I have zero patience for toxic kitchen gear. Those mystery-metal pans with peeling chemical coatings have no place in a home kitchen. They degrade under high heat, leach forever chemicals into your food, and frankly, they do a terrible job of actually browning bread.
Instead, arrange your bread slices on a heavy-duty, commercial-grade bare aluminum sheet pan. Aluminum conducts heat beautifully and evenly, ensuring every single slice toasts at the exact same rate. Bake them in a 400°F (200°C) oven for about 10 to 12 minutes, flipping halfway through, until they are deeply golden and crisp on the outside, but still retain a slight, satisfying chew in the very center.
If you prefer the stovetop method because you do not want to turn on your oven in the middle of summer, use a well-seasoned carbon steel skillet or a high-quality, heavy-bottomed stainless steel pan. If you are terrified of your stainless steel pan because you do not know how to cook on it without your food cementing itself to the bottom, you need to learn the water drop test immediately to master temperature control.
Once your bread is perfectly toasted, you must immediately transfer the hot slices to a wire cooling rack. If you leave hot toast sitting flat on a baking sheet or a cutting board, the steam escaping from the bottom of the bread will condense against the flat surface and make the underside of the bread soggy before you even get a chance to top it. Airflow is critical for maintaining crunch.
The Tomato Matrix: Prepping the Perfect Topping
Not all tomatoes are created equal, especially when it comes to raw applications like bruschetta. In the absolute peak of summer, heirloom varieties are magnificent, complex, and deeply flavorful, but they are notoriously watery. If you are using large heirlooms or giant beefsteak tomatoes, you must core them and scoop out the watery seed jelly before dicing the firm flesh.
If it is the middle of winter and you are craving bruschetta, do not buy those pale, mealy, baseball-sized hothouse tomatoes wrapped in plastic. They taste like sadness and have a Brix level (sugar content) bordering on zero. Instead, opt for cherry or grape tomatoes. Because of their high skin-to-flesh ratio, they retain much better texture, moisture density, and concentrated flavor year-round.
When it comes to cutting those tiny, slippery cherry tomatoes, you must use a blade that can pierce the skin without crushing the delicate interior. A razor-sharp chef’s knife is ideal, but if your knife skills are still a work in progress, reaching for a serrated utility knife is an absolute game-changer. The micro-teeth grip the slippery tomato skin and slice cleanly through without requiring you to apply heavy downward pressure.
After you have diced and salted the tomatoes, and let them drain for their mandatory 20 minutes, it is time to add the aromatics to build your flavor profile.
Basil: Add fresh basil at the very last possible minute. Basil leaves are incredibly delicate and highly prone to enzymatic browning and oxidation. If you chop them too early and let them sit in the acidic tomato mixture, they will turn black, slimy, and bitter. Chiffonade (thinly slice) the basil right before serving to preserve its bright green color and sweet, anise-like aroma.
Olive Oil: Toss the drained tomatoes with a generous splash of your absolute best extra virgin olive oil. This is the exact moment to break out the expensive, peppery finishing oil you got as a gift, not the bulk jug you use for sautéing onions on a Tuesday night. The fat in the oil carries the fat-soluble flavor compounds in the tomatoes across your palate.
Balsamic Vinegar: Here is a somewhat controversial culinary take: traditional, authentic Italian bruschetta does not contain balsamic vinegar. However, if you love the tangy, complex sweetness it brings (and I often do), do not pour raw vinegar directly into the tomato bowl. The harsh acid will break down the tomatoes further and turn the mixture into a muddy brown swamp. Instead, buy or make a thick balsamic glaze reduction and drizzle it elegantly over the fully assembled crostini at the very end.
Food Safety and Temperature Control: The FDA Reality Check
This is the part of the masterclass where I put on my strict, authoritative sous-chef hat, because absolutely nobody wants to send their dinner guests home with a severe case of food poisoning. We need to talk about the strict FDA guidelines regarding cut tomatoes.
You might think of tomatoes as a highly acidic, totally safe ingredient that can sit on the counter all day. However, once a tomato is cut, its internal pH (usually hovering around 4.3 to 4.7) and high water activity make it a prime, hospitable breeding ground for dangerous bacteria like Salmonella and E. coli. The FDA officially classifies cut tomatoes as a TCS food—meaning they require strict Time/Temperature Control for Safety.
What does this mean for your casual weekend gathering? It means you cannot leave a massive, beautiful bowl of chopped, room-temperature tomatoes sitting out on the patio in the hot afternoon sun for six hours while people graze.
According to strict food safety regulations, once tomatoes are cut, they must be held at 41°F (5°C) or below in a refrigerator. If they are left out at room temperature for serving, they must be completely consumed or thrown in the trash within 4 hours. This protocol is known as using Time as a Public Health Control, and it is based on the rapid, exponential replication rate of bacteria at ambient temperatures.
However, from a purely culinary perspective, refrigerating tomatoes destroys their flavor. The cold temperature permanently alters and mutes the volatile flavor compounds that make a tomato taste like a summer day.
The brilliant solution for the home host? Prep your ingredients in strategic batches. Keep your whole tomatoes at room temperature to preserve their flavor. Dice and salt a single batch right before the party starts. If the party is going long into the evening, have a second batch of whole tomatoes ready to chop and salt later, rather than chopping them all at 1:00 PM and letting them languish dangerously on the counter until 7:00 PM. This ensures peak flavor, maximum crispness for the bread, and strict adherence to food safety protocols.
Setting Up the Mindful Crostini Bar
Now that we have completely mastered the science of the ingredients and the safety protocols, let us talk about event logistics. If you want to host a beautiful dinner party without spending the entire evening sweating in the kitchen and missing out on the fun, you need to embrace the interactive food station. The DIY crostini bar is the ultimate hack for the busy, modern host.
By deconstructing the bruschetta and letting guests build their own, you solve two massive problems at once. First, you completely eliminate the soggy bread issue, because the wet topping does not touch the dry bread until the exact moment your guest is ready to take a bite. Second, you free yourself from the tedious, time-consuming task of assembling forty individual appetizers while your friends are in the living room drinking your expensive wine without you.
When setting up your crostini bar, flow and staging are everything. You want to guide your guests through a logical, mess-free assembly line.
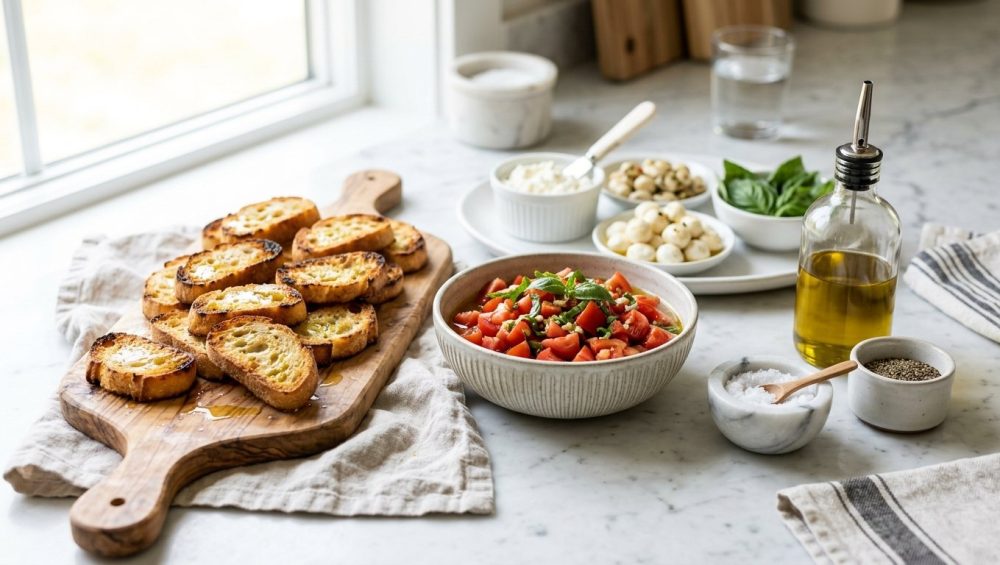
Station 1: The Foundation. Always start with the plates and napkins. Guests need their hands free to build their masterpiece. Next to the plates, arrange your perfectly toasted, garlic-rubbed, olive-oil-painted crostini in a beautiful, overlapping pattern on a large, well-maintained wooden board. (Side note: make sure you are oiling your wooden boards properly with food-grade mineral oil; if your cutting board keeps cracking, you are neglecting its hydration).
Station 2: The Spreads (The Secondary Lipid Barriers). Offer small bowls of secondary moisture barriers for guests who want to experiment. Whipped ricotta with lemon zest, creamy mascarpone, or a high-quality salted butter are excellent choices. Provide small spreading knives for this station.
Station 3: The Star of the Show. This is where your perfectly drained, salted, and oiled tomato mixture lives. You must use a slotted spoon for serving. Even with the rigorous salting process, tomatoes will continue to weep slightly over time. A slotted spoon ensures that any residual liquid stays safely in the bottom of the bowl, not on your guest’s bread.
Station 4: The Finishing Touches. Provide small, aesthetic bowls of flaky sea salt, a peppermill for freshly cracked black pepper, microgreens, your delicate chiffonade of basil, and a squeeze bottle of balsamic glaze.
Beyond the Tomato: Creative & Safe Crostini Toppings
While the classic tomato and basil bruschetta is undeniably the star of the show, a truly mindful crostini bar should offer variety. This caters to different dietary preferences, keeps the palate engaged, and makes the spread look incredibly abundant. Because you have already done the hard work of making the perfect toasted bread bases, adding a few extra toppings requires almost zero extra effort.
Prosciutto, Fig, and Goat Cheese: The salty, savory punch of cured pork pairs beautifully with the sweet jamminess of fresh or preserved figs and the tangy, earthy bite of goat cheese. It is an elegant, high-impact combination.
White Bean and Rosemary Purée: A fantastic, hearty vegan option that costs pennies to make. Blend canned cannellini beans with extra virgin olive oil, roasted garlic cloves, fresh rosemary, and a heavy squeeze of lemon juice. It has the rich, creamy texture of hummus but with a distinctly rustic Italian flavor profile.
Roasted Mushroom and Thyme: Sauté mixed wild mushrooms in a screaming hot pan (again, absolutely no cheap non-stick pans allowed!) until they release all their moisture and deeply caramelize. Toss them with fresh thyme leaves and a splash of sherry vinegar to cut the earthiness.
Gorgonzola, Walnut, and Hot Honey: A pungent, crunchy, sweet, and spicy combination that acts as an incredible palate cleanser between the heavier savory bites. The hot honey binds the crumbled cheese and nuts to the toast beautifully.
Equipment Check: Ditching the Toxic Junk
I cannot write a comprehensive masterclass without addressing the tools you are using to execute these techniques. I firmly believe that absolutely anyone can cook like a seasoned expert, but you are severely handicapping yourself if your kitchen is full of cheap, toxic, or dangerously dull equipment. You do not need a kitchen bursting with single-use, plastic gadgets that clutter your drawers, but you do need a few foundational pieces of high-quality, durable gear.
If your baking sheets warp in the oven with a loud, terrifying “BANG” every time they hit 400 degrees, throw them out. Invest in heavy-gauge commercial aluminum pans that will never warp. If you want to take your bread toasting to the absolute next level, try crisping your crostini directly on a preheated baking steel. The intense, even radiant heat will give you a blistered crust that rivals a professional wood-fired oven.
And finally, audit your cookware. If you are still using lightweight pans with a black synthetic coating that is flaking off into your food, you are literally eating microplastics and forever chemicals with every meal. That is unacceptable. Upgrade to carbon steel, enameled cast iron, or heavy-bottomed tri-ply stainless steel. They will outlive you, they are completely safe for your family, and they will give you the kind of hard sear and deep browning that makes restaurant food taste so incredibly good.
The Joy of Stress-Free Entertaining
Hosting a weekend gathering should not end with you hyperventilating over a tray of soggy, disintegrating bread while your guests politely pretend they aren’t eating tomato-flavored mush. By understanding the simple culinary science of osmosis, implementing hydrophobic lipid barriers, respecting the thermodynamics of toasted bread, and adhering to basic food safety principles, you can completely eliminate the stress of the appetizer course.
A mindful crostini bar is much more than just a clever hosting hack; it is a way to invite your guests into the culinary experience. It sparks conversation, allows for dietary personalization, and most importantly, it keeps you out of the kitchen and in the living room where you belong, glass of wine in hand, enjoying the company of your friends.
So, ditch the cheap pans, sharpen your knives, salt your tomatoes aggressively, and reclaim your weekend. You have the knowledge. You have the science. Now go make some mind-blowing food.






