
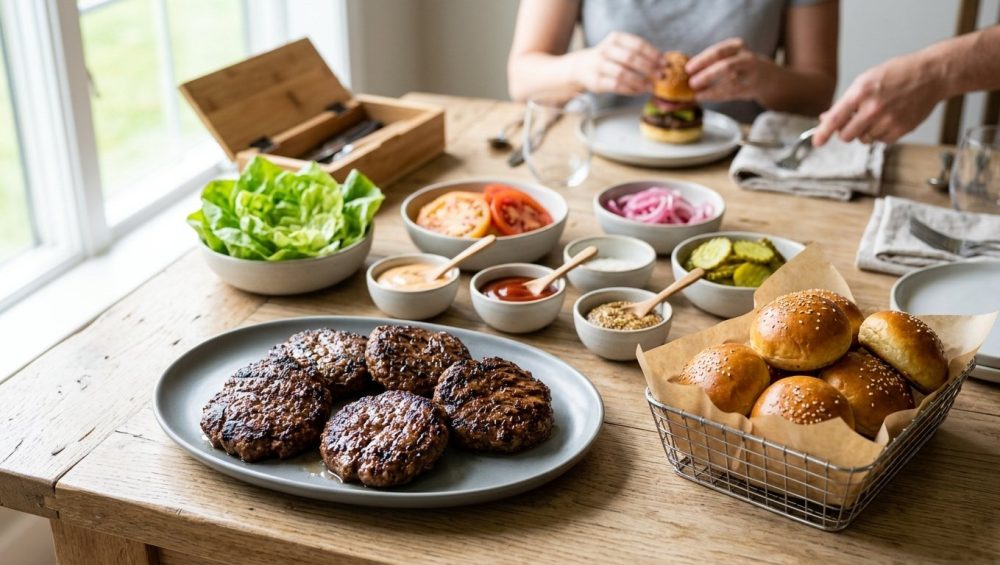
Let’s get one thing straight before we even turn on the stove: you deserve to enjoy your own weekend gatherings. Pour yourself a generously sized glass of Pinot Noir, tie your apron, and let’s have a brutally honest chat about the state of your dinner parties. If you are spending your entire Saturday night trapped behind a hot grill, frantically flipping burgers while your guests are out on the patio actually having fun, you are doing it wrong. You do not need a culinary degree to throw a mind-blowing party, but you do need a strategy.
Today, we are tackling the ultimate crowd-pleasing, host-saving entertaining hack: the build-your-own slider bar. It is interactive, it accommodates picky eaters, and most importantly, it allows you to do 90% of the work before the doorbell even rings. But there is a massive, looming problem that ruins this concept for most everyday home cooks.
I am talking about the dreaded shrinking slider.
You know exactly what I mean. You spend an hour meticulously forming delicate, perfectly flat, two-inch beef patties. They look like they belong in a gourmet magazine. But the second they hit the hot skillet, they violently contract, puffing up in the center until they resemble tough, rubbery golf balls. When your guests try to eat them, the meatball-slider shoots right out the back of the bun, taking a rogue cherry tomato and a glob of mayonnaise with it. It is a messy, frustrating disaster.
But do not panic. I am your biggest cheerleader, and I promise you that professional-level results are completely achievable in your standard home kitchen. We are going to dive deep into the food science of why meat behaves this way, how to outsmart it, and how to execute a flawless, stress-free burger station that will make you look like an absolute culinary genius.
The Food Science of the Shrinking Slider
To defeat the enemy, you must first understand the enemy. And in this case, the enemy is a microscopic combination of protein coagulation and moisture loss. When you throw a raw beef patty onto a screaming hot cooking surface, a complex series of chemical and physical reactions kicks off instantly.
Raw ground beef is composed primarily of muscle fibers, fat, and water (in fact, raw beef is roughly 70% water). The muscle fibers themselves are made up of two primary proteins: myosin and actin. When these proteins are exposed to heat, they begin to denature, which is a fancy chef-speak way of saying they unfold and change their physical structure.
Around 120°F, the myosin proteins begin to coagulate. As the internal temperature climbs toward 150°F, the actin proteins follow suit. When these proteins coagulate, they violently contract. Imagine a network of microscopic rubber bands suddenly snapping tight. As they tighten, they physically squeeze the water and rendered fat out of the muscle fibers. This is why you hear that glorious sizzling sound in the pan—it is the sound of moisture escaping the meat and instantly vaporizing upon contact with the hot metal.
But why does the burger turn into a dome? It comes down to basic thermodynamics. The outside edges of your slider patty cook much faster than the dense, raw center. As the perimeter of the patty reaches those high temperatures, the proteins around the edge shrink and tighten first, acting like a restrictive belt. Because the center of the patty is still relatively soft and raw, the tightening edges force the meat and juices inward and upward. The result? A shrunken, domed meatball.
If you are tired of watching your beautiful prep work get ruined, you need to learn how to keep patties from shrinking on the grill. The good news is that science provides us with a few foolproof workarounds.
The Holy Trinity of Patty Perfection
We are not going to accept mediocre, tough sliders. By controlling three simple variables—your fat ratio, your handling technique, and the physical shape of the meat—you can guarantee perfectly flat, juicy patties every single time.
The Golden Fat Ratio: 80/20
Let us have a serious talk about fat. I see far too many weekend culinary hobbyists buying 90/10 or even 95/5 lean ground beef for their burgers, thinking they are doing everyone a favor. Listen to me carefully: lean ground beef is a dry, crumbly disaster waiting to happen. If you want to make a healthy turkey chili, go for it. But if you are making burgers, fat is not the enemy—it is the entire point.
Fat is what provides lubrication, flavor, and a tender mouthfeel. When you use ultra-lean beef, there is no fat to render and coat the muscle fibers. As the proteins contract and squeeze out their water, you are left with a dense, sawdust-like puck. On the other end of the spectrum, using a 70/30 blend (which is 30% fat) will result in massive grill flare-ups and extreme shrinkage, because a third of the patty’s mass will literally melt away into the pan.
The undisputed sweet spot for sliders and burgers is an 80/20 blend (80% lean muscle to 20% fat). Usually labeled as ground chuck, this ratio provides the perfect equilibrium. It contains enough fat to baste the meat from the inside out as it cooks, keeping the patty incredibly juicy, but it has enough structural integrity to hold its shape without shrinking into oblivion. Tell your butcher you want 80/20 ground chuck, and do not let them talk you into anything leaner.
Gentle Handling and Temperature Control
Ground beef is not playdough, and it is certainly not a stress ball. One of the most common rookie mistakes is manhandling the meat. When you aggressively knead, squeeze, and pack ground beef, you are forcing the proteins to cross-link. This creates a dense, sausage-like texture that becomes incredibly tough when cooked.
When forming your sliders, you want to use a light touch. Wet your hands slightly with cold water (this prevents the fat from sticking to your skin and melting from your body heat). Gently grab a small portion of the 80/20 chuck—about two ounces is perfect for a slider—and softly toss it back and forth between your palms just until it holds together. Place it on your parchment paper and gently press it into a disk that is slightly wider than your slider buns, keeping in mind that a small amount of shrinkage is inevitable.
Furthermore, one of the most catastrophic mistakes home cooks make is salting ground beef too early. Salt dissolves muscle proteins. If you mix salt directly into the raw meat mixture, or if you salt the patties hours in advance, the salt will begin to cure the beef, turning it bouncy and springy. You must only season the absolute exterior of the patties with kosher salt and freshly ground black pepper right before they hit the heat.
The Physics of the Dimple Trick
Now for the ultimate secret weapon against the domed meatball effect. It is a technique so incredibly simple that it feels like cheating, but it is rooted entirely in the physics we discussed earlier.
Once you have formed your gentle, two-ounce patties, take your thumb and press a shallow indentation directly into the center of each raw patty. You want a dimple that is about a quarter of an inch deep, making the patty look slightly like a shallow bowl or a red blood cell.
Why does this work? Remember that the edges of the burger cook and tighten first, squeezing the meat toward the center. By creating a physical void in the middle of the patty, you are giving the expanding meat a place to go. As the edges contract, the center pushes upward, filling in the dimple perfectly. By the time the slider is fully cooked, the thumbprint will have completely vanished, leaving you with a flawlessly flat, uniform patty that sits beautifully on a bun.
The “No-Go” Rule: Ditch the Toxic Cookware
You all know my core philosophy: life is too short, and your health is too important, to cook on cheap, toxic garbage. I have an absolute “No-Go” rule when it comes to flimsy non-stick pans with peeling, flaking Teflon coatings. If you are searing burgers on high heat using a scratched non-stick skillet from a discount bin, you are not only ruining your food with a weak, gray sear, but you are potentially leaching forever chemicals into your family’s dinner. Throw it in the trash. Today.
To achieve that glorious, deeply browned Maillard reaction crust on your sliders, you need cookware that can handle serious thermal mass. You need heavy metals.
Cast Iron Skillets: A well-seasoned cast iron skillet is an heirloom piece of equipment. It takes a long time to heat up, but once it gets hot, it stays hot. When you drop cold slider patties onto cast iron, the temperature of the pan barely drops, allowing for an immediate, aggressive sear that locks in flavor.
Carbon Steel Griddles: If you are cooking for a crowd, a carbon steel griddle placed over two stovetop burners is the ultimate diner-style secret. It seasons just like cast iron but is slightly lighter and more responsive to temperature changes.
Heavy-Clad Stainless Steel: A high-quality, tri-ply stainless steel pan is fantastic for developing a crust. If you are terrified of your meat sticking to stainless steel pans, you just need to learn the Leidenfrost effect. Heat the dry pan until a drop of water beads up and dances across the surface like mercury. Once it does that, add your oil, wait for it to shimmer, and add your meat. It will release naturally once the crust forms.
And whatever you do, please ditch the aerosol cooking spray. The soy lecithin and propellants in those cans polymerize under high heat, leaving a sticky, impossible-to-remove lacquer on your beautiful cookware. Use real butter, tallow, or a high-smoke-point oil like avocado oil.
Finally, to get that perfect, gooey cheese melt without turning your slider into a hockey puck, I highly recommend using a stainless steel melting dome. It traps the steam from the pan, instantly enveloping the cheese in a blanket of heat and melting it in seconds, saving your meat from overcooking.
The Blueprint for a Mindful Slider Bar
We have conquered the science of the patty. Now, we must conquer the art of the party. The whole point of a DIY slider station is to eliminate the chaotic bottleneck of the host standing over a grill, furiously taking custom orders for medium-rare versus well-done. You are a host, not a short-order cook. This is how you embrace the art of effortless hosting. A slider bar allows guests to mingle, customize their plates, and graze at their own pace.
Pre-Party Patty Prep
Time is money, even on the weekends. You should not be touching raw ground beef while your guests are drinking your wine. Hours before the party, portion, form, and dimple all of your slider patties. Layer them between sheets of parchment paper in an airtight container and keep them in the refrigerator. Chilling the patties actually helps the fat solidify, which prevents it from melting out too quickly when it hits the hot pan later.
Prep all of your toppings, slice your tomatoes, wash your lettuce, and arrange your condiment spreads in beautiful little ramekins. Cover them with plastic wrap and keep them chilled. When the time comes, all you have to do is pull the components out and arrange them on the counter.
The Thermodynamics of Hot Holding
The secret to a successful buffet is managing temperature. You want to cook all the sliders in one or two large batches just as the party is kicking into gear, and then hold them safely in a warm environment so guests can serve themselves.
The FDA is very clear about the “Danger Zone” for foodborne illness, which is between 41°F and 135°F. When managing a buffet, you must maintain safe food holding temperatures to keep bacteria at bay. Hot food must be held at a minimum of 135°F (though 140°F is the recommended safety buffer).
To achieve this without drying out your perfectly cooked sliders, you have a few elegant options:
- The Chafing Dish Method: Invest in a stainless steel chafing dish with Sterno fuel. The water bath beneath the food tray provides a gentle, ambient, moist heat that keeps the burgers hot without actively continuing to cook them. Keep the lid on as much as possible to trap the steam.
- The Slow Cooker Hack: If you do not want to buy a chafing dish, a slow cooker set to the “Warm” setting is a fantastic alternative. Place a damp, clean kitchen towel at the bottom of the slow cooker, and stack your cooked sliders on top. The towel provides humidity, preventing the meat from drying out while the ceramic insert maintains a safe temperature.
- The Loose Meat Alternative: If forming patties feels like too much work, a “Sloppy Joe” style loose meat slider is an incredible crowd-pleaser that holds perfectly in a slow cooker. Just remember, if you are browning up a massive batch of loose meat, please stop stirring ground beef every three seconds so it can actually develop a sear. Let it sit, let it brown, and then break it up.
Architectural Flow of the Station
Do not just throw everything on a table and hope for the best. Set up your slider bar in a logical, linear progression to prevent traffic jams.
- Station 1: Plates and napkins.
- Station 2: The Buns. Keep them pre-sliced and lightly toasted.
- Station 3: The Hot Holding. Your chafing dish of perfectly flat, juicy patties.
- Station 4: The Cheese Board. Have a variety of sliced cheeses ready to drape over the hot meat.
- Station 5: The Cold Crunch. Lettuce, tomatoes, pickles, and onions.
- Station 6: The Sauces. Mayonnaise, mustard, ketchup, and specialty aiolis.
Accommodating the Masses: Diverse Diets Without the Stress
We live in the modern era, which means your dinner party will inevitably include a patchwork of dietary preferences. A mindful host accommodates these needs without making a fuss, and a slider bar is uniquely suited for this.
The Gluten-Free and Low-Carb Contingent
For your gluten-free guests, source a high-quality GF bun. Be warned: gluten-free bread can often have the texture of a dry sponge. You can completely transform it by brushing the cut sides with a little mayonnaise and toasting it face-down in a skillet. The fat and heat revitalize the starches and give it a much-needed crunch. Make sure to toast the GF buns in a separate, clean pan to avoid cross-contamination.
For the low-carb or keto crowd, offer a lettuce wrap option. Do not use flimsy spinach or watery iceberg lettuce. Butter lettuce (Boston or Bibb) is the undisputed king of the lettuce wrap. Its leaves are naturally cup-shaped, structurally sound, and have a buttery, tender bite that complements the rich beef perfectly.
Plant-Based Perfection
You will likely have a vegetarian or vegan guest, and they deserve better than a frozen, microwaveable hockey puck. If you are using modern plant-based ground meat alternatives (like Beyond or Impossible), treat them with the same respect as your beef. Form them gently and use the dimple trick. Keep in mind that plant-based meats lack the natural animal fats of beef, so you will need to use a generous amount of oil in your pan to achieve a good sear and prevent sticking. Hold these patties in a separate, clearly labeled warming dish to respect your guests’ dietary boundaries.
Condiment and Topping Architecture
A slider is a delicate ecosystem. Because the ratio of bun-to-meat is much higher in a slider than in a standard burger, the toppings carry a massive amount of the flavor profile. You cannot phone this in.
The Cheese Strategy
Cheese is arguably the most important condiment on a burger. If you are serving a crowd, pre-slice a variety of high-quality block cheeses: sharp cheddar, pepper jack, and a classic, unapologetic American cheese (which, thanks to sodium citrate, melts better than anything else on earth).
To achieve a luxurious melt, you absolutely must ditch the pre-shredded cheese. Those convenient little bags are dusted with cellulose and potato starch to prevent clumping in transit. When you try to melt them, those anti-caking agents turn grainy and refuse to emulsify properly. Always buy a block and slice it yourself.
Alternatively, if you decide to offer a warm liquid queso for your guests to drizzle, you need to know how to fix a broken cheese sauce. There is nothing sadder than a slow cooker full of separated, oily, clumpy cheese. Using a stabilizing liquid like evaporated milk, rather than standard milk or cream, provides the necessary proteins to keep your cheese sauce silky smooth for hours on the buffet line.
The Crunch and the Acid
An 80/20 beef patty is intensely rich and fatty. To balance that richness, you need sharp, aggressive acidity and a serious textural crunch. Standard dill pickles are non-negotiable, but if you want to elevate your slider bar, spend ten minutes the night before making quick-pickled red onions. Thinly slice a red onion, pack it in a jar, and pour over a boiling mixture of equal parts water and white vinegar, a tablespoon of sugar, and a heavy pinch of salt. By the next day, they will be bright pink, crunchy, and packed with the perfect acidic bite.
For additional crunch, skip the raw white onions and offer a bowl of crispy fried shallots (you can buy these pre-made at any Asian supermarket). They add an incredible savory depth and a shatteringly crisp texture that transforms a basic slider into a gourmet experience.
The Sauce Station
Ketchup and yellow mustard are fine, but you are a mindful host aiming for culinary artistry. Create a simple, signature “house sauce” to tie the whole bar together. Start with a base of high-quality mayonnaise, add a squeeze of fresh lemon juice, a spoonful of Dijon mustard, a dash of smoked paprika, and finely minced pickles.
Instruct your guests (or lead by example) to spread a layer of this fat-based sauce on both the top and bottom buns. This is not just for flavor; the mayonnaise acts as a hydrophobic barrier, waterproofing the bread and preventing the juices from the patty and the tomatoes from turning the delicate slider bun into a soggy, disintegrating mess.
The Final Bite
Hosting a gathering should never feel like a punishment. By understanding the simple food science behind protein contraction, honoring the 80/20 fat ratio, and employing the genius of the dimple trick, you have officially banished the shrinking, domed meatball slider from your kitchen forever.
More importantly, by utilizing safe, thermodynamic holding strategies and a logical buffet architecture, you have freed yourself from the tyranny of the stove. You can finally pour that second glass of wine, mingle with your friends, and actually enjoy the incredible food you have prepared.
Cooking is not about possessing a rare, innate talent; it is about arming yourself with knowledge, respecting your ingredients, and refusing to cook on toxic gear. You have the blueprint. Now go fire up that heavy metal skillet, dimple those patties, and host the most effortless, mind-blowing slider party of the season. Cheers!






