
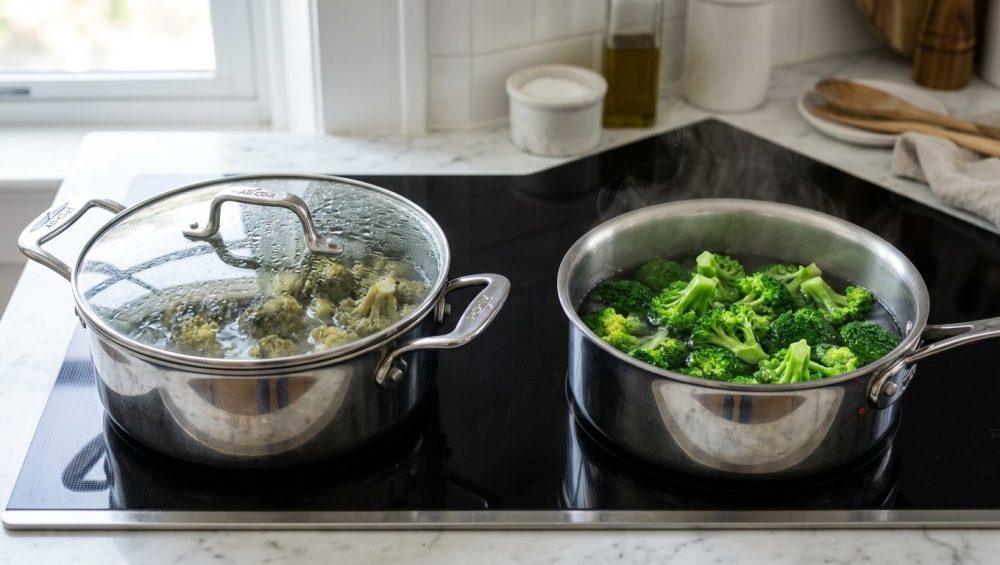
Listen up, weekend culinary warriors. We need to have a serious, sit-down conversation about what you are doing to your side dishes. Picture this: It is a busy Tuesday evening. You have just spent a small fortune at the local farmer’s market on a bundle of gorgeous, vibrant, snap-worthy asparagus and a head of broccoli that looks like a miniature, lush green forest. You bring this beautiful bounty home, chop it up, and toss it into a pot of boiling water. Because you are a busy professional and time is quite literally money, you slap a lid on that pot to “speed things up.” You turn your back for a few minutes to pour yourself a well-deserved glass of wine. When you finally lift that lid, you are not greeted by the vibrant, emerald-green vegetables you paid for. Instead, you are staring into a pot of swampy, sad, olive-gray mush that looks like it was excavated from a 1950s TV dinner tray.
I have been there. I have set off the smoke detector more times than I care to admit, and I have served my fair share of gray, unappetizing broccoli to polite but visibly disappointed dinner guests. But here is the good news: you do not need a pretentious culinary degree or a kitchen full of expensive gadgets to cook like an absolute expert. You just need to understand a tiny bit of basic food chemistry. The secret to achieving perfectly bright, crisp, restaurant-quality green vegetables every single time is shockingly simple, and it all comes down to exactly why your green beans turn gray the minute you look away. It is not a lack of skill; it is a fundamental misunderstanding of how a covered pot traps volatile acids.
Today, we are diving deep into the microscopic world of plant cells, the thermodynamics of boiling water, and the absolute betrayal of the pot lid. Pour yourself that glass of wine, grab your favorite chef’s knife, and let us fix your vegetable game once and for all.
The Science of Green: Meet the Chlorophyll Molecule
To understand why your vegetables are turning the color of dishwater, we first have to understand why they are green in the first place. You probably remember the word “chlorophyll” from middle school biology. Chlorophyll is the miraculous, light-absorbing pigment found inside the chloroplasts of plant cells. It is the engine of photosynthesis, capturing solar energy from the sun and reflecting back the green wavelengths of light to our eyes.
From a chemical perspective, chlorophyll is a highly complex, fragile molecule. It consists of a large “porphyrin ring” structure with a long hydrocarbon tail. But the most important part of this entire molecule—the absolute VIP of this chemical structure—is a single, delicate magnesium atom sitting right dead in the center of that ring. As long as that magnesium atom stays safely tucked in its little molecular pocket, your broccoli, asparagus, spinach, and green beans will remain a beautiful, vibrant green.
When you first drop green vegetables into a pot of rapidly boiling water, something magical happens. For the first sixty seconds, the vegetables actually become brighter and greener. This is not a chemical change; it is a physical one. In their raw state, the spaces between plant cells are filled with microscopic pockets of air and naturally occurring gases. These air pockets act like tiny clouds, slightly obscuring our view of the chlorophyll pigments. The intense, sudden heat of the boiling water causes these gases to rapidly expand and escape from the plant tissue, while the liquid from the cells flows into those empty spaces. Suddenly, the “cloud cover” is gone, the light refraction becomes perfectly uniform, and you get a crystal-clear, high-definition view of the bright green chlorophyll.
If you were to pull the vegetables out of the water at this exact moment, you would be a culinary hero. But you don’t. You leave them in the water, and worse, you put a lid on the pot. This is where the chemistry turns against you, and if you want to know how to fix your food without resorting to a takeout menu, you need to understand the invisible war happening inside that cookware.
The Betrayal of the Covered Pot: The Trap of Volatile Acids
Here is the absolute crux of the issue: plant cells are packed full of naturally occurring organic acids. When you subject vegetables to the aggressive heat of boiling water, their rigid cell walls begin to break down and rupture. As these cell walls collapse, they release those trapped organic acids—such as formic acid, acetic acid, and various other volatile compounds—directly into the cooking environment.
Because these specific acids are “volatile,” they easily vaporize and turn into gas when heated. If you are boiling your vegetables in an uncovered pot, these acidic gases simply rise with the steam, float up into your kitchen exhaust fan, and disappear harmlessly into the atmosphere. Your cooking water remains relatively neutral, and your vegetables stay safe.
But what happens when you slap a lid on that pot? You create a closed, hostile ecosystem. The steam, now heavily laden with vaporized plant acids, rises up and hits the cold underside of the pot lid. It immediately condenses into liquid droplets. Because gravity exists, this highly acidic condensation rains right back down into your cooking water. With every passing minute, the concentration of these trapped acids increases, causing the pH of the cooking water to plummet.
This acidic environment is the ultimate enemy of chlorophyll. When the water becomes acidic, it is flooded with free-floating hydrogen ions. These aggressive hydrogen ions attack the chlorophyll molecule, forcefully evicting that delicate magnesium atom from the center of the porphyrin ring and taking its place.
When magnesium is replaced by hydrogen, the molecule is no longer chlorophyll. It has been chemically transformed into a completely different compound called pheophytin. And what color is pheophytin? You guessed it: a dull, muddy, depressing olive-gray.
This is not a slow process, either. Recent food science studies published in 2025 and 2026 regarding chlorophyll degradation kinetics have shown just how rapidly this thermal and acidic breakdown occurs. Research demonstrates that when green vegetables are boiled at 100°C in a neutral or slightly acidic environment, measurable pheophytin formation begins in as little as 3.2 minutes. By the time you hit the 8.7-minute mark, a staggering 92% of the chlorophyll has been irreversibly converted into gray pheophytin.
Let me repeat that: irreversibly. Once that magnesium atom is gone, it is gone for good. There is no culinary magic trick, no foolproof cooking secrets, and no amount of wishing that will turn pheophytin back into chlorophyll. Your side dish is ruined, and the lid is the primary culprit.
The “No-Go” Rule: Banishing Toxic and Inefficient Cookware
Before we get into the exact step-by-step masterclass of how to boil vegetables correctly, I need to take a brief, snarky detour to talk about your equipment. As your dedicated Sassy Sous-Chef, I have a strict, non-negotiable philosophy when it comes to kitchen gear. I absolutely despise cheap, toxic, poorly made cookware. If you are trying to execute precise food chemistry in a scratched-up, peeling, ten-dollar non-stick pot you bought at a discount store five years ago, you are fighting a losing battle.
First of all, boiling water in degraded non-stick pans is a fantastic way to leach mystery chemicals and synthetic polymers into your family’s dinner. We are actively banishing toxic kitchen gear from our lives this year. Throw that peeling hazard in the trash where it belongs.
Secondly, cheap, thin cookware lacks “thermal mass.” Thermal mass is a material’s ability to absorb, store, and maintain heat. When you drop a pound of cold, raw broccoli into a thin aluminum pot of boiling water, the temperature of the water instantly plummets. The rapid boil dies, and the water reduces to a sad, pathetic simmer. Because the water temperature has dropped, your vegetables have to sit in the water much longer to cook through. And as we just learned from our dive into chlorophyll kinetics, time is the enemy. The longer the vegetables sit in hot water, the more time the plant’s internal acids have to destroy the chlorophyll. Furthermore, there is an enzyme present in plant cells called chlorophyllase, which actively dissolves chlorophyll molecules. The intense heat of a raging boil instantly destroys this enzyme, but ironically, chlorophyllase thrives and is most active at warm, sub-boiling temperatures. If your cheap pot loses its boil, you are literally creating the perfect spa environment for chlorophyll-destroying enzymes to thrive.
You need heavy-duty, high-quality equipment. A thick-bottomed, multi-clad stainless steel pot or a heavy enameled cast-iron Dutch oven is mandatory. These materials hold onto heat like a vault. When you add your cold vegetables, the water temperature barely flinches, the boil recovers in seconds, the chlorophyllase enzyme is instantly obliterated, and your vegetables cook in a fraction of the time. If you are constantly wondering why your frying pans keep warping or why your pots can’t hold a boil, it is time to invest in heavy-gauge stainless steel. Your health, your sanity, and your vegetables will thank you.
The Sassy Sous-Chef’s Masterclass Method for Perfect Greens
Alright, we have covered the molecular biology, the thermodynamics, and the equipment. Now it is time for the practical application. If you want to stop serving gray mush and start serving vegetables that look like they belong on the cover of a food magazine, you must follow this science-backed blanching method with absolute, militant precision.
Step 1: The Massive Ocean of Water
Do not try to boil a pound of green beans in two inches of water. You need a massive volume of water—ideally about four quarts (one gallon) of water for every one pound of green vegetables. Why? Two reasons. First, as we just discussed, a larger volume of water holds more thermal mass, ensuring the water stays at a raging boil when the cold vegetables are added. Second, a massive ocean of water acts as a buffer. Even if some volatile acids fail to escape into the air, a huge volume of water will heavily dilute them, preventing the pH of the pot from dropping to a level that threatens your chlorophyll.
Step 2: Salt Like You Mean It (The 0.5% Rule)
Most home cooks sprinkle a tiny, useless pinch of salt into their pasta or vegetable water. Stop doing that. You need to aggressively season your blanching water until it tastes like the ocean. Food chemistry dictates a very specific ratio here: you need a 0.5% to 0.8% salt concentration by volume. In practical terms, that means adding about one level tablespoon of kosher salt per quart of water (or four tablespoons for a gallon).
This is not just for flavor, though properly seasoned vegetables taste infinitely better. Salt actually plays a critical role in preserving the green color. The sodium ions in the salt help to shield the chlorophyll molecules, preventing the magnesium atom from being easily displaced by hydrogen. Furthermore, boiling vegetables without salt causes chlorophyll to degrade into pheophytin up to three times faster. Just remember: the salt must be fully dissolved in the rapidly boiling water before the vegetables go in.
Step 3: The Raging, Aggressive Boil
Bring that salty ocean to a violent, rolling boil. Not a simmer. Not a gentle bubble. A raging, angry boil. As mentioned earlier, this maximum heat is required to instantly denature and destroy the chlorophyllase enzyme before it can dissolve your beautiful green pigments.
Step 4: Leave the Lid in the Cabinet
Drop your vegetables into the boiling water in small batches. And then, step away from the lid. Leave it in the drawer. Leave it in the cabinet. Do not even look at it. You must leave the pot completely uncovered for the entire duration of the cooking process. This allows the vaporized formic and acetic acids to escape freely into the air, keeping your heavily salted cooking water at a safe, neutral-to-alkaline pH. This is the single most important rule of the entire process.
Step 5: The 7-Minute Absolute Threshold
Time is money, and in the kitchen, time is color. You must strictly adhere to time thresholds calibrated to vegetable cell wall integrity. For delicate greens like asparagus or thin green beans, they only need 2 to 3 minutes. For denser vegetables like broccoli florets, you might need 4 to 5 minutes. Under no circumstances should you ever boil a green vegetable for more than 7 minutes.
Beyond the 7-minute mark, the pectin networks that hold the vegetable’s cellular structure together dissolve completely, leading to irreversible mushiness. Furthermore, extended boiling degrades heat-sensitive, water-soluble nutrients. According to the USDA Nutrient Data Laboratory, overcooking greens can destroy up to 78% of their Vitamin C content. We are cooking dinner, not making baby food. Get them out of the water the second they are tender-crisp. Before you throw away sad veggies because they turned to mush, evaluate your timer habits.
Step 6: The Ice Bath Shock (Cessation of Thermal Degradation)
When you remove the vegetables from the boiling water, they are still incredibly hot. If you simply put them in a bowl on the counter, the residual internal heat will continue to cook them, breaking down the cell walls and converting the chlorophyll to pheophytin right before your eyes. You must immediately plunge the boiled vegetables into a massive bowl of ice water.
This technique, known as “shocking,” instantly drops the core temperature of the vegetable, halting all enzymatic and thermal degradation dead in its tracks. Once they are completely cold (which only takes a minute or two), remove them from the ice bath and dry them thoroughly on a clean kitchen towel. You can store these perfectly blanched, neon-green vegetables in the fridge for days, and quickly reheat them in a hot skillet with a little butter or olive oil right before serving. If you want to stop eating mushy veggies, the ice bath is your ultimate insurance policy.
Debunking Terrible Kitchen Advice: The Baking Soda Myth
As a home cook navigating the internet, you will inevitably stumble across a blog or a forum post claiming that the “ultimate chef hack” for keeping vegetables bright green is to add a pinch of baking soda (sodium bicarbonate) to the boiling water. I am here to tell you, with every ounce of snark in my body, to never, ever do this.
Is the chemistry behind the claim accurate? Technically, yes. Baking soda is highly alkaline (pH of around 8.3). Adding it to the boiling water immediately neutralizes all of the naturally occurring organic acids released by the plant, ensuring the water remains alkaline. In an alkaline environment, chlorophyll cannot convert into gray pheophytin. Instead, it converts into a compound called chlorophyllin, which is an unnaturally bright, almost radioactive neon green.
So, if it keeps them green, why is it a terrible idea? Because while the baking soda is busy protecting the color, it is simultaneously destroying the physical structure and the nutritional profile of the vegetable.
Alkaline environments cause a chemical reaction called “saponification” when they interact with the hemicellulose and pectins in plant cell walls. Saponification is literally the chemical process used to make soap. The baking soda violently breaks down the structural integrity of the vegetable, turning the exterior into a slimy, soapy, disintegrating mush.
But the horror does not stop at texture. Baking soda is an absolute assassin when it comes to water-soluble vitamins. Cooking vegetables in an alkaline solution completely destroys thiamine (Vitamin B1) and riboflavin (Vitamin B2), with degradation rates hitting up to 92%. It also accelerates the loss of Vitamin C. You are left with a side dish that looks artificially green, feels like soap in your mouth, and possesses the nutritional value of a wet paper towel.
Stick to the massive pot of heavily salted water and leave the lid off. It is the only scientifically sound way to achieve perfection without chemical sabotage. It is also a great way to ensure you are not ruining your nonstick pans with weird alkaline chemical reactions, though as we established, you shouldn’t be boiling in non-stick anyway.
Plating and Serving: The Final Acid Test
You have done everything right. You used a heavy stainless steel pot. You salted the water until it tasted like the sea. You boiled the vegetables uncovered for exactly four minutes, and you shocked them in an ice bath. They are crisp, they are vibrant, and they are beautiful.
But your job is not over. The laws of chemistry do not stop applying just because the food is on the dining room table. Chlorophyll remains highly sensitive to acid, even after it has been perfectly cooked.
Many weekend cooks love to dress their freshly blanched green beans or asparagus with a bright, zesty lemon vinaigrette. Lemon juice and vinegar are, of course, highly acidic. If you toss your perfectly green vegetables in a vinaigrette and let them sit in a serving bowl for twenty minutes before your guests sit down to eat, that acid will slowly eat away at the chlorophyll. By the time the forks hit the plates, your masterpiece will have reverted to that dreaded olive-gray pheophytin. It is enough to make you want to rescue a ruined dinner with a blowtorch.
The solution here is simple timing. If you are serving your vegetables with an acidic dressing, do not apply it until the absolute last possible second. Toss the vegetables in the vinaigrette right as you are carrying the platter to the table. Alternatively, you can serve the dressing on the side and let your guests apply it themselves. If you have ever wondered why your salad dressing separates or ruins the color of your greens, timing and emulsification are everything.
The Sassy Sous-Chef’s Final Word
Cooking is not magic. It is not an exclusive club reserved for people who spent four years at a culinary institute in France. Cooking is just applied physics and chemistry, wrapped up in a delicious package. When you understand the basic rules of the game—like the fact that trapped volatile acids are the mortal enemy of the magnesium atom inside a chlorophyll molecule—you gain total control over your kitchen.
You do not need to be intimidated by weeknight side dishes. You do not need to settle for gray, mushy, unappetizing vegetables that your kids refuse to eat. You just need a big pot, a lot of salt, a rolling boil, and the confidence to leave that lid tucked safely away in your cabinet.
Now, go pour yourself another glass of wine, crank up your stove, and show that broccoli who is boss. You’ve got this.






