
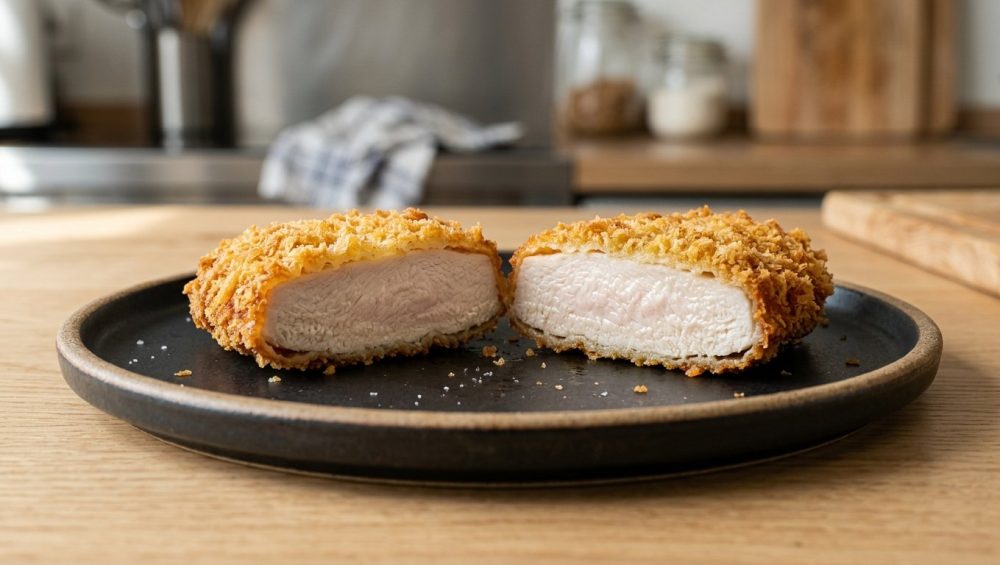
Listen, we need to have a serious talk about your Tuesday night chicken cutlets. I know exactly how this plays out in your kitchen because I used to do the exact same thing. You buy a beautiful piece of protein. You set up your little bowls of flour, egg, and breadcrumbs. You dip, you dunk, you coat, and you immediately drop that chicken into a skillet of hot oil. It sizzles, it smells amazing, and you feel like an absolute culinary genius.
But then, tragedy strikes.
You pull the chicken out of the pan, set it on your cutting board, and the moment your knife breaks the surface, the entire golden, crispy crust slides off in one sad, soggy sheet. You are left staring at a pale, naked piece of poultry on one side of your plate and a greasy pile of detached breadcrumbs on the other. It is infuriating. It makes you want to order takeout and never look at a frying pan again.
If your dinner frequently turns out dry and completely bald, I am here to tell you that it is not your recipe’s fault. It is a fundamental misunderstanding of food chemistry. You are treating the breading process like a frantic assembly line when you should be treating it like a science experiment. The secret to a bulletproof, tear-resistant, restaurant-quality crust doesn’t require a culinary degree, expensive ingredients, or pretentious chef-speak. It requires exactly fifteen minutes of doing absolutely nothing.
Welcome to the definitive masterclass on the science of starch hydration, protein bonding, and the magic of a quick rest. Grab a glass of wine, take a deep breath, and let’s fix your food.
The Physics of the Blow-Off: Why Your Crust Fails
To understand why your breading falls off, we first have to understand the violent, chaotic environment of a hot frying pan. When you place a breaded piece of meat into 350°F oil, you are not just “cooking” it; you are initiating a rapid cascade of thermal dynamics and moisture evaporation.
Raw meat is composed of roughly 75% water. When that moisture meets hot oil, it instantly vaporizes into steam. If you have just slapped a layer of flour, egg, and breadcrumbs onto the surface of that meat and immediately thrown it into the skillet, that steam has nowhere to go. It rapidly expands at the exact boundary between the surface of the meat and the crust. The steam physically pushes the breading away from the protein, creating a literal air pocket of pressure that blows the crust right off the chicken.
Food scientists who utilize Low-Field Nuclear Magnetic Resonance (LF-NMR) to study moisture in food systems categorize this moisture into two distinct states: “free water” and “bound water”. Free water is highly mobile; it exists on the surface of your ingredients and inside the muscle fibers, and it turns into steam violently and rapidly. Bound water, on the other hand, is chemically locked to proteins and starches via microscopic hydrogen bonds. Bound water does not boil off instantly; it stays exactly where it is.
When you rush your breading process, the moisture on the surface of your chicken and the water inside your egg wash remains entirely as “free water.” You have created a fragile, temporary physical layer that is entirely susceptible to steam blow-off. You need a chemical bond, and chemical bonds take time.
The Magic of the 15-Minute Rest: Starch Hydration and Protein Bonding
This is where the magic of the resting period comes into play. When you finish breading your pork chop, eggplant, or chicken cutlet, you must place it on a wire cooling rack and walk away for 15 to 30 minutes. Do not touch it. Do not look at it. Let the chemistry do the heavy lifting.
During this crucial window, two massive scientific transformations occur: starch hydration and protein bonding.
First, the starches present in your all-purpose flour act as a sponge. Starch molecules (composed of amylose and amylopectin) begin to absorb the free water from the egg wash and the natural moisture on the surface of the meat. As the starch granules hydrate, they swell and gelatinize, converting that volatile “free water” into highly stable “bound water”. This hydrated starch matrix transforms from a loose, dusty powder into a sticky, viscous gel that physically anchors itself into the microscopic crevices of the meat’s surface.
Second, we have protein cross-linking. Egg whites (albumen) are essentially liquid protein. When left to rest, these egg proteins begin to unfold and bond with the gluten proteins present in the flour, as well as the myosin proteins on the surface of the meat. They weave together to form a complex, tear-resistant bio-glue.
By the time 15 minutes have passed, the flour, egg, and breadcrumbs are no longer three separate ingredients sitting on top of a chicken breast. They have chemically fused into a single, cohesive, unified armor. When this hydrated, protein-locked matrix hits the hot oil, the starches instantly set and crisp up before the steam can push them away. The result? A crust that is so fiercely bonded to the meat that you could practically hit it with a hammer, and it wouldn’t flake off.
The Standard Breading Procedure (SBP): A Microscopic Masterclass
Now that you understand the chemistry, we need to talk about the execution. The culinary world calls this the Standard Breading Procedure (SBP). It is a three-stage, dry-wet-dry method that has been used in professional kitchens for centuries. But because home cooks are always trying to save time, they cut corners. They skip the flour, or they don’t dry the meat, or they rush the steps.
If you want an extra crispy chicken crust that rivals your favorite restaurant, you must follow these steps with absolute precision.
Step 1: Desiccation (Dry Your Meat)
Moisture is the enemy of adhesion. If you pull a chicken breast straight out of the package, it is covered in a slippery layer of purge (meat juices) and water. If you drop that wet chicken directly into flour, the flour will turn into a gummy, sliding paste that will never adhere.
Take paper towels and aggressively pat your protein completely dry on all sides. You want the surface to feel tacky, almost matte. If you are working with uneven cuts of meat, this is the time to pound them flat. If you are still struggling with dull kitchen knives that hack your poultry to pieces, please sharpen them—a smooth, even surface ensures that the meat cooks at the same rate as the breading browns.
Step 2: The Primer Layer (Flour)
Your first station is your dry dredge. All-purpose flour is standard, but you can mix in a little cornstarch or rice flour for extra crispness. The purpose of this layer is to act as a primer, much like painting a wall. The flour wicks up any residual microscopic moisture on the surface of the meat and provides a dry, textured surface for the egg wash to grab onto.
While you should avoid scooping your flour directly out of a compacted bag when baking a cake, for breading, simply dump a generous mound into a shallow dish. Season this flour heavily with salt, pepper, garlic powder, and paprika. Bland flour makes for a bland crust. Dredge the meat completely, pressing the flour into every crevice, and then—this is critical—shake off the excess. You want a micro-thin, translucent layer of flour. If the flour is caked on too thick, the crust will separate from the meat.
Step 3: The Glue (Egg Wash)
Your second station is the wet binder. Lightly beat your eggs until the yolks and whites are completely homogenized. You can add a splash of water, milk, or buttermilk to thin it out slightly, which prevents the egg from going on too thick and rubbery.
Dip your floured meat into the egg wash, ensuring it is coated entirely. Lift it up and let the excess egg drip off back into the bowl. If you carry too much liquid over to your breadcrumb station, you will create a soggy, heavy mess that will inevitably fail in the pan.
Step 4: The Armor (The Crumbs)
Your final station is the crunch. Whether you are using traditional Italian breadcrumbs, crushed cornflakes, or my personal favorite, Japanese Panko crumbs, the technique remains the same.
Drop the egg-coated meat into the crumbs. Do not just lightly toss the meat in the bowl. You need to use your hands to aggressively pack and press the crumbs into the surface of the meat. You are forcing the dry, jagged edges of the breadcrumbs to embed themselves into the wet egg proteins. Once coated, shake off the loose stragglers.
Step 5: The Crucial Rest
We have arrived at the most important step of the entire process. Transfer your perfectly breaded cutlets to a wire cooling rack set over a baking sheet. Set a timer for 15 minutes.
Do not stack the cutlets on top of each other, or they will steam and get soggy. Do not put them on a flat plate, or the bottom will turn into mush. Elevating them on a wire rack allows air to circulate around the entire piece of meat, facilitating the starch hydration and protein bonding we discussed earlier.
The Fry, The Thermodynamics, and The Gear Warning
Alright, your 15 minutes are up. The starches have gelled. The proteins have cross-linked. The crust is practically cemented to the meat. It is time to cook. But before you even think about turning on a burner, we need to talk about your cookware, because the wrong pan will completely sabotage all of your hard work.
Why Your Pan Matters (The “No Toxic Gear” Rule)
I am going to be brutally honest with you: I have zero patience for cheap, toxic kitchenware. If you are planning to fry this beautiful, scientifically-perfected chicken in a $15 non-stick pan that you bought at a discount store three years ago, stop right now.
Teflon and standard non-stick coatings are not designed for the high heat required for proper shallow frying. When you heat these cheap pans past 400°F—which happens very quickly when preheating oil—the chemical polymer bonds begin to degrade, releasing toxic fumes and microscopic plastic flakes into your food. Furthermore, as these pans age and the coating inevitably scratches and peels, they lose their non-stick properties entirely. You should be actively banishing toxic kitchen gear from your home.
For shallow frying, you need heavy, durable cookware with massive thermal mass. I highly recommend a heavy-duty carbon steel skillet, an enameled cast iron pan, or a high-quality multi-clad stainless steel skillet. If you are using traditional bare cast iron, ensure you maintain a rust-free skillet with proper seasoning, as the polymerized oil creates a naturally slick surface.
If you opt for stainless steel, you must properly preheat the pan before adding your oil. You can verify the temperature using the water drop test—flicking a drop of water into the pan to see if it glides across the surface like a mercury bead (the Leidenfrost effect). If you skip this step, your chicken sticks to your stainless steel like superglue, and when you try to flip it, the pan will rip your perfectly rested crust right off the meat, completely defeating the purpose of this entire article.
Temperature Control and the Maillard Reaction
Add a generous layer of neutral, high-smoke-point oil (like canola, peanut, or avocado oil) to your preheated pan. You want about a quarter-inch of oil—enough to submerge the bottom half of the cutlet.
The target temperature for your oil is 350°F. If the oil is too cold, the breading will act like a sponge, absorbing the grease and becoming a heavy, oily mess. If the oil is too hot, the breadcrumbs will burn into bitter carbon before the internal meat is safely cooked.
When you gently lay the rested, breaded chicken into the pan (always lay it away from you so the oil doesn’t splash back), the temperature of the oil will immediately drop. This is why you need a heavy pan; it retains heat and recovers quickly.
Allow the chicken to fry undisturbed. Do not constantly poke, prod, or shift it around. Let the Maillard reaction—the complex chemical reaction between amino acids and reducing sugars—work its magic to create that gorgeous, golden-brown crust. When you see the edges turning deep golden, carefully flip it using tongs or a flexible fish spatula.
Once both sides are perfectly crisp, remove the chicken and place it back onto a clean wire cooling rack. Do not drain fried food on paper towels! Paper towels trap the rising steam escaping from the hot food, directing that moisture straight back into the crust you just worked so hard to build. A wire rack keeps the air flowing and the crust shatteringly crisp.
Finally, never guess when poultry is done. Invest in a reliable meat thermometer and pull the chicken when the internal temperature hits 165°F.
Weekday Shortcuts: Time is Money
I can already hear the protests from the weekend culinary hobbyists who are exhausted on a Tuesday night. “I just got home from work, the kids are screaming, and you want me to wait 15 minutes for starch hydration? I don’t have time for this!”
I firmly believe that time is money during the week, and I am the biggest advocate for efficiency. But skipping the rest period is a false economy. If you skip it, you ruin the meal, and nobody wants to eat a ruined meal. Instead, you need to rethink your workflow. A beautifully organized dream kitchen isn’t just about having the right spatulas; it is about sequencing your tasks intelligently.
Here is how you hack the 15-minute rest on a busy weeknight:
1. The Morning Prep: You can bread your chicken cutlets in the morning before you leave for work. Place them on a wire rack, uncovered, in the refrigerator. The modern refrigerator is essentially a giant dehumidifier. Leaving them uncovered all day not only allows for maximum starch hydration, but the circulating cold air will aggressively dry out the exterior of the breadcrumbs. When you fry them that evening, the crust will be unimaginably crispy.
2. The Multitasking Window: If you are breading at dinnertime, make it the very first thing you do when you walk into the kitchen. Bread the chicken, set it on the rack, and start your 15-minute timer. Use those exact 15 minutes to wash your prep bowls, wipe down the counters, toss a quick vinaigrette salad, or set the dining table. By the time your side dishes are ready and your kitchen is clean, the chicken is fully rested and ready to hit the hot oil. You haven’t lost a single second of your evening; you simply rearranged the order of operations.
The Final Verdict
Cooking is not magic, and you do not need a culinary degree to produce mind-blowing food in a standard home kitchen. You just need to understand the basic rules of engagement.
When your breading falls off, it is simply the universe’s way of telling you that you ignored the laws of physics. Steam needs to be managed. Proteins need time to bond. Starches need time to hydrate. By implementing a simple, zero-cost, hands-off 15-minute resting period, you are fundamentally altering the molecular structure of your food, creating a permanent, tear-resistant bond between the meat and the crust.
So the next time you set up your dredging station, respect the chemistry. Dry your meat, press your crumbs, walk away for 15 minutes, and use a high-quality, non-toxic pan. Your weeknight dinners will instantly transform from a frustrating, soggy mess into a masterclass in crispy, golden perfection. Now go get your hands dirty in some flour, and let the science do the rest.






