
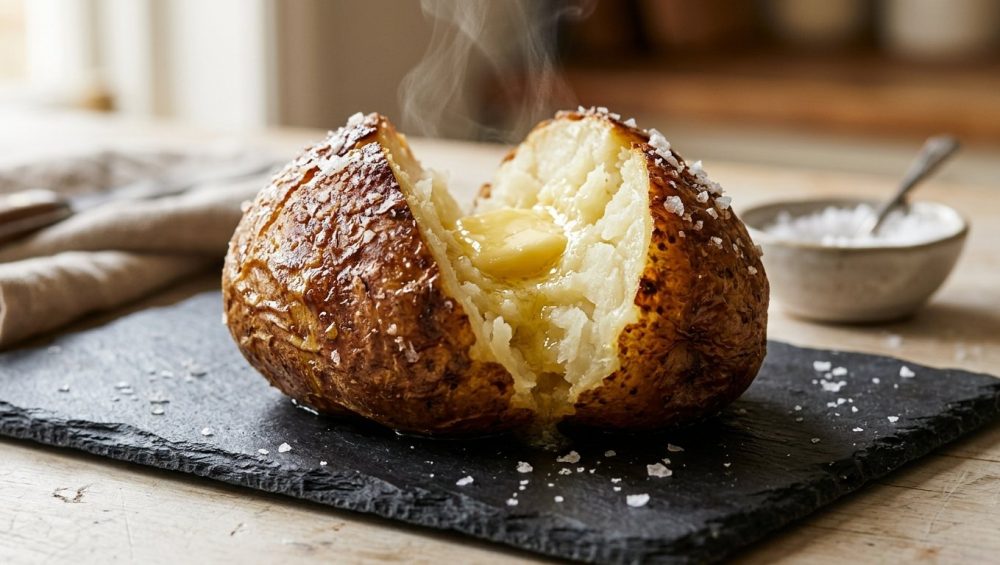
Let’s get one thing straight right out of the gate: if you are still wrapping your baking potatoes in aluminum foil before tossing them into the oven, you are committing a culinary felony. I know that sounds dramatic, but as someone who has spent years navigating the trials, errors, and occasional smoke-detector symphonies of the home kitchen, I have zero patience for bad habits passed down as gospel.
A perfectly executed baked potato is a masterpiece of textural contrast. It should boast a shatteringly crisp, deeply savory skin that gives way to an interior so light, fluffy, and crystalline that it practically melts the moment butter touches it. Instead, millions of well-meaning home cooks are serving up sad, wet, dense baked potatoes that taste more like damp sponges than starchy perfection.
The culprit? That shiny, crinkly roll of aluminum foil sitting in your pantry.
Today, we are going to completely dismantle the myth of the foil-wrapped spud. We are going to dive deep into the food science, the thermodynamics of roasting, and the exact, foolproof methodology you need to achieve steakhouse-level perfection in your own standard home kitchen. Grab a glass of wine, pull up a stool, and let’s talk potato physics.
The Restaurant Myth: Why We Started Wrapping Potatoes
To understand why we wrap potatoes in foil, we have to look at the history of the commercial restaurant industry. Foil was invented around 1910, and it didn’t take long for steakhouses and diners to realize it had a very specific, highly utilitarian application in a high-volume kitchen.
When a restaurant opens for dinner service at 5:00 PM, they do not have the luxury of baking a fresh potato to order for every single customer. A proper bake takes an hour. So, prep cooks bake a hundred potatoes in the afternoon, wrap them tightly in aluminum foil, and toss them into a warming drawer or a banquet holding pan.
Aluminum foil is a fantastic thermal insulator when wrapped tightly around a hot object. It traps the residual heat and prevents the potato from dropping into the culinary danger zone. In a commercial setting, wrapping a potato in foil is strictly a temperature-holding strategy. It was never designed to be a cooking technique.
Unfortunately, generations of home cooks went to these steakhouses, saw their baked potatoes arrive in a shiny silver jacket, and mistakenly assumed that this was the “professional” way to cook them. We brought the foil into our home ovens, completely blind to the fact that we were ruining our side dishes. Just as overcrowding a sheet pan traps evaporating moisture and leaves you with soggy roasted veggies, wrapping a potato in an impermeable metal barrier traps moisture and completely destroys its internal texture.
The Thermodynamics of a Baking Potato
If we want to cook like experts without needing a culinary degree, we have to understand the basic thermodynamics of what happens inside our ovens.
A raw Russet potato is essentially a dense, solid block of complex carbohydrates, and it is composed of roughly 80 percent water. When you place that raw potato into a hot oven, heat energy begins to transfer into the potato via radiation (from the oven walls) and convection (from the circulating hot air).
As the internal temperature of the potato slowly rises, the water trapped inside its cellular structure begins to heat up. When the internal temperature approaches 212°F (100°C), that liquid water undergoes a phase change and turns into steam. In a naked, unwrapped potato, this steam safely vents out through the porous skin—especially if you have properly pierced it. As the moisture evaporates and escapes into the dry oven environment, the starches left behind begin to dehydrate, separate, and fluff up.
This delicate balance of heat transfer and moisture evaporation is incredibly precise. If your oven is running cold, the potato will never reach the critical temperature required to convert that water into steam. This is exactly why you need a simple oven thermometer to ensure your appliance is actually hitting the 400°F to 425°F range it claims to be at. When the heat is correct and the moisture is allowed to freely evaporate, you are left with a masterpiece.
The Aluminum Foil Trap: Steaming vs. Baking
Now, let’s look at what happens when you introduce aluminum foil to this thermodynamic equation.
When you wrap a raw potato in foil and put it in the oven, the foil heats up almost instantly. However, it creates a completely impermeable, airtight barrier around the food. As the water inside the potato reaches the boiling point and turns into steam, it has absolutely nowhere to go.
The steam pushes out of the potato, hits the inner wall of the aluminum foil, condenses back into liquid water, and drips right back onto the potato skin. You are no longer baking or roasting; you are actively steaming the potato in a miniature, metallic sweat lodge of its own making.
This trapped moisture forces the starchy interior of the potato to become waterlogged, dense, and gummy. Furthermore, the skin of the potato—which should be a crispy, savory delight—turns into a flabby, leathery, unappetizing wet blanket. You are sabotaging the texture of your food before it even has a chance to cook.
Worse yet, wrapping potatoes in foil presents a very real, scientifically documented food safety hazard. If you bake a foil-wrapped potato and leave it sitting on the counter to cool down for hours, you are creating the ultimate breeding ground for Clostridium botulinum, the bacteria responsible for botulism. These dangerous bacterial spores thrive in warm, moist, oxygen-free environments. A foil-wrapped potato sitting at room temperature is basically a luxury resort for botulism. If your meat thermometer is lying to you about safe holding temperatures, you could be putting your dinner guests at serious risk. Unwrapping the potato immediately halts this risk by exposing the surface to oxygen and allowing rapid cooling.
The “No-Go” Rule: Toxic Gear and Cheap Foil
Since we are on the topic of aluminum foil, we need to have a very serious, brutally honest conversation about the equipment we use in our home kitchens. As your resident Sassy Sous-Chef, I have a strict “No-Go” rule when it comes to cheap, toxic kitchenware. I absolutely despise mystery metals, flimsy disposable pans, and peeling non-stick coatings.
If you are buying the cheapest, thinnest aluminum foil at the discount store, you are highly likely dealing with a product that can easily degrade, tear, or even leach metallic flavors into your food when exposed to high heat and acidic ingredients. But the real crime happens when home cooks try to bake their potatoes on cheap, toxic non-stick baking sheets.
Do not put a cheap non-stick pan into a 425°F oven to bake a potato. Conventional non-stick coatings (like Teflon and its modern cousins) begin to rapidly degrade at temperatures above 450°F, and they can start releasing toxic PFOA analogues and dangerous fumes right into your kitchen air. You do not need a culinary degree to know that breathing in aerosolized plastic is a bad idea. I am a massive advocate for banishing toxic kitchen gear from your life entirely.
Invest in high-quality, heavy-gauge stainless steel sheet pans, or bare aluminum commercial half-sheets that do not have synthetic chemical coatings. You want bakeware that can take a beating, handle extreme heat, and last a lifetime. If you are using thin, flimsy metal trays, you already know the frustration of hearing a loud “POP” in the oven because your cheap baking sheets keep warping under thermal stress.
For the absolute best baked potato, you actually don’t need a baking sheet at all—you should bake them directly on the stainless steel oven rack. If you need something to catch the oil drips, place a heavy-duty stainless steel pan on the rack below the potatoes. Keep the toxic gear out of your oven, and let the pure, unadulterated heat do its job.
The Food Science of Starch Gelatinization
To truly master the baked potato, we have to zoom in and look at what is happening on a microscopic, molecular level. Not all potatoes are created equal, and understanding the chemistry of starch is the secret to achieving that coveted fluffy interior.
Starch in a potato comes in two primary molecular forms: amylose and amylopectin. Amylose is a long, straight, linear chain of glucose molecules, while amylopectin is a highly branched, bushy structure.
Waxy potatoes—like Yukon Golds, Red Bliss, or fingerlings—have a lower percentage of amylose and higher moisture content. Their tight cellular walls hold together firmly when cooked, which makes them incredible for boiling, mashing, or throwing into a potato salad, but absolutely atrocious for baking. If you try to bake a waxy potato, it will turn out dense, creamy, and heavy.
Starchy potatoes—specifically the mighty Russet Burbank—are the undisputed kings of the baking world. They boast a very high amylose content and thick, hearty skins.
When the internal temperature of a Russet potato crosses the 140°F mark, a magical process called starch gelatinization begins. The tightly packed starch granules start to absorb the surrounding water, swelling up like tiny balloons. As the temperature continues to climb toward that critical 205°F to 212°F window, these swollen granules reach their maximum capacity and burst open, creating a complex, sponge-like matrix.
If you have wrapped the potato in foil, this matrix becomes completely flooded with trapped steam, resulting in a soggy, gluey disaster. But if you have baked the potato naked, the excess moisture evaporates away into the oven air. The amylose molecules then cool slightly and link together, forming a dry, crystalline, incredibly fluffy texture that absorbs butter like a sponge. Understanding this foundational science is just as vital to your cooking as knowing how to use the water drop test to properly preheat a skillet. It is all about manipulating heat and moisture to your advantage.
The Masterclass: The Foolproof, Foil-Free Technique
We have covered the history, the thermodynamics, the dangers of toxic gear, and the molecular biology of starch. Now, it is time for the main event. This is my definitive, no-nonsense, highly researched masterclass on how to bake the perfect potato. Follow these steps with ruthless precision, and you will never eat a mediocre spud again.
Step 1: The Selection and The Scrub
Go to the store and buy large, uniform Russet Burbank potatoes. You want them to be relatively the same size so they cook at the exact same rate. When you get them home, scrub them aggressively under cold running water. Potatoes grow in the dirt, and we are going to be eating the skins, so get them impeccably clean.
Once washed, dry them completely with a clean kitchen towel. This is crucial. If the potato skin is wet, the oil we apply in Step 3 will not adhere properly, and the skin will steam instead of crisping. Take a moment to carve out any deep black eyes or bruises. Using a dull blade makes this dangerous and sloppy, so if you notice your kitchen knives go dull, hone them before you start hacking away at a rolling root vegetable.
Step 2: The Puncture
Do not skip this step unless you want to spend your evening scrubbing exploded potato shrapnel off the walls of your oven. Take a standard dinner fork and aggressively pierce the potato about six to eight times, going about half an inch deep all around. These punctures act as vital steam vents, allowing the internal pressure to safely escape as the water boils inside the potato.
Step 3: The Oil and Salt Massage
This is where the magic happens. Place your dry, punctured potatoes in a large bowl. Drizzle them generously with a high-quality cooking oil. You want an oil that can withstand a 400°F oven without hitting its smoke point and turning bitter. Good quality olive oil, avocado oil, or even melted beef tallow are spectacular choices. Massage the oil into the skins with your hands until every millimeter is coated.
Next, shower the potatoes liberally with coarse kosher salt. Do not use iodized table salt; it is too fine, tastes metallic, and will make the potato overwhelmingly salty. Kosher salt clings to the oil and acts as a desiccant, actively drawing microscopic amounts of moisture out of the potato skin as it bakes. This reaction, combined with the hot oil, triggers a beautiful Maillard reaction, transforming the skin into a savory, shatteringly crisp, glass-like shell.
Step 4: The Bake
Preheat your oven to 400°F (or 425°F if you have particularly massive potatoes). Place the oiled, salted potatoes directly onto the center oven rack. Do not put them on a baking sheet, as the pan will block the conductive heat from circulating evenly around the bottom of the potato.
If you are worried about oil dripping and smoking up your kitchen, simply place a piece of aluminum foil or a bare stainless steel catch pan on the rack directly below the potatoes. (See? Foil is fine as a drip-catcher, just keep it away from the food itself). Bake the potatoes undisturbed for 55 to 65 minutes.
Step 5: The Temperature Check
You cannot judge a baked potato solely by giving it a squeeze. A potato might feel soft on the outside but still be dense and chalky in the very center. The only way to guarantee perfectly gelatinized starch is by temperature.
Take your instant-read digital thermometer and plunge it directly into the thickest, deepest center of the largest potato. You are looking for an absolute minimum of 205°F, with 210°F to 212°F being the absolute gold standard. If it reads 195°F, close the oven door and give it another ten minutes. Patience is mandatory here.
Step 6: The Resting Period and The Fluff
When the potatoes hit that glorious 210°F mark, pull them out of the oven using tongs. Place them on a wire cooling rack and let them undergo a passive cooldown for exactly 8 to 10 minutes. This brief rest allows the starches to settle and prevents the potato from turning gummy when sliced.
After the rest, take a serrated knife and cut a deep slit down the center of the potato. Grab the potato by the two opposite ends and push inward and upward. The potato will beautifully blossom open, releasing a massive plume of trapped steam. This final release of steam is the last crucial step in ensuring the interior remains bone-dry and cloud-like.
Weekend Perfection vs. Weekday Efficiency
As a home cook, I firmly believe that time is money. While the 75-minute masterclass method outlined above is my absolute obsession for a lazy Sunday dinner, I am a realist. When you walk through the door at 6:15 PM on a Tuesday after a brutal day at the office, you do not have an hour and a half to wait for a side dish to roast.
But that does not mean you should compromise your standards. If you try to aggressively rush the process by chopping the potato into cubes and frying them in a cheap skillet with aerosol spray, you are just ruining your nonstick pans and making a greasy mess.
Instead, use the Weekday Microwave-Oven Hybrid Hack.
Take your washed, dried, and heavily pierced Russet potato and microwave it on high for 5 to 7 minutes, flipping it halfway through. The microwave uses electromagnetic waves to directly agitate the water molecules inside the potato, rapidly raising the internal temperature to jumpstart the cooking process.
Once the potato is slightly softened (but not fully cooked), carefully remove it from the microwave. It will be screaming hot, so use tongs. Now, execute Step 3: rub it with oil and kosher salt. Toss it directly onto the rack of a preheated 425°F oven for 15 to 20 minutes.
The microwave does the heavy lifting of gelatinizing the interior starches, while the high-heat oven blasts the oiled skin, dehydrating it and creating that essential crispy texture. You get 90 percent of the steakhouse perfection in less than half the time. Weekday dinners are saved, and you didn’t have to touch a single sheet of aluminum foil.
The Ultimate Toppings Guide (Because We Aren’t Savages)
You have just spent the time and scientific effort to engineer the perfect, fluffy, crispy-skinned baked potato. Do not disrespect your own hard work by topping it with garbage. A potato this good demands high-quality fats and fresh ingredients to properly meld with the hot starch matrix.
First, the butter. Drop a generous tablespoon of high-quality, high-fat cultured European butter directly into the steaming crevice of the potato. The residual heat will melt the butter instantly, allowing the milk solids and butterfat to coat the individual starch crystals, creating a rich, velvety mouthfeel.
Next, the tang. A healthy dollop of full-fat sour cream or crème fraîche provides a necessary acidic contrast to the heavy, earthy starch.
Finally, the cheese. If you are adding cheese, buy a block of sharp, aged cheddar or Gruyère and grate it yourself using a microplane or box grater. Do not, under any circumstances, ruin your pristine potato by dumping a handful of industrially processed pre-shredded cheese out of a plastic bag. Those pre-shredded bags are heavily coated in cellulose (wood pulp) and anti-caking agents to prevent clumping on the supermarket shelf. When those chemicals hit the heat of your potato, they refuse to melt properly, leaving you with a waxy, grainy, unappetizing mess. Grate your own cheese; it takes thirty seconds and melts into a glorious, stringy, gooey blanket of perfection.
Finish the whole thing off with freshly cracked black pepper, a pinch of flaky sea salt, and a shower of finely chopped fresh chives for a bright, allium bite.
The Final Word
Cooking is not magic. It is just applied physics, chemistry, and thermodynamics, wrapped up in an apron and handed a glass of wine.
Once you understand why a potato needs to breathe, why steam is the enemy of a crispy skin, and why aluminum foil belongs nowhere near a baking Russet, you take back control of your kitchen. You don’t need a Michelin star to make mind-blowing food. You just need to ditch the toxic gear, respect the science of the ingredients, and have the confidence to let the oven do its job.
So throw away the foil, grab the kosher salt, and go bake the best potato of your life. You’ve got this.






