
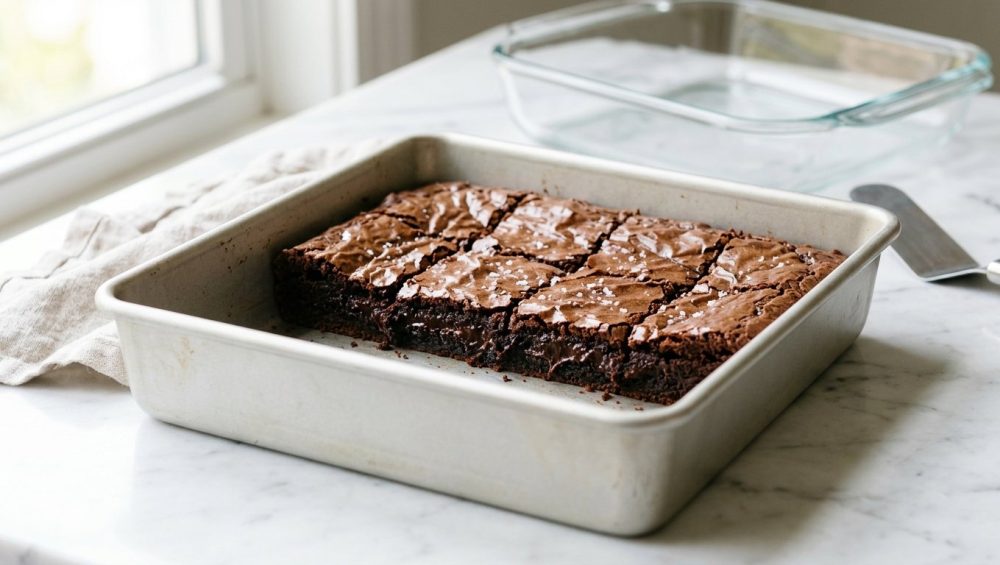
The Heartbreak of the Overbaked Edge
Picture this: It is a Friday evening. You have survived another grueling week of endless emails, pointless meetings, and the general chaos of modern existence. You decide to reward yourself by tackling a weekend baking project. You meticulously whisk together a premium brownie batter, folding in the finest cocoa powder and chocolate chunks you could find. You pour this liquid gold into your trusty, heavy glass baking dish, slide it into the oven, and wait for the magic to happen. The kitchen fills with the intoxicating aroma of chocolate. You pull the pan out, let it cool, and eagerly cut into the corner.
And then, tragedy strikes.
The edges of your brownies require a diamond-tipped masonry saw to penetrate. They are dry, crumbly, and taste vaguely of chocolate-flavored concrete. Desperate for salvation, you dig into the center of the pan, only to find that it is completely raw, a wobbly pool of uncooked batter. You immediately blame yourself. You blame your oven calibration. You assume that because you do not have a fancy culinary degree, you are simply incapable of executing a basic dessert.
Listen to me, weekend warriors: Stop beating yourself up. It is not your fault. It is not your recipe, and it is not your lack of professional training. The culprit is sitting right there on your countertop. It is your pan. If you ever want to rescue a ruined dinner or save a disastrous dessert, you have to fundamentally understand the tools you are working with. Anyone can bake bakery-level, mind-blowingly fudgy brownies in a standard home kitchen, but you cannot do it if you are sabotaging yourself with the wrong equipment.
The Physics of Baking: Why Your Equipment Dictates Your Success
Baking is not magic, and it certainly is not about luck. Baking is applied thermodynamics. When you place a pan of batter into a 350°F oven, you are initiating a complex series of heat transfer reactions. Your oven is essentially a heated box that uses convection (hot air circulating) and radiation (infrared heat from the heating elements) to cook your food. But the most critical factor in baking a dense batter is conduction—the direct transfer of heat from the pan to the food.
This is where the material of your bakeware becomes the most important decision you will make. In the culinary world, we measure a material’s ability to transfer heat using its thermal conductivity (often referred to as its k-value).
Let us look at the hard, scientific numbers. Aluminum, the undisputed king of commercial baking, has a thermal conductivity of roughly 237 W/m·K. It absorbs heat from the oven instantly and transfers it directly into your food with aggressive efficiency. Glass, on the other hand, has a thermal conductivity of about 1.1 W/m·K. Read that again. Aluminum transfers heat over two hundred times faster and more efficiently than glass.
When you use glass to bake brownies, you are essentially wrapping your batter in a heavy winter coat and expecting it to get a sunburn. Glass actively resists heat transfer. Upgrading your bakeware to highly conductive metal is not just a pro-chef secret; a high-quality aluminum pan is one of the most essential kitchen tools for beginners. If you want professional results, you have to respect the physics of the kitchen.
The Pyrex Trap: The Hidden Danger of Insulating Bakeware
Glass bakeware is beautiful. It is nostalgic. It looks phenomenal when you are serving a layered lasagna or a bubbling fruit cobbler. But it has absolutely no business housing your brownie batter. To understand why glass ruins your desserts, we have to look at how it behaves under thermal stress.
The Slow Heat Ramp-Up
Because glass is a thermal insulator, it takes an agonizingly long time to heat up in the oven. When you place a glass dish full of room-temperature batter into a hot oven, the glass acts as a barrier. For the first fifteen minutes of your bake, the center of your brownie batter is completely insulated from the heat of the oven floor. However, the top of the batter is exposed to the hot, circulating ambient air.
By the time the thick glass finally absorbs enough energy to start cooking the bottom and sides of the batter, the top is already drying out. The edges, which are in direct contact with the slowly heating glass, sit there dehydrating. The center remains a cold, gooey mess because the heat simply cannot penetrate fast enough through the insulating barrier of the dish.
The Thermal Shock Factor
We also need to address the structural integrity of modern glass bakeware. Prior to 1998, most American-made Pyrex was crafted from borosilicate glass, which was highly resistant to rapid temperature changes. Today, most consumer glass bakeware is made from tempered soda-lime glass. While soda-lime glass is more resistant to being dropped, it is incredibly vulnerable to thermal shock. Moving a cold glass pan directly into a blazing hot oven, or placing a hot glass pan onto a cold, wet countertop, is exactly why you end up with a glass baking dish shattered into a thousand razor-sharp pieces across your kitchen floor. It is a completely unnecessary hazard for a simple batch of brownies.
The Carryover Cooking Catastrophe
Let us pretend for a moment that you possess a magical oven, and you somehow manage to pull your glass pan of brownies out at the exact right second. The center looks perfectly set, and the edges aren’t burnt yet. You set the pan on the counter to cool, patting yourself on the back for a job well done.
You have forgotten one crucial detail: glass has a massive thermal mass.
Specific heat capacity is the amount of heat energy required to raise the temperature of a substance, and consequently, how much heat that substance holds onto once it is removed from the heat source. Glass holds onto heat like a bitter grudge. When you take an aluminum pan out of the oven, it cools down to a safe, touchable temperature in a matter of minutes. When you take a thick glass pan out of the oven, it stays screaming hot for twenty to thirty minutes.
This phenomenon is known as “carryover cooking.” Your brownies are not done baking just because you took them out of the oven. As they sit on your counter, that thick glass dish continues to aggressively pump retained heat into the edges and bottom of your dessert. That perfectly set center you were so proud of? It is now overcooked. Those chewy edges? They are rapidly turning into croutons. Dealing with carryover cooking in glass is one of the most frustrating, unavoidable annoyances in the culinary world, right up there with realizing your silicone spatulas taste like soap because they absorbed cheap dishwasher detergent.
The Dark Non-Stick Delusion
At this point, you might be thinking, “Fine, Sassy Sous-Chef, I’ll ditch the glass and use a metal pan.” You rummage through your cabinets and pull out a dark, charcoal-colored, non-stick baking pan you bought at a discount store five years ago.
Put it back. You have just traded one thermodynamic disaster for another.
While metal conducts heat far better than glass, the color of your metal pan dramatically alters how it interacts with the radiant heat in your oven. This comes down to a property called emissivity. Dark colors are highly emissive; they absorb infrared radiation at an incredibly aggressive rate. In a standard home convection or conventional oven, radiant heat accounts for roughly 35% to 45% of the total energy transfer.
When you place a dark pan in the oven, it acts like a heat magnet. It absorbs all that radiant energy and superheats the exterior of the pan much faster than the ambient air can heat the center of the batter. The result? The bottom and edges of your brownies scorch and burn before the center has a chance to reach its setting temperature. If you are stubbornly clinging to those dark nonstick pans, you are guaranteeing yourself a dry, overbaked crust every single time.
The “No-Go” Rule: Why We Are Ditching Toxic Coatings
Since we are on the topic of cheap, dark non-stick bakeware, we need to have a serious, brutally honest conversation about kitchen gear. As a home cook who values both my time and my health, I have a strict “No-Go” rule when it comes to toxic, low-quality kitchen equipment.
Those cheap non-stick pans are usually coated with low-grade polytetrafluoroethylene (PTFE) or other synthetic polymers. When subjected to high oven temperatures over time, these coatings degrade, blister, and inevitably begin to flake off directly into your food. There is absolutely nothing appetizing about finding a chip of mystery chemical coating embedded in your dessert.
Furthermore, you do not save money by buying a ten-dollar pan that you have to throw away and replace every eight months. High-quality, uncoated metal bakeware will literally outlive you if you treat it right. I am a fierce, unrelenting advocate for banishing toxic kitchen gear from your house once and for all. You deserve tools that work with you, not against you, and you certainly deserve food free from peeling chemical flakes.
The Holy Grail: Bare, Light-Colored Aluminum
If glass is an insulating trap and dark non-stick is a scorching hazard, what is the solution? The undisputed holy grail of bakeware—the standard used in every professional bakery and test kitchen on the planet—is bare, light-colored, heavy-gauge aluminum.
The Power of Reflectivity and Conduction
Light-colored aluminum is the perfect baking vessel for three distinct reasons. First, its light, shiny surface reflects radiant heat rather than absorbing it. This prevents the edges and bottom of your brownies from scorching, allowing for a gentle, even bake. Second, as we discussed, aluminum’s massive thermal conductivity means it heats up almost instantly when it enters the oven, transferring that heat evenly across the entire surface of the batter. There are no hot spots, and there are no cold centers.
The Importance of Heavy Gauge
Finally, aluminum has very low thermal mass. The second you remove it from the oven, it begins to cool rapidly. Within a few minutes, the pan is cool enough to touch, effectively stopping the carryover cooking process and locking in that perfect, fudgy texture.
When shopping for aluminum bakeware, you must insist on heavy-gauge metal. Do not buy the flimsy, bendable pans from the supermarket baking aisle. Thin, cheap metal cannot handle the thermal expansion of a hot oven, which is exactly why your baking sheets keep warping and sounding like a gunshot in the middle of a baking cycle. Invest in commercial-grade, thick aluminum (often sold at restaurant supply stores for incredibly reasonable prices).
The Anatomy of the Perfect Fudgy Center
To truly master the brownie, you need to understand what is happening inside the batter on a molecular level as it bakes. A brownie is a delicate emulsion of fat (butter or oil), sugar, eggs, and a very small amount of flour and cocoa powder. Unlike a cake, which relies on a strong gluten network and chemical leaveners (baking soda or powder) to create a light, airy crumb, a fudgy brownie relies on a high fat-to-flour ratio to remain dense and rich.
The Coagulation of Proteins
As the aluminum pan rapidly and evenly transfers heat into the batter, the egg proteins begin to unfold and coagulate. This structure-building process generally occurs between 160°F and 180°F. For a perfectly fudgy brownie, we want the internal temperature of the center to reach exactly 185°F to 195°F. At this temperature, the eggs have set enough to hold the brownie together, but the starches in the flour haven’t fully dried out.
The Secret to the Crackly Crust
What about that highly coveted, tissue-paper-thin crackly crust on top? That is entirely dependent on dissolved sugar and egg foam. As the batter bakes, the sugar that has dissolved into the fat migrates to the surface, creating a delicate meringue-like crust. If you want a flawless, glossy top, you must dissolve the sugar fully into your warm melted butter or hot oil before you add your dry ingredients. When you combine this technique with the even heat distribution of a light aluminum pan, you get a masterpiece: a glossy, crackly top, chewy edges, and a dense, molten center.
Damage Control: Adapting if You Refuse to Buy a New Pan
I know some of you are stubborn. I know some of you are reading this from a vacation rental where the only available baking vessel is a scratched glass casserole dish from 1992. If you absolutely must bake your brownies in a glass pan, I will judge you silently, but I will also give you the scientific workarounds to mitigate the damage.
Temperature and Time Adjustments
If you are forced to use glass, you must alter the recipe’s instructions. Standard baking recipes are developed and tested using metal pans. To compensate for the insulating properties of glass, you must lower your oven temperature by exactly 25°F (for example, drop a 350°F recipe down to 325°F). Lowering the ambient heat slows down the drying of the top crust, giving the glass enough time to heat up and cook the center without completely incinerating the edges.
Because you are baking at a lower temperature, you will need to increase the overall baking time by anywhere from 5 to 15 minutes. You must watch the pan like a hawk during the final stretch.
Proper Pan Preparation
Do not rely on the slick surface of the glass to release your brownies. You must line the pan with parchment paper. Whatever you do, do not coat the glass in aerosol non-stick sprays. The propellants and emulsifiers in those cans polymerize under high heat, leaving a sticky, yellow residue that is impossible to scrub off. When it comes to maintaining your bakeware, cooking spray is the enemy. Use butter to adhere a parchment sling to the glass instead.
Finally, to combat carryover cooking, you must remove the brownies from the oven slightly earlier than you think you should. The residual heat in the glass will finish the job on the counter.
The Masterclass: Step-by-Step to Brownie Perfection
Now that we have established the absolute supremacy of the light-colored aluminum pan, let us walk through the foolproof, time-saving, expert method for baking the perfect batch of fudgy brownies. Time is money, and we are not going to waste a single minute on unnecessary steps.
Step 1: The Parchment Sling
Never bake brownies directly against the metal. Cut a sheet of high-quality parchment paper so that it covers the bottom of your aluminum pan and extends up two opposite sides, creating an overhang. This is your “sling.” Once the brownies are baked and cooled, you simply grab the overhang and lift the entire block of brownies out of the pan. This allows for perfectly clean, sharp cuts on a cutting board, rather than scratching your beautiful aluminum pan with a knife.
Step 2: Precision Measurement
Throw your volume measuring cups in the trash where they belong. The density of flour and cocoa powder varies wildly depending on humidity and how tightly you pack the cup. If you accidentally add 20% too much flour, your fudgy brownies will turn into dry cake. Instead, use a digital kitchen scale to measure your ingredients in grams. It is faster, it creates fewer dirty dishes, and it guarantees absolute consistency every single time you bake.
Step 3: Strategic Oven Placement
Always bake your brownies on the middle rack of a fully preheated oven. If you place them too high, the radiant heat from the top element will burn the sugar crust. If you place them too low, the bottom element will scorch the base. The middle rack ensures the aluminum pan receives balanced, even convective heat.
Step 4: The Toothpick Myth
Generations of home cooks have been taught to insert a toothpick into the center of a baked good; if it comes out clean, it is done. This is a fatal error when baking fudgy brownies. If your toothpick comes out entirely clean, your brownies are already overbaked and dry. You want to pull the aluminum pan from the oven when a toothpick inserted into the center comes out with thick, moist crumbs attached to it (but not wet, liquid batter).
Step 5: The Chill Phase
This is the hardest step, but it is non-negotiable. When you pull the aluminum pan from the oven, the rapid cooling of the metal stops the baking process. However, the fats inside the brownie are still fully melted. If you cut into them now, they will fall apart into a messy, molten pile. You must let them cool to room temperature on a wire rack. For the absolute best texture—the kind of dense, truffle-like fudge you pay five dollars a square for at a boutique bakery—wrap the cooled pan in plastic wrap and place it in the refrigerator for two hours before slicing. The cold solidifies the butter and chocolate, resulting in the cleanest, sharpest cuts and the most incredible mouthfeel imaginable.
The Final Bite
You do not need a Michelin star or a fancy culinary degree to create mind-blowing food in your home kitchen. You just need a little bit of science, a healthy dose of common sense, and the right equipment. Baking is a science, and in science, variables matter.
By ditching the heavy, insulating glass dishes and the toxic, scorching dark non-stick pans, you are eliminating the two biggest variables that cause dessert disasters. Switch to bare, light-colored, heavy-gauge aluminum bakeware. Respect the thermodynamics of your oven. Use a scale, watch your temperatures, and never trust a clean toothpick.
The days of rock-hard edges and raw, soupy centers are officially behind you. Go forth, preheat your ovens with confidence, and reclaim your weekend baking projects. You’ve got this.






