
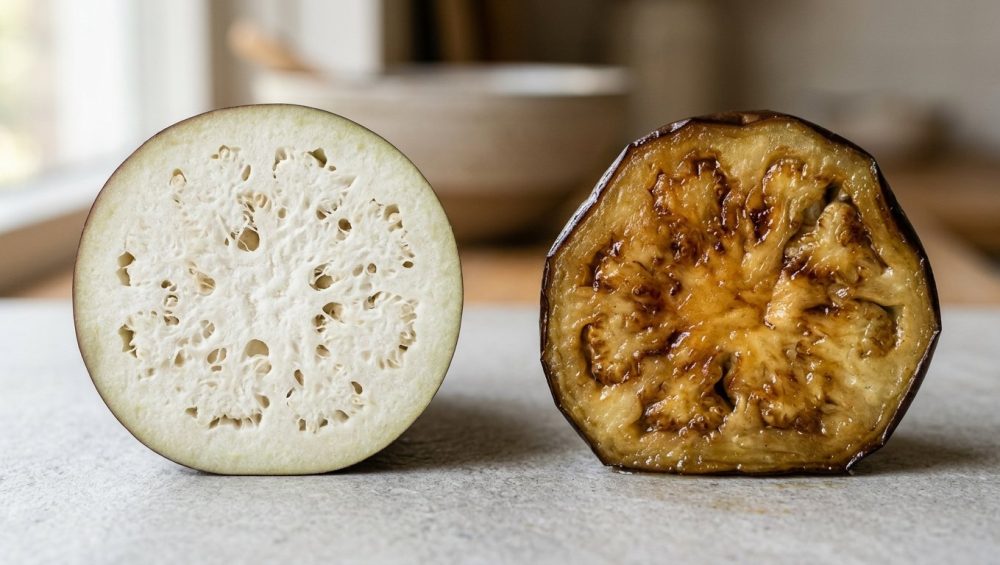
Listen up, weekend culinary warriors. We need to have a serious conversation about the purple elephant in the room. You know exactly what I am talking about. You buy a beautiful, glossy eggplant at the farmer’s market with grand visions of whipping up a rustic ratatouille, a silky baba ganoush, or a crispy, golden eggplant parmesan. You slice it up, toss it into a hot skillet with a generous glug of expensive extra-virgin olive oil, and then… tragedy strikes.
In the blink of an eye, that innocent-looking vegetable drinks up every single drop of fat in the pan. Panic sets in. You pour in more oil. It drinks that, too. By the time you are done cooking, your beautiful produce has transformed into a heavy, greasy, oil-logged sponge that leaves a puddle of grease on your plate and a pit of regret in your stomach.
I have been there. We have all been there. I learned to cook through trial, error, and setting off the smoke detector more times than I care to admit. But here is the brutal truth: cooking eggplant isn’t a test of your culinary intuition; it is a test of your understanding of plant biology. You do not need a culinary degree to cook mind-blowing food, but you do need to understand the basic science of the ingredients on your cutting board.
In this definitive masterclass, we are going to completely deconstruct the cellular structure of the eggplant. We are going to look at the cold, hard science of why it absorbs so much fat, and more importantly, I am going to teach you the foolproof, scientifically backed prep techniques to stop it from happening ever again. Grab a glass of wine, pull up a stool, and let’s fix your food.
The Anatomy of a Culinary Sponge: Why Eggplant Acts Like a Vacuum
To understand why your dinner is turning into an oil slick, we have to put on our lab coats and look at the anatomy of Solanum melongena. Botanically speaking, the eggplant is actually a berry, not a vegetable, and it possesses one of the most uniquely frustrating cellular structures in the entire culinary world.
The 45 Percent Rule
Beneath that tough, glossy purple skin lies the mesocarp—the spongy, white inner flesh of the fruit. Unlike a zucchini or a cucumber, which have relatively dense, water-filled cellular networks that collapse predictably under heat, the eggplant’s parenchyma tissue is essentially a biological foam. It contains large, irregularly shaped air cavities surrounded by incredibly thin, flexible cell membranes.
In fact, up to 45 percent of a raw eggplant’s total volume by weight is made up of pure, empty intercellular air space. Read that again. Almost half of the vegetable you are holding is just trapped air.
The Capillary Action Catastrophe
When you take a raw, un-prepped slice of eggplant and drop it directly into a hot, oiled skillet, a disastrous chain reaction occurs. As the heat hits the flesh, the tiny air pockets expand and then rapidly collapse, creating a microscopic vacuum effect. The spongy structure acts like a capillary wick, aggressively sucking hot oil deep into the center of the flesh before the exterior even has a chance to brown.
Because the cell walls of the eggplant are highly resistant to natural firming during heat exposure, the vegetable doesn’t form a protective crust quickly enough to seal the oil out. Instead, the oil bypasses the surface entirely and floods the internal spongy matrix.
The “Just Add More Oil” Fallacy
This is where the rookie home cook panics. You see the pan go bone-dry in three seconds flat, so you grab the bottle of olive oil and pour more in. The eggplant absorbs that, too. You repeat the cycle until the vegetable is completely saturated.
Here is why this ruins your dinner: when the eggplant is finally fully cooked and its structure completely breaks down, it loses its ability to hold onto all that fat. The cellular matrix collapses entirely, and the vegetable suddenly releases all the oil it absorbed back out onto your plate, resulting in a heavy, calorically dense, and texturally unappealing mess. If you want to make light, tender, perfectly seared dishes, you must collapse the cellular sponge before it ever touches cooking fat.
The “No-Go” Rule: Stop Cooking in Toxic Pans
Before we even discuss how to prep the vegetable, we need to have a brutally honest conversation about the equipment you are using. As your sassy sous-chef, I have zero patience for pretentious chef-speak, but I have even less patience for cheap, toxic kitchenware that actively sabotages your meals and your health.
If you are trying to achieve a perfect, golden-brown sear on your vegetables, you absolutely cannot do it in that scratched-up, mystery-metal non-stick pan you bought for fifteen dollars back in college. When you crank the heat to properly sear moisture-heavy vegetables, cheap synthetic coatings begin to degrade, off-gas, and eventually flake directly into your food. It is a well-known fact that budget pans end up losing their non-stick slip after just a few months of high-heat cooking.
Furthermore, if you are relying on chemical propellants to coat your cookware, you are doing yourself a massive disservice. Those chemical aerosol cooking sprays ruin pans by leaving an indestructible, sticky polymerized residue that ruins the thermal conductivity of the cooking surface.
The Safe, High-Quality Alternatives
You do not need a kitchen full of copper to cook like an expert, but you do need safe, durable, heavy-gauge cookware that retains heat.
I strongly advocate for heavy-bottomed tri-ply stainless steel, carbon steel skillets, or enameled cast iron. Yes, a lot of home cooks struggle with food sticking to stainless steel, but that is entirely a temperature management issue, not a flaw in the pan. When you heat a high-quality stainless steel skillet properly (utilizing the Leidenfrost effect), it provides a naturally stick-resistant surface that will give your eggplant a gorgeous, caramelized crust that a cheap Teflon pan could never dream of achieving.
Throw out the peeling toxic pans. Invest in real metal. Now, let’s get back to the food.
Method 1: The Classic Salt Sweat (Osmosis in Action)
If you have ever read a traditional Italian or Mediterranean recipe, you have undoubtedly seen the instruction to salt your eggplant slices and let them drain in a colander. For decades, culinary folklore claimed this was done to “draw out the bitterness.”
Let’s debunk that right now. Modern hybrid varieties—like the Fairy Tale, Globe, and Italian eggplants you find at the grocery store—have been specifically bred to contain incredibly low levels of solanine, the alkaloid compound responsible for bitterness. The bitterness has largely been bred out of the plant. So why do we still salt it?
We do it for the texture. We do it to destroy the sponge. A little salt fixes greasy eggplant by fundamentally altering the cellular structure before cooking.
The Science of Osmotic Dehydration
When you apply a generous layer of kosher salt to the exposed flesh of the eggplant, you initiate a process called osmotic dehydration. The high concentration of sodium ions on the surface disrupts the hydrogen bonding in the cell membranes. Because nature seeks equilibrium, the water trapped inside the plant cells is forcefully drawn out through the semi-permeable membrane to dilute the salt on the surface.
As the water exits the cells, it floods the empty intercellular air pockets we talked about earlier. With the air pockets now filled with water and the cell walls structurally weakened, the entire spongy matrix collapses in on itself. By the time you are done salting, the eggplant has condensed into a dense, firm piece of produce that is physically incapable of absorbing massive amounts of oil. In fact, USDA trials have shown that this method can reduce oil absorption during frying by up to 38 percent.
The Step-by-Step Salting Guide
- Slice and Arrange: Cut your eggplant into your desired shape (rounds, planks, or cubes). Arrange them in a single layer on a wire cooling rack set over a baking sheet. Do not just throw them in a bowl, or they will end up sitting in a pool of their own extracted juices.
- Apply the Salt: Generously sprinkle coarse kosher salt over the exposed flesh. If you are doing slices, flip them and salt the other side as well. Do not use fine table salt; it dissolves too quickly and makes the food overly salty.
- The Waiting Game: Let the eggplant sit undisturbed for at least 30 to 45 minutes. You will physically see beads of moisture pooling on the surface as the osmosis does its job.
- The Crucial Cleanup: This is the step most rookies skip. You must thoroughly rinse the slices under cold running water to remove the excess surface salt.
- Pat Dry: After rinsing, you absolutely must press the slices completely dry between layers of heavy-duty paper towels or clean kitchen towels. If you skip this step, the residual surface water will cause the eggplant to steam in the pan rather than sear.
Method 2: The Microwave Miracle (The Weeknight Savior)
I am going to be entirely honest with you: as much as I respect the science of the salt sweat, time is money. When you are rushing home from the office on a Tuesday at 6:00 PM, you do not have 45 minutes to stand around watching a vegetable sweat on a wire rack. If you want to conquer weeknight cooking anxiety, you have to prioritize efficiency and utilize smart, modern kitchen hacks.
This is where the microwave comes into play. Yes, the microwave. Forget the pretentious food snobs who claim microwaves are only for reheating coffee. The microwave is your best friend when it comes to rapidly manipulating the moisture content of vegetables.
How the Microwave Destroys the Sponge
Instead of relying on a slow chemical process like osmosis to draw moisture out, the microwave uses electromagnetic radiation to excite the water molecules already present inside the eggplant’s cells. This rapidly heats the internal water, essentially steaming the vegetable from the inside out.
As the internal temperature rises, the cell walls rupture, the trapped water evaporates as steam, and those pesky air pockets instantly implode. In just a fraction of the time it takes to salt the vegetable, the microwave achieves the exact same structural collapse, rendering the flesh dense, pliable, and perfectly primed for a quick, oil-free sear.
The Step-by-Step Microwave Hack
- Prep the Plate: Line a large, microwave-safe plate with two layers of heavy-duty paper towels.
- Arrange the Cuts: Place your cubed or sliced eggplant on the paper towels in a single, even layer. Do not pile them up, or they will steam unevenly.
- Nuke It: Microwave on HIGH for 5 to 10 minutes (depending on the wattage of your appliance and the size of your cuts). Check them at the 5-minute mark. You are looking for the flesh to look slightly shriveled, translucent, and soft to the touch.
- Cool and Cook: Carefully remove the plate (it will be hot) and let the eggplant cool for a minute. The paper towels will have absorbed the expelled moisture. Your eggplant is now pre-cooked, structurally collapsed, and ready to be tossed into a hot skillet where it will brown beautifully without absorbing a drop of excess grease.
Method 3: The Dry-Roast Pre-Game (For the Weekend Perfectionist)
Now, let’s pivot. When Saturday rolls around and you have the luxury of time, you can afford to be an absolute perfectionist with your elaborate cooking projects. If you are building a complex, layered moussaka or a towering eggplant parmesan, you want maximum flavor concentration alongside structural integrity.
If you want to master simple weeknight dinners, you microwave. If you want to master weekend culinary artistry, you dry-roast.
The Physics of the Dry Roast
The dry-roast method involves baking the raw eggplant slices in a high-temperature oven with absolutely no oil whatsoever. By exposing the naked vegetable to ambient, dry heat (around 400°F or 200°C), you force the water inside the cells to slowly evaporate. As the moisture leaves the plant, the cellular matrix shrinks, the air pockets close up, and the flesh consolidates dramatically.
Because you are not using salt, you don’t have to worry about over-seasoning your final dish. Because you are not using oil, the eggplant cannot absorb anything. It simply roasts in its own natural juices, concentrating its earthy, sweet flavor profile while simultaneously fixing the texture problem.
The Step-by-Step Dry Roast
- Preheat the Oven: Crank your oven to 400°F (200°C).
- Parchment is Mandatory: Line a heavy-duty aluminum baking sheet with parchment paper or a high-quality silicone baking mat. Do not put the naked eggplant directly on the metal, or it will cement itself to the pan.
- The Naked Bake: Arrange your slices in a single layer. Do not add oil. Do not add salt. Just slide the tray into the oven.
- Roast and Flip: Bake for 15 to 20 minutes, flipping the slices halfway through. You want the flesh to look significantly shrunken, dry to the touch, and slightly browned around the edges.
- The Finishing Touch: Once the structure has collapsed, remove the tray from the oven. Now—and only now—can you lightly brush the slices with a high-quality olive oil and proceed with your recipe. The oil will sit beautifully on the surface, creating a barrier that facilitates browning without penetrating the flesh.
Method 4: The Brine Soak (The Overachiever’s Route)
For those of you who refuse to compromise on texture when deep-frying, there is a fourth, highly scientific method: the saltwater brine. This technique is specifically engineered for dishes where you need the eggplant to maintain a pristine, creamy interior while sporting a shattering, crispy fried exterior.
The Science of Water Displacement
Instead of drawing water out of the eggplant, a brine actively forces salted water into the vegetable. By submerging the porous slices in a heavily salted water bath, the spongy air pockets act like a vacuum, but instead of sucking up oil, they suck up the saltwater.
When you eventually take the brined eggplant, pat it dry, and drop it into a vat of hot frying oil, the physics of thermal dynamics take over. The water trapped inside the air pockets rapidly turns to steam. Because the outward pressure of the escaping steam is stronger than the inward pressure of the hot oil, the steam literally pushes the fat away from the flesh. The oil is physically blocked from entering the cellular structure, resulting in a perfectly crisp exterior and a lush, creamy, grease-free interior.
The Step-by-Step Brine
- The Solution: In a large mixing bowl, dissolve 2 tablespoons of kosher salt into 4 cups of warm water.
- The Submersion: Drop your sliced or cubed eggplant into the water. Because eggplant is full of air, it will float. You need to weigh it down by placing a smaller plate or lid on top of the water to keep the pieces fully submerged.
- The Soak: Let it sit for 30 to 45 minutes.
- The Squeeze: Drain the eggplant in a colander. Take handfuls of the pieces and gently squeeze them to expel the excess surface water, then aggressively pat them dry with paper towels. Proceed to bread and fry as usual.
Prepping Like a Pro: Knife Skills and Board Setup
You cannot execute any of these scientific methods properly if your physical prep station is a chaotic disaster. I constantly remind my readers that organization and proper tool maintenance are the foundation of good cooking. You must ensure you have the beginner kitchen tools you need before you even think about turning on the stove.
Taming the Tough Skin
Eggplant skin is notoriously tough, glossy, and slippery. If you are trying to slice through a large globe eggplant with a cheap, unsharpened blade, you are putting your fingers in serious danger. The blade will slide off the waxy exterior and go straight into your hand.
It is a well-known kitchen fact that dull knives make you cry when prepping aromatics, but they cause actual physical injuries when dealing with tough-skinned produce. Keep your chef’s knife honed and sharpened. Let the weight of the blade do the work, slicing through the skin with a smooth, forward-gliding motion rather than a forceful downward chop.
Precision Slicing for Even Cooking
Whether you are salting, microwaving, or roasting, the success of the structural collapse depends entirely on the uniformity of your cuts. If you have some slices that are half an inch thick and others that are two inches thick, the thin ones will turn to mush while the thick ones remain raw and spongy in the center. Take your time. Aim for uniform, symmetrical pieces.
Once your mountain of produce is perfectly diced, do not ruin your knife blade by scraping it across the cutting board to scoop up the pieces. You absolutely must invest in a bench scraper. This simple, cheap piece of metal is the unsung hero of the kitchen. Use it to cleanly scoop up your prepped eggplant and transfer it to your colander or microwave plate in one swift motion.
The Final Sear: Cooking the Prepped Eggplant
Congratulations. You have successfully utilized plant biology to collapse the spongy mesocarp of your eggplant. You have defeated the air pockets. But the battle is not quite over. How you handle the vegetable in the pan dictates whether your dish is a culinary triumph or a mediocre side dish.
The Pastry Brush Technique
Even with the cellular structure collapsed, you still want to exercise control over your cooking fat. Instead of pouring a glug of oil directly into the skillet, pour a small amount of high-quality olive oil into a ramekin. Use a silicone pastry brush to lightly paint the oil directly onto the surface of the prepped eggplant slices.
By applying the oil to the food rather than the pan, you ensure a perfectly even, micro-thin layer of fat that facilitates the Maillard reaction (that beautiful, savory browning) without drowning the vegetable. You maintain total control over the caloric density of the dish.
Heat Management and Pan Crowding
When you add the eggplant to your pre-heated carbon steel or stainless steel skillet, you must hear a distinct, aggressive sizzle. If it doesn’t sizzle, your pan is too cold, and the vegetable will simply sit there and steam.
More importantly, you must respect the physical real estate of your cookware. Do not overcrowd the pan. If you pile a mountain of eggplant cubes on top of each other, the ambient moisture escaping from the cooking vegetables will become trapped, dropping the temperature of the pan and creating a steam bath. You will never achieve a golden-brown crust in a steam bath. Cook in batches if you have to. Let the pieces breathe. Give them the space they need to caramelize and develop those deep, complex, roasted flavor profiles.
Conclusion: Master Your Kitchen, Master Your Food
At the end of the day, cooking is not magic. It is just applied physics, chemistry, and biology wrapped up in a delicious package. You do not need to be a Michelin-starred chef to make incredible food; you just need to understand the basic rules of engagement.
The eggplant is a dramatic, demanding ingredient. In its raw state, it is spongy, resistant to seasoning, and desperate to ruin your dish by hoarding all your expensive olive oil. But when you treat it with respect—when you use salt, microwaves, or heat to break down its stubborn cellular walls before the real cooking begins—it undergoes a miraculous transformation. It becomes silky, custard-like, tender, and deeply savory.
Stop letting a purple berry intimidate you. Throw out your toxic, peeling pans, sharpen your chef’s knife, and show that vegetable who is boss. You have the science, you have the techniques, and you have the sassy encouragement of a home cook who has made all the mistakes so you don’t have to. Now get into the kitchen, prep your ingredients properly, and go make something spectacular. You’ve got this.






