
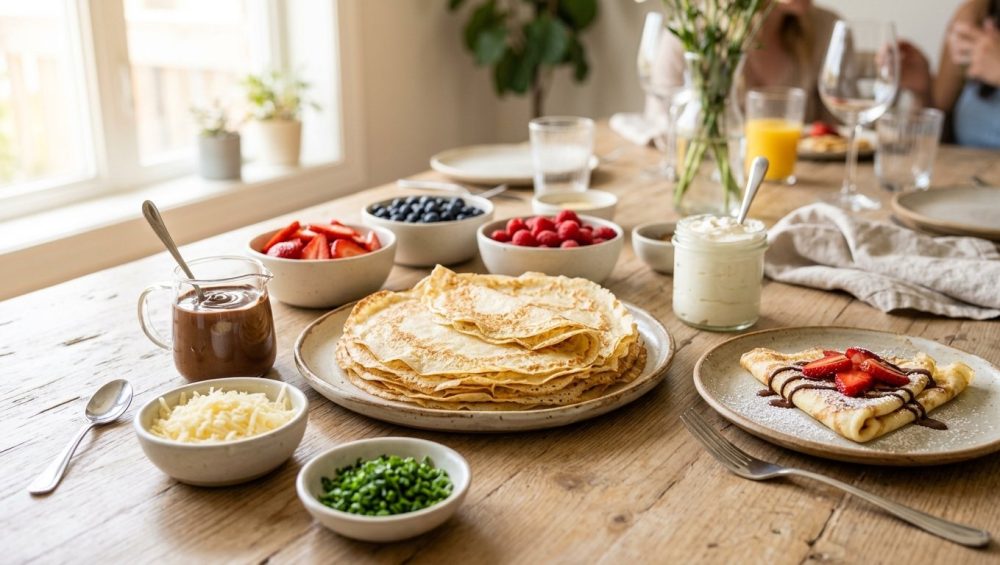
Welcome to 2026, the undisputed era of the “belonging economy” in home hosting. People are completely exhausted by stuffy, pretentious dinner parties where the host is locked in the kitchen, sweating over a twelve-step reduction sauce, while the guests sit awkwardly in the dining room. We want connection. We want intimacy. But as a weekend culinary hobbyist, you still want to show off just a little bit. You want to serve something that looks effortlessly chic but tastes like you secretly graduated from a Parisian culinary academy.
Enter the interactive crepe bar. It is the absolute pinnacle of mindful, low-stress hosting. But there is a glaring issue that plagues almost every home cook who attempts this: the crepes themselves. Instead of delicate, melt-in-your-mouth French lace, you end up chewing on something that has the exact tensile strength and mouthfeel of a yoga mat.
I have set off my smoke detector enough times to tell you exactly where you are going wrong. You do not need a culinary degree to make mind-blowing food, but you do need to understand a tiny bit of basic food science. We are going to deconstruct the exact mechanics of crepe batter, banish the cheap toxic pans ruining your food, and build a foolproof blueprint for a weekend gathering that actually allows you to sit down and drink a glass of wine with your friends.
The Anatomy of a Crepe: Why Yours Currently Taste Like Yoga Mats
Listen to me: if your crepes are tough, rubbery, or tearing the moment you try to flip them, the problem is almost entirely in your batter preparation. It is not your wrist technique, and it is certainly not because you lack some innate French culinary gene. Crepe batter is deceptively simple—just flour, milk, eggs, and butter—but it is highly unforgiving if you disrespect the chemistry of those ingredients.
The Gluten Trap: What Happens When You Overmix
Let’s talk about flour. All-purpose flour contains two crucial proteins: glutenin and gliadin. The moment these proteins come into contact with a liquid like milk or water, they bond together to form a complex, elastic network known as gluten. In the world of baking, gluten is your best friend when you are making a crusty loaf of sourdough bread or a chewy artisan bagel. It provides structure and an aggressive chew.
But we are not making bread. We are making crepes. We want extreme tenderness. When you aggressively whisk your batter by hand to get rid of every last lump, you are rapidly developing those gluten strands. You are essentially creating a microscopic web of elastic bands. When that heavily agitated batter hits a hot pan, the proteins seize, tighten, and contract. The result? A rubbery, dense disc that requires a steak knife to cut through. You have to stop treating your crepe batter like a stress ball.
The Science of Resting: Time is Your Secret Ingredient
This brings us to the single most important step that impatient weekday cooks love to skip, and exactly why your batter needs to rest before it ever sees a stove. When you mix your batter and immediately start ladling it into a pan, the flour has not had time to properly hydrate. The starch granules in the flour need time to absorb the liquid.
If you cook un-rested batter, the water in the milk evaporates instantly upon hitting the hot metal, leaving behind a brittle, dry, and uneven structure. However, if you let the batter sit in the refrigerator for at least two hours—or ideally overnight—two magical things happen. First, the starches fully swell and absorb the liquid, thickening the batter into a cohesive, velvety consistency. Second, that tight, stressed-out gluten network you accidentally created while mixing finally has time to relax. You will witness the magic of resting your batter the moment you pour it; it will spread effortlessly and cook into a tender, pliable masterpiece.
Hydration and Flour Types: Stop Using the Wrong Base
Not all flours are created equal. If you are using bread flour, you are setting yourself up for failure because of its exceptionally high protein content. Standard all-purpose flour is your reliable workhorse here. For traditional French savory crepes, known as galettes, you should absolutely be using buckwheat flour. Buckwheat is naturally gluten-free, which means you cannot overwork the gluten, but it behaves entirely differently when hydrating. It requires more liquid and a longer resting period to allow the natural microorganisms to break down the starches and develop that signature earthy, nutty flavor.
The Structural Role of Eggs and Butter
Eggs are the structural backbone of the crepe. While flour provides the bulk, the proteins in the egg whites coagulate upon hitting the heat, giving the crepe the flexibility it needs to be folded, rolled, and stuffed without falling apart. The yolks provide richness, a gorgeous golden hue, and emulsifying fats that tenderize the crumb. If you try to make a crepe with just flour and milk, you will end up with a brittle cracker.
Butter, specifically melted butter whisked directly into the batter, acts as an internal lubricant. It coats the flour particles, physically inhibiting excessive gluten formation. It also ensures the cooked crepe remains soft and pliable as it cools, rather than drying out and cracking on your guests’ plates.
The Equipment: Burn Your Toxic Pans (Seriously)
We need to have a serious, brutally honest conversation about the equipment you are using. I have a strict “no-go” rule in my kitchen, and it applies to the cheap, peeling, mystery-metal pans you bought on clearance five years ago.
The Truth About Peeling Non-Stick and Mystery Metals
There is a very specific, highly concerning reason your non-stick pans keep losing their slip after only a few months of use. Traditional non-stick coatings made with PTFE (commonly known by the brand name Teflon) degrade rapidly when exposed to high heat. When you crank your stove up to preheat that flimsy aluminum pan, the synthetic coating begins to break down, releasing invisible fumes and gradually flaking microscopic chemical polymers directly into your food.
I am absolutely militant about banishing toxic kitchen gear from my home, and you should be too. You do not want PFAS or “forever chemicals” leaching into your beautiful weekend brunch. Throw away the scratched non-stick pan. It is ruining your food, it is ruining your health, and it is the reason your crepes are sticking to the center and tearing at the edges.
The Safe, High-Performance Alternatives You Actually Need
If you want to cook like an expert, you need to use what the experts use: carbon steel. A carbon steel crepe pan is the holy grail of French cooking. It is lighter and more responsive than cast iron, meaning it heats up quickly and reacts instantly when you turn the dial on your stove down. Yes, it requires seasoning. You will need to build up a natural patina of polymerized oil, but once you do, it becomes a naturally non-toxic, fiercely non-stick surface that will literally outlive you.
If the idea of seasoning a pan gives you weeknight anxiety, your backup option is a high-quality, heavy-bottomed ceramic-coated pan. Ceramic pans use a silica-based sol-gel coating that is free of PTFE and PFAS. They are brilliantly non-stick right out of the box. Just be aware that ceramic coatings are fragile; they will eventually lose their slickness after a year or two of heavy use, but at least when they degrade, they aren’t off-gassing toxic chemicals into your kitchen.
Maintaining Your Carbon Steel Investment
Once you have banished your toxic pans, you must learn to care for your carbon steel. Never, ever put it in the dishwasher. Never soak it in soapy water overnight. When you finish cooking your crepes, simply wipe the pan out with a dry paper towel while it is still warm. If there are stubborn bits of food, use a gentle scrub brush and hot water, then immediately dry the pan bone-dry on the stove over low heat. Wipe a microscopic layer of neutral oil over the cooking surface before putting it away. This simple ritual ensures your pan will remain flawlessly non-stick for decades, passing down through generations rather than ending up in a landfill every two years.
The Foolproof Master Batter Recipe (and Technique)
We survive the weekdays with clever shortcuts so we can afford to be absolute perfectionists on the weekend. But honestly, making crepe batter is where ruthless efficiency and culinary perfection perfectly align.
The Blender Hack: Efficiency Meets Perfection
Put down the whisk. The absolute best way to make crepe batter is in a standard countertop blender. By dumping all your ingredients into a blender jar and blitzing it on high for exactly twenty seconds, you achieve two things. First, you completely obliterate any dry pockets of flour, ensuring a perfectly smooth batter without the risk of over-agitating the dough by hand for ten minutes. Second, the rapid spinning blades actually shear and cut the protein strands, minimizing gluten development right from the start. The blender also aerates the batter, introducing tiny micro-bubbles that contribute to a lighter, more delicate final texture. Just remember, even with the blender hack, the batter still absolutely must rest in the fridge so the starches can hydrate.
The Perfect Consistency: Chasing “Heavy Cream”
The master ratio for classic French crepes is incredibly simple, but it must be followed by weight, not volume.
- 120g All-purpose flour
- 250g Whole milk (do not use skim; you need the fat and milk solids for browning)
- 100g Eggs (exactly two large eggs)
- 15g Melted butter (adds flavor and pliability)
- 2g Salt
- 10g Sugar (only if making sweet crepes; omit for savory)
When you blend this together, the consistency should mimic heavy cream. It should be highly pourable, coating the back of a spoon but sliding off easily. If it resembles pancake batter, it is entirely too thick, and you will end up with spongy flatbreads instead of delicate crepes. Stop eyeballing it with measuring cups. Buy a cheap digital scale and weigh your ingredients. Precision buys you perfection.
The Art of the Pour and Flip
Cooking the crepe is a sensory experience. You have to watch, listen, and feel the heat. This is where most weekend hobbyists panic, but I promise you, with a little thermodynamic awareness, it is completely foolproof.
Temperature Control: The Leidenfrost Effect and Butter Sizzles
If you are using a carbon steel or stainless steel pan, temperature control is your primary weapon against sticking. You can rely on the magic of the water drop test to evaluate your preheating progress. This test is based on the Leidenfrost effect, a physics phenomenon where water hits a surface so hot that it instantly vaporizes its bottom layer, creating an insulating cushion of steam that allows the water droplet to glide around like a mercury ball.
This is the exact same scientific principle you would utilize for stick-free searing on stainless steel when cooking a chicken breast. However, there is a massive caveat for crepes: full Leidenfrost temperatures (around 370°F to 450°F) are actually too hot for butter. If you drop butter into a pan at that extreme temperature, the milk solids will instantly burn and turn acrid.
For crepes, you want the pan just slightly below that extreme threshold. When you flick a tiny droplet of water into the pan, it should sizzle aggressively and evaporate within a second or two. When you add a tiny dab of butter and wipe it around with a paper towel, it should foam and sizzle gently, not smoke aggressively.
The Wrist Flick: Spreading the Batter Like a Pro
Once your pan is perfectly heated and lightly greased, lift it off the heat source entirely. Pour exactly one-quarter cup (or a standard ladle’s worth) of batter directly into the center of the pan. Immediately tilt and swirl the pan using a confident, circular wrist motion. The goal is to encourage the batter to race around the outer edges before the heat of the metal sets the proteins.
You have about three seconds to do this. If the pan is too hot, the batter will instantly cook and seize into a thick, lumpy mess in the center. If it is too cold, the batter will pool lazily and stick to the metal. Once the batter is spread paper-thin, place it back on the heat for about 45 to 60 seconds. When the edges start to turn golden brown and pull away from the sides of the pan, slide a thin offset spatula underneath, confidently lift, and flip. The second side only needs about 20 seconds.
Designing the Mindful Crepe Bar: Low-Stress Hosting
Now that you have mastered the science of the crepe, let’s talk about the gathering. The hospitality trends of 2025 and 2026 have shown a massive shift away from formal, rigid dining toward the “belonging economy”. Your guests do not want to sit stiffly at a formal table while you stress out in the kitchen; they want to interact, customize their meals, and feel like they are part of the process.
If you want to host a relaxed dinner party, an interactive crepe bar is the ultimate cheat code. It shifts the burden of plating and assembly entirely onto your guests, transforming the meal into a communal, engaging activity.
The Psychology of Communal Eating
The shift toward the “belonging economy” is rooted in a deep psychological need for connection in an increasingly digital world. When you host a traditional dinner party, the rigid structure of sitting at a formal table while being served plated courses creates an inherent hierarchy: the host as the exhausted servant, the guests as the passive audience.
An interactive crepe bar shatters this dynamic. When guests are standing around the kitchen island, ladling their own fillings, folding their own crepes, and laughing at their own messy creations, the pressure completely evaporates. It fosters a sense of shared vulnerability and active participation. People bond over the act of building their food. It transforms a simple meal into an immersive experience where everyone feels a profound sense of ownership and belonging.
The Prep-Ahead Strategy: Do the Work on Thursday
Time is money, and stress is the enemy of a good host. The beauty of this menu is that almost everything can be done days in advance. Because we know that our batter needs to rest to hydrate the starches, you can make your batter on Thursday evening for a Saturday brunch. The batter will happily sit in an airtight container in the back of your refrigerator for up to 48 hours, developing incredible flavor and the perfect relaxed texture.
You can also prep all of your fillings the day before. Chop your vegetables, grate your cheeses, and whip your cream. When Saturday arrives, your only job is to stand at the stove with a glass of wine, swirling batter and handing warm crepes to your friends as they pass through the kitchen.
Setting the Stage: Flow and Ergonomics for Guests
To prevent a traffic jam in your kitchen, you must design your crepe station with basic ergonomics in mind. Create a linear flow. Start with a stack of warm plates at one end of the island. Next, place the freshly cooked crepes under a clean, slightly damp kitchen towel to keep them warm and pliable.
Follow this with the savory fillings, then the sweet fillings, and finally the garnishes and utensils. You might wonder why you need a bench scraper for a crepe party, but it is the ultimate tool for quickly scooping up large volumes of diced ingredients from your cutting board into your serving bowls during prep, keeping your station immaculate.
The Fillings: Sweet, Savory, and Spectacular
A truly spectacular crepe bar requires a balance of textures and flavors. You want a mix of rich, acidic, crunchy, and smooth components. Do not overcomplicate the offerings; curate a few high-quality ingredients that pair well together.
The Savory Station: Gruyère, Mushrooms, and Proteins
For the savory route, classic French ingredients are unbeatable. Offer a bowl of finely grated Gruyère cheese, thinly sliced high-quality ham, and a pan of deeply caramelized onions.
Sautéed mushrooms are a must, but ensure you cook the water out of them entirely; excess moisture is the enemy of a delicate crepe. You will quickly understand why your cheese sauce breaks or your crepe turns into a soggy disaster if you overload it with wet, weeping vegetables. Keep the savory fillings robust but relatively dry. A simple garnish of fresh chives or a handful of peppery arugula tossed in lemon juice provides the perfect acidic bite to cut through the rich cheese.
The Sweet Station: Macerated Berries, Chocolates, and Creams
For the dessert phase, the options are limitless, but classic combinations always win. A jar of high-quality hazelnut spread, lightly warmed so it drizzles easily, is mandatory.
Macerated strawberries—sliced and tossed with a spoonful of sugar and a splash of Grand Marnier—create their own beautiful syrup. Fresh herbs can elevate a sweet crepe unexpectedly; a little finely chopped mint over berries is divine. Just be sure to store your herbs properly in a slightly damp paper towel in the fridge so you don’t watch your fresh herbs get slimy before the party even begins. Finish the sweet station with a bowl of freshly whipped cream, lightly sweetened and hit with a dash of real vanilla bean paste, and a shaker of powdered sugar.
Troubleshooting Crepe Tragedies: Quick Fixes for Panic Moments
Even with the perfect batter and the best carbon steel pan, the first crepe is almost always a disaster. We call it the “chef’s tax.” You eat it over the sink, adjust your variables, and move on. Here is how to fix the most common issues on the fly:
Tearing When Flipping: If your crepe is tearing, your pan is likely not hot enough, meaning the proteins haven’t fully set before you tried to force the spatula under it. Alternatively, your batter might be slightly too thin, lacking the structural integrity to hold together. Wait an extra ten seconds before flipping.
Rubbery and Tough: If your crepes are dense and chewy, you either overmixed the batter, added too much flour, or—most likely—refused to let the batter rest. If you are in the middle of cooking and notice this, there is no quick fix for un-rested gluten, but adding a tiny splash of melted butter or milk to the remaining batter can sometimes tenderize the next batch slightly.
Lacy, Crispy, and Blistered: If your crepe looks like a burnt doily with massive craters and crispy edges, your pan is way too hot. The moisture in the batter is flash-boiling the second it hits the metal, creating massive steam pockets. Turn your burner down, remove the pan from the heat for a full minute to cool, and wipe out any excess butter. You want a whisper of grease, not a deep-frying pool.
Conclusion: Empowering Your Inner Weekend Chef
Cooking beautiful, professional-level food at home does not require a culinary degree, a brigade of sous-chefs, or a kitchen full of pretentious, single-use gadgets. It simply requires an understanding of the basic science behind your ingredients and a refusal to settle for toxic, low-quality cookware.
By respecting the hydration of your flour, mastering the thermodynamics of a real carbon steel pan, and embracing the prep-ahead philosophy of modern hosting, you can completely eliminate the stress of entertaining. The interactive crepe bar is more than just a meal; it is a blueprint for mindful connection. So whisk that batter, let it rest, pour yourself a generous glass of wine, and invite your friends over. You’ve got this.






