
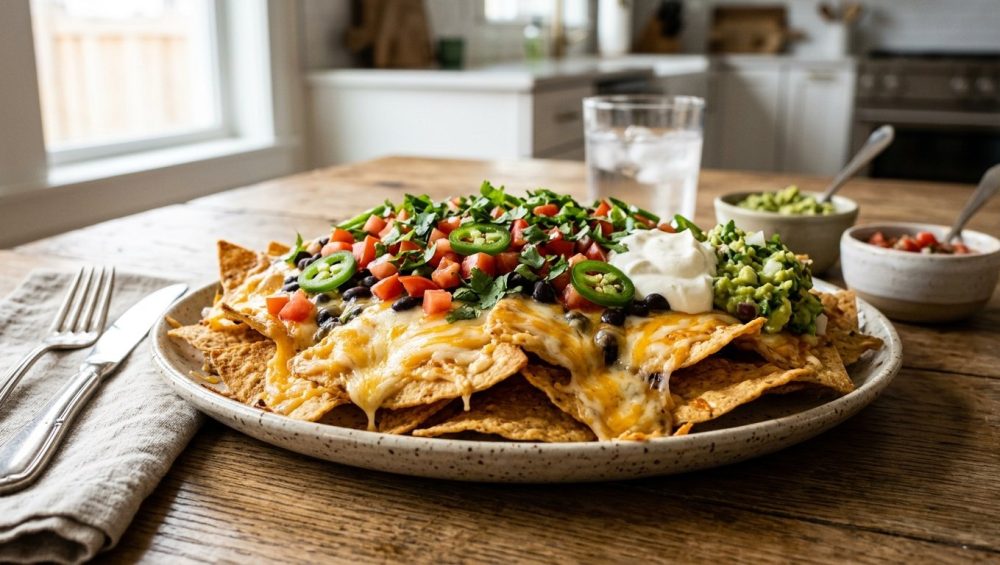
We need to have a very serious, brutally honest conversation about the elephant in the room—or rather, the soggy, depressing pile of mush currently masquerading as an appetizer on your coffee table. You know exactly the scenario I am talking about. You invite friends over, you start with a glorious mountain of crispy tortilla chips, you pile on an ungodly amount of wet toppings, and you throw the entire chaotic mess into the oven. Ten minutes later, you pull out a structural disaster. The top layer is a scorched, greasy catastrophe, and the bottom layer has dissolved into a wet, sad sponge that requires a spoon to eat. It is a culinary tragedy, and frankly, as a self-respecting home cook, you deserve better.
As someone who has set off the smoke detector more times than I care to admit while learning the ropes, I have zero patience for recipes or techniques that set you up for failure. We are not running a Michelin-starred restaurant out of our home kitchens, but we are absolutely not eating garbage, either. Weeknights are for speed, efficiency, and clever shortcuts, but weekends? Weekends are for perfection. And building a mindful nacho bar—a structured, communal feast where every single chip remains perfectly crispy from the first bite to the last—is the epitome of weekend perfection. It requires no pretentious culinary degree, just a basic understanding of moisture-barrier science, the thermodynamics of cheese melting points, and a healthy dose of unapologetic snark about your terrible bakeware.
The Tragic Physics of a Soggy Chip (And How to Defeat It)
Moisture: The Ultimate Enemy
Let’s get one fundamental rule straight before we go any further: moisture is the mortal enemy of the tortilla chip. When you dump a jar of watery salsa, a mound of wet black beans, or a pile of greasy, un-drained beef directly onto naked chips, you are committing a crime against texture. To understand why this happens, we need to look at the physics of the chip itself.
Tortilla chips are essentially dehydrated, fried starch matrices. During the frying process, the moisture inside the corn dough rapidly evaporates, leaving behind a porous, crispy network of starches and proteins. When these porous chips are exposed to liquid, capillary action takes over. They act like aggressive little sponges, drawing water deep into their core. The starches retrograde, absorbing the liquid until their structural integrity completely collapses. By the time your guests dig in, they are no longer eating a chip; they are scooping up a soggy, unappetizing paste.
The Structural Integrity of the Tortilla Chip
Not all chips are created equal, and your choice of base material will make or break your entire operation. If you are buying those paper-thin, delicate “restaurant-style” chips for a fully loaded nacho bar, you are setting yourself up for heartbreak. Those wispy little triangles are designed for gently dipping into a shallow bowl of salsa, not for supporting the architectural weight of a half-pound of beef, beans, and melted cheese.
You need heavy-duty, thick-cut corn tortilla chips. The secret to their strength lies in a centuries-old Mesoamerican process called nixtamalization. During this process, dried corn kernels are steeped and cooked in an alkaline solution (usually water mixed with slaked lime or calcium hydroxide). This alkaline bath breaks down the hemicellulose in the corn’s cell walls, significantly altering its chemical structure. It makes the corn easier to grind into masa, dramatically improves its nutritional profile by freeing up niacin, and creates a dough that, when fried, forms an incredibly sturdy, robust chip [1]. A thicker, properly nixtamalized chip has a lower surface-area-to-volume ratio, meaning it takes significantly longer for moisture to penetrate to its core. When building your base, seek out thick, stone-ground yellow or white corn chips. Leave the delicate stuff for the dip bowls.
The Science of the Moisture Barrier
Cheese as Spackle: Building the Foundation
Here is the million-dollar secret to a mindful nacho bar, the technique that separates the amateurs from the weekend culinary warriors: the pre-bake cheese barrier. Before you even think about adding wet ingredients like beans, meat, or salsas, you must lay down a foundational layer of cheese directly onto the naked chips and bake it for a few minutes.
Why? Because melted cheese is predominantly milk fat, and fat is hydrophobic (water-repelling). When the cheese melts over the chips, it fills in the porous gaps and creates a literal physical shield over the starch matrix. This cheese spackle acts exactly like a tarp on a leaky roof. Once that hydrophobic barrier is set, you can pile on the heavier, wetter toppings without fear of the moisture soaking through to the chip below. It is a simple, extra five-minute step that completely revolutionizes the texture of your final dish.
The Fat-to-Moisture Ratio in Toppings
Even with an impenetrable cheese barrier, you still need to rigorously manage the moisture levels of your toppings. If you are browning meat for your nachos, you must ensure you cook off the excess liquid. There is a scientific reason why your ground beef steams instead of developing a beautiful, flavorful sear—you are likely crowding the pan and trapping the water released by the meat. Drain your meat thoroughly before it ever touches a chip.
The same rule applies to beans and vegetables. If you are using canned black beans, rinse them and dry them on a paper towel. If you are using refried beans, heat them up in a separate skillet to evaporate excess water, and dollop them onto the chips strategically rather than smearing them into a wet, heavy cement layer. Every single ounce of water you eliminate during your prep phase is an ounce of crispiness saved for the final bite. And if you are making a homemade chili topping from scratch, remember that acid prevents starches from softening; this is exactly why your beans stay hard if you add acidic tomatoes to the pot before the legumes are fully tender. Cook your components properly before they join the nacho assembly line.
Choosing Your Arsenal: Safe, Non-Toxic Bakeware
Why Your Cheap Baking Sheet is Ruining Your Life
We need to have a very serious, brutally honest talk about the toxic wasteland currently residing in your kitchen cabinets. If you are baking your nachos on a scratched, peeling, flimsy non-stick baking sheet that you bought for five dollars a decade ago, you are doing it wrong. I have a strict “no-go” rule on toxic gear, and you should too.
Those cheap non-stick coatings are often loaded with PFAS (per- and polyfluoroalkyl substances), notoriously known as “forever chemicals.” These synthetic chemicals are so insidious, bioaccumulative, and harmful to human health and the environment that global regulators are actively outlawing them. Major bans on PFAS in food packaging and cookware are taking effect across multiple US states (including Minnesota, Colorado, and Maine) and the European Union throughout 2025 and 2026 [2, 4]. When you blast a cheap, scratched non-stick pan in a 400-degree oven, you are risking chemical off-gassing directly into your food.
Beyond the severe health risks, those flimsy pans are a functional nightmare. They lack thermal mass and warp violently under high heat. If you’ve ever nearly jumped out of your skin because your baking sheets warp with a loud “pop” in the middle of a bake, it is because thin, cheap metal expands unevenly. Stop ruining your nonstick pans with aerosol cooking sprays (which contain propellants that bake into a sticky, impossible-to-remove residue) and high heat. Just throw the toxic, warped metal in the recycling bin where it belongs.
The Heavyweight Champions: What to Use Instead
For a proper, evenly cooked nacho bar, you need bakeware with serious thermal mass and durability. A heavy-duty, uncoated aluminized steel or tri-ply stainless steel half-sheet pan is your best friend. Yes, you might be terrified of cooking without a chemical coating because you don’t understand why everything sticks to your stainless steel pans, but for nachos, the solution is laughably simple: a single sheet of unbleached parchment paper. It completely solves the sticking problem without introducing forever chemicals into your appetizer.
Alternatively, a large, well-seasoned carbon steel baking steel or a safe, high-quality ceramic-coated pan will distribute heat evenly across its entire surface. High thermal emissivity ensures that the chips in the dead center of the pan crisp up just as beautifully as the ones on the outer edges, eliminating the dreaded “soggy middle” syndrome.
The Great Cheese Debate: Melting Points and Chemistry
The Pre-Shredded Trap (A Culinary Crime)
If you take away nothing else from this exhaustive masterclass, let it be this: never, ever use pre-shredded bagged cheese for nachos. I will say it louder for the people in the back. Buying pre-shredded cheese is a culinary crime that sabotages your meal before it even begins.
Pre-shredded bagged cheese is heavily coated in anti-caking agents—typically cellulose (which is literally refined wood pulp), potato starch, and sometimes natamycin (an antifungal preservative). These powders are added to keep the individual shreds from clumping together during transit and storage. While this is great for extending shelf life, it is an absolute disaster for melting. Those starches inhibit the milk proteins and fats from flowing together smoothly under heat. This chemical interference is exactly why your cheese sauce gets grainy and why your baked nachos end up with a powdery, greasy, separated film instead of a glorious, elastic cheese pull.
Buy a block of high-quality cheese and grate it yourself. It takes exactly sixty seconds with a standard box grater. I know time is money, but ruining a weekend masterpiece to save one minute of prep time is just terrible math. And a quick pro-tip: if your block of cheese crumbles when sliced or grated, it means it is either too cold straight out of the fridge or too deeply aged. Let it temper on the counter for ten minutes before grating.
The Best Cheeses for Maximum Melt and Minimal Grease
Cheese melting is not magic; it is pure, predictable chemistry. Cheese is essentially a complex emulsion of water, liquid milk fat, and solid milk proteins (primarily caseins) held together by calcium bonds. When heat is applied, the protein matrix relaxes, allowing the trapped fat and water to flow together as a liquid.
Young cheeses with a high moisture content and a pH level around 5.3 to 5.5—like Monterey Jack, Oaxaca, Asadero, and young white cheddar—melt into a beautiful, cohesive blanket because they have enough retained water to sustain the emulsion [1]. They melt smoothly and evenly at around 130°F to 150°F (54°C to 65°C). Monterey Jack is the undisputed king of the nacho melt, while Oaxaca (a Mexican stretched-curd cheese similar to mozzarella) provides an unmatched, dramatic cheese pull.
Deeply aged cheeses, like sharp cheddar, aged gouda, or Parmesan, have lost a significant amount of their moisture during the aging process. Their protein webs have been broken down by enzymes into tight, brittle clumps. When you blast these aged cheeses with high heat, their weakened emulsion breaks entirely. Without enough water to keep things cohesive, the fat rapidly separates from the proteins, leaving you with a disgusting puddle of orange grease and tough, chewy clumps of milk solids.
For the ultimate nacho bar, use a 50/50 blend. Grate a generous amount of Monterey Jack or Oaxaca for the supreme, gooey melt, and blend it with a mild-to-medium Cheddar to provide that classic, sharp, tangy flavor profile without breaking the emulsion.
The Art of Layering: A Structural Engineering Masterclass
The Base Layer: Wide and Shallow
The biggest rookie mistake in nacho history is the “mountain” build. Piling chips into a massive, towering pyramid on a small plate guarantees failure. It ensures that the chips in the center will be completely barren and dry, while the ones on the outside will be crushed under a suffocating pound of toppings. You are not building the Great Pyramid of Giza; you are building a wide, shallow, structurally sound foundation.
Spread your sturdy, thick-cut chips in a single, slightly overlapping layer (aim for about a 20% to 30% overlap) across your heavy-duty sheet pan. Every single chip must have direct, unimpeded access to the cheese layer. No chip left behind.
The Middle Ground: Distributing the Wealth
Once your base layer is down, apply your moisture-barrier cheese spackle. Bake it for 3 to 4 minutes until the cheese is just melted and the hydrophobic seal is established. Remove the pan from the oven.
Now, and only now, do you add your warm, pre-cooked toppings. Distribute your well-drained seasoned beef, your simmered black beans, or your grilled chicken evenly across the landscape. Do not dump them in a massive pile in the center. Use the micro-layering technique: sprinkle small amounts of each ingredient so that every chip has a little bit of everything. Follow this with a second, lighter layer of your freshly grated cheese blend. This top layer acts as the glue, binding the heavy toppings to the base so they don’t roll off when you pick up a chip.
The Crown Jewels: Post-Bake Toppings
This is where the “mindful” part of the nacho bar truly shines. Never, under any circumstances, bake your cold, fresh ingredients. Baking sour cream, guacamole, lettuce, or fresh pico de gallo is a surefire way to introduce massive amounts of water into your perfectly engineered structure, instantly turning it into soup.
After the final bake, set up a customizable topping station. Let your guests add their own fresh, vibrant ingredients to their individual plates. The contrast between the hot, salty, fatty base and the cold, acidic, fresh toppings is what makes nachos a perfectly balanced dish. If you are prepping ahead and wondering why your guacamole turns brown before the party even starts, remember that oxygen is the enemy. Keep it sealed with a thin layer of water or lime juice pressed directly against the surface until the exact moment of serving. And please, use glass or stainless steel bowls for your prep; there is a very scientific reason why your plastic containers stay greasy and hold onto foul odors long after the party is over, as plastic is highly porous and absorbs lipophilic (fat-loving) compounds.
Temperature and Timing: The Thermodynamic Sweet Spot
Baking vs. Broiling: A Dangerous Game
There is a fierce, ongoing debate in the culinary world about the ideal oven temperature for nachos. Let me settle it for you right now: 350°F to 400°F (175°C to 200°C) is the thermodynamic sweet spot [8].
If you bake them at 350°F, you are utilizing a foolproof, gentle convective heat. This temperature provides enough ambient heat to melt the cheese thoroughly and warm the toppings without immediately scorching the delicate edges of the chips. It takes about 5 to 7 minutes for the final bake. If you are confident, keeping a close eye on the oven, and want a faster, crispier result, 400°F will get the job done in about 4 to 5 minutes [8].
Do not use the broiler unless you enjoy living dangerously and eating ash. The broiler provides intense, direct, radiant heat from the top down. It will violently scorch the exposed tips of your tortilla chips in seconds, turning them black and bitter, while leaving the cheese and toppings hidden in the center completely unmelted and cold [7]. Stick to the standard bake or convection setting for even, surrounding heat.
The Resting Period (Yes, Nachos Need to Rest)
You rest your expensive steaks to redistribute juices, you rest your pancake batter to hydrate the flour, and yes, you absolutely must rest your nachos. When you pull that blazing hot sheet pan out of the oven, the melted cheese is essentially liquid magma. The fats are highly fluid, and the chips are superheated.
If you dive in immediately, the cheese will slide right off the chips, leaving the toppings behind on the parchment paper, and you will undoubtedly burn the roof of your mouth. Let the pan sit at room temperature for exactly two to three minutes. This brief resting period allows the temperature to drop just enough for the cheese lipids to slightly coagulate and bind to the chips and toppings. This ensures that when you pull a chip from the pile, the toppings actually come with it, locked in place by the cooling cheese matrix.
Executing the Mindful Nacho Bar
Prep Strategy: Efficiency is Everything
I am a firm believer that time is money, especially when you are hosting a gathering. The beauty of a mindful nacho bar is that 90% of the work can (and should) be done well in advance. This is where your weeknight efficiency skills pay off for a weekend feast.
Grate your cheese, cook and drain your proteins, simmer your beans, and chop your fresh garnishes hours before your guests arrive. Store them in high-quality, odor-free glass containers in the fridge. Speaking of prep, if you are wondering why your spatula smells like garlic from your last cooking session, it is because cheap, low-grade silicone absorbs volatile flavor compounds. Upgrade to high-grade, non-porous platinum silicone tools for your prep work to avoid cross-contaminating your sour cream with yesterday’s stir-fry.
When it is time to eat, assembly takes less than five minutes, and the baking takes another seven. You get to spend your evening actually enjoying your friends’ company, sipping a drink, and relaxing, instead of sweating over a hot stove while everyone else has fun.
The Setup: Guiding Your Guests
A mindful gathering is about intentionality, flow, and eliminating stress for both the host and the guests. Place the hot sheet pan of perfectly engineered nachos (safely rested on a large heat-proof trivet or wooden board) at the center of your kitchen island or dining table.
Surround the master pan with small, beautiful bowls of your cold, fresh toppings: vibrant red and green salsas, cooling sour cream, sharp pickled red onions, fresh cilantro, and sliced jalapeños. Provide small serving tongs or spoons for each bowl. This communal setup empowers your guests to customize their own perfect bite. They can load up their individual plates with the hot, crispy base, and then garnish exactly to their liking without compromising the structural integrity of the main dish on the sheet pan. It transforms a historically messy, chaotic, and often disappointing appetizer into an interactive, elevated, and deeply satisfying dining experience.
You do not need a culinary degree to make mind-blowing food at home. You just need to stop sabotaging yourself with bad techniques, toxic equipment, and pre-shredded cheese. By respecting the physics of the tortilla chip, mastering the science of the moisture barrier, and understanding basic cheese chemistry, you can elevate the humble nacho from a soggy pub-grub disaster into a structurally sound, incredibly delicious masterpiece. So ditch the flimsy baking sheets, grate your own cheese, and reclaim your weekend. Your tastebuds—and your guests—will thank you.






