
We have all experienced the profound, soul-crushing disappointment of a bad meatball. You know exactly what I am talking about. You invite your friends over for a weekend dinner party, pour yourself a generous glass of Pinot Noir, and spend an hour lovingly rolling ground beef and pork into perfectly uniform spheres. You sear them, you simmer them in a beautiful San Marzano tomato sauce, and you serve them over a bed of fresh pasta.
Then, you take a bite.
Instead of yielding to your fork with tender, melt-in-your-mouth grace, the meatball fights back. It is dense. It is rubbery. It has the structural integrity of a Titleist golf ball and the moisture content of the Sahara Desert. You chew, and you chew, and you wonder why the universe is punishing you.
Listen to me: you are not a bad cook. You do not need a culinary degree from Le Cordon Bleu to make restaurant-quality food in your standard home kitchen. What you need is a basic understanding of food science and the willingness to throw out outdated cooking myths. If you are tired of serving dry, heavy ground meat dishes and want a foolproof method for preventing tough and dense results, you have come to the right place. Grab your wine, pull up a stool, and let’s talk about the magic of the panade.
The Anatomy of a Meatball: Why Ground Meat Wants to Seize
To understand how to fix a tough meatball, we first have to understand why meat gets tough in the first place. I promise I will keep the pretentious chef-speak to a minimum, but we need to talk a little bit of science.
Ground meat is essentially a chaotic, microscopic web of chopped muscle fibers, fat, and connective tissue. When you apply heat to meat, the proteins inside those muscle fibers completely freak out. This process is called denaturation.
There are three major proteins you need to care about: myosin, collagen, and actin.
- Myosin is the first to tap out. It begins to denature and coagulate around 122°F to 144°F (50°C to 62°C). This is the stage where your meat transitions from raw and translucent to cooked and opaque.
- Collagen, the connective tissue, begins to shrink violently around 158°F (70°C).
- Actin is the final boss. It denatures around 180°F (82°C). When actin denatures, the protein strands aggressively cross-link and bind together.
Imagine a net made of rubber bands. As the meat cooks and these proteins denature, the rubber bands shrink, tighten, and squeeze together. What happens when you squeeze a wet sponge? The water pours out. This is exactly what happens inside your meatball. The tightening protein matrix physically squeezes the natural water and rendered fat right out of the meat. This is the exact same reason why a poorly cooked burger shrinks in the pan, sitting in a puddle of its own juices, steaming instead of browning.
Because ground meat has been run through a meat grinder, the muscle fibers are chopped up, exposing exponentially more surface area than a solid steak. This means it is even easier for that precious moisture to escape during the cooking process. Left to its own devices, cooked ground meat is destined to become a dry, crumbly mess.
The Dry Breadcrumb Delusion
If ground meat is naturally prone to drying out, why on earth do so many traditional recipes instruct you to dump a cup of dry, dusty breadcrumbs straight into the mixing bowl?
This is one of the most pervasive and destructive myths in home cooking. Somewhere along the line—probably in a 1950s cookbook focused on stretching expensive meat rations—someone decided that dry breadcrumbs were a necessary “binder.” Yes, they bind things. But at what cost?
When you mix dry breadcrumbs into raw ground beef, those crumbs act as a desiccant. They are literal moisture vampires. Before the meat even hits the hot pan, the dry bread is already aggressively absorbing the natural water and fat from the meat.
Then, when you cook the meatball and the proteins begin their inevitable shrinking and squeezing routine, the dry breadcrumbs offer absolutely zero protection. In fact, they make it worse. They lock up whatever little moisture is left, leaving the meat proteins to cross-link and seize unhindered. You end up with a crumbly, heavy matrix of overcooked protein and soggy bread. It is a culinary tragedy, and we are stopping it today.
Enter the Panade: The Culinary Forcefield
If dry breadcrumbs are the villain, the panade is the superhero swooping in to save your dinner party.
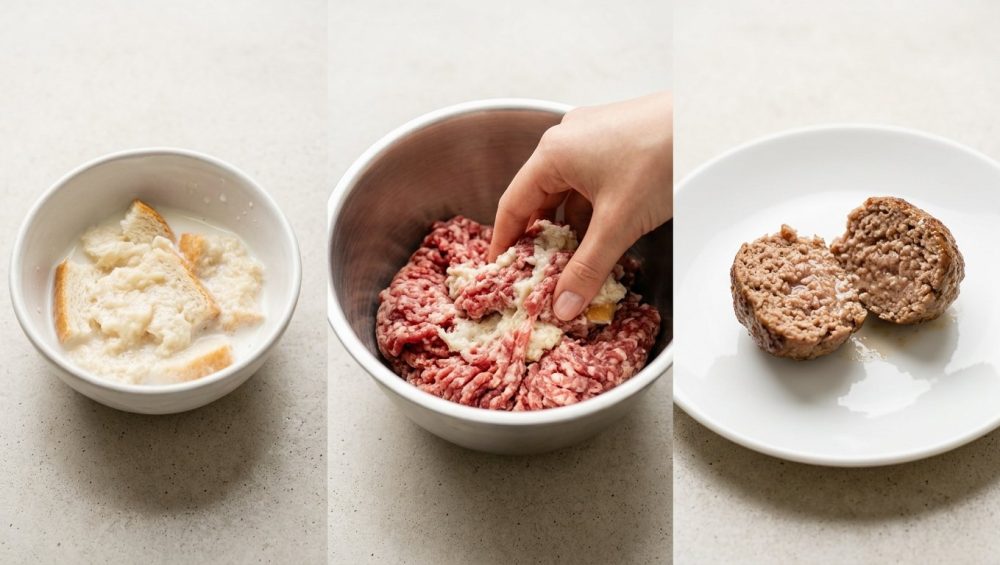
A panade (pronounced pah-NAHD) is a mixture of starch and liquid—usually bread and milk—that is mashed together into a thick, homogenous paste before being folded into ground meat. It is a technique that has been used by clever European grandmothers for centuries, and it is the absolute secret weapon of the modern home cook.
Here is the brilliant, simple science behind why it works.
When you soak bread in milk, the starches in the bread become fully hydrated. When you gently mix this wet paste into your ground meat, it coats the chopped muscle fibers. As the meatball cooks and the temperature rises, those hydrated starches undergo a process called gelatinization. They swell and burst, forming a literal starch gel.
This starch gel acts as a physical barrier—a culinary forcefield, if you will. It provides a layer of lubrication between the protein strands. When the myosin and actin try to shrink and cross-link, the starch gel physically gets in their way. It prevents the proteins from binding too tightly to one another.
Because the protein matrix cannot squeeze together tightly, the natural juices and rendered fats remain trapped inside the meatball instead of leaking out into your pan. The result? A meatball that is insanely tender, light, and bursting with juicy flavor, even if you accidentally leave it in the oven a few minutes too long.
The Chemistry of the Perfect Panade
Not all panades are created equal. The ingredients you choose will directly impact the flavor, texture, and browning of your final dish. Let’s break down your options, because I firmly believe that understanding why you are using an ingredient is the key to cooking without a recipe.
The Starch Element
You need a starch that will easily dissolve into a smooth paste.
- White Sandwich Bread: This is the undisputed champion of the panade. Basic, soft, crustless white bread dissolves almost instantly when introduced to liquid. It leaves no hard lumps and has a neutral flavor that lets your meat and aromatics shine.
- Sourdough or Artisan Breads: If you are tackling an elaborate weekend cooking project, using a high-quality sourdough can add a beautiful, tangy depth of flavor to your meatballs. However, you must remove the crusts, and you will need to soak the bread much longer to ensure it breaks down completely.
- Panko Breadcrumbs: If you are rushing to get a weeknight dinner on the table and don’t have fresh bread, Panko is an acceptable substitute. Because Panko is light and airy, it hydrates much faster than dense traditional breadcrumbs.
- Standard Dry Breadcrumbs: Avoid these if possible. If it is an absolute emergency, you can use them, but they require significantly more liquid and resting time to fully hydrate into a gel rather than a gritty paste.
The Liquid Element
While you can technically use water to make a panade, you are missing out on a massive opportunity to build flavor and manipulate the chemistry of the meat.
- Whole Milk: This is the gold standard. Milk is a powerhouse ingredient for a panade. First, it contains calcium, which reacts with the natural enzymes in the meat to gently soften and tenderize the proteins without turning them to mush. Second, milk contains lactose (milk sugar). When exposed to high heat, lactose accelerates the Maillard reaction—the chemical process responsible for that gorgeous, savory brown crust on the outside of your meatball.
- Heavy Cream: If you are using very lean meats, like ground turkey or chicken breast, heavy cream is your best friend. Lean meats lack the natural fat necessary for a juicy mouthfeel. The butterfat in heavy cream artificially replaces that missing fat, ensuring your poultry meatballs don’t taste like dry sawdust.
- Beef or Chicken Stock: If you are dairy-free, a high-quality, low-sodium stock is a fantastic alternative. It adds a massive punch of umami and savory depth, though you will miss out on the tenderizing calcium and the browning benefits of lactose.
- Water: Only use water if you are completely out of everything else. It provides the necessary hydration for the starch gel, but it brings absolutely zero flavor to the party.
Step-by-Step: Constructing the Ultimate Panade
Making a panade takes exactly three minutes of active work, which means you have absolutely no excuse to skip this step, even on a chaotic Tuesday night.
The Golden Ratio: For every one pound (16 ounces) of ground meat, you need approximately 1/2 cup of torn, crustless bread (about one to two slices) and 2 to 3 tablespoons of liquid.
Step 1: Tear and Soak. Tear your bread into small, thumbnail-sized pieces and toss them into a large mixing bowl. Pour your milk (or preferred liquid) evenly over the top.
Step 2: The Hydration Wait. Walk away. Let it sit for at least 5 to 10 minutes. The bread needs time to act like a sponge and pull the liquid into its cellular structure. If you rush this, you will end up with dry lumps of bread in your meatballs, which is a textural nightmare.
Step 3: The Mash. Take a standard dinner fork and aggressively mash the soaked bread. You want to obliterate it. Keep mashing until it transforms into a thick, smooth, homogenous paste. It should look a bit like thick oatmeal or wallpaper paste. If it seems too dry and crumbly, add another splash of milk. If it is swimming in a puddle of unabsorbed liquid, add a tiny pinch of extra bread.
Weeknight Efficiency vs. Weekend Perfection
I am a realist. I know that the way you cook on a Wednesday evening after a nine-hour workday is vastly different from how you cook on a lazy Sunday afternoon. Your panade strategy should adapt to your schedule.
The Weeknight Shortcut
When time is money, skip the artisanal bread. Grab a 1/2 cup of Panko breadcrumbs and 1/4 cup of heavy cream. Toss them in a bowl, give it a quick stir, and let it sit for exactly two minutes while you chop your garlic and open a bottle of wine. Panko’s airy structure absorbs heavy cream almost instantly. The high fat content of the cream will protect the meat, and you can have your meatballs mixed and in the pan in under ten minutes.
The Weekend Masterpiece
When you have the time to be an absolute perfectionist, elevate your panade. Use the crumb of a high-hydration sourdough boule. Soak it in a mixture of whole milk and a splash of homemade, gelatin-rich bone broth. Mash it into a flawless paste, fold it into a custom blend of ground chuck, short rib, and pork shoulder, and let the entire mixture rest in the refrigerator for two hours before rolling. This resting period allows the starches to fully integrate with the meat matrix, resulting in a texture so light and tender it will bring tears to your eyes.
The “No-Go” Rule: Cooking Gear that Ruins Meatballs
We need to have a serious conversation about your cookware. You can craft the most scientifically perfect, panade-infused meatball on the planet, but if you drop it into a cheap, warped, scratched Teflon pan, you are going to ruin it.
I have zero patience for cheap toxic kitchenware. Flimsy non-stick pans are the enemy of good cooking. First, they cannot safely hold the high heat required to properly sear meat. If you push a cheap non-stick pan past 500°F (which happens very quickly on a gas stove), the chemical coating begins to break down and off-gas toxic fumes.
Second, the entire point of a non-stick coating is to prevent food from gripping the pan. But to build a deeply flavorful, caramelized crust on a meatball, the meat needs to temporarily grip the hot metal. You want those beautiful browned bits (the fond) to develop on the bottom of the pan so you can deglaze them into your tomato sauce.
If you are currently cooking with pans that have flaking non-stick coatings, throw them in the garbage immediately. You are eating microplastics, and your food tastes mediocre.
To cook a perfect meatball, you need cookware with high thermal mass—meaning it absorbs heat, holds onto it, and distributes it evenly, even when you drop a pound of cold meat into it.
- Stainless Steel: A heavy-bottomed, multi-clad stainless steel skillet is perfect. Yes, meat can stick to stainless steel, but only if you use it incorrectly. If you drop your meatballs into properly preheated stainless steel with a shimmer of oil, they will sear beautifully and release themselves from the pan the exact second the crust is fully formed.
- Enameled Cast Iron: A wide, enameled cast-iron braiser is my personal favorite for meatballs. It holds heat like a furnace, sears the meat aggressively, and seamlessly transitions from the stovetop to the oven for braising.
- Carbon Steel: If you prefer a naturally non-stick surface without the toxic chemicals, a well-seasoned carbon steel skillet is a phenomenal, lightweight alternative to cast iron.
Mastering the Mix: The “Claw” Method
Now that you have your panade paste and your high-quality cookware, we need to talk about mixing. Ground meat is highly sensitive to mechanical manipulation. Every time you squeeze, press, or knead ground meat, you are encouraging those myosin proteins to cross-link prematurely.
If you treat your meatball mixture like a ball of Play-Doh, forcefully squeezing it through your fingers, you will completely undo the protective benefits of your panade. You will end up with a dense, bouncy sausage patty rather than a delicate meatball.
The Fix: Use the “Claw” method.
Place your ground meat in a large bowl. Add your panade paste, your salt, your herbs, your grated Parmesan, and your beaten egg. Spread your fingers wide like a claw. Gently dig your hand to the bottom of the bowl and lift the meat, folding it over itself. Do this with a light, airy touch. You want to disperse the panade evenly throughout the meat matrix without compressing the muscle fibers. Stop mixing the exact second the ingredients are incorporated.
When it comes time to roll the meatballs, do not aggressively pack them together like a snowball. Scoop the meat and gently roll it between your oiled palms just enough to form a cohesive shape. The looser the pack, the more tender the final bite.
Temperature and Cooking Techniques
You have built the perfect panade and mixed it with the delicate touch of a neurosurgeon. Now, it is time to apply heat. You have three primary options, and the panade will protect your meat in all of them.
1. The Stovetop Sear and Simmer
This is the classic Italian-American method. Heat a tablespoon of neutral oil in your heavy skillet over medium-high heat. Add the meatballs, being careful not to crowd the pan. Let them sit undisturbed for 2 to 3 minutes to achieve a perfect crust. Gently rotate them to brown the other sides. They do not need to be cooked through at this stage. Once browned, pour your simmering marinara sauce directly into the pan, turn the heat to low, cover, and let them gently braise for 20 minutes. The panade will keep the meat incredibly tender while it absorbs the acidic brightness of the tomatoes.
2. The High-Heat Bake
If you are cooking for a crowd and don’t want to stand over a splattering stove, the oven is your best friend. Preheat your oven to 425°F (220°C). Line a heavy rimmed baking sheet with parchment paper. Space your meatballs evenly and bake for 15 to 18 minutes. The high ambient heat will trigger the Maillard reaction on the exterior, while the panade gel protects the interior from drying out.
3. The Direct Braise (No Searing)
If you want the softest, most delicate meatballs imaginable, skip the searing entirely. Bring a pot of rich tomato sauce or chicken broth to a gentle simmer. Gently drop the raw, panade-infused meatballs directly into the bubbling liquid. Cover and simmer gently for 25 minutes. Because you aren’t exposing the meat to high, direct heat, the proteins never seize. The panade binds the meat just enough to keep it from falling apart in the sauce, resulting in a meatball that literally melts in your mouth.
A Quick Note on Seasoning: The panade is a flavor sponge. It will dilute the saltiness of your meat slightly. Make sure you are seasoning your meat mixture aggressively. However, beware of adding salt too early to the raw ground meat and letting it sit overnight, as salt dissolves myosin and will cure the meat, turning your meatballs into springy sausages. Mix your salt in right before you cook.
Advanced Meatball Troubleshooting
Even with a panade, things can occasionally go sideways. Here is how to fix common issues on the fly, because a smart cook knows how to pivot.
Problem: The mixture is way too wet and won’t hold a shape.
- The Fix: You either added too much liquid to your panade, or your ground meat was incredibly fatty. Do not panic. Place the entire bowl in the refrigerator for 20 minutes. The chilling process will firm up the animal fats, making the meat much easier to roll. If it is still impossibly wet, add a tablespoon of dry Panko to absorb the excess moisture, wait five minutes, and try again.
Problem: The meatballs fell apart in the sauce.
- The Fix: You likely didn’t mash your panade thoroughly enough. If there are large, dry chunks of bread in the mixture, they create structural weak points in the meatball. Next time, ensure the panade is a smooth paste. For now, congratulations, you have made a phenomenal, rich meat sauce for your pasta.
Problem: I want a crispy exterior, but they are soft.
- The Fix: If you are baking your meatballs and want a crispy golden brown exterior, make sure you are using a dark, heavy baking sheet, and do not crowd the pan. If the meatballs are too close together, the moisture evaporating from them will create a steam bath, preventing any crisping. Give them space to breathe.
Problem: I am gluten-free. Can I still make a panade?
- The Fix: Absolutely. You can use gluten-free white bread, but be aware that gluten-free flours (like rice flour and tapioca starch) are incredibly thirsty. You will likely need to add 25% more liquid to the panade to ensure it hydrates fully into a paste rather than a gritty sand. Alternatively, you can use a small amount of mashed potatoes or even ricotta cheese to provide structural moisture, though it won’t form the exact same protective starch gel.
Problem: I am dairy-free. What liquid should I use?
- The Fix: Swap the milk for a rich, unsalted beef or chicken stock. It provides the liquid necessary to hydrate the starch while adding a massive boost of savory flavor. Avoid using sweet plant milks like almond or vanilla oat milk, unless you want your meatballs to taste like a breakfast cereal. Unsweetened, unflavored soy milk is the closest chemical match to dairy milk if you want a neutral liquid.
Problem: The cleanup is a nightmare.
- The Fix: If you stored your raw, panade-heavy meatball mix in a plastic Tupperware container, the animal fats and starches will cling to it like glue. If you find your plastic containers stay greasy no matter how much you scrub, stop using hot water first. Rinse the container with cold water and dish soap to break the fat bonds, then switch to hot water. Or better yet, switch to glass prep bowls.
The Final Verdict
Cooking is not about blindly following a list of ingredients; it is about understanding the mechanics of your food. When you understand that heat makes protein tighten, and that a hydrated starch gel physically prevents that tightening, you unlock the ability to control your outcomes.
You do not have to accept dry, heavy meatballs as a fact of life. You do not have to stress out when hosting a dinner party. By simply taking three minutes to mash some bread and milk together, you can completely transform the texture of your ground meat. It is a brilliant, inexpensive, science-backed technique that will instantly elevate your weeknight dinners and save you from ever having to frantically figure out how to salvage a ruined dinner again.
So, throw out those dusty, flavor-stealing dry breadcrumbs. Embrace the panade. Buy a decent stainless steel skillet. Pour yourself another glass of wine, and go make the most tender, juicy, mind-blowing meatballs of your life. You’ve got this.






