
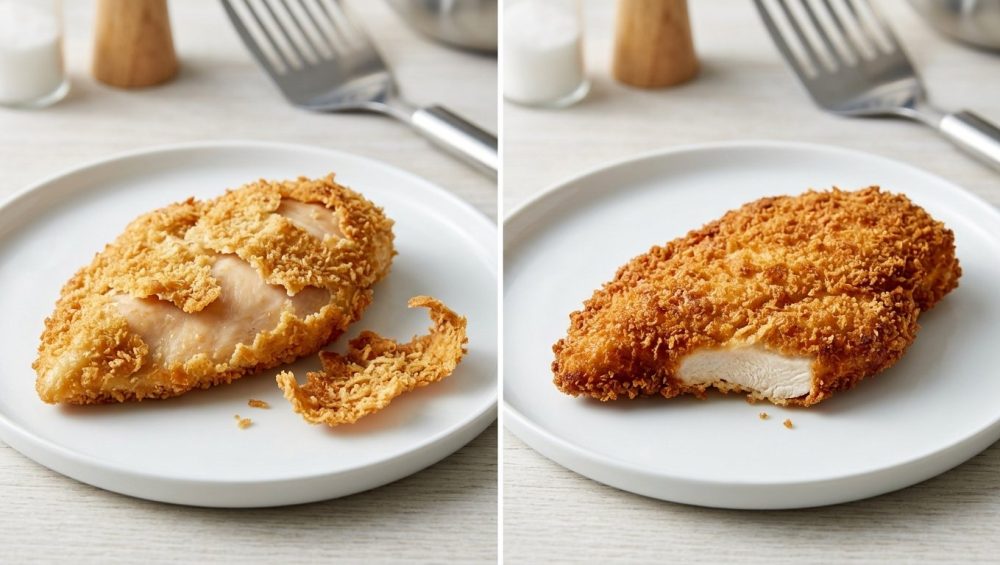
Listen, we need to have a serious talk about your chicken cutlets. You know exactly what I’m talking about. You spend your precious evening pounding out the meat, setting up an elaborate assembly line of bowls, and coating your kitchen counters in a fine dusting of flour. You carefully fry those cutlets to a beautiful, golden brown. But the moment your knife hits the meat, the entire crust slides off in one sad, soggy sheet, leaving you with a completely naked piece of poultry and a pile of greasy breadcrumbs.
It is a culinary tragedy, and frankly, you deserve better.
If you are trying to transform your chaotic cooking routine into something that actually brings you joy, you cannot be fighting a losing battle with your breading every time you crave chicken parmesan or a crispy pork schnitzel. As a home cook, you do not need a culinary degree to achieve restaurant-quality, bulletproof crusts that cling to your meat like their life depends on it. You just need a little bit of patience and a basic understanding of kitchen chemistry.
The secret to perfectly adhered breading doesn’t require expensive ingredients, specialized equipment, or complicated techniques. It requires exactly fifteen minutes of doing absolutely nothing. Today, we are going to dive deep into the science of starch hydration, protein bonding, and thermodynamics to explain exactly why your breading is abandoning you, and how a simple 15-minute resting period will fix it forever.
The Anatomy of the Standard Breading Procedure
Before we can fix the problem, we have to look at the foundation. In the professional culinary world, there is a rigid, non-negotiable workflow known as the Standard Breading Procedure. If you have been skipping steps, combining bowls, or trying to invent your own shortcuts, you are already setting yourself up for failure.
The Standard Breading Procedure consists of three distinct stages, and each one serves a very specific structural purpose.
Stage 1: The Flour Dredge
You cannot just dunk a piece of wet, raw meat into a bowl of egg and expect it to stick. Meat is naturally slippery and covered in surface moisture. If you skip the flour, the egg wash will simply slide right off the surface, taking your breadcrumbs with it. The flour acts as a primer. It absorbs the surface moisture of the meat and creates a dry, textured surface for the egg to grab onto.
Stage 2: The Egg Wash
This is your glue. Eggs are incredibly complex biological structures, packed with water, fat, and highly reactive proteins like ovalbumin. When you dip your floured meat into the beaten egg, the proteins bind to the flour layer. Later, when the egg hits the hot oil, those proteins will coagulate and harden, locking the entire breading matrix into place.
Stage 3: The Crumb Coat
This is the armor. Whether you are using traditional Italian breadcrumbs, crushed cornflakes, or airy Japanese panko, this outer layer provides the crunch. The dry crumbs stick to the wet egg wash, creating a barrier that protects the meat from the intense heat of the frying oil while simultaneously soaking up just enough fat to turn beautifully golden and crispy.
If you are currently fixing rookie kitchen mistakes, the very first thing you need to do is respect this three-step process. But here is the kicker: even if you follow the Standard Breading Procedure flawlessly, your crust can still fall off if you immediately throw that meat into a hot pan.
The Physics of the Failure: Why Your Crust Abandons You
To understand why breading fails, you have to understand the enemy. The enemy is not your pan, and it is not your oil. The enemy is steam.
When you place a piece of raw meat into a skillet of 350°F oil, a violent reaction occurs. The surface moisture of the meat rapidly heats up and reaches its boiling point (212°F). When water boils, it converts into a gas—steam—and expands to roughly 1,700 times its original volume.
If you have rushed the breading process and immediately dropped your freshly coated chicken into the hot oil, the flour and egg layers have not had time to bond to the meat. They are just sitting loosely on top. As the meat cooks and releases its internal moisture, that moisture flashes into steam. Because the breading hasn’t formed a tight, unified seal, the expanding steam gets trapped between the surface of the chicken and the crust.
The steam literally acts like a microscopic explosive, pushing the breading away from the meat to create an air pocket. By the time you pull the chicken out of the pan, the crust is completely detached, hovering around the meat like a loose, greasy sleeping bag. The moment you cut into it, the structural integrity collapses, and the breading slides right off.
The Magic of the 15-Minute Rest
This brings us to the ultimate, zero-effort secret weapon that separates the frantic amateurs from the seasoned home cooks: the resting period.
After you pull your meat out of the breadcrumbs, you must place it on a wire rack and walk away for at least 15 to 30 minutes. Do not touch it. Do not look at it. Go pour yourself a glass of wine, wipe down your counters, or stare out the window. This brief window of time is where the actual magic happens, and it is entirely driven by two scientific processes: starch hydration and protein coagulation.
The Chemistry of Starch Hydration
When you first coat your chicken, the flour layer is dry and powdery. If you fry it immediately, it remains a dry, powdery layer separating the meat from the egg. But if you let it rest, the starches in the flour have time to absorb the moisture from both the surface of the meat and the egg wash above it.
As the flour hydrates, it undergoes a transformation. The dry dust swells and turns into a tacky, highly adhesive paste. A recent study in the International Journal of Biological Macromolecules demonstrated that the hydration properties of starches directly dictate how well a batter adheres and how much oil it absorbs during deep-frying. By giving the starch time to hydrate, you are fundamentally changing its structure from a loose powder into an industrial-strength culinary glue.
Protein Cross-Linking
While the starches are hydrating, the proteins in the egg are doing their own heavy lifting. The egg wash slowly seeps into the microscopic crevices of the meat and interlocks with the hydrating flour. Instead of having three distinct, separate layers (meat, flour, egg), the resting period allows these layers to physically merge. The moisture equalizes, and the breading matrix becomes a single, unified coating that is fiercely bonded to the proteins of the meat.
When you finally drop this rested, hydrated cutlet into the hot oil, the steam generated by the cooking meat can no longer blow the crust off. The bond is too strong. Instead, the steam is forced to vent harmlessly through the porous crust, leaving your breading perfectly intact, tightly adhered, and devastatingly crispy. If you are serious about demystifying modern recipes, mastering this single chemical reaction will elevate your cooking overnight.
The Flour Foundation: Choosing Your Starch
While standard all-purpose (AP) flour is the default choice for most home cooks, you have options if you want to manipulate the texture of your crust. The type of starch you use in your initial dredge plays a massive role in how effectively the breading adheres.
All-Purpose Flour
AP flour is reliable, cheap, and contains enough protein (gluten) to form a reasonably strong bond. However, because it contains gluten, it can sometimes become tough or heavy if it absorbs too much moisture. It is the workhorse of the kitchen, but it is not the only option.
Cornstarch
If you want an impossibly light, shatteringly crisp crust, swap out half of your AP flour for cornstarch. Cornstarch is pure starch with zero protein (no gluten). It hydrates incredibly well and creates a paste that fries up significantly crispier than wheat flour. This is the secret behind the ultra-crispy textures found in Korean fried chicken and many Asian stir-fry techniques.
Rice Flour
Rice flour is another brilliant alternative. It absorbs less oil than wheat flour and fries up with a delicate, glass-like crunch. If you are struggling with heavy, greasy cutlets and looking for simple kitchen fixes to lighten up your meals, a 50/50 blend of AP flour and rice flour in your dredging station will change your life.
The Egg Wash Equation
The egg wash is the bridge between your dry meat and your dry crumbs. But not all egg washes are created equal. If your egg wash is too thick, it will create a rubbery, dense layer under your breadcrumbs. If it is too thin, it won’t have enough protein to act as a proper glue.
The Golden Rule: Always thin your eggs.
When you beat whole eggs, the proteins are tightly coiled and the mixture is highly viscous. If you try to dip floured meat into pure, thick beaten eggs, you will end up with globs of egg white sliding off the chicken in slimy chunks. To prevent this, you must thin the egg wash with a splash of liquid—usually about one tablespoon of water or milk per egg.
This added moisture breaks down the viscosity of the egg whites, creating a smooth, homogenous liquid that coats the floured meat evenly. A thin, even coat of egg translates to a thin, even layer of breadcrumbs.
The Crumb Selection: Panko vs. Traditional
The final layer of your breading is where you dictate the texture of the finished dish. While you can technically use anything from crushed Ritz crackers to pulverized almonds, the two most common choices are traditional breadcrumbs and Panko.
Traditional Breadcrumbs
Standard Italian or plain breadcrumbs are very fine and dense. Because they are so small, they pack tightly together, creating a solid, uniform shell around the meat. This is great for dishes like Chicken Parmesan, where you need a sturdy crust that can hold up to being smothered in marinara sauce and melted mozzarella. However, because they are so dense, they tend to absorb more oil and can become heavy if not fried at the correct temperature.
Panko (Japanese Breadcrumbs)
If you want maximum crunch, Panko is the undisputed king. Unlike traditional breadcrumbs, which are baked and then ground, Panko is made from crustless bread that is processed into large, airy flakes and cooked using electrical currents. This unique manufacturing process creates a crumb with a jagged, porous structure.
When Panko hits hot oil, the jagged edges crisp up beautifully, while the airy structure prevents the crumb from absorbing excess grease. The result is a lighter, crispier, and significantly less oily crust. If you are trying to decode pretentious recipe jargon, just know that anytime a chef promises an “ultra-crispy” crust, they are almost certainly using Panko.
The Pan and The Oil: The “No-Go” Rule on Toxic Gear
We need to pause the cooking lesson for a moment because I have zero patience for toxic kitchenware, and frying is where cheap gear becomes actively dangerous.
If you are pan-frying breaded cutlets in a cheap, scratched, lightweight non-stick Teflon pan, you need to stop immediately. Throw it in the garbage. I am completely serious.
To achieve a crispy crust, you need to fry your meat in oil that is between 350°F and 375°F. To maintain that temperature when you add cold meat, your pan needs to be incredibly hot. Traditional non-stick pans are coated with PTFE (Polytetrafluoroethylene), commonly known as Teflon. When you heat a Teflon pan past 500°F—which happens shockingly fast when you are preheating a pan on a gas stove—the chemical coating begins to break down and degrade.
When this toxic degradation occurs, the pan releases invisible, odorless fluoropolymer fumes into your kitchen air. Exposure to these fumes causes a condition known as polymer fume fever, colloquially called the “Teflon flu,” which results in chills, headaches, and chest tightness. Furthermore, these fumes are famously and instantly fatal to pet birds. If a pan can kill a parrot from across the room, you should not be using it to cook your dinner.
If you are serious about banishing toxic kitchen gear, you must invest in proper, high-mass cookware for frying.
The Safe Alternatives:
- Cast Iron: The undisputed champion of shallow frying. Cast iron has massive thermal density, meaning once it gets hot, it stays hot. It won’t drop in temperature when you add your meat, ensuring a fast, aggressive sear that locks the breading in place.
- Carbon Steel: The lighter, more maneuverable cousin of cast iron. It offers the same incredible heat retention and natural, safe non-stick properties once properly seasoned.
- Stainless Steel (Multi-clad): A high-quality, heavy-bottomed stainless steel skillet is virtually indestructible, completely non-toxic, and provides incredibly even heating.
Temperature Control: The Hidden Culprit
Even with a 15-minute rest and a high-quality cast iron skillet, your breading will still fail if you completely botch your temperature management. There are two temperatures you must fiercely control: the temperature of the meat, and the temperature of the oil.
The Meat Temperature
Never, ever take a piece of chicken directly from the back of a 34°F refrigerator, bread it, and throw it straight into a frying pan. Cold meat drops the temperature of the frying oil drastically. The 15-minute resting period we discussed earlier serves a dual purpose: not only does it hydrate the starches to lock the breading in place, but it also takes the chill off the meat, bringing it closer to room temperature.
The Oil Temperature
Frying is a delicate thermodynamic dance. Your target oil temperature is 350°F.
- If the oil is too cold (below 325°F): The crust will not sear. Instead, the breadcrumbs will act like tiny sponges, soaking up the lukewarm oil. By the time the meat is cooked, the breading will be a heavy, greasy, soggy mess that sloughs off the chicken.
- If the oil is too hot (above 400°F): The breadcrumbs will burn and turn acrid before the raw meat inside has a chance to cook through.
Use an instant-read thermometer to monitor your oil. If you don’t have one, drop a single breadcrumb into the pan. It should immediately sizzle and dance on the surface. If it sinks and does nothing, the oil is too cold. If it instantly turns black and smokes, you’ve gone too far.
The Step-by-Step Masterclass for Bulletproof Breading
Alright, let’s put all this science into a practical, foolproof workflow. If you follow these exact steps, I guarantee you will never suffer the indignity of a naked chicken cutlet again.
Step 1: Dry the Meat
Moisture is the enemy of adhesion. Take your chicken, pork, or eggplant, and aggressively pat it completely dry with paper towels. If the surface is wet, the flour will turn into a gummy mess before it even hits the egg.
Step 2: The Dredge
Season the meat with salt and pepper before breading. Drop the dry meat into your flour (or flour/cornstarch blend). Toss it around until it is completely coated, making sure to press the flour into every crevice. Then—and this is crucial—shake off the excess. You want a thin, translucent dusting of flour, not a thick, clumpy paste.
Step 3: The Dip
Transfer the floured meat into your thinned egg wash. Turn it over a few times to ensure there are no dry spots of flour remaining. Lift the meat out and let the excess egg drip back into the bowl for three to four seconds.
Step 4: The Pack
Place the wet meat into your breadcrumbs. Do not just lightly toss it. You need to aggressively pack the crumbs onto the meat. Bury the cutlet under a mound of crumbs and press down firmly with the palm of your hand. You are physically forcing the crumbs into the egg and flour matrix. Shake off the loose excess.
Step 5: THE REST
Place the fully breaded cutlet onto a wire cooling rack set over a baking sheet. Walk away. Set a timer for 15 minutes. Let the starches hydrate. Let the egg proteins bond. Let the magic happen.
Frying Etiquette: Don’t Ruin It In The Pan
You have done the prep work. Your breading is locked and loaded. Now, you have to execute the fry without sabotaging yourself.
Rule 1: Do Not Overcrowd the Pan
If you try to cram four massive chicken breasts into a single 10-inch skillet, the temperature of the oil will plummet. The pan will lose its heat, the oil will stop frying, and the meat will begin to steam in its own juices. Steam destroys breading. Cook in batches, leaving at least an inch of space between each piece of meat.
Rule 2: Stop Touching It
Once you gently lay the meat into the hot oil (always lay it dropping away from you so the oil doesn’t splash back), take your hands off the tongs. Do not nudge it. Do not peek underneath it. Do not continuously flip it.
The crust needs time to undergo the Maillard reaction—the chemical process of browning that solidifies the starches and proteins into a rigid shell. If you try to flip the meat before this rigid shell has formed, you will tear the delicate, semi-cooked breading right off the chicken. Wait until you see a deep, golden-brown halo forming around the edges of the meat (usually 3 to 4 minutes), then flip it exactly once.
Rule 3: Use the Right Tools
Never use a fork to flip breaded meat. Piercing the crust introduces holes where hot oil can seep in and internal steam can aggressively blow out, ruining the structural integrity. Use a pair of silicone-tipped tongs or a flexible fish spatula to gently turn the meat. And while we are talking about tools, remember that cooking spray is the enemy of high-heat frying. It contains emulsifiers like soy lecithin that burn at low temperatures and leave a sticky, impossible-to-remove polymerized residue on your good cookware. Use real, high-smoke-point liquid oil like avocado, peanut, or canola.
The Aftermath: Resting After Frying
Congratulations, you have successfully fried a perfect, golden, tightly adhered cutlet. Now, you have exactly one minute to ruin it.
The biggest mistake home cooks make after frying is transferring their beautiful, crispy chicken directly onto a plate lined with paper towels. I understand the logic—you want to drain the excess grease. But paper towels are a massive structural trap.
When you place hot, fried meat onto a flat paper towel, the heat radiating from the bottom of the chicken hits the plate and creates—you guessed it—steam. The paper towel traps that steam directly against the bottom of your crust. Within sixty seconds, the underside of your perfectly fried cutlet will become a soggy, mushy disaster. If you want to avoid the hidden trap of paper towels, you must elevate the meat.
As soon as the chicken leaves the frying pan, transfer it to a clean wire cooling rack set over a baking sheet. The magic of a wire rack allows full 360-degree air circulation. The excess oil drips away harmlessly, and the heat radiates off the meat without creating trapped steam. The crust remains shatteringly crisp on all sides while the meat rests and the internal juices redistribute.
Final Thoughts from the Sassy Sous-Chef
Cooking is not magic, even when the results taste like it. It is just applied science, basic chemistry, and a little bit of patience. You don’t need to be a Michelin-starred chef to make mind-blowing fried chicken on a random Tuesday night. You just need to respect the process.
Dry your meat. Follow the three-step breading procedure. Thin your eggs. Pack your crumbs. And for the love of all things culinary, give your food fifteen minutes to rest and hydrate before you throw it into a hot, non-toxic pan.
When you stop fighting the chemistry of your food and start working with it, you can effortlessly turn a stressful chore into kitchen artistry. Now go throw out that scratched Teflon pan, get your wire racks ready, and go fry something spectacular. You’ve got this.






