
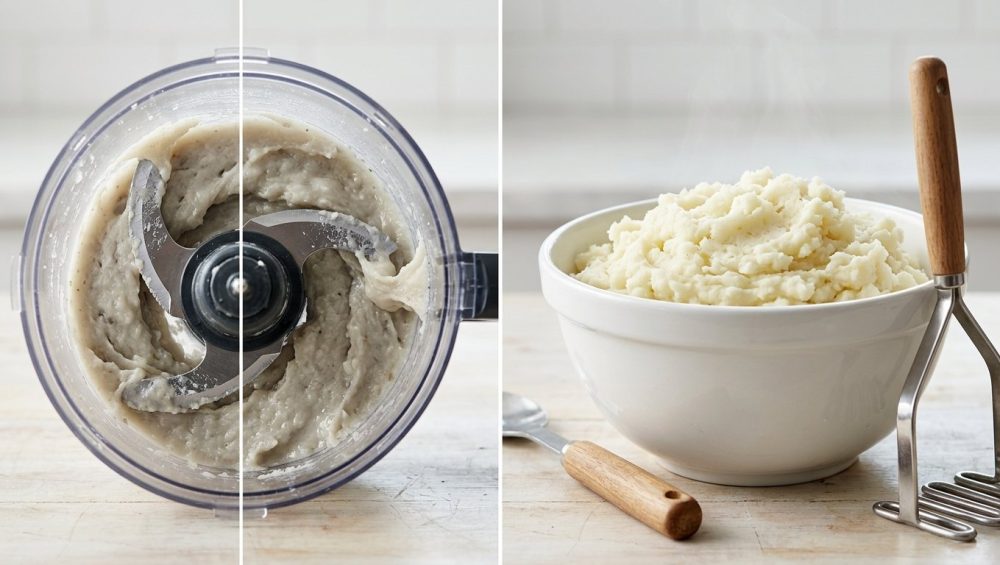
Listen up, because we need to have a serious, closed-door intervention about what is happening in your kitchen on Thursday nights and holiday mornings. You have the roast perfectly caramelized in the oven, a beautiful pan gravy simmering away on the back burner, and a steaming pot of boiled potatoes ready to be transformed into a cloud of buttery, creamy perfection. And then, in a moment of sheer weeknight panic or misguided efficiency, you reach for the food processor. Or the countertop blender. Or, heaven forbid, the immersion blender.
Stop. Put the appliance down and step away from the electrical outlet.
If you have ever wondered why your beautifully cooked spuds suddenly mutated into a sticky, cohesive paste that could easily double as industrial wallpaper adhesive, you have fallen victim to the hidden danger of high-speed blades. It is a culinary tragedy that strikes millions of well-meaning home cooks every single year, turning what should be a fluffy, ethereal side dish into a gummy, inedible disaster. And the worst part? It is entirely preventable.
As a home cook who has made every mistake in the book (and set off the smoke alarm more times than I care to admit), I am here to tell you that you do not need a pretentious culinary degree to make restaurant-quality food. You just need to understand a little bit of basic food science and stop relying on technological shortcuts that actively destroy your ingredients. We are going to dive deep—really, exhaustively deep—into the microscopic anatomy of a potato, the violent physics of high-speed blending, and the exact steps you need to take to guarantee perfectly light, airy mashed potatoes every single time.
The Anatomy of a Potato: A Microscopic Look at Starch
To understand why blenders are the sworn, mortal enemy of the potato, we have to put on our lab coats and look at what a potato actually is on a microscopic level. I promise to keep the science accessible, but you need to know this if you want to stop ruining your side dishes.
Inside the flesh of a raw potato, starch is meticulously stored in tiny, delicate little cellular sacs called amyloplasts. Think of these amyloplasts as microscopic water balloons filled with tightly packed starch molecules. There are two main types of starch molecules hanging out inside these balloons: amylose and amylopectin.
Amylose is a long, linear, straight-chain molecule. Because of its rigid, linear structure, it crystallizes easily and provides the architectural scaffolding of the starch world. It is the absolute hero of our story. Amylose helps keep things fluffy, dry, and separate.
Amylopectin, on the other hand, is a massive, highly branched, chaotic molecule. It is the sticky, gooey, cohesive element that gives short-grain sushi rice its cling and makes certain sauces incredibly thick. In the context of mashed potatoes, amylopectin is the villain. We want it to stay securely locked inside those cellular water balloons.
When you drop your peeled, cubed potatoes into a pot of water and apply heat, a fascinating thermal transformation occurs. As the temperature of the water rises, those little amyloplast “balloons” start to absorb water. They swell up, getting larger and softer. By the time the internal temperature of the potato reaches about 140°F to 160°F (60°C to 70°C), the cells are fully engorged and gelatinized, but—and this is the critical part—they are still mostly intact.
The entire objective of mashing potatoes is to gently separate these swollen, intact cells from one another. You want them to slide past each other, creating a loose, fluffy network that can absorb your butter and cream without turning into a solid mass. You want to coax them apart, like gently untangling a delicate gold necklace.
The Crime Scene: What High-Speed Blades Actually Do to Your Food
This brings us to the crime scene: the exact moment you drop those delicate, swollen starch balloons into a food processor or hit them with a high-powered immersion blender.
Blenders and food processors are engineered for high-shear emulsification. They are designed to violently obliterate cell walls, liquefy solid matter, and forcefully combine unmixable liquids like oil and water. When those stainless steel blades spin at thousands of revolutions per minute, they do not gently separate the potato cells. They act like a microscopic lawnmower, slicing and violently rupturing the delicate amyloplasts.
When those cell walls burst, they vomit their contents—specifically, that sticky, highly branched amylopectin—directly into the surrounding environment. Because amylopectin is essentially nature’s glue, releasing it en masse creates an immediate, irreversible chemical reaction. The free, extracellular starch binds with the water and dairy in your pot, forming a highly viscous, non-Newtonian gel.
Within seconds, your fluffy potatoes become a heavy, gummy, cohesive paste. Legendary food scientist Harold McGee notes that this gooeyness develops precisely because you are literally beating the starch out of the cooked cells, creating a consistency identical to a cornstarch-thickened sauce. You cannot un-rupture a cell. Once you have blended those potatoes into glue, no amount of butter, cream, or desperate praying is going to save them. You have permanently altered the molecular structure of your side dish.
This is why I constantly preach that time is money on a weekday, but using the wrong shortcut will cost you your entire meal. A food processor might seem like a brilliant time-saver, but it applies immense lateral shear force that crushes the starch granules rather than suspending them. You end up with a dense, chewy nightmare. It is a classic rookie mistake, much like ruining your nonstick pans with aerosol cooking sprays—a shortcut that ultimately destroys the final product.
The Great Potato Divide: Waxy vs. Starchy Cultivars
Now that we understand the violent physics of starch rupture, we need to talk about the potatoes themselves. Not all spuds are created equal, and choosing the wrong variety at the grocery store is the second biggest reason your mash is failing. You cannot treat a potato like a generic, interchangeable ingredient.
Potatoes generally fall into three botanical categories: starchy, waxy, and all-purpose.
Starchy Potatoes (The Kings of Mash)
Russet potatoes (often called Idaho or baking potatoes) are the undisputed, heavyweight champions of the mashed potato world. They have a remarkably high starch content (around 20% to 22% by weight) and very low moisture. More importantly, their starch is composed of a significantly higher ratio of amylose (the straight, fluffy starch) compared to waxy potatoes. When cooked, the cells of a Russet potato readily fall apart into individual, fluffy aggregates. They act like tiny, dry sponges, ready to soak up massive amounts of butter and cream without becoming waterlogged. If you want that classic, cloud-like, ethereal texture, Russets are your best friend.
Medium-Starch / All-Purpose Potatoes (The Flavor Powerhouses)
Yukon Golds fall into this category. They have a moderate starch content and a slightly lower amylose ratio than Russets, but they make up for it with an incredibly rich, naturally buttery flavor and a creamy mouthfeel. They are slightly more forgiving if you accidentally over-mix them (with a hand tool, not a blender!), and they offer a beautiful, appetizing golden hue. Many professional chefs use a 50/50 blend of Russets and Yukon Golds to get the ultimate, undisputed balance of fluffy texture and rich flavor.
Waxy Potatoes (The Enemy of the Mash)
Red Bliss, New Potatoes, and Fingerlings are waxy potatoes. They have a low starch content (around 16%) and a very high moisture content. Their starch is almost entirely composed of that sticky, branched amylopectin. Because their cell walls are stronger and they contain more internal moisture, they do not fall apart easily when cooked. They require significantly more mechanical force to mash, which means you are far more likely to rupture the cells and release that sticky amylopectin gel. Waxy potatoes are fantastic for potato salad or roasting, where you want them to hold their shape, but they have absolutely no business being in your mashed potatoes.
The Right Tools for the Job (And the Toxic Gear You Need to Trash)
We have established that blenders, food processors, and electric hand mixers are strictly forbidden. So, what should you be using? The manual tools you choose will dictate the final texture of your dish.
And before we get into the specifics, let me reiterate my absolute zero-tolerance policy for toxic, cheap kitchen gear. I have zero patience for flimsy, plastic potato mashers covered in peeling non-stick coatings. When you plunge a cheap plastic masher into a pot of 200-degree potatoes, you are leeching microplastics and toxic mystery chemicals straight into your family’s holiday meal. I absolutely despise toxic kitchenware. You need 18/10 surgical-grade stainless steel. It is non-reactive, it won’t bend when you hit a stubborn potato chunk, and it doesn’t harbor bacteria in deep scratches. Having the right, safe gear is foundational, and it’s why I always emphasize the essential kitchen tools for beginners when they start out.
The Potato Ricer: The Holy Grail of Fluff
If you want the absolute lightest, most ethereal mashed potatoes of your life, you need a potato ricer. Period. This tool looks like a giant garlic press on steroids. You place the cooked potato chunks into the hopper and squeeze the handles together, forcing the potato through tiny perforated holes.
Why is this the holy grail? Because it extrudes the potato using a single, gentle pressing motion. There is zero shearing, zero violent agitation, and zero prolonged friction. The potato cells are gently separated as they pass through the holes, falling into your bowl like fluffy little grains of rice. Because the cells remain perfectly intact, they are primed to absorb dairy without releasing their sticky amylopectin. If you have ever wondered why your mashed potatoes turn into glue despite your best efforts, the lack of a ricer is often the missing piece of the puzzle.
The Food Mill: The Traditionalist’s Choice
A food mill is another phenomenal option, especially if you are making a massive batch for a large holiday gathering. It consists of a stainless steel bowl with a hand-cranked blade that gently presses the food through a perforated bottom plate. Like the ricer, it uses gentle, pressing force rather than high-speed shearing. The added bonus of a food mill is that you don’t even have to peel your potatoes beforehand; the mill will naturally separate the tough skins from the soft flesh as you crank. This is exactly how the legendary French chef Joël Robuchon achieved his famous, Michelin-starred, silky-smooth pommes purée.
The Traditional Hand Masher: The Weekday Warrior
For a quick Tuesday night dinner, a sturdy, stainless steel hand masher is perfectly acceptable. It will not give you the ultra-fine, silky texture of a ricer, but it will give you a rustic, slightly chunky mash that is incredibly satisfying. The key here is to use a straight up-and-down pressing motion. Do not stir, whip, or drag the masher through the potatoes. Press down, lift up, move over, and repeat. The moment the potatoes are broken down, stop immediately.
And please, make sure your hand masher is a solid piece of heavy-gauge stainless steel. Flimsy wire mashers will bend under pressure, and cheap plastic ones will degrade. Just as you wouldn’t tolerate ceramic cookware that has lost its non-stick properties, you shouldn’t tolerate a masher that bends under the weight of a Yukon Gold.
The Masterclass: A Step-by-Step Guide to Flawless Mashed Potatoes
Now that we have the rigorous science and the proper gear sorted out, let’s walk through the exact, foolproof process for making the best mashed potatoes you have ever tasted. This is the definitive blueprint for culinary perfection. Do not skip a single step.
Step 1: Precision Prep and the Importance of Uniformity
Start with 3 pounds of equal parts Russet and Yukon Gold potatoes. Peel them thoroughly, ensuring you remove all the green spots and deep eyes. Cut the potatoes into uniform, 1.5-inch chunks. Consistency is absolutely key here; if your pieces are different sizes, the smaller ones will overcook and disintegrate into mush before the larger ones are even tender. Just make sure your chef’s knife is actually sharp—using dull blades is a safety hazard and crushes your food instead of slicing it. If you find your kitchen knives get dull after just a few uses, you are probably using a terrible cutting board that is destroying the edge alignment.
Place the uniform potato chunks into a large, heavy-bottomed pot. Now, pay close attention: Cover them with cold water.
Step 2: The Cold Water Start and the Magic of the PME Enzyme
Do not drop raw potatoes into boiling water. If you drop them into boiling water, the exteriors will rapidly overcook and turn to mush while the interiors remain hard and raw. By starting with cold water and bringing it up to a simmer slowly, you allow the heat to penetrate evenly to the core of the potato.
Furthermore, as Harold McGee points out, bringing the temperature up slowly allows a specific enzymatic reaction to take place in the cell walls. An enzyme called pectin methylesterase (PME) gets activated around 120°F (50°C). PME alters the pectin in the potato’s cell walls, essentially reinforcing them and making them much stronger and firmer. This reinforced cell wall acts as a protective barrier, keeping that sticky amylopectin safely trapped inside the cell during the mashing process. If you drop potatoes directly into boiling water, the extreme heat denatures and destroys the PME enzyme before it has a chance to fortify the cell walls, leaving your potatoes highly vulnerable to bursting.
Add a generous handful of kosher salt to the cold water. The water should taste like the sea. This is your only opportunity to season the actual interior of the potato via osmosis.
Step 3: The Gentle Simmer
Bring the pot to a boil over medium-high heat, then immediately reduce the heat to maintain a gentle, rolling simmer. Do not aggressively boil your potatoes. Violent, chaotic boils will cause the potatoes to smash against each other and the sides of the pot, prematurely breaking them down and waterlogging them.
Simmer until the potatoes are completely tender. You should be able to slide a paring knife into the center of a chunk with absolutely zero resistance. If there is any hard core left, your final mash will have crunchy, unpleasant lumps. This usually takes about 15 to 20 minutes of simmering. Don’t rely on a timer; rely on your physical senses. Just like when you realize your cheap meat thermometer is lying about the internal temperature of a steak, you have to trust tactile cues over digital readouts.
Step 4: The Crucial Drying Phase
This is the step that 90% of home cooks skip, and it is a massive mistake. Once the potatoes are tender, drain them thoroughly in a colander. But do not start mashing yet!
Water is the absolute enemy of a rich, creamy mash. If your potatoes are waterlogged, they will not be able to absorb the butter and cream. Return the drained potatoes to the hot, empty pot and set it over low heat for about 1 to 2 minutes. Gently shake the pot. You will see the residual moisture steaming off the surface of the potatoes. As soon as they look dry and slightly chalky on the outside, remove them from the heat immediately.
Step 5: The Dairy Protocol (Fat First, Liquid Second)
While your potatoes are cooking, you need to prepare your dairy. Never, under any circumstances, add cold butter or cold milk to hot potatoes. Cold dairy will dramatically drop the temperature of the potatoes, causing the starches to seize up and undergo retrogradation, making them gummy and stiff.
In a small saucepan, gently heat 1 cup of whole milk (or heavy cream, if you are feeling decadent) and 1 stick (8 tablespoons) of high-quality, unsalted butter until the butter is completely melted and the mixture is steaming hot.
Science Sidebar: Some brilliant food scientists, including the team at America’s Test Kitchen, advocate for adding the butter before the liquid. The theory is that coating the starch molecules in fat first prevents them from interacting with the water in the milk, reducing the risk of a gluey texture. If you are using a ricer, you can melt the butter separately, fold it gently into the riced potatoes first to lubricate the cells, and then add the hot milk to thin the mixture.
Step 6: The Gentle Mash and Fold
Pass your hot, dry potatoes through your potato ricer or food mill directly into a large, warm mixing bowl. If you are using a hand masher, press straight down until the chunks are broken up.
Immediately pour the hot butter and milk mixture over the potatoes. Now, put down the masher. Switch to a silicone spatula. Gently fold the liquid into the potatoes. Scrape the bottom of the bowl and lift the potatoes over the liquid, repeating until the dairy is just absorbed. Do not stir vigorously. Do not whip. The moment the liquid is incorporated and the mash looks cohesive, stop.
Taste for seasoning, add more salt if necessary, and serve immediately.
Troubleshooting and Rescue Missions: What If You Already Messed Up?
Okay, let’s say you didn’t read this article in time. You panicked, you used the food processor, and now you are staring at a pot of translucent, gluey potato paste. What do you do?
First, take a deep breath. Second, accept the hard truth: you cannot turn this paste back into fluffy mashed potatoes. The cell walls are destroyed, the amylopectin is loose, and the chemical reaction is permanent. However, you do not have to throw them in the trash. You can pivot and repurpose that starchy binder.
Rescue Mission 1: The Ultimate Potato Casserole
Spread the gummy potatoes into a greased baking dish. Top them with a ridiculous amount of shredded cheddar cheese, crispy bacon bits, chives, and a dollop of sour cream. Bake at 400°F until the cheese is bubbling and browned. The intense heat of the oven and the distraction of the heavy toppings will completely mask the textural flaws of the potatoes.
Rescue Mission 2: Crispy Potato Croquettes and Latkes
That sticky texture is actually a fantastic binder. Let the gluey potatoes cool completely in the fridge. Mix in an egg, some grated parmesan cheese, chopped scallions, and a handful of flour or panko breadcrumbs. Form them into small patties and pan-fry them in a cast iron skillet with oil until golden and crispy. The exterior will crisp up beautifully, and the interior will be dense, creamy, and deeply savory.
Rescue Mission 3: The Secret Soup Thickener
If you are making a blended vegetable soup or a creamy potato leek soup later in the week, save the gluey potatoes in an airtight container. Because they are essentially a pure starch gel at this point, they act exactly like a roux or a cornstarch slurry. Whisk a few spoonfuls into a simmering soup to thicken it instantly and add a velvety mouthfeel. Use a sturdy silicone spatula for this, because we all know why your wooden spoons keep cracking when you use them to pry thick starch off the bottom of a hot cast iron pot.
Conclusion: Respecting the Process
Cooking is not about rushing blindly through a checklist; it is about understanding how your ingredients react to heat, friction, and time. When you use an aggressive tool like a blender on a delicate structure like a swollen starch cell, you are fighting against the natural chemistry of the food.
This philosophy applies to absolutely everything in your kitchen. If you dump raw spices into a cold pot without blooming them, you can’t be confused when your spices taste bland and dusty. If you use a cheap, rock-hard bamboo board, you shouldn’t be shocked when it ends up ruining your knives in a matter of weeks. You have to use the right tool and the right technique for the specific job at hand.
For mashed potatoes, that means prioritizing gentle separation over violent destruction. The secret to mind-blowing, restaurant-quality mashed potatoes isn’t a secret ingredient or a mystical chef’s trick. It is simply the absence of abuse. It is choosing the right potato, starting in cold water, drying them thoroughly, warming your dairy, and above all else, keeping them far, far away from the spinning blades of a blender.
By investing in a simple potato ricer or food mill, and understanding the delicate nature of those microscopic starch balloons, you empower yourself to conquer one of the most beloved side dishes in culinary history. You are no longer at the mercy of gummy, gluey disasters. You are the master of your kitchen, the commander of your starches, and the purveyor of perfectly fluffy, buttery clouds of potato perfection. Now get out of here, go buy a ricer, and if I ever catch you plugging in a food processor to make mashed potatoes, I am permanently revoking your butter privileges. Happy cooking.






