
We have all been there. You decide that today is the day you are going to break your expensive cafe habit. You are going to be a domestic god or goddess. You are going to make bubble tea at home, saving yourself eight dollars a pop and the indignity of standing in a thirty-minute line behind teenagers filming TikTok dances. You buy a bag of tapioca pearls, boil them up, and marvel at your own brilliance as they turn delightfully squishy. You proudly drop them into a beautiful, condensation-beaded glass of iced milk tea, take a massive sip through your oversized straw, and… crunch.
Instead of a delightful, bouncy treat, you are suddenly chewing on something that strongly resembles aquarium gravel. Welcome to the infuriating, tear-inducing world of homemade boba.
If this has happened to you, take a deep breath. Put down the cup. You are not a failure, and you certainly do not need to go out and buy a commercial boba-cooking machine that takes up half your counter space. You just need a little bit of practical food science. I firmly believe that absolutely anyone can cook like an expert and execute mind-blowing weekend culinary projects without a culinary degree. My goal today is to cure cooking anxiety around this specific, notoriously finicky ingredient.
In this exhaustive, definitive masterclass, we are going to dive deep into the molecular drama of tapioca starch. We are going to decode pretentious recipe jargon so you actually understand why your pearls are turning into rocks. Most importantly, I am going to reveal the warm-syrup holding technique that cafes use to keep their boba flawlessly chewy for hours. Let’s get to work.
The Anatomy of a Boba Pearl: What Are We Actually Eating?
Before we can fix the problem, we need to understand the subject. A boba pearl is not a complex, multi-ingredient pastry. At its core, it is an incredibly simple dough made from just three things: tapioca starch, water, and sugar (usually brown or black sugar for color and flavor). But that simplicity is exactly why it is so unforgiving. There is no butter or egg yolk to mask your mistakes.
The Role of Cassava Root and Tapioca Starch
Tapioca starch is derived from the cassava root, a starchy tuber native to South America but heavily cultivated in tropical regions worldwide. Unlike wheat flour, which contains a complex web of gluten proteins that give bread its structure, tapioca flour is almost entirely pure starch.
To understand how this starch behaves, we have to look at its molecular makeup. Starch is composed of two primary molecules: amylose and amylopectin. Amylose is a straight, linear chain of glucose molecules, while amylopectin is a highly branched, tree-like structure. The ratio of these two molecules dictates exactly how a starch will behave when heated and cooled.
For example, regular rice starch contains about 35% amylose and 65% amylopectin. Tapioca starch, on the other hand, is uniquely skewed: it contains only about 17% to 20% amylose, meaning it is packed with a whopping 80% to 83% amylopectin. This massive concentration of branched amylopectin is the scientific reason why tapioca has such incredible viscosity, stretchiness, and elasticity. It is the engine that drives the bounce.
The Elusive “QQ” Texture Explained
If you have ever visited Taiwan, the undisputed birthplace of bubble tea, you will have encountered the term “QQ”. It is a beloved, culturally significant descriptor for food that has a springy, bouncy, and elastic mouthfeel. Think of it as the East Asian culinary equivalent of Italian al dente, but with significantly more bounce and resilience.
When a boba pearl has the perfect QQ texture, it offers a distinct physical experience. It yields to your teeth with a satisfying, soft resistance, but it fights back just a little bit before breaking. It should never be mushy, gummy, or paste-like, and it absolutely should not have a hard, chalky core. Achieving this goldilocks state of QQ requires a highly specific combination of hydration and thermal energy. When you get it right, it is a textural masterpiece. When you get it wrong, you break a tooth.
The Villain of the Story: Starch Retrogradation
So, why does your homemade boba turn hard the second it hits your iced drink? The culprit is a ruthless, unforgiving chemical process called starch retrogradation. This is the enemy, and understanding it is the key to winning the war.
The Gelatinization Phase (Cooking)
When you drop raw, hard tapioca pearls into a pot of violently boiling water, a process called gelatinization begins. The intense heat and abundant moisture force the tightly packed, crystalline structures of the starch molecules to relax and open up. Water rushes into these amorphous regions, causing the starch granules to swell massively and break apart.
As the long-chain polymers detangle, they form new hydrogen bonds with the surrounding water, trapping the liquid inside a newly formed structural network. Visually, you can see this happening: the opaque, chalky dough ball slowly transforms into a translucent, squishy, gel-like sphere. Congratulations, you have achieved gelatinization. You have made boba.
The Cooling Crisis (Why Ice is the Enemy)
Here is where the tragedy occurs. You take your beautifully gelatinized, hot pearls and plunge them directly into a beverage filled with ice cubes.
The moment the temperature of the boba drops rapidly, the starch molecules panic. The sudden lack of thermal energy causes the amylose and amylopectin chains to violently snap back together. They rapidly realign, squeezing out the water they just absorbed, and reform their rigid, tightly-packed crystalline structures.
This rapid re-crystallization is starch retrogradation. It is the exact same chemical process that causes a loaf of bread to go stale and hard on your counter, except the extreme cold of your iced tea puts the process into hyper-drive. Within minutes, your squishy QQ pearl has reverted into a dense, impenetrable rock.
The Myth of the Cold Water Rinse
If you have ever read a terrible internet recipe that told you to rinse your freshly boiled boba in a bowl of ice water to “stop the cooking process” or “make them extra chewy,” I want you to immediately erase that advice from your memory.
Rinsing hot tapioca pearls in ice water triggers instant, catastrophic retrogradation. You are literally shocking the starch back into its hardened state before it even reaches the cup. This is a technique meant for wheat noodles or blanched vegetables, not for highly concentrated amylopectin starch balls. Never, ever put your cooked boba in an ice bath.
The “No-Go” Rule: Beware of Toxic Cookware When Boiling
Before we get into the exact step-by-step cooking method, we need to have a serious, brutally honest conversation about your equipment. I have zero patience for cheap, toxic kitchenware, and boiling boba is a process that will absolutely destroy a bad pot.
Cooking tapioca pearls requires a fierce, rolling boil for a full thirty minutes, followed by a thirty-minute covered steeping phase where the pot retains its heat. Tapioca is incredibly sticky, and as it boils, it releases a thick, gluey starch into the water.
If you are attempting to boil this starchy, abrasive mixture in a cheap, five-dollar aluminum pot coated in peeling, scratched-up Teflon, you are making a catastrophic error. The intense heat and the sticky nature of the starch will pull the degraded non-stick coating right off the metal. You will end up with toxic, synthetic chemical flakes embedded in your boba pearls. I am fiercely dedicated to banishing toxic kitchen gear from your home, and this is exactly why.
Do not use mystery metals. Do not use pans where the coating is bubbling or flaking. In fact, using cheap spray oils on these degraded surfaces is another major culprit in ruining your nonstick pans, but that is a rant for another day.
For boiling boba, you need safe, high-quality, high-thermal-mass equipment. You should exclusively use a heavy-bottomed, fully clad stainless steel pot, or a high-quality enameled cast iron Dutch oven. These materials are non-toxic, incredibly durable, and most importantly, they hold onto heat beautifully. That heat retention is absolutely critical for the thirty-minute resting phase, which we will discuss shortly. If you are building a proper setup, a solid stainless steel pot is one of the essential kitchen tools for beginners that you will use for the rest of your life.
The Commercial Café Secret: Thermal Holding
So, if cold temperatures cause boba to turn hard, how do commercial bubble tea shops manage to serve ice-cold drinks with perfectly soft, warm, gooey pearls? Do they have access to some magical, chemically modified starch that defies the laws of physics?
No. They just understand temperature control. They utilize professional thermal holding and batch preservation techniques.
Why Cafes Never Serve “Fresh Off the Stove” Boba
If you walk into a reputable, high-volume boba shop, pay close attention to the barista’s station. You will never see them scooping pearls straight out of a boiling pot of water, and you will certainly never see them pulling boba out of a refrigerator.
Instead, they hold their cooked, ready-to-serve boba in a temperature-controlled environment. Health codes and quality standards require that these pearls be kept hot. Most cafes use a commercial food warmer or an electric soup kettle set to maintain a constant temperature of around 135°F (57°C). At this specific temperature, the starch molecules remain relaxed and gelatinized, completely preventing retrogradation while keeping the food safe for consumption.
The Warm-Syrup Bath Technique
However, heat alone is not enough. If you just left cooked boba in a warm pot of water, they would eventually disintegrate into a mushy sludge. If you left them in a dry heated pan, they would fuse together into a single, impenetrable mega-pearl.
The true secret is the medium: the warm-syrup bath. Cafes hold their hot pearls submerged in a thick, rich, heavily concentrated brown sugar syrup. This syrup performs three vital functions simultaneously. First, it deeply infuses the bland tapioca dough with complex, caramel-like sweetness. Second, the viscosity of the syrup acts as a physical lubricant, preventing the sticky pearls from clumping together.
Third, and most importantly, the high sugar concentration and the constant 135°F heat act as a thermodynamic shield. When you scoop this hot, syrup-coated boba into an iced drink, the thick layer of warm syrup temporarily insulates the pearl from the ice. The boba stays soft and gooey right up until the second it travels up your straw. The contrast of the hot, sweet boba hitting the cold milk tea in your mouth is what creates that perfect, fleeting window of QQ texture.
The Masterclass: Cooking Flawless Boba at Home
Now that you understand the science of the starch and the secrets of the cafe, it is time to execute. This is your weekend project. Turn on some music, pour yourself a glass of wine, and let’s cook.
Selecting the Right Pearls (and the Digital Scale Rule)
Your first step is sourcing the right ingredients. Buy high-quality, traditional raw tapioca pearls from a reputable Asian grocer. Avoid the “instant 5-minute” boba at all costs. Those quick-cooking pearls are heavily processed, often pre-gelatinized, and they completely lack the structural integrity required to achieve a true, authentic bounce. You want the raw, fragile, powdery spheres that require a full thirty-minute boil.
If you are feeling incredibly ambitious and want to make the dough from scratch using tapioca flour and water, I applaud you. But hear me out: you must weigh your ingredients. Tapioca starch is notoriously temperamental. If you try to measure it with volume cups, you will fail. Using a digital kitchen scale is mandatory for this level of precision.
The Rolling Boil and the Convection Current
Take your heavy-bottomed stainless steel pot and fill it with a massive amount of water. You need an absolute minimum ratio of 6 parts water to 1 part boba by weight. Tapioca releases a tremendous amount of sticky gel as it cooks. If you skimp on the water, the liquid will turn into a thick, bubbling paste. The water will trap the heat, the bubbles will aggressively expand, and you will quickly find out exactly why your pasta pot boils over, leaving a nightmare of scorched glue all over your stovetop.
Bring the water to a fierce, aggressive, rolling boil. Do not add the pearls until the water is violently bubbling. If you drop raw tapioca into lukewarm water, the exterior starch will dissolve before the heat can set its structure, resulting in a pot of cloudy sludge.
Carefully pour in the pearls and immediately stir them gently with a wooden spoon so they do not stick to the bottom. Within a minute or two, they will float to the surface. Once they are all floating, reduce the heat to medium—just enough to maintain a steady simmer—cover the pot with a tight-fitting lid, and set a timer for exactly 30 minutes. Stir them every ten minutes to ensure nothing is sticking.
The Crucial Resting Phase
When the thirty-minute timer goes off, turn off the heat completely. Do not open the lid. Do not peek. Walk away.
You must let the pot sit undisturbed on the warm burner for another 30 minutes. This is the resting phase, and it is entirely non-negotiable. During this time, the residual heat in the water gently penetrates the very core of the pearl, ensuring that the innermost starch molecules fully gelatinize. If you skip this step, you will end up with boba that is squishy on the outside but has a hard, chalky, raw center. The heavy stainless steel or cast iron pot you used earlier is doing the heavy lifting here, retaining the necessary thermal energy to finish the cooking process gently.
The Warm-Syrup Holding Technique (Step-by-Step)
While your boba is in its thirty-minute resting phase, you need to prepare the holding bath. This is the step that separates the frustrated amateurs from the mindful home baristas.
Crafting the Perfect Sugar Syrup
In a small, safe saucepan, combine equal parts dark brown sugar and water. If you want a truly authentic, deeply complex flavor profile, use muscovado sugar or Taiwanese black sugar. These unrefined sugars contain a high molasses content, which provides that signature rich, roasted caramel flavor that elevates a good milk tea.
Heat the mixture gently over medium-low heat, stirring constantly just until the sugar crystals are completely dissolved. You are not making caramel, and you do not want to boil off the water. You just want a rich, dark, fluid syrup. Once dissolved, turn the heat down to the absolute lowest setting your stove allows.
Temperature Control for the Holding Bath
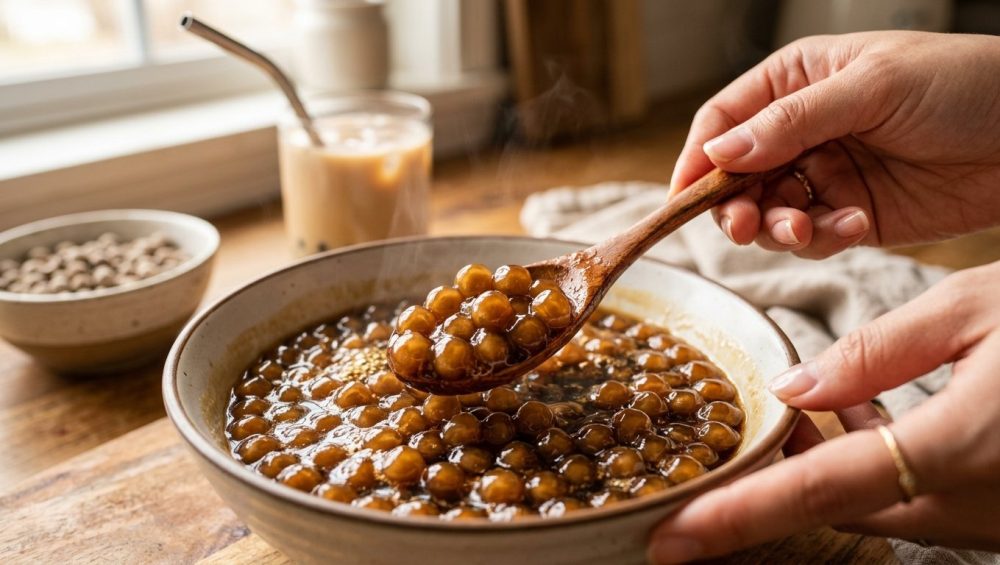
When the boba has finished its thirty-minute rest, carefully drain the pearls through a fine-mesh stainless steel strainer. Remember the golden rule: DO NOT RINSE THEM. Shake off the excess water, and immediately transfer the hot, steaming pearls directly into your prepared saucepan of warm brown sugar syrup. Stir them gently so every single pearl is coated in the glossy liquid.
Now, you must hold them at temperature. If you have a slow cooker, you can transfer the mixture to the crock and set it to the “Keep Warm” function. If you are using your stovetop, keep the saucepan on the lowest possible simmer burner, or ideally, place the saucepan over a larger skillet filled with an inch of warm water to create a gentle double-boiler effect.
Your goal is to keep this syrup bath hovering right around 120°F to 135°F. In this warm, sugar-rich environment, your boba will remain flawlessly QQ, soft, and chewy for up to four to six hours. You have successfully recreated the commercial cafe environment on your own kitchen counter.
Building Your Mindful Bubble Tea Bar
You have conquered the science of starch. You have mastered the thermal holding technique. Now, it is time to reap the rewards of your labor and host a relaxed dinner party or a weekend afternoon gathering centered around a gorgeous, DIY bubble tea bar.
Prepping Ahead Without Sacrificing Texture
The beauty of a boba bar is that almost everything can be prepared well in advance, minimizing your stress when guests arrive. You can brew your robust black tea (Assam or Ceylon work best for cutting through milk), whisk your matcha, and prepare your various milk options (oat, whole, or soy) hours ahead of time. Store all of these liquids in the refrigerator so they are icy cold.
However, the boba itself must be the final act. Because of the unavoidable reality of starch retrogradation, boba must be made fresh the day you intend to consume it. There is absolutely no such thing as “make-ahead” boba for the next day. Plan your boiling and steeping time so that the pearls enter their warm syrup bath right before your guests are ready to drink.
Assembling the Drinks: Timing the Ice
When it is time to serve, the order of operations is crucial for maximizing that perfect textural window. Do not just dump everything into a cup at once.
- The Base: Use a slotted spoon to scoop a generous portion of the hot, syrup-soaked boba into the bottom of a tall glass.
- The Tiger Stripes: Tilt the glass at a 45-degree angle and slowly rotate it, allowing the thick, hot brown sugar syrup to coat the inside walls. This creates those highly sought-after, aesthetic “tiger stripes” that look incredible and distribute the sweetness evenly.
- The Ice: Gently add a handful of ice cubes directly on top of the hot boba.
- The Liquid: Pour your ice-cold tea and milk over the ice.
- The Serve: Hand the drink to your guest immediately with a wide boba straw, instructing them to stir vigorously before their first sip.
Because the boba is hot and insulated by the syrup, it will resist the freezing temperature of the ice just long enough for your guests to enjoy the beverage with a flawless, bouncy texture. But remember, time is ticking. If you let that iced drink sit on a table for an hour, the ice will eventually win the thermodynamic battle, and the starch will retrograde. Bubble tea is a fleeting joy meant to be consumed fresh.
Troubleshooting Common Boba Disasters
Even when you know the science, the kitchen can throw you curveballs. If your weekend project didn’t turn out perfectly, don’t panic. Let’s troubleshoot the most common failures so you know exactly how to adjust for next time.
Mushy on the Outside, Hard on the Inside
This is the most common beginner mistake. If your pearls are dissolving into slime on the exterior but crunching like raw pasta in the center, you suffered a failure of heat penetration. This usually means one of three things: you didn’t use enough water (creating a starchy sludge that trapped the heat), you didn’t boil them at a high enough temperature, or you impatiently skipped the thirty-minute covered resting phase. The core of the pearl requires sustained, gentle, carry-over heat to fully gelatinize. Respect the resting phase.
Pearls Dissolving into Sludge Completely
If you end up with a pot of cloudy, thick, brown soup with no distinct pearls remaining, you added the raw boba to water that was not hot enough. Tapioca dough is incredibly fragile. If the water is lukewarm, the starch simply dissolves. You must wait for a violent, rolling boil before the pearls touch the water. The intense heat instantly sets the exterior of the pearl, locking the shape in place so it can survive the boiling process.
The “Next Day” Reheating Myth
Let’s address the elephant in the room. You made a massive batch of boba, you couldn’t eat it all, and you put the leftovers in the fridge overnight. The next morning, you pull out a container of literal pebbles. Furthermore, because of the intense concentration of the dark syrup, you are probably scrubbing the Tupperware and wondering why your plastic containers stay greasy and stained for days.
Can you save refrigerated boba? The internet is full of “hacks” suggesting you microwave the hard pearls with a splash of water. Let me be perfectly clear: this will yield deeply mediocre results. Microwaving will forcefully inject heat back into the starch, temporarily softening the exterior, but the structural integrity of the pearl has already been compromised by the retrogradation. It will be mushy on the outside and vaguely tough on the inside. It will never, ever be QQ again.
Do yourself a favor: accept the loss, throw the hardened pearls away, and scale down your recipe next time. Make only what you and your guests can joyfully consume in a four-hour window.
Mastering the art of the homemade bubble tea bar does not require commercial equipment, artificial preservatives, or a degree in molecular gastronomy. It simply requires a basic respect for the science of tapioca starch, a refusal to use toxic pots, and the patience to hold your boba in a warm, sweet embrace. You have the knowledge now. Go forth, boil some water, and reclaim your kitchen. You’ve got this.






