
Picture this: It is a Tuesday night. You are exhausted from a long day of pretending to care about spreadsheet metrics, and you have decided to treat yourself. You stopped by the butcher on the way home, spent a frankly unreasonable amount of money on a pair of beautiful, thick-cut, bone-in pork chops, and you are ready to sear them to absolute steakhouse perfection. You heat up your skillet, you carefully lay the meat down, and you wait for that glorious, sizzling sound of culinary triumph.
But then, disaster strikes. Within seconds, the edges of your beautiful, expensive pork chop begin to lift off the pan. The meat bucks and buckles like a cheap lawn chair. Before your very eyes, the chop contorts itself into the shape of a sad, meaty cereal bowl. Because the center of the meat is now hovering a half-inch above the hot oil, it completely misses out on the searing process. When you finally plate your dinner, the outer edges are tough and overcooked, while the center is a depressing, pale, boiled gray.
If this sounds like a personal attack, take a deep breath and pour yourself a glass of wine. You are not alone, and you are not a bad cook. You have simply fallen victim to the ruthless laws of kitchen physics.
Welcome to my kitchen. I am here to tell you that you do not need a culinary degree from a pretentious French institute to cook like an absolute professional in your own home. You just need a little bit of science, a dash of common sense, and the willingness to learn exactly why your pork chops curl when they hit a hot pan. Today, we are going to dive deep into the thermal dynamics of meat, the anatomy of a pig, and the ten-second, zero-cost prep trick that will instantly upgrade your weeknight dinners and guarantee a flawless, golden-brown crust every single time.
The Anatomy of a Pork Chop (And Why It Hates You)
To understand why your food is aggressively rebelling against you in the skillet, we first need to understand what a pork chop actually is. A piece of meat is not just a uniform, homogenous block of protein. It is a highly complex biological structure made up of distinct layers, tissues, and fibers, all of which react to heat in completely different ways.
The Muscle vs. The Fat Cap
Let’s break down the architecture of a standard pork loin chop. The vast majority of the chop—the part you actually want to eat—is the Longissimus dorsi muscle. This interior section is primarily composed of water, myofibrillar proteins, and a web of intramuscular fat (also known as marbling). This muscle tissue is relatively tender, highly highly susceptible to drying out, and requires careful temperature management to remain juicy.
Surrounding this tender interior muscle is the fat cap. This is the thick, opaque band of subcutaneous fat that runs along the outer edge of the chop. In a culinary sense, this fat cap is a goldmine of flavor. When properly rendered in a hot pan, it becomes crispy, savory, and downright irresistible. However, from a structural standpoint, this fat cap is the exact reason your meat is warping into a bowl shape.
Connective Tissue: The Hidden Saboteur
If you look very closely at the boundary line where the white fat cap meets the pink lean muscle, you will notice a thin, incredibly tough membrane. This is a layer of connective tissue, primarily composed of two proteins called collagen and elastin.
In the living animal, this connective tissue acts as a biological glue, holding the skin and subcutaneous fat tightly to the muscle wall. It is designed by nature to be incredibly strong, elastic, and resilient. In the kitchen, however, this connective tissue is a hidden saboteur.
When you cook a piece of meat low and slow—like braising a pork shoulder for eight hours—collagen slowly breaks down and melts into rich, luxurious gelatin. But when you are pan-searing a pork chop on a Tuesday night, you are using high, fast, aggressive heat. Under these intense thermal conditions, the connective tissue does not have time to melt. Instead, it panics. It seizes up, denatures, and contracts violently. This sudden, aggressive contraction is the mechanical force that ruins your dinner.
The Thermodynamics of Meat: What Happens in the Pan
Cooking is not magic; it is applied thermodynamics. When raw meat meets hot metal, a cascade of violent chemical and physical reactions takes place. Understanding these reactions is the key to taking control of your kitchen.
The Maillard Reaction: The Holy Grail of Searing
The entire goal of pan-searing a pork chop is to achieve the Maillard reaction. Named after the French chemist Louis-Camille Maillard, who first described it in 1912, this is the complex chemical reaction between amino acids and reducing sugars that gives browned food its distinctive, savory flavor.
The Maillard reaction is the holy grail of the culinary arts. It is the reason a seared steak tastes infinitely better than a boiled one. It creates hundreds of new, highly complex flavor compounds that register on our palates as “roasted,” “savory,” and “meaty”. However, the Maillard reaction is notoriously demanding. It generally only occurs at high temperatures, specifically between 280°F and 330°F (140°C to 165°C).
Furthermore, heat transfer in a skillet relies entirely on direct physical contact (conduction). If your pork chop buckles and the center lifts away from the surface of the pan, that pocket of air acts as an insulator. Air is a terrible conductor of heat. Without direct contact with the hot metal, the center of your meat will never reach the 280°F threshold required for browning. It will simply steam in its own ambient moisture, which is exactly why your steaks turn out gray and hopelessly bland.
Shrinkage Discrepancy: The Physics of the Curl
So, we know that the connective tissue contracts, and we know that we need flat surface contact for the Maillard reaction. But why does the meat actually curl? It all comes down to a concept called shrinkage discrepancy.
When you apply heat to any animal protein, it loses moisture and its muscle fibers coagulate. On average, meat will shrink by roughly 25% to 30% of its total volume during the cooking process. However, not all parts of the meat shrink at the same rate.
The lean interior muscle shrinks at a relatively steady, predictable pace. But the outer fat cap, loaded with that highly reactive elastin and connective tissue, shrinks much faster and to a much tighter degree than the muscle it surrounds.
Imagine taking a soft kitchen sponge, tying a thick rubber band tightly around its perimeter, and then tossing it into a hot dryer. As the rubber band shrinks and tightens, the sponge has nowhere to go but up. It bows outward to relieve the tension. This is exactly what is happening in your skillet. The outer band of connective tissue acts like a shrinking corset, squeezing the perimeter of the chop and forcing the center to bulge outward.
The Zero-Cost, 10-Second Fix: Scoring the Fat Cap
Now that we understand the thermal physics and the biological anatomy working against us, we can easily outsmart them. You do not need to buy a heavy meat press. You do not need to stand there pressing the meat down with a spatula for ten minutes. The solution is entirely preventative.
The Technique: How to Score Properly
To stop the chop from curling, we simply have to cut the tension belt. This technique is called scoring, and it takes exactly ten seconds before you start cooking.
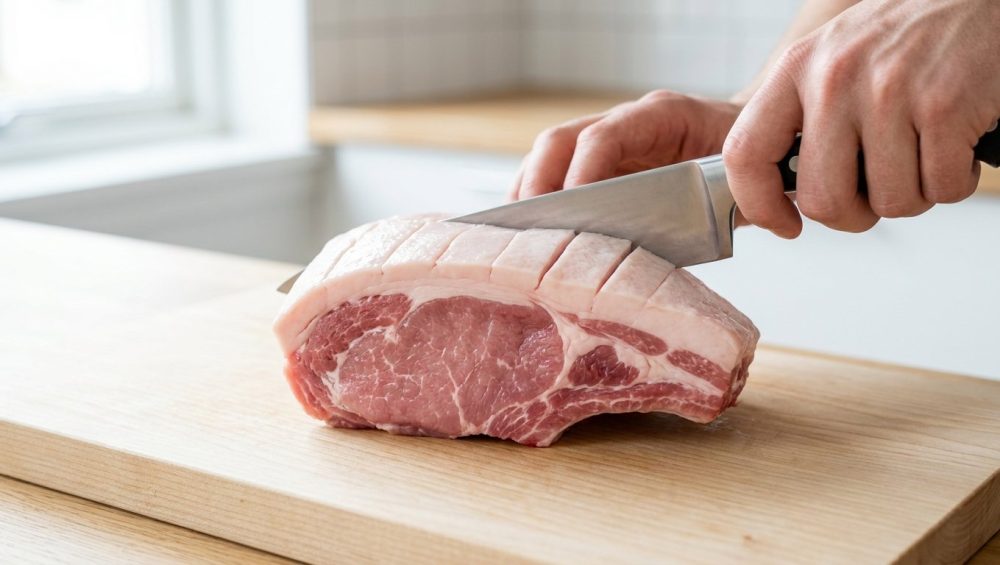
Take your raw pork chop and place it flat on your cutting board. Take a sharp chef’s knife and make vertical cuts into the outer fat cap, spacing them about one inch apart along the entire curved edge of the meat.
You want to cut completely through the white fat and slice cleanly through that tough, silvery membrane of connective tissue, stopping just as your blade reaches the pink muscle. Do not cut deeply into the meat itself, or you will create channels for the internal juices to leak out during cooking.
This is the absolute magic of scoring the fat. When this scored meat hits the hot pan, the connective tissue will still seize and contract. But because you have severed the continuous band, the tension is broken. Instead of squeezing the entire chop into a bowl shape, the individual one-inch segments of fat will simply pull apart from one another, expanding your cuts into little V-shapes. The structural integrity of the “belt” is destroyed, and the lean muscle remains perfectly, beautifully flat against the skillet. Maximum surface contact is maintained, and a flawless, edge-to-edge Maillard crust is guaranteed.
Knife Selection: Why Your Dull Blade is Ruining Dinner
Let me be brutally honest for a moment: scoring a fat cap is incredibly easy, provided you are not trying to do it with a knife that has the cutting power of a wooden spoon. The connective tissue surrounding a pork chop is tough, slippery, and surprisingly resistant to friction.
If you try to score the fat with a dull, neglected blade, you will not slice cleanly through the membrane. Instead, you will end up sawing, tearing, and mangling the edges of your expensive meat, ruining its texture and appearance.
If you find that your knives get dull so fast, you need to take a hard look at your kitchen habits. Are you tossing them into the dishwasher? Are you cutting on glass or marble boards, which are actively dulling your knives with every slice? A sharp knife is the most important tool in any home cook’s arsenal. Keep it honed, hand-wash it immediately after use, and treat it with respect.
Beyond the Curl: Other Reasons Your Pork Chops Suck
Scoring the fat cap will solve the curling problem permanently. But if you want to elevate your weeknight dinners from “edible” to “mind-blowing,” we need to address a few other common rookie mistakes that are sabotaging your sear.
The Moisture Problem: Why Wet Meat Steams
I see this mistake constantly, and it drives me absolutely crazy. You cannot sear wet meat. Period. It defies the laws of physics.
When you pull a pork chop out of its vacuum-sealed plastic packaging, it is covered in surface moisture. If you drop that wet piece of meat directly into a hot pan, the thermal energy of the skillet is immediately hijacked. Instead of driving the temperature of the meat up to the 280°F Maillard threshold, the pan’s heat must first be spent evaporating the surface water.
Water boils and turns to steam at 212°F (100°C). Until every single drop of that surface moisture has evaporated, the temperature of the meat’s exterior cannot rise above 212°F. Your pork chop is literally steaming itself in the pan. By the time the water finally cooks off and the browning process begins, the delicate interior of the chop is already hopelessly overcooked.
The fix is ridiculously simple: before you score, before you season, take a heavy-duty paper towel and aggressively pat the meat bone-dry on all sides. A dry surface is the non-negotiable prerequisite for a great crust.
The Temperature Factor: Cold Meat in a Hot Pan
The second easiest way to ruin a sear is to take meat directly from a 38°F refrigerator and throw it onto a hot skillet.
Cookware relies on thermal mass—its ability to hold and retain heat energy. When you introduce a dense, freezing-cold object into a hot pan, you cause a massive thermal shock. The temperature of the pan plummets instantly. If the pan loses too much heat, it drops below the Maillard zone, and once again, your meat begins to steam and boil in its own juices rather than searing.
Take your pork chops out of the fridge at least 20 to 30 minutes before you plan to cook them. Let them sit on the counter and take the chill off. This simple step ensures that your pan maintains its high heat, delivering a hard, fast sear that locks in flavor without overcooking the center.
The Cookware Conundrum: Ditch the Toxic Non-Stick
As the Sassy Sous-Chef, I have a few strict rules, and this is the most important one: stop trying to achieve professional-level sears in cheap, scratched-up, aluminum non-stick pans. You are wasting your time, you are ruining your food, and you are potentially poisoning your family.
Why Cheap Teflon is the Enemy of a Good Sear
Traditional non-stick pans are coated with Polytetrafluoroethylene (PTFE), commonly known as Teflon. These pans are fantastic for gently cooking scrambled eggs or flipping delicate pancakes on a Sunday morning. They are absolutely useless for searing meat.
To get a proper, steakhouse-quality crust on a pork chop, you need to get your pan ripping hot—often approaching 450°F to 500°F. Here is the brutal truth: cheap PTFE coatings cannot handle that level of thermal stress. When heated past 500°F, Teflon begins to break down at a molecular level, releasing invisible, toxic polymer fumes that can cause flu-like symptoms in humans and are famously fatal to pet birds.
I have zero tolerance for toxic kitchen gear. You should never have to worry about inhaling chemical fumes just to make dinner. Furthermore, when subjected to high-heat searing, these cheap coatings quickly degrade, blistering, peeling, and losing their slip entirely within a few months. Throw them in the trash where they belong.
The Holy Trinity of Searing: Cast Iron, Carbon Steel, and Stainless Steel
If you want to cook like an expert, you need to use the right tools. For searing meat, you need heavy cookware with high thermal mass—pans that can absorb a massive amount of heat and hold onto it tightly when a cold piece of meat is introduced.
Your first option is the classic cast iron skillet. It is cheap, virtually indestructible, and holds heat like a bank vault. Properly seasoning cast iron creates a thick layer of polymerized oil that acts as a safe, natural, chemical-free non-stick surface.
Your second option is carbon steel. Walk into the kitchen of any high-end French restaurant, and you will see stacks of carbon steel pans. They offer the incredible heat retention of cast iron but are significantly lighter and more responsive to temperature changes.
Finally, we have multi-clad stainless steel. Stainless is brilliant because it allows you to build a “fond”—those sticky, caramelized brown bits left in the pan after searing, which form the base of an incredible pan sauce. If you are terrified of your meat sticking to stainless steel, you simply need to learn the water drop test. By heating the pan until a drop of water beads up and dances across the surface like mercury (the Leidenfrost effect), you create a microscopic layer of vapor that prevents proteins from adhering to the metal.
The Ultimate Sassy Sous-Chef Pork Chop Protocol
We have covered the biology, the thermodynamics, the knife skills, and the metallurgy. It is time to put it all together into a foolproof, step-by-step masterclass for the perfect weeknight pork chop.
Prep, Sear, Rest: The Step-by-Step Method
Step 1: Dry and Score. Remove your pork chops from the fridge 30 minutes before cooking. Pat them aggressively dry with paper towels. Take your sharp chef’s knife and score the fat cap at one-inch intervals, cutting through the connective tissue belt to prevent curling.
Step 2: The Dry Brine. Generously season the chops on all sides with kosher salt. Do this at least 30 to 45 minutes before cooking. This is called dry brining. Initially, the salt will draw moisture out of the meat via osmosis. But if you wait, that salty liquid will dissolve the surface proteins and be reabsorbed back into the muscle fibers, seasoning the meat all the way through and helping it retain moisture during cooking.
Step 3: Preheat the Pan. Place your cast iron, carbon steel, or stainless steel skillet over medium-high heat. Let it get genuinely hot. Add a high-smoke-point oil (like avocado or grapeseed oil; leave the extra virgin olive oil in the pantry, as it will burn instantly).
Step 4: The Sear. Carefully lay the chops into the hot oil, laying them away from you so you don’t splash boiling fat onto your favorite shirt. Because you scored the fat cap, the meat will lay perfectly flat. Do not touch them. Do not poke them. Do not move them around. Let the pan do its thermal work. After about 3 to 4 minutes, you should have a gorgeous, mahogany-brown crust. Flip and repeat on the other side.
The Carryover Cooking Factor
Here is where most home cooks ruin their hard work: they overcook the meat out of a misplaced fear of foodborne illness.
For decades, our grandmothers cooked pork chops until they resembled dry, chalky shoe leather. This was due to a historical fear of trichinosis, a parasite that used to be prevalent in the pork supply. However, modern farming practices have virtually eradicated trichinosis in commercial pork. Recognizing this, the USDA completely overhauled its safety guidelines in 2011.
The USDA no longer recommends cooking whole cuts of pork to a dry, miserable 160°F. The current, scientifically backed safety standard for pork chops is an internal temperature of 145°F (63°C), followed by a mandatory three-minute rest period. At 145°F, your pork chop will be incredibly juicy, tender, and slightly blushing pink in the center.
To nail this temperature perfectly, you must account for carryover cooking. When you remove a piece of meat from a hot skillet, the intense heat trapped in the outer layers continues to travel inward, raising the internal temperature of the meat by another 5 to 10 degrees as it rests.
Therefore, you should use a high-quality digital instant-read thermometer to monitor your chops. Pull them out of the pan when the very center hits 135°F to 140°F. Transfer them to a cutting board, tent them loosely with foil, and let them rest for at least 5 minutes. During this rest, the internal temperature will gently coast up to that perfect, safe 145°F mark, and the violently agitated muscle fibers will relax, locking the juices inside the meat instead of bleeding out all over your plate.
The Final Bite
Cooking a restaurant-quality meal at home does not require expensive gadgets, obscure ingredients, or a grueling apprenticeship in a Parisian kitchen. It simply requires a basic understanding of the physical forces at play.
Your pork chops were curling because biology designed the pig’s connective tissue to act like a tight belt, and thermodynamics caused that belt to shrink violently under high heat. By taking ten seconds to score the fat cap, you broke the tension. By drying the meat, you allowed the Maillard reaction to thrive. And by using a proper, heavy-bottomed pan and a digital thermometer, you took absolute control over the thermal transfer.
You are no longer a victim of kitchen chaos. You are the master of your skillet. So go ahead, buy the good meat, score the fat, and sear with confidence. You’ve got this.






