Pour yourself a glass of Pinot Noir, tie your apron, and let’s have a very serious, brutally honest conversation about the sad, mushy, exploded legumes currently sitting in your Dutch oven. We have all been there. You decide to be a responsible, budget-conscious adult. You bypass the canned goods aisle, grab a bag of beautiful dried heirloom beans, and proudly march home. You follow your grandmother’s advice to the letter: you soak them overnight in a giant bowl of plain tap water. The next day, you boil them. Two hours later, you lift the lid, expecting a pot of creamy, perfectly intact culinary perfection.
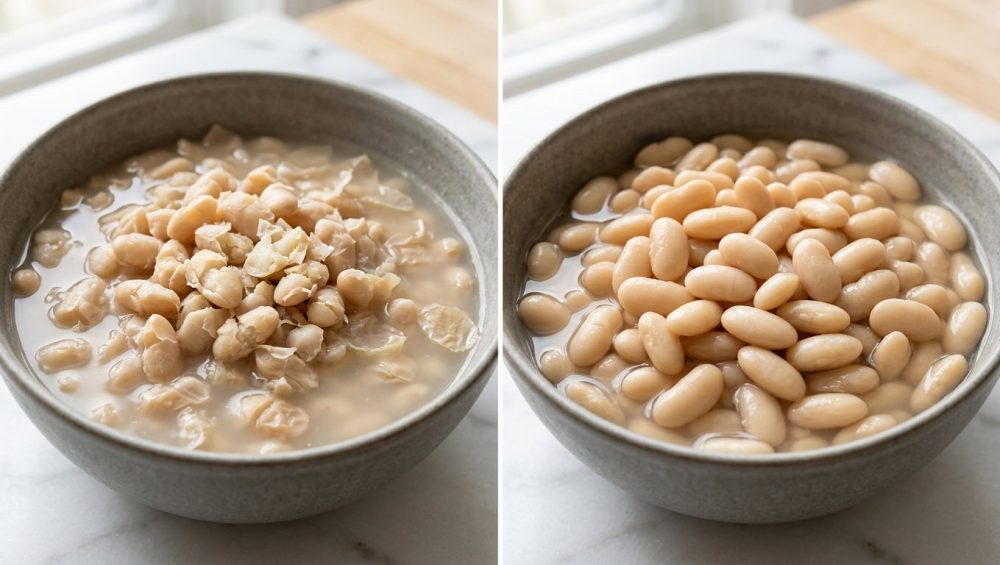
Instead? You are staring at a chaotic, unappetizing sludge. Half the beans have blown their skins off entirely, dissolving into a gritty, starchy porridge, while the other half are somehow still as hard as gravel. It is infuriating. It is enough to make you throw in the towel, order overpriced delivery, and swear off from scratch cooking forever.
But before you toss that pot into the sink, let me stop you. You are not a bad cook. You are just a victim of bad, outdated culinary dogma. For decades, we have been fed a massive lie about how to treat dried legumes. The culprit isn’t your stove, and it isn’t your stirring technique. The culprit is that bowl of plain tap water you used for soaking.
I am here to tell you that if you want to achieve professional-level, restaurant-quality beans—the kind with incredibly creamy interiors and flawlessly intact, snappy skins—you must fundamentally change your prep game. We are going to dive deep into the fascinating food science of pectin, sodium ions, and osmosis. By the end of this masterclass, you will understand exactly why your beans fall apart, and you will learn the simple, scientifically validated brining trick that will completely revolutionize your weeknight dinners. No culinary degree required.
The Pretentious Chef Myth That Ruined Your Tuesday Night Dinner
If you have ever cracked open a vintage cookbook or watched an old-school cooking show, you have undoubtedly heard the golden rule of legume preparation: Never, ever salt your beans until they are completely finished cooking, or they will become tough.
This is, to put it mildly, absolute nonsense. It is a persistent culinary myth that has ruined countless meals, and it is exactly the kind of snobby gatekeeping that I have zero patience for. We need to decode pretentious recipe jargon and look at the actual chemistry happening in your pot.
The anti-salt brigade claims that sodium draws out moisture and hardens the bean’s exterior. But modern food science, including exhaustive testing by culinary authorities like America’s Test Kitchen and the FDA’s Bacteriological Analytical Manual validation studies, has proven the exact opposite. Salting your beans—specifically, soaking them in a saltwater brine before cooking—is the single most effective technique to achieve uniform tenderness and deep, layered flavor.
Why did the “no salt” myth start in the first place? It likely originated from a misunderstanding of how acids interact with legumes (more on that later), combined with the fact that early home cooks were dealing with highly variable, unrefined salts and extremely hard well water. But in a modern kitchen, clinging to this outdated advice is just making your life harder. Weekday cooking is all about efficiency. Time is money, and you do not have three hours to babysit a pot of unevenly cooking beans, only to end up with a disappointing mush. If you are serious about breaking your takeout habit and mastering foundational ingredients, you have to embrace the brine.
Food Science 101: The Pectin Prison and the Calcium Cross-Link
To understand why plain water is the enemy of a good bean, we have to put on our lab coats and look at the microscopic anatomy of a dried legume. Don’t worry, I promise to keep this painless.
The Anatomy of a Dried Bean
A dried bean is essentially a dormant, dehydrated plant embryo surrounded by a starchy food supply (the cotyledon), all encased in a protective outer skin (the seed coat). When you drop that rock-hard bean into water, the moisture can only enter through a tiny, microscopic opening called the micropyle. This is a slow, bottlenecked process.
The seed coat itself is held together by a complex carbohydrate called pectin. Think of pectin as the cellular glue or the mortar between the bricks of the bean’s cell walls. In a dried bean, this pectin network is incredibly strong and rigid. Why? Because the pectin molecules are cross-linked by calcium and magnesium ions.
Calcium ions have a double positive charge (Ca2+). Because of this double charge, a single calcium ion can grab onto two separate pectin strands at the same time, binding them tightly together like a microscopic handcuff. This creates a dense, inflexible web. It is a brilliant evolutionary design meant to protect the seed in nature, but it is an absolute nightmare when you are trying to make a smooth, creamy batch of hummus or a comforting bowl of chili. If you have ever wondered why your dried beans never soften, this rigid, calcium-reinforced pectin prison is the primary suspect.
Why Plain Water Is Actually Your Enemy
So, what happens when you soak this calcium-locked bean in plain tap water overnight?
The water slowly seeps through the micropyle and begins to hydrate the bean. However, plain water does absolutely nothing to weaken the calcium-pectin cross-links. The skin remains stubbornly rigid. As the inside of the bean (the cotyledon) absorbs water, it swells and expands rapidly. But because the outer skin is still locked in its inflexible pectin prison, it cannot stretch to accommodate the swelling interior.
When you finally apply heat and bring the pot to a boil, disaster strikes. The inner starches gelatinize and expand even further. The rigid skin, unable to stretch, undergoes massive shear stress. Eventually, the pressure becomes too great, and pop. The skin blows out, the starchy interior spills into the boiling water, and your beautiful beans disintegrate into a cloudy, unappetizing mush.
This is why the traditional soaking method is fundamentally flawed. It hydrates the bean, but it completely fails to prepare the skin for the thermal and physical expansion that occurs during cooking. If you want to cure cooking anxiety and stop second-guessing your every move at the stove, you need a method that addresses the structural integrity of the bean itself.
The Hero We Need: Why Sodium Ions Are the Ultimate Kitchen Hack
Enter the saltwater brine. By simply adding salt to your soaking water, you trigger a brilliant, invisible chemical reaction that solves the blowout problem entirely. It is not magic; it is just basic inorganic chemistry working in your favor.
The Great Ion Exchange
When you dissolve salt (sodium chloride) in water, it breaks down into positively charged sodium ions (Na+) and negatively charged chloride ions (Cl-). As the beans soak in this salty bath, the sodium ions infiltrate the seed coat and encounter that rigid, calcium-locked pectin network.
Here is where the magic happens: the sodium ions aggressively compete with the calcium and magnesium ions for binding sites on the pectin molecules. Eventually, the sodium displaces the calcium. But remember how calcium has a double positive charge and acts like a handcuff holding two pectin strands together? Sodium only has a single positive charge (Na+). It can only hold onto one pectin strand at a time.
By replacing the double-handed calcium with single-handed sodium, the tight cross-links are broken. The pectin network is fundamentally weakened and loosened. The bean’s skin transforms from a rigid, brittle shell into a pliable, flexible membrane.
The Osmotic Priming Effect
Because the skin is now flexible, it can stretch and expand smoothly as the interior of the bean hydrates and swells. When you transfer the brined beans to the stove and turn up the heat, the pliable skin acts like a gentle balloon, expanding to hold the gelatinizing starches without bursting.
Furthermore, the brine acts as an osmotic primer. The slight salinity draws moisture more evenly through the bean’s layers, preventing the dreaded “soft on the outside, chalky on the inside” texture. The salt also penetrates deep into the cotyledon, seasoning the bean from the inside out. Unbrined beans, even when cooked in heavily salted water, often taste bland in the center because the salt never had time to penetrate the core before the starches fully cooked and locked up. A proper brine allows seasonings to penetrate up to four times deeper than unbrined beans.
If you are a weekend culinary hobbyist looking to fix your food and elevate your from-scratch meals, understanding this ion exchange is your golden ticket. It is the exact kind of low-effort, high-reward technique that separates amateur cooks from the pros.
The Official Sassy Sous-Chef Bean Brining Masterclass
Alright, enough theory. Let’s get down to the practical application. Brining beans is ridiculously simple, but precision matters. We are not just blindly throwing salt into a bowl; we are creating a controlled chemical environment. Here is the definitive, science-backed method for perfectly tender, intact beans every single time.
Step 1: The Ratios (Don’t Guess, Measure)
The goal is to create a brine with a salinity of approximately 1% to 2% by weight. If the brine is too weak, the ion exchange won’t happen efficiently. If it is too strong, you risk over-seasoning the beans (though it takes a lot to truly ruin them this way).
For the standard home cook, the golden ratio is:
3 Tablespoons of Diamond Crystal Kosher Salt (or 1.5 to 2 Tablespoons of Morton Kosher/Sea Salt) per 4 Quarts (1 Gallon) of Water, for every 1 Pound of Dried Beans.
A quick note on salt: Not all salts are created equal by volume. Diamond Crystal is incredibly flaky and light, which is why you need more of it. If you are using dense table salt, cut the measurement down to 1 Tablespoon. Better yet, ditch the table salt entirely—it often contains anti-caking agents and iodine that can introduce metallic off-flavors to your delicate legumes. Stick to pure kosher or sea salt.
Dissolve the salt completely in the water before adding your sorted, rinsed dried beans. Ensure the beans are submerged by at least three inches of water, as they will double or triple in size as they hydrate.
Step 2: The Temperature and Time Variables
Time and temperature are the two levers you can pull to control the brining process.
For the absolute best texture, I recommend a cool room-temperature brine (around 68°F to 72°F) for 8 to 12 hours. This is the perfect overnight scenario. You toss them in the bowl after dinner, and they are ready to cook the next day.
If your kitchen is sweltering, or if you need to extend the brining time because your schedule changed, put the bowl in the refrigerator (34°F to 38°F). You can safely brine beans in the fridge for up to 24 hours without them beginning to ferment or sprout.
What if you forgot to soak them overnight and you need beans for dinner tonight? Do not panic. You can utilize a “quick brine.” Bring the brine solution and the beans to a rapid boil for exactly two minutes. Turn off the heat, cover the pot tightly, and let them sit for one hour. The aggressive heat accelerates the hydration and the ion exchange. It is not quite as perfect as a slow, cold brine, but it is vastly superior to cooking them from rock-hard scratch. Knowing how to pivot like this is an essential kitchen survival guide skill for any busy home cook.
Step 3: The Rinse (Or Lack Thereof)
This is a highly debated topic, but I am going to settle it right now. When the brining time is up, drain the beans. Do not rinse them.
Rinsing washes away the residual surface salt and the flavorful compounds that have begun to develop. You want to carry that seasoned goodness right into your cooking pot.
Now, I know what the health-conscious crowd is thinking: What about the sodium levels? Extensive laboratory testing (including ICP-MS analysis) has shown that a 1.25% brine adds only about 110 to 140 milligrams of sodium per half-cup serving of cooked beans. To put that in perspective, a single slice of standard sandwich bread contains about 150 milligrams. It is well within safe dietary limits.
However, if you are strictly monitoring your sodium intake for medical reasons, you can reduce the brine concentration to 0.75%, or you can choose to rinse the beans after brining and omit any additional salt during the actual cooking process. You will still get the textural benefits of the weakened pectin without the full sodium load.
Navigating the Hard Water Problem and Acidic Roadblocks
Even with a perfect brine, there are two environmental factors that can completely sabotage your beans in the cooking pot: hard water and acidic ingredients. Understanding how to navigate these roadblocks is crucial for consistent success.
Hard Water: The Silent Bean Killer
If you live in an area with notoriously hard tap water, you are fighting an uphill battle. Hard water is heavily saturated with dissolved calcium and magnesium minerals.
Remember the ion exchange we just discussed? If you brine your beans perfectly, replacing the calcium with sodium, but then you boil those beans in hard, calcium-rich tap water, you are effectively undoing all your hard work. The overwhelming amount of calcium in the boiling water will force its way back into the pectin network, re-establishing those rigid cross-links and locking the bean’s skin down tight.
If you suspect hard water is ruining your legumes, the fix is simple: use filtered or bottled spring water for the actual cooking phase. Alternatively, you can add a microscopic pinch of baking soda (about 1/8th of a teaspoon per quart) to the cooking water. The baking soda creates a slightly alkaline environment, which actively promotes the breakdown of pectin into smaller molecules, drastically speeding up the softening process. Just be careful—too much baking soda will turn your beans to mush and leave a soapy, metallic aftertaste.
The Tomato Trap
The second major roadblock is acid. Ingredients with a low pH—like tomatoes, wine, vinegar, or citrus juice—are the mortal enemies of softening pectin.
When pectin is exposed to an acidic environment, the molecules undergo a structural shift. The acid neutralizes the negative charges on the pectin strands, which stops them from repelling each other. Instead, they huddle tightly together, forming an incredibly dense, heat-resistant gel network. In simple terms: acid locks the pectin prison down permanently.
If you add a can of crushed tomatoes or a splash of white wine to your chili or stew before the beans are fully tender, they will never soften. You could boil them for ten hours, and they will still have the texture of damp gravel. This is a classic rookie mistake, and it is exactly why you must stop adding tomatoes too early when building a recipe.
Always, always wait until the beans have reached your desired level of creamy tenderness before introducing any acidic components to the pot. Once the beans are soft, the acid actually becomes helpful—it firms up the exterior just enough to prevent them from turning into mush as the stew simmers and the flavors meld.
Let’s Talk Numbers: Global Bean Economics and Why This Matters Now
You might be wondering why I am so incredibly passionate about the microscopic cellular structure of a humble legume. It is because mastering dried beans is not just a culinary flex; it is a vital economic and nutritional strategy for the modern home cook.
We are living in an era of unprecedented grocery inflation. Food costs are skyrocketing, and families are feeling the pinch at the checkout counter. Meanwhile, the global beans and legumes market is quietly exploding. In 2021, global bean consumption stood at 19 million tons, and production is projected to surpass a staggering 31.6 million metric tons by 2026. The demand for plant-based, sustainable protein is driving a massive agricultural shift.
Dried beans are one of the most cost-effective, nutrient-dense foods on the planet. A one-pound bag of dried heirloom beans might cost a few dollars, but it yields the equivalent of three to four cans of pre-cooked beans. When you rely on canned beans, you are paying a premium for water, tin, and shipping weight. Furthermore, canned beans are often pressure-cooked at extreme temperatures, which degrades their texture and leaves them tasting metallic and flat.
By learning to properly brine and cook dried beans, you are unlocking a massive culinary and economic advantage. You take control of the sodium levels, you dictate the flavor profile from the inside out, and you save a significant amount of money in the process. You don’t need a kitchen full of expensive gadgets to eat like royalty; you just need a few reliable beginner kitchen tools and a solid understanding of basic food science.
The “No-Go” Rule: Toxic Gear to Avoid When Cooking Beans
As your resident Sassy Sous-Chef, I would be entirely remiss if I gave you this masterclass on brining without addressing the actual vessel you are using to cook your food. I have a strict, uncompromising philosophy when it comes to kitchen equipment: I absolutely despise cheap, toxic, corner-cutting gear.
When you are boiling a large pot of brined beans, you are dealing with a hot, slightly salty, and eventually (if you are making chili or stew) acidic liquid. This is a highly reactive environment. If you are using a cheap, scratched non-stick pot from a discount big-box store, you are actively ruining your food and potentially your health.
Those flimsy non-stick coatings (especially older Teflon pans) are not designed to withstand hours of heavy, wet simmering. The salt and heat will cause the chemical coating to degrade, blister, and peel directly into your beautiful, creamy beans. I cannot stress this enough: stop using damaged non-stick cookware for heavy boiling. It is one of the most critical steps in banishing toxic kitchen gear from your home. Furthermore, if you are constantly spraying these cheap pots with aerosol cooking oils to prevent sticking, you are just baking a layer of sticky, polymerized soy lecithin onto the surface, which is exactly why you are ruining your nonstick pans in the first place.
Similarly, avoid unlined aluminum or cheap, thin-gauge reactive metals. The prolonged exposure to the salty bean broth will cause the aluminum to leach into the food, imparting a highly unpleasant, metallic, tinny flavor that will completely mask the delicate, earthy notes of your legumes.
So, what should you use? Invest in high-quality, durable, non-reactive cookware. A heavy-bottomed enameled cast-iron Dutch oven is the absolute gold standard for cooking beans. The thick cast iron provides exceptional, even heat distribution, preventing the beans at the bottom of the pot from scorching, while the glass-like enamel coating is completely inert and will not react with salt or acid.
If a Dutch oven isn’t in the budget, a heavy-gauge, fully clad stainless steel stockpot is your next best option. Stainless steel is incredibly durable, non-reactive, and safe for high-heat simmering. Just ensure you know how to properly manage the heat to prevent sticking.
Troubleshooting Your Bean Disasters
Even with the perfect brine and the finest enameled Dutch oven, things can occasionally go sideways. If you followed the brining rules and your beans are still fighting you, check these two common culprits:
1. Your Beans Belong in a Museum, Not a Pot
Dried beans have a shelf life. They do not stay good forever. As beans sit in a pantry for years, their internal moisture drops to near zero, and the cellular structures become permanently damaged and oxidized. The pectin networks cross-link so aggressively that no amount of sodium ion exchange can save them. If you are boiling beans for four hours and they are still crunchy, they are likely ancient. Buy your beans from stores with high turnover, or better yet, source them directly from reputable heirloom bean purveyors.
2. You Are Boiling Them Violently
Beans require a gentle touch. Once you bring the pot to an initial boil, you must immediately reduce the heat to a bare, lazy simmer. If you maintain a rolling, aggressive boil, the violent agitation will bash the beans against each other and the sides of the pot. The physical shear stress will tear even the most perfectly brined, pliable skin to shreds. Treat them gently. A low, slow simmer ensures the starches gelatinize evenly without causing structural collapse.
Final Thoughts: Reclaiming Your Kitchen Confidence
Cooking from scratch shouldn’t feel like a high-stakes gamble. You shouldn’t have to cross your fingers and pray to the culinary gods every time you put a pot on the stove. When you understand the basic science behind your ingredients—when you know why pectin behaves the way it does, and how a simple spoonful of salt can manipulate cellular structure—you strip away the mystery and the stress.
You do not need a culinary degree to make mind-blowing food. You just need to ditch the outdated myths, invest a few minutes in prep work, and let chemistry do the heavy lifting. By embracing the saltwater brine, you are taking a massive step toward cooking with true intention and confidence.
So the next time you find yourself staring down a bag of dried chickpeas or heirloom pintos, do not reach for that bowl of plain tap water. Give them the salty, osmotic spa treatment they deserve. Your Tuesday night dinners will never be the same, and your palate—and your grocery budget—will thank you. Now go forth, brine boldly, and show those legumes exactly who is boss in your kitchen.