Picture this: It is 6:30 PM on a random Tuesday. You are exhausted from a day of endless emails, your patience is thinner than cheap deli ham, and all you want is a perfectly pan-seared pork chop or a simple, comforting fried egg. You dutifully place your skillet on the stove, crank the heat, and drop in a generous knob of butter. Within seconds, the butter melts, foams, and then—without warning—sounds like a string of angry firecrackers. A rogue droplet of scalding hot grease launches itself out of the pan, landing squarely on your forearm. You jump back, uttering a string of expletives that would make a sailor blush, while your stovetop and favorite shirt are instantly coated in a fine mist of dairy fat.
Welcome to the club. We have all been there.
As a home cook who learned the ropes through sheer trial, error, and setting off the smoke detector more times than I care to admit, I can tell you that stovetop grease explosions are the bane of the weeknight culinary warrior. You might think this violent splattering is just an inevitable tax you have to pay for cooking a decent meal. You might even think it is your fault. I am here, glass of wine in hand, to tell you that it is absolutely not your fault. It is just basic physics.
I firmly believe that anyone—yes, even you, the person who once burned water—can cook like an absolute expert and produce mind-blowing food without stepping foot inside a pretentious culinary school. But to do that, you have to understand your ingredients. You have to understand why your food behaves the way it does under heat. And most importantly, you have to stop relying on cheap, kitchenware that actively sabotages your efforts. If I see one more heavily scratched, peeling non-stick pan in a home kitchen, I am going to scream. We do not do mystery metals or toxic synthetic coatings here. We do real cooking with real tools.
Today, we are going deep into the science of the sauté pan. We are going to break down the exact thermodynamic reasons why your butter turns into a hostile projectile, bust some pervasive kitchen myths passed down from your well-meaning but scientifically misguided grandmother, and equip you with the foolproof techniques you need to control pan heat like a Michelin-starred chef. Grab your favorite cutting board and pour yourself a drink. Class is in session.
The Anatomy of a Grease Explosion: What Is Butter, Anyway?
To understand why your butter is actively trying to assassinate you, we first have to understand what butter actually is. Most people look at a stick of butter and see a solid block of pure, unadulterated fat. That is your first mistake.
Breaking Down the Emulsion
Butter is not pure fat. It is a highly delicate water-in-oil emulsion. When cream is agitated (churned) for a long enough period, the fat membranes smash into each other, break apart, and clump together, separating from the liquid buttermilk. But they do not separate perfectly.
According to the rigorous standards set by the United States Department of Agriculture (USDA), commercially sold butter must contain a minimum of 80 percent butterfat. So, what exactly makes up the remaining 20 percent? Roughly 16 to 18 percent of that stick is pure water, and the final 1 to 2 percent consists of dairy milk solids, primarily whey and casein proteins.
When you toss a tablespoon of butter into a hot pan, you are not just melting fat. You are introducing a significant volume of water and protein directly to a high-heat environment. That hidden water is the true culprit behind your messy stovetop.
American vs. European Butter
Not all butter is created equal, and the type of butter you buy directly impacts the severity of your splatter zone. Standard American butter brands—think of your typical supermarket staples or the beloved Kirkland Signature blue box—hover right around that legally mandated 80 percent fat mark, meaning they carry a relatively high water content.
On the other hand, European-style butters, such as Kerrygold or Plugrá, are churned longer. This extended churning process forces more buttermilk out of the emulsion, resulting in a richer product that boasts anywhere from 82 to 84 percent butterfat. That might sound like a negligible difference to a novice, but in the world of baking and high-heat searing, a 2 to 4 percent drop in water content is massive. Less water means a slightly more stable melt, a richer flavor profile, and, crucially, marginally less violent popping when it hits the heat.
However, do not be fooled into thinking that splurging on European butter will magically solve all your splattering woes. Even at 84 percent fat, there is still more than enough moisture trapped in that golden block to cause a ruckus. To stop the pop, we have to look at the physics of the pan.
The Physics of the Pop: Why Water and Hot Fat Hate Each Other
Cooking is not magic; it is applied chemistry and thermodynamics. And when it comes to the relationship between water and hot cooking fat, the laws of physics are brutally unforgiving.
The 212°F Boiling Point Collision
Here is the fundamental rule of the kitchen: liquid water turns into gaseous steam at exactly 212°F (100°C). Cooking fats, however, can easily reach temperatures of 350°F, 400°F, or even 450°F without boiling. They simply get hotter and hotter until they eventually reach their smoke point and begin to burn and break down.
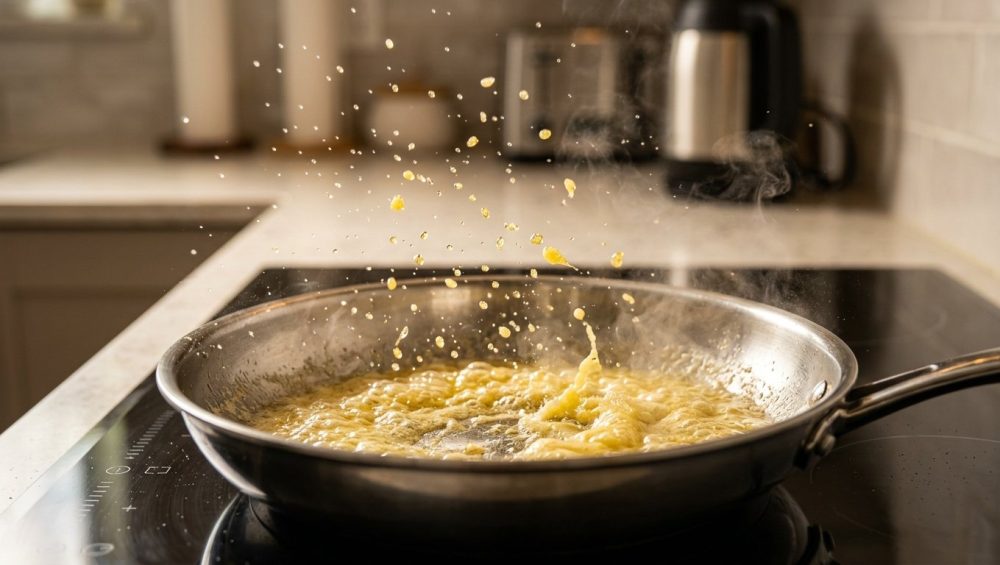
When you place a knob of butter into a skillet that has been preheated to 350°F, you are creating an immediate, violent thermal collision. The fat portion of the butter melts instantly and coats the bottom of the pan. Meanwhile, the water portion of the butter hits that 350°F surface and instantly vaporizes into steam.
Steam Expansion and the Trapped Vapor Phenomenon
When liquid water converts into steam, it rapidly expands to roughly 1,600 times its original volume. Because liquid fat is significantly heavier, denser, and more viscous than gaseous steam, the steam temporarily gets trapped underneath the layer of melted butterfat.
This creates a microscopic pressure cooker at the bottom of your skillet. The trapped steam builds kinetic energy until the pressure becomes too great, and it violently bursts through the surface of the fat. When that steam bubble pops, it acts like a miniature depth charge, launching tiny, scalding droplets of butterfat into the air. That is the aggressive “pop” and splatter that stains your apron and burns your wrists.
This exact same thermodynamic principle is why throwing a cup of water onto a grease fire is a catastrophic mistake. The water sinks below the burning oil, instantly vaporizes, and propels a massive fireball of flaming grease into your kitchen ceiling. While your morning eggs are hopefully not on fire, the physics of the splatter are identical.
Why Adding Food Makes It Worse
You might notice that the butter eventually calms down and stops popping after a minute or two. That silence means all the inherent water in the butter has successfully evaporated. But the moment you drop a piece of chicken, a steak, or a handful of mushrooms into the pan, the chaotic splattering starts all over again.
Why? Because all food contains water. When the surface moisture of your food makes contact with the hot fat, the water vaporizes, expands, and throws the overlying oil upward, creating long jets of hot fat that break into flying droplets. That glorious, mouth-watering sizzling sound you hear when deep-frying or searing is literally the auditory evidence of water violently leaving the food and turning into steam.
The Great Oil-and-Butter Myth (Busted)
If you have spent any time around older generations of home cooks, you have undoubtedly heard this classic piece of kitchen folklore: “Just add a splash of olive oil to your butter! It stops the butter from splattering and raises the smoke point so it won’t burn.”
I say this with all the love and respect in the world for our grandmothers: this is complete and utter nonsense. It is a culinary myth that needs to be permanently retired.
“Just Add a Drop of Oil!” – Why Your Grandmother Was Wrong
Let’s use our critical thinking skills. We just established that splattering is caused by the water inside the butter vaporizing and bursting through the fat layer. If you add a tablespoon of olive oil or canola oil to the pan alongside your butter, have you magically removed the water from the butter? No. The water is still there.
In fact, adding extra oil often makes the splattering noticeably worse. By adding more fat to the pan, you are creating a deeper pool of liquid for the water to sink into. When the water vaporizes under a deeper layer of fat, the resulting steam bubble has to push through more resistance, resulting in a larger, more aggressive pop when it finally breaches the surface. The oil does absolutely nothing to stop the thermodynamic reaction between water and heat.
The Truth About Smoke Points vs. Splatter Points
The second half of that persistent myth claims that mixing oil with butter raises the butter’s smoke point. Again, science says otherwise.
The smoke point of standard, unclarified butter is relatively low—around 350°F (177°C). This low threshold is entirely due to the dairy milk solids (the proteins and sugars) suspended in the fat. When the pan hits 350°F, those milk solids begin to toast, turn brown, and eventually burn, turning black and acrid.
If you pour avocado oil (which has a smoke point of 500°F) into a pan and add a knob of butter, the pan’s overall temperature capacity does not magically average out. The milk solids in the butter are still sitting in a pan that is getting hotter and hotter. The moment the temperature of that oil-and-butter mixture reaches 350°F, the milk solids will begin to burn, regardless of what they are swimming in.
The only slight truth to this myth is dilution. By adding oil, you are diluting the concentration of milk solids in the pan, which means they might take a few extra seconds to fully blacken, and the burnt flavor might be slightly less pronounced. But they will still burn. If you want to safely sear at high temperatures without burning your fat, mixing oils is a fool’s errand.
Masterful Heat Control: Taming the Pan Thermodynamics
So, if adding oil is a myth, how do we actually stop the stovetop from looking like a Jackson Pollock painting? The answer lies in masterful heat control. Time is money during the week, but taking sixty seconds to manage your thermals will save you ten minutes of scrubbing grease off your backsplash later.
The Cold Pan Start
One of the most effective ways to evaporate the water out of your butter gently is to utilize the cold pan start. Instead of preheating your skillet until it is blazing hot and then dropping the butter in to face an instant thermal shock, try placing your butter into a cold pan and turning the burner to medium-low.
As the heavy-bottomed pan gradually warms up, the butter melts slowly. The water content approaches the 212°F boiling point at a relaxed pace. Instead of a violent, explosive pop, the water will gently bubble and sizzle away. You will see a layer of white foam form on the surface—this is the water escaping and the milk proteins separating.
Once the bubbling subsides and the fat turns clear with little white specks resting at the bottom, congratulations! You have successfully cooked off the water. Now you can safely crank the heat up to medium-high to sear your food. Without the water present, the butterfat will sit calmly in the pan, waiting for your ingredients.
Gradual Heating vs. Shock Heating
Shock heating is the enemy of a clean kitchen. When you blast a pan with maximum heat right out of the gate, you create severe temperature differentials. This not only causes aggressive splattering when moisture is introduced, but it can also permanently warp your cookware.
Gradual heating allows you to monitor the visual cues of your fat. First comes the melt, then the foaming (water evaporation), then the clearing of the fat, and finally, the browning of the milk solids. If you let those milk solids toast to a beautiful golden-hazelnut color, you have just made beurre noisette, or brown butter. If you want to make better brown butter for your weekend baking projects or pasta sauces, controlling this gentle evaporation phase is absolutely critical.
Choosing the Right Cookware
I am going to reiterate my strict no-go rule on toxic gear: throw away your cheap, scratched, peeling Teflon skillets. Not only do they release toxic polymer fumes when heated past 390°F, but their lightweight aluminum construction creates massive hot spots. These hot spots cause localized micro-explosions in your butter, making splattering erratic and uncontrollable. Because cooking spray is the enemy of any decent pan’s longevity anyway, you should be investing in real materials.
You need heavy-clad stainless steel, thick carbon steel, or traditional cast iron. These materials possess the thermal mass required to distribute heat evenly across the entire cooking surface. An even heat distribution means the water in your butter evaporates uniformly rather than violently erupting over a single hot spot.
When using high-quality stainless steel, you should always use the water drop test to check if the pan has reached the correct temperature before adding your fat. If a droplet of water beads up and dances across the surface like a mercury marble, the pan is perfectly heated, and you are ready to cook. If you want to prevent protein sticking to your stainless steel, mastering this exact thermal sweet spot is mandatory.
Clarified Butter and Ghee: The Ultimate Splatter-Free Solutions
If you want the rich, luxurious flavor of butter, but you want absolutely zero splattering and the ability to sear a steak at 450°F without filling your kitchen with acrid smoke, there is only one true solution: Clarified butter.
What Is Clarified Butter?
Clarified butter is exactly what it sounds like: butter that has had its impurities removed. By gently melting the butter and allowing the components to separate by density, you can completely eliminate the two things that cause problems in the pan: the water (which causes the splattering) and the dairy milk solids (which cause the burning and smoking).
Once the water and solids are stripped away, you are left with 100 percent pure, golden butterfat. Because there is no water left to vaporize, clarified butter will sit completely silently in a hot pan. No popping, no hissing, no grease explosions.
The Smoke Point Upgrade
The functional upgrade of clarifying your butter is staggering. While raw butter will start to burn and smoke at a measly 350°F, pure clarified butter boasts a massive smoke point of 450°F to 485°F. This makes it one of the most stable, high-heat cooking fats available in the culinary world.
You can confidently drop a thick ribeye into a blazing hot cast iron skillet coated in clarified butter, and you will get a crust so perfect it will make you weep, all without setting off the smoke detector. Plus, because the lactose and casein have been removed, it is generally safe for people with severe dairy sensitivities.
How to Make Liquid Gold at Home
Do not waste your hard-earned money buying tiny, overpriced jars of clarified butter at the artisanal grocery store. You can make a massive batch at home for a fraction of the cost. I highly recommend making this a weekend project.
- The Melt: Place a pound (or two) of high-quality unsalted butter into a heavy-bottomed saucepan over low heat. Do not stir it. Just let it melt gently.
- The Separation: As it melts, it will separate into three distinct layers. A white, frothy foam (the whey proteins and trapped water vapor) will rise to the very top. The pure, clear butterfat will sit in the middle. The heavier milk solids (casein) will sink to the bottom.
- The Skim: Take a wide, shallow spoon and meticulously skim the white foam off the top and discard it.
- The Pour: Once the top is clear, carefully pour the golden liquid fat into a clean glass mason jar, leaving the sunken white solids behind in the pot.
If you choose to let the butter simmer a little longer before straining, allowing those sunken milk solids to toast and caramelize at the bottom of the pot, you will infuse the fat with a deeply nutty, aromatic flavor. Congratulations, you have just made traditional Indian Ghee.
Because you have removed all the water, this liquid gold is entirely shelf-stable. You can leave the jar right on your countertop for months without it going rancid. It is the ultimate time-saving weeknight hack.
Ingredient Prep: Your First Line of Defense
We have fixed the butter, but we are only halfway there. Remember, the moment you add food to hot fat, the surface moisture on that food will violently vaporize and cause splattering. If your ingredients are dripping wet, even pure clarified butter will pop like crazy. Your first line of defense against a messy stove is rigorous ingredient preparation.
The Art of the Paper Towel
I cannot stress this enough: moisture is the enemy of browning. If you pull a chicken breast out of its plastic packaging and immediately toss it into a hot pan, the pan’s thermal energy has to waste time boiling away that surface water before the meat can even begin to brown. That boiling process creates massive steam pockets and aggressive grease splatters.
You must thoroughly pat your proteins dry with paper towels before they go anywhere near the stove. Drying the surface guarantees immediate contact with the hot fat, initiating the Maillard reaction instantly. That surface moisture is exactly why your chicken won’t brown properly. Dry it off, and you will get a gorgeous, golden crust with half the mess.
Room Temperature vs. Fridge-Cold Proteins
Dropping an ice-cold piece of meat directly from the refrigerator into a hot pan is a rookie mistake. As the cold meat hits the humid air of your kitchen, microscopic condensation forms on its surface. When that condensation hits the hot butter, you get an instant pop.
Let your proteins rest on the counter for 20 to 30 minutes before cooking. This takes the chill off the meat, ensures a more even internal cook, and allows surface condensation to evaporate naturally.
If you want to take your prep to the next level, utilize the technique of dry brining. By generously salting your steaks or poultry and leaving them uncovered on a wire rack in the fridge overnight, the salt draws out the interior moisture, which is then reabsorbed, while the cold, circulating air of the fridge perfectly desiccates the exterior skin. Combine this with the magic of dry brining to guarantee the crispiest, most splatter-free sear of your life.
Managing Moisture in Vegetables
Proteins aren’t the only culprits. Freshly washed spinach, damp mushrooms, and water-logged zucchini are notorious for causing grease explosions.
If you wash your greens, you must run them through a salad spinner until they are bone dry. For mushrooms, never wash them under a running faucet; they act like sponges and will release all that tap water directly into your hot butter, turning your sauté into a sad, soggy boil. Instead, wipe mushrooms clean with a damp paper towel.
Tactical Gear: Splatter Screens and Defensive Tools
Even with perfect heat control, clarified butter, and bone-dry ingredients, high-heat cooking will always produce a tiny bit of inevitable micro-splatter. When you are hard-searing a steak or frying up Sunday morning bacon, you need the right tactical gear to protect your kitchen and your skin.
Why Lids Are Actually Your Enemy
When the popping starts, the natural human instinct is to grab a heavy lid and slam it over the pan to contain the chaos. This is a massive mistake.
When you cover a hot, frying pan with a lid, you trap all the escaping steam. That steam rises, hits the relatively cooler surface of the lid, and immediately condenses back into liquid water droplets. Eventually, gravity wins, and those water droplets rain right back down into the boiling hot fat.
This creates a vicious, cyclical reaction of secondary splattering that is often more violent than the initial pop. Furthermore, by trapping the steam, you are actively changing the cooking environment from a dry-heat sear to a moist-heat steam. You will ruin the crispy crust you worked so hard to build. Lids are for braising and simmering, never for pan-frying.
The Mesh Splatter Screen
The unsung hero of the weeknight kitchen is the fine-mesh stainless steel splatter screen. This brilliant, inexpensive tool rests flat across the top of your skillet. The microscopic holes in the metal mesh are large enough to allow steam to escape freely—ensuring your food stays crispy and dry—but they are small enough to catch and trap the flying droplets of hot grease.
It is the single most effective way to keep your stovetop pristine without compromising the quality of your food. Buy a sturdy, dishwasher-safe splatter screen and keep it within arm’s reach of your stove at all times.
The Right Spatula and Cleanup Tools
When you are dealing with hot, popping butter, the last thing you want is for your tools to melt into your dinner. I despise cheap plastic turners that fray at the edges. Ever wonder why your spatulas taste like soap when you use them? It is because low-grade silicone and nylon absorb dishwasher detergents and degrade under high heat. Invest in a high-quality, flexible, slotted stainless steel fish turner. It can withstand 500°F pan temperatures without breaking a sweat.
And when dinner is done and there are a few inevitable flecks of grease on your counter, do not ruin your sponges trying to scrub it away. This is why you absolutely need a bench scraper to effortlessly squeegee the mess right off your prep station into the sink.
Weekday Shortcuts vs. Weekend Perfection
As a busy professional, I live by the mantra that time is money. But I also firmly believe that weeknight efficiency should never come at the expense of flavor. Here is how I manage the butter-splatter conundrum depending on the day of the week.
The Quick Tuesday Night Sauté Strategy
It is Tuesday. You are tired. You do not have the patience to gently coax the water out of whole butter, and you certainly do not have time to clean the stove.
This is when you reach for that jar of homemade clarified butter sitting on your counter. Drop a spoonful into your stainless steel skillet, crank the heat, and sear your perfectly dried chicken thighs without a single drop of grease hitting the backsplash.
If you ran out of clarified butter, use a high-smoke-point, neutral oil like avocado oil for the actual cooking process. Once the protein is fully cooked and resting on a cutting board, turn the burner off completely. While the pan is still warm but the heat source is dead, toss in a generous knob of cold, whole butter. The residual heat will melt the butter gently, allowing the water to evaporate softly without splattering, while the milk solids emulsify with the pan drippings to create a glossy, luxurious pan sauce. You get all the flavor of butter with zero the mess.
Of course, to ensure the meat is perfectly cooked before you build that sauce, you need accurate temperature readings. If your meat thermometer is lying to you, your dinner is doomed regardless of how perfectly you managed the pan fat. Always use a calibrated, instant-read digital thermometer.
The Elaborate Saturday Night Pan-Baste
The weekend is when we slow down. This is when we embrace the process, pour a second glass of wine, and aim for absolute culinary perfection.
When I am cooking a thick-cut, dry-aged steak on a Saturday night, I want the complex, nutty flavor of browned milk solids permeating the meat. I start by searing the steak in a tiny bit of clarified butter or beef tallow to establish the crust. Then, during the last two minutes of cooking, I drop the heat to medium-low and add a massive, unapologetic chunk of whole, European-style butter to the pan, along with crushed garlic cloves and sprigs of fresh thyme.
As the butter melts, the water content causes it to foam vigorously. I tilt the pan toward me, grab a large spoon, and rapidly baste the foaming butter over the top of the steak. The continuous movement and the cooling effect of the evaporating water actually prevent the milk solids from burning instantly. Instead, they slowly toast to a perfect golden brown, enveloping the steak in a rich, aromatic, hazelnut-scented crust.
Because the heat is lowered and the butter is actively being agitated, the splattering is kept to a manageable minimum. It is a technique that requires patience, attention, and respect for the ingredients. Otherwise, you will wonder why your cast iron leaves black specks of burnt, acrid dairy protein all over your expensive cut of beef.
Conquering the Kitchen with Confidence
Cooking is not about blindly following recipes or crossing your fingers and hoping the stove doesn’t bite back. It is about understanding the fundamental rules of engagement. When you know that butter is an emulsion of fat and water, and you understand the violent thermodynamics of steam expansion, the mystery of the splattering pan completely vanishes.
You no longer have to fear the sizzle or dread the cleanup. By keeping your ingredients bone-dry, managing your thermal shock, utilizing tools like splatter screens instead of suffocating lids, and harnessing the incredible high-heat power of clarified butter, you are taking absolute control of your kitchen environment.
You don’t need a culinary degree to cook like an expert. You just need a little bit of science, a refusal to use cheap toxic gear, and the confidence to show that hot pan exactly who is boss. Now, wipe down your counters, sharpen your knives, and go make something spectacular. I’ll be here, finishing my wine, cheering you on.


