Picture this: It is a busy Tuesday night. You are exhausted, you are hungry, and you just want a simple, comforting bowl of carbohydrates. You have a pot of water on the stove, you drop in your pasta, and you turn your back for exactly five seconds to mince a clove of garlic. Suddenly, you hear it. The dreaded, unmistakable hiss of water aggressively overflowing onto the hot gas burner. You whip around to find your stovetop covered in a thick, bubbling, cloudy mess of starchy foam that is rapidly baking onto the metal grate. You spend the next ten minutes frantically blowing on the pot, adjusting the heat, and mourning the fact that you will now have to spend your post-dinner relaxation time scrubbing burnt carbon off your stove.
Listen up: We have all been there. But as your resident Sassy Sous-Chef, I am here to tell you that you do not have to live like this. You do not need a culinary degree from Le Cordon Bleu to understand how to control your cookware. You just need a little bit of science, a dash of common sense, and the willingness to rethink everything your grandmother taught you about boiling water.
Today, we are going deep into the physics and chemistry of your kitchen. We are going to decode the exact molecular reactions that cause that infuriating starchy foam, and we are going to outline the foolproof, scientifically backed methods to permanently prevent messy stovetop spills. No fluff, no pretentious chef-speak, and absolutely no tolerance for bad kitchen habits. Grab your favorite spatula, pour yourself a glass of wine, and let’s get into it.
The Chemistry of the Culinary Eruption: Why Pasta Water Foams
To defeat your enemy, you must first understand your enemy. Why does a pot of plain water boil politely, while a pot of pasta water turns into a violent, foaming volcano? The answer lies in a fascinating intersection of botany, thermodynamics, and fluid dynamics.
The Anatomy of a Noodle
Dry pasta is essentially a miracle of food engineering. High-quality pasta is made from durum wheat semolina, which is mixed with water and extruded through dies (preferably bronze, for that beautiful, sauce-gripping texture). On a microscopic level, a dry noodle is a tightly packed matrix of gluten proteins and starch granules. Starch is a complex carbohydrate made up of two primary glucose polymers: amylose (which is linear and straight) and amylopectin (which is highly branched).
When you drop that dry, brittle noodle into a pot of boiling water, a process called starch gelatinization begins. As the water penetrates the pasta matrix, the tightly packed starch granules begin to absorb the hot liquid. They swell, loosen, and eventually burst open. When they burst, they release those amylose and amylopectin molecules directly into your cooking water.
The Science of Surface Tension
Now, let’s talk about the water itself. Pure water has a high surface tension. The H2O molecules at the very surface of the water are highly attracted to each other because they do not have any water molecules above them to bond with. They pull tightly together, forming a sort of invisible, microscopic “skin.” When pure water boils, the steam bubbles rise from the bottom of the pot, hit that surface skin, easily break through it, and pop. The steam escapes, and the water level remains relatively stable.
However, when those sticky starch molecules leach out of your pasta, they completely change the physics of the pot. Starch acts as a surfactant. It interferes with the water molecules, lowering the surface tension just enough to make that invisible “skin” incredibly elastic.
When a steam bubble rises to the surface of starchy water, the bubble doesn’t just pop. The starch-reinforced water stretches around the steam, creating a flexible, resilient bubble wall. Because these bubbles are now stabilized by the starch, they refuse to burst immediately. As more and more bubbles rise from the heat source below, they begin to stack on top of each other. This rapid accumulation of unbreakable bubbles creates the thick, expanding foam that inevitably climbs the walls of your pot and ruins your stovetop.
Understanding this specific chemical reaction is the ultimate key to surviving kitchen disasters. Once you realize that you are fighting a battle against elastic starch bubbles, the solutions become incredibly obvious.
The Myth, The Legend, The Wooden Spoon Trick
If you have spent any time on the internet, or if you have an Italian grandmother, you have likely heard of the famous wooden spoon trick. The advice is simple: place a wooden spoon horizontally across the rim of your boiling pot, and the water will magically refuse to boil over.
But does it actually work? Or is it just another kitchen superstition?
The Physics of Wood vs. Water
The answer is yes, it absolutely works—but it is not magic; it is pure thermodynamics and material science. The wooden spoon trick relies on two fundamental properties of wood: its thermal conductivity and its cellular structure.
First, let’s look at temperature. Wood is an incredibly poor conductor of heat. While the water in your pot is bubbling away at 212°F (100°C), the wooden spoon resting on top remains relatively close to room temperature. When those hot, starchy, elastic bubbles rise up and physically touch the cool wood, the temperature differential causes a sudden, localized drop in heat. The steam trapped inside the bubble rapidly condenses back into liquid water, causing the entire structural integrity of the bubble to collapse.
Second, let’s look at texture. Wood is highly porous and hydrophilic, meaning it naturally attracts and absorbs water. Its surface is made of rough cellulose fibers. When the smooth, tension-filled wall of a starch bubble hits the rough, dry, water-absorbing surface of the wooden spoon, the physical friction and moisture-wicking action pierce the bubble wall, popping it instantly.
Why the Spoon Trick Fails
Before you go resting a spoon on every pot in your kitchen, you need to know the limitations. The spoon trick is a buffer, not a miracle worker.
If your pot is filled to the absolute brim with water, or if you have the heat cranked to an apocalyptic, roaring inferno, the sheer volume and speed of the rising foam will overwhelm the spoon. The wood will become saturated with boiling water, its temperature will rise, and it will lose its ability to condense and pop the bubbles. Furthermore, not all spoons are created equal. A spoon made of dense, smooth bamboo or one that has been heavily coated in mineral oil will repel water, rendering the trick much less effective.
Relying solely on a spoon while ignoring your heat settings is a rookie error, and this simple misunderstanding is one of the main factors ruining your dinners. The spoon is a safety net; it buys you the few seconds you need to walk over and turn the heat down. It is not a substitute for proper temperature management.
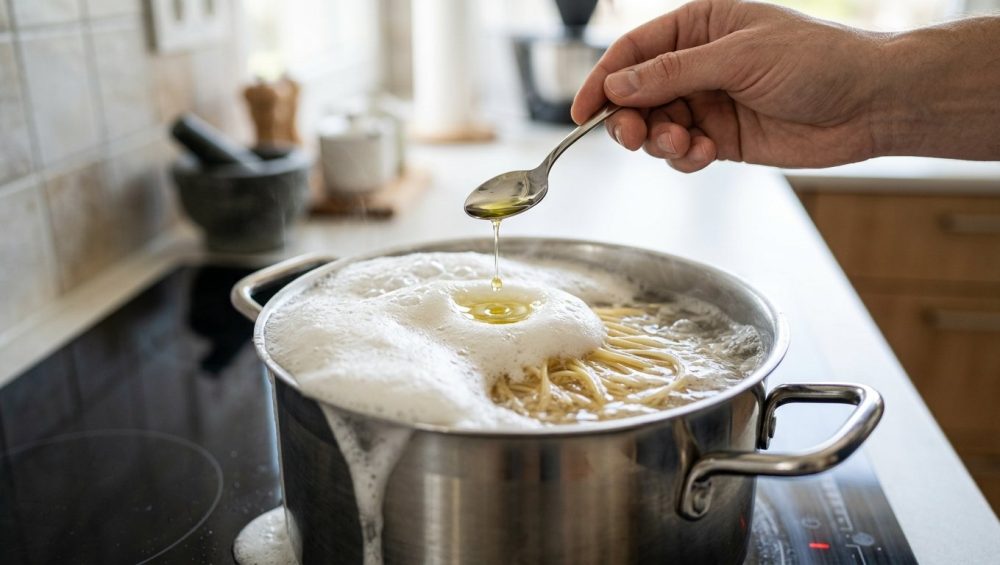
The “Fat Trick” and the Great Olive Oil Debate
Let’s address the most controversial piece of pasta advice in the culinary world: adding a splash of olive oil to the boiling water.
If you ask a casual home cook why they do this, they will usually tell you it stops the noodles from sticking together. (Spoiler alert: it doesn’t. Oil floats. Your pasta is submerged. The math doesn’t math). However, if you ask someone who understands the science of boiling water, they will tell you that adding oil is actually a highly effective way to stop the pot from boiling over.
How Oil Breaks the Tension
From a purely scientific standpoint, adding a tablespoon of oil to starchy water is a brilliant way to destroy foam. Oil molecules are hydrophobic—they aggressively repel water. Because oil is less dense than water, it naturally floats to the surface, exactly where the problematic starch bubbles are forming.
When a starch bubble rises and hits the layer of oil, the hydrophobic lipids disrupt the structural integrity of the bubble’s “skin.” The oil literally breaks the surface tension, causing the bubbles to snap and collapse before they can stack into a foam. If your only goal in life is to prevent a boil-over, dropping a tiny pat of butter or a teaspoon of oil into the water will absolutely solve your problem.
Why You Should Never Do It
But here is where I, your Sassy Sous-Chef, put my foot down. Do not add oil to your pasta water. Ever.
Yes, it stops the foam. But at what cost? When your pasta is perfectly al dente and you pour the contents of your pot into a colander, that floating layer of oil drains directly down over your noodles. It coats every single piece of penne, spaghetti, and rigatoni in a slick, waterproof barrier.
When you subsequently add your beautiful, slow-simmered marinara or your delicate garlic-infused white wine sauce, the sauce will literally slide right off the pasta and pool sadly at the bottom of the bowl. Coating your noodles in a slick layer of fat completely ruins your sauce by preventing it from adhering.
We do not compromise the final quality of our meal just to save ourselves from turning down the stove dial. If you want to stop the foam, manage your heat, use a bigger pot, or stir your pasta. Leave your expensive extra virgin olive oil out of the boiling water.
The Water-to-Pasta Ratio: Debunking the Cauldron Myth
For generations, cookbook authors and television chefs have aggressively pushed the “Cauldron Rule.” The standard advice dictates that you must use an absurdly large pot filled with 4 to 6 quarts of rapidly boiling water for every single pound of pasta. The rationale was that a massive volume of water dilutes the leached starch, preventing the water from becoming too viscous, which in turn prevents the pasta from sticking and the pot from foaming over.
I am here to tell you that this rule is completely outdated, highly inefficient, and actively detrimental to your final dish.
The Magic of Concentrated Starch
Modern food science—championed by culinary legends like Harold McGee and J. Kenji López-Alt—has proven that you can cook pasta perfectly in a fraction of the water. Using less water (just enough to comfortably submerge the noodles) means your pot comes to a boil in five minutes instead of twenty, saving you massive amounts of time and energy on a weeknight.
More importantly, using less water means the starch that leaches out of the pasta is not diluted into a massive, watery abyss. Instead, you are left with a highly concentrated, cloudy, viscous liquid. Listen to me very carefully: this highly concentrated liquid is the absolute magic of starchy water that professional chefs rely on to make restaurant-quality meals.
This liquid gold is a powerful emulsifier. When you add a splash of this concentrated starch water to a pan of hot fat (like butter, olive oil, or rendered guanciale), the starch physically binds the water and the fat together into a glossy, creamy, unified sauce. Without this starchy binder, your emulsion breaks and your cheese sauce gets grainy and unappetizing.
The Catch: Higher Starch = Higher Foam Risk
Here is the trade-off: if you use less water, your water becomes significantly starchier. And as we learned in our chemistry lesson, more starch means stronger bubbles and a much higher risk of the pot boiling over.
If you choose to use the low-water method, you cannot walk away from the stove. You must use a wider, shallower vessel (like a large sauté pan or a braiser) rather than a tall stockpot. The wider surface area allows the steam bubbles to spread out and dissipate rather than stacking vertically. In fact, if you want to save even more time, the frying pan pasta trick is a total game-changer. You place dry pasta in a wide skillet, cover it with cold water, and turn on the heat. As the water comes to a boil, the pasta cooks, the liquid reduces, and you are left with perfectly cooked noodles sitting in a shallow pool of premium, ultra-concentrated starch water, ready to be sauced.
Pot Geometry and The “No-Go” Rule on Toxic Gear
We cannot discuss boiling water without discussing the vessel holding that water. The geometry and material of your cookware play a massive role in whether your dinner stays in the pot or ends up on the burner.
Tall vs. Wide
If you use a tall, narrow pot (like an asparagus steamer or a small soup pot) to boil pasta, you are begging for a boil-over. A narrow pot forces all the rising steam to funnel through a very small surface area. The starch bubbles have nowhere to go but up, rapidly climbing the steep walls.
Conversely, a wide pot (like a Dutch oven or a broad stockpot) provides a massive surface area at the top of the water. The bubbles are distributed horizontally. They have room to stretch, thin out, and pop before they ever reach the rim. Always choose width over height when boiling starchy foods.
The “No-Go” Rule on Toxic Gear
Now, allow me a brief moment to get on my soapbox, because this is a non-negotiable rule in my kitchen. If you are boiling pasta in a flimsy, scratched, bargain-bin aluminum pot lined with a degraded non-stick coating, we need to have a serious intervention.
I have zero patience for cheap cookware with peeling non-stick coatings that leach chemicals into your food. Not only do these thin pots have terrible heat distribution (causing aggressive, localized hot spots that trigger sudden, violent boil-overs), but they are fundamentally unsafe. When non-stick coatings degrade, they can release microplastics and toxic forever chemicals (PFAS) directly into your boiling water.
As a home cook who cares about the quality of the food I serve my family, I am a massive advocate for banishing toxic kitchen gear from your home immediately. You do not need a cabinet full of cheap, reactive mystery metals.
If you want to cook safely, efficiently, and with total control over your heat, investing in a heavy-bottomed piece of high-quality stainless steel will change your culinary life. A multi-clad stainless steel pot has a core of aluminum or copper sandwiched between layers of surgical-grade steel. This construction absorbs the heat from your stove and distributes it perfectly evenly across the entire base and up the sides of the pot. When the heat is even, the boil is even. You don’t get explosive geysers of steam shooting up from one side of the pot. You get a controlled, predictable simmer.
Step-by-Step: The Foolproof Method to Stop the Spill
We have covered the science, the myths, and the equipment. Now, let’s put it all together into a rigorous, foolproof, step-by-step masterclass on how to boil pasta without ever reaching for the paper towels to clean your stove.
Step 1: Select the Right Vessel
Choose a wide, heavy-bottomed stainless steel or enameled cast-iron pot. Ensure that once your water and pasta are added, there is still at least three inches of clearance between the surface of the water and the rim of the pot. Give the foam room to breathe.
Step 2: The Water Ratio
Fill the pot with enough water to easily submerge the pasta, plus an extra inch or two to account for expansion. You do not need a massive cauldron, but you do need enough liquid so the pasta can move freely when stirred.
Step 3: Season Aggressively
Before the water boils, add your salt. The old adage says pasta water should be “salty like the sea.” In practical terms, this means about 1 to 1.5 tablespoons of kosher salt per gallon of water.
A quick scientific detour: Does salt prevent the water from boiling over? No. Salt raises the boiling point of water slightly (a phenomenon known as boiling point elevation), but the amount of salt we use in cooking only raises the temperature by a fraction of a degree. It has absolutely zero impact on starch foam. We salt the water purely because it is our only opportunity to season the actual interior of the noodle.
Step 4: The Crucial 90-Second Agitation
Bring the water to a rolling boil. Drop your pasta in. Immediately—do not walk away, do not check your phone, do not chop garlic—grab your tongs or a wooden spoon and stir the pasta continuously for the first 90 seconds.
Why? Because the moment dry pasta hits boiling water, the surface starches instantly gelatinize and become incredibly sticky. If the noodles are resting against each other, they will fuse into a solid, impenetrable brick. Furthermore, stirring disrupts the initial massive release of starch, preventing a sudden, localized concentration of foam from forming right at the bottom of the pot.
Step 5: Temperature Modulation (The True Secret)
This is the most important step in this entire article. Once you have dropped the pasta in and given it a thorough stir, the water temperature will have dropped slightly. Wait for the water to return to a boil.
The absolute second you see those rolling bubbles return, turn the heat down.
You do not need a violent, aggressive, roaring boil to cook pasta. Water cannot exceed 212°F (100°C) at sea level, no matter how high you turn the dial. A furious boil does not cook your pasta any faster; it just violently agitates the noodles, breaks them apart, and generates a massive excess of steam that fuels the starchy foam.
Drop your burner down to medium or medium-low. You are looking for a gentle, steady simmer—a continuous stream of moderate bubbles. Pasta proteins and starches cook perfectly fine at temperatures as low as 180°F to 190°F. By maintaining a gentle simmer, you drastically reduce the volume of steam being produced, which completely eliminates the physical force required to push the starch foam over the edge of the pot.
Step 6: The Lid Dilemma
Never, under any circumstances, place a lid on a pot of boiling pasta. A lid traps the steam, instantly increasing the pressure and temperature of the air above the water. This trapped heat supercharges the starch bubbles, causing the foam to expand exponentially. The moment you lift that lid, the sudden change in pressure will cause the foam to violently erupt over the sides. Lids are for bringing water to a boil before the pasta goes in. Once the starch is in the water, the lid stays off.
Advanced Troubleshooting for the Stubborn Cook
Even with perfect technique, there are a few edge cases that require specialized knowledge. If you are dealing with alternative ingredients or challenging environments, here is how you adapt.
The Gluten-Free and Legume Pasta Nightmare
If you have ever cooked pasta made from chickpeas, red lentils, or brown rice, you know that they foam aggressively. In fact, legume-based pastas produce a foam so thick and violent it looks like a high school science fair volcano.
This happens because legumes are packed with high levels of proteins and saponins (natural chemical compounds that foam heavily when agitated in water—it’s the same reason aquafaba whips up like egg whites). When you combine the starch of the pasta with the saponins of the legumes, you create an indestructible, highly stable foam matrix.
For gluten-free and legume pastas, the low-water method is too risky. You must use a significantly larger pot, a higher volume of water to dilute the saponins, and you must be incredibly vigilant with your temperature control. Keep the heat at the absolute lowest possible simmer that still maintains cooking temperature. If the foam starts to rise, a quick blast of air from your lungs (blowing on the surface) will temporarily cool the bubbles and collapse them, buying you time to lower the heat further.
High Altitude Cooking
If you live in Denver, Colorado, or anywhere significantly above sea level, the atmospheric pressure is lower. Because the pressure pushing down on the water is lower, water boils at a lower temperature (around 202°F at 5,000 feet).
Because your boiling water is physically cooler, your pasta will take longer to cook. However, the lower boiling point also means the steam bubbles are less energetic. High-altitude cooks actually experience slightly fewer aggressive boil-overs, but they must be careful not to overcompensate by cranking the heat to the maximum in an attempt to cook the pasta faster. Trust the process, maintain a gentle simmer, and simply add a minute or two to your timer.
Conclusion: Reclaiming Your Kitchen
Cooking should never be a source of stress, and it certainly shouldn’t require a hazmat cleanup crew after every meal. The frustrating phenomenon of the boiling-over pasta pot is not a personal failure; it is simply a chemical reaction doing exactly what the laws of physics dictate it must do.
By understanding the mechanics of starch gelatinization, respecting the power of surface tension, and utilizing smart temperature control, you strip the chaos out of the process. You don’t need to rely on old wives’ tales, you don’t need to ruin your sauces with oil, and you definitely don’t need to panic.
Arm yourself with a wide, heavy-bottomed stainless steel pot. Use just enough water to get the job done. Stir early, drop the heat to a gentle simmer the moment the boil returns, and keep that lid far away from the stove. Save that precious, cloudy, starchy water to emulsify your sauces, and serve up a restaurant-quality meal with the quiet confidence of a home cook who truly understands their craft.
Now, go put a pot of water on the stove. You’ve got this.


