Listen, we need to have a serious talk about what is happening in your skillet on Tuesday nights.
You come home exhausted from work. You want to make a quick batch of weeknight tacos, a simple meat sauce for pasta, or a comforting chili. You rip open a package of ground chuck, toss that cold brick of meat into a lukewarm pan, and start hacking at it with a spatula like it owes you money.
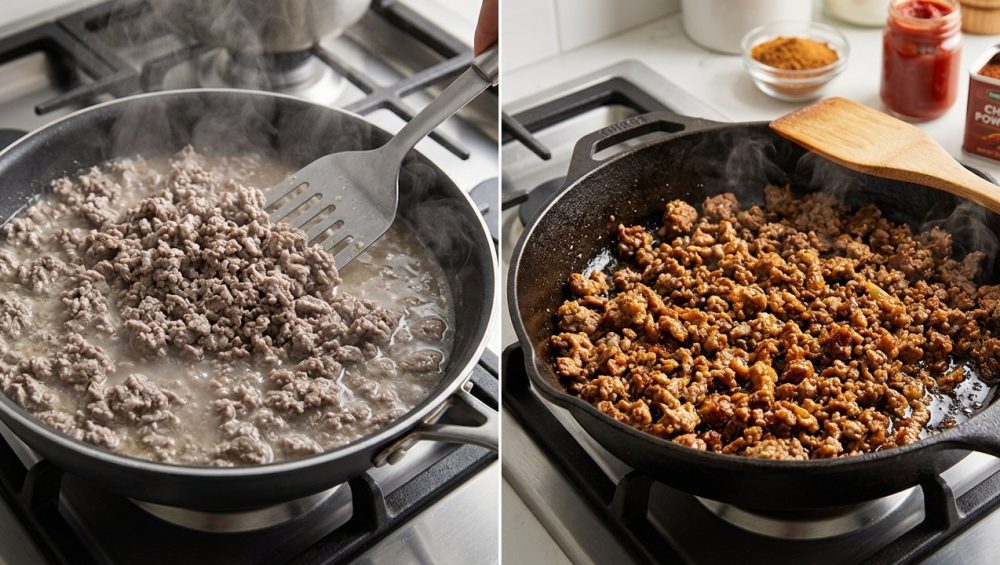
And what happens? It weeps. It releases a horrifying, bubbling pool of murky, gray water. You are no longer frying meat; you are boiling it in its own sorrow. The kitchen smells vaguely of wet dog, the meat turns the color of a concrete sidewalk, and the texture becomes remarkably similar to pencil erasers.
Recipe writers are partially to blame for this tragedy. How many times have you read the instruction: “Brown the ground beef for 5 to 7 minutes until no longer pink”? It is a culinary lie of omission. Browning meat is not a simple matter of applying heat until the red goes away. It is a precise scientific process that requires the right temperature, the right moisture management, and a whole lot of patience.
I firmly believe that anyone can cook like a professional in a standard home kitchen without a fancy culinary degree. But to do that, you have to stop treating cooking like a chore and start respecting the physics of food. Today, we are ending the frustration of boiled, flavorless beef. We are going to break down the exact science of why your ground meat steams, the catastrophic mistakes you are making at the stove, and the foolproof techniques that will guarantee a deeply caramelized, intensely savory crust every single time.
The Science of the Sear: Why Brown Means Flavor
Before we fix your technique, you need to understand what you are actually trying to achieve. When we talk about “browning” meat, we are not just talking about changing its cosmetic appearance. We are chasing a very specific chemical reaction.
The Magic of the Maillard Reaction
In 1912, a French chemist named Louis Camille Maillard discovered the complex chemical reaction that makes seared steak taste like steak, roasted coffee taste like coffee, and baked bread taste like bread. The Maillard reaction is a form of non-enzymatic browning that occurs when the amino acids (proteins) and reducing sugars in food are subjected to high heat.
When these compounds collide at the right temperature, they recombine to create hundreds of brand-new, highly complex volatile flavor compounds. We are talking about pyrazines that taste nutty, furans that taste like sweet caramel, and thiophenes that give off that unmistakable roasted-meat aroma. Without the Maillard reaction, your ground beef is just a vessel for whatever sauce you drown it in. With it, the beef becomes a rich, savory, umami-packed powerhouse.
The Ultimate Enemy: The Latent Heat of Vaporization
Here is the catch: The Maillard reaction does not even begin to kick off until the surface of your food reaches approximately 285°F (140°C), and it does not truly thrive until you hit the 310°F to 320°F range.
Do you know what boils at 212°F (100°C)? Water.
Meat is essentially a sponge made of muscle fibers, and it is composed of roughly 70% to 75% water. When you apply heat to meat, those muscle fibers contract and squeeze that water out into your pan. This brings us to a concept in physics known as the latent heat of vaporization. Water requires an absolutely massive amount of thermal energy (2,260 kJ/kg, to be exact) to change its state from a liquid into a gas (steam).
As long as there is liquid water pooling in your skillet, the temperature of that pan—and the surface of your meat—is mathematically and physically locked at 212°F. It cannot get one degree hotter until every single drop of that water has evaporated. Therefore, if your meat is sitting in a puddle of water, the Maillard reaction is physically impossible. You are steaming your dinner.
Mistake #1: The Crowded Pan and the Great BTU Deficit
The most common reason your ground beef turns into a gray swamp is that you are asking your stove to do something it does not have the power to do.
The Home Stove Disadvantage
Heat output on a gas stove is measured in BTUs (British Thermal Units). A standard commercial burner in a professional restaurant kitchen easily pumps out 30,000 to 40,000 BTUs. When a restaurant chef drops a pound of wet meat into a pan, that massive jet engine of a burner instantly flashes the meat’s moisture into steam. The pan stays scorching hot, and the meat browns immediately.
Your home stove is not a jet engine. A typical residential burner tops out around 7,000 to 12,000 BTUs. When you take a full pound (or worse, two pounds) of cold, wet ground beef and dump it into a 10-inch skillet, you are overwhelming the pan. The temperature of the metal violently crashes by 85°F to 110°F in a matter of seconds.
Because your home burner lacks the raw horsepower to recover that lost heat instantly, the meat slowly warms up, the muscle fibers contract, and the water leaks out. Because the pan isn’t hot enough to evaporate that water on contact, it pools. Congratulations, you have created a beef hot tub.
The Fix: You have to manage your surface area. If you are cooking more than one pound of meat, you must do it in batches, or you must use a massive 12-inch or 14-inch skillet. The wider the pan, the more surface area there is for the liquid to spread out and evaporate quickly.
Mistake #2: The Compulsive Stirrer Syndrome
We need to talk about your kitchen anxiety. Why do you feel the overwhelming urge to push your food around the pan every four seconds?
Home cooks treat ground beef like a high-speed stir-fry. The second the meat hits the pan, they are in there with a wooden spoon, breaking it up into tiny little pebbles and aggressively tossing it around. This is a fatal error.
Heat transfer requires prolonged physical contact. The metal of your skillet is hot; the air above it is not. Every single time you stir the meat, you break its contact with the hot metal. You expose the cooking surface of the beef to the cooler air, dropping its temperature and completely interrupting the Maillard reaction.
If you want the deep, crusty flavor of a smash burger in your weeknight meat sauce, the key to a perfect sear is patience. You have to press the meat down into the pan and step away. Leave it the hell alone. Let it sit completely undisturbed for at least 90 to 120 seconds. Drink a sip of wine. Stare at the wall. Let the heat do its job.
Mistake #3: Cold Meat, Cold Pan, Sad Dinner
Dropping fridge-cold meat into a poorly preheated pan is a recipe for disaster.
When you take ground beef directly from a 35°F refrigerator and throw it into a skillet, you are maximizing the temperature shock to your cookware. The colder the meat, the harder the pan’s temperature will crash, and the longer it will take to recover. While you shouldn’t leave raw meat sitting on the counter all afternoon, letting it rest at room temperature for 15 to 20 minutes before cooking takes the chill off and gives your stove a fighting chance.
Equally important is preheating your pan properly. Do not put your meat and your oil into a cold pan and turn on the burner. The pan must be fully up to temperature before the meat ever touches it. If you are using high-quality uncoated cookware, you can always rely on the water drop test to ensure your stainless steel is properly preheated. Flick a tiny drop of water into the pan; if it immediately shatters into a dozen tiny beads that dance across the surface like mercury, your pan is ready. If it just sits there and aggressively boils, the pan is too cold.
Mistake #4: Your Toxic, Flimsy Cookware is Sabotaging You
I have a strict “no-go” rule in my kitchen, and it is time you adopt it too. I absolutely despise cheap, lightweight, toxic non-stick cookware.
If you are trying to sear meat in a $15 flimsy aluminum pan coated in peeling Teflon (PTFE), you are fighting a losing battle. First of all, heating these synthetic non-stick coatings to the high temperatures required for searing can cause them to degrade, off-gas toxic fumes, and flake into your food. Those cheap, lightweight pans end up losing their slip after just a few months of high-heat cooking, leaving you with a warped, useless piece of garbage. If you are finally ready for banishing toxic kitchen gear from your life, this is the sign you’ve been waiting for.
The Physics of Thermal Mass
The real reason flimsy pans ruin your ground beef comes down to the physics of thermal mass. Thermal mass is essentially a material’s ability to absorb and store heat energy. It is calculated by multiplying the mass of the object by its specific heat capacity.
Aluminum is a fantastic conductor of heat, but cheap non-stick pans are stamped so incredibly thin that they have virtually no mass. Because they lack physical weight, they cannot store a meaningful reservoir of thermal energy. The millisecond you drop a pound of cold, wet beef into a thin aluminum pan, the pan gives up all of its heat, the temperature plummets, and your meat begins to boil.
To properly sear meat, you need heavy-duty cookware with massive thermal retention.
- Cast Iron: Cast iron has a lower specific heat capacity than aluminum (about 540 J/kg·°C compared to aluminum’s 900 J/kg·°C), but cast iron skillets are incredibly thick and physically heavy. A 6-pound cast iron skillet holds a mammoth amount of stored heat. When the meat hits it, the pan barely flinches. The temperature stays high, and the browning begins instantly.
- Carbon Steel: Similar to cast iron, carbon steel holds heat beautifully but is slightly more responsive to temperature changes.
- Multi-Clad Stainless Steel: A heavy, thick-bottomed, fully clad stainless steel skillet (which features an aluminum or copper core sandwiched between layers of steel) offers the perfect balance of heat conduction and thermal mass.
Ditch the toxic peeling pans. Invest in heavy metal. Your food will immediately taste better.
The Secret Weapon: The Baking Soda Hack (Velveting)
Now that we have covered the mechanical errors, it is time to introduce a brilliant scientific shortcut. If you want to absolutely guarantee deeply browned, incredibly tender ground beef that refuses to dry out, you need to look in your baking cabinet.
Better Browning Through Chemistry
In Chinese cooking, there is a traditional technique called “velveting,” where thinly sliced meats are marinated in a mixture containing an alkaline ingredient (often baking soda) to alter the meat’s structure, keeping it impossibly tender during a high-heat stir-fry. We can apply this exact same chemistry to our weeknight ground beef.
Meat is naturally slightly acidic, sitting at a pH of around 5.5. When meat is exposed to high heat at this acidic pH, the proteins denature and bond together tightly, wringing out their internal moisture like a twisted sponge.
By tossing your raw ground beef with a tiny amount of baking soda (sodium bicarbonate), you raise the pH level on the surface of the meat, creating a mildly alkaline environment. This does two incredible things:
- It prevents moisture loss: The higher pH alters the electrical charge of the meat proteins, making it physically difficult for them to bond tightly together. Because the proteins cannot squeeze together, the meat retains its natural juices instead of dumping them into your pan.
- It accelerates the Maillard reaction: The complex chemical reactions responsible for browning occur significantly faster and more efficiently in an alkaline environment. You will achieve a dark, crusty sear in a fraction of the time, meaning the interior of the meat stays tender and juicy instead of cooking down into dry gravel.
The Formula: For every 1 pound of ground beef, dissolve 1/2 teaspoon of baking soda in 1 tablespoon of water. Pour this alkaline slurry over the raw meat, gently toss it with your hands to distribute it evenly, and let it sit on the counter for 15 to 20 minutes before cooking.
A quick note on seasoning: While you are treating the meat with baking soda, do not add your salt just yet. When it comes to salting ground beef, doing it at the wrong time can actually draw out more moisture through osmosis, defeating the entire purpose of our alkaline spa treatment. Save the heavy salting for the pan.
The Sassy Sous-Chef’s Definitive Masterclass: Step-by-Step Ground Beef Perfection
We have covered the physics, the thermodynamics, and the chemistry. Now, let’s put it all together. Here is your rigorous, foolproof, step-by-step masterclass on how to perfectly sear ground beef on a Tuesday night without losing your mind.
Step 1: The Alkaline Spa Treatment
Remove your ground beef (preferably an 80/20 blend for the best flavor-to-fat ratio) from the refrigerator. Mix your 1/2 teaspoon of baking soda with 1 tablespoon of water, and gently massage it into the meat. Do not overwork the beef, or you will make it tough. Let the meat sit on the counter for 15 minutes to take the chill off and let the pH magic happen. Pat the top of the meat dry with a paper towel right before it goes into the pan to remove any excess surface moisture.
Step 2: The Heavy Metal Preheat
Place your largest cast iron or heavy-clad stainless steel skillet on the stove over medium-high heat. Let it preheat dry for several minutes. Once the pan is screaming hot, add a tablespoon of high-smoke-point oil (like avocado oil, grapeseed oil, or clarified butter). Swirl the oil until it shimmers and ripples. And for the love of all things culinary, do not use aerosol cooking spray because the propellants will polymerize to your pan and ruin it forever.
Step 3: The Smash and Ignore
Gently place the ground beef into the center of the roaring hot pan. Immediately use a stiff metal spatula to smash the meat down flat, spreading it out into one giant, even patty that covers as much of the pan’s surface area as possible.
Now, step away. Do not touch it. Do not stir it. Do not look at it funny. Let the meat sear completely undisturbed for at least 90 seconds to 2 full minutes. You will hear a violent, aggressive sizzling sound—this is the sound of water flashing into steam instantly, and the Maillard reaction building a glorious crust.
Step 4: The Flip and Crumble
After two minutes, slide your metal spatula under the giant beef patty. You should feel a hard, deeply browned crust scraping against the bottom of the pan. Flip the entire mass over in large sections.
Now, and only now, can you start breaking the meat apart. Use the edge of your spatula to chop the beef into your desired crumble size. Because the meat is already deeply seared and the baking soda is keeping the proteins relaxed, it will not release a flood of water. Season generously with kosher salt and freshly ground black pepper at this stage.
Step 5: The Deglaze
Once the meat is cooked through and beautifully browned, you will notice a layer of dark, caramelized residue stuck to the bottom of your skillet. This is called the fond, and it is culinary gold. Do not leave it behind.
If your recipe calls for onions, toss them in now; the moisture from the onions will help lift the fond. If your recipe calls for aromatics, make a well in the center of the beef and drop them in. Just remember, if your garlic always burns, it is because you are adding it way too early in the process; it only needs 30 to 60 seconds of heat.
Finally, pour in a splash of liquid—beef broth, a glug of dry red wine, or even just water. As the liquid bubbles, vigorously scrape the bottom of the pan with your spatula. Deglazing is the magic trick for turning those burnt bits into sauce that coats your meat in pure flavor.
Troubleshooting: How to Salvage a Steaming Meat Puddle
Okay, let’s say you are reading this article in a panic because it is too late. You crowded the pan, you stirred too much, the temperature crashed, and you are currently staring at a tragic, bubbling gray puddle of beef soup. Don’t panic. We can salvage this.
Do Not Let It Boil Dry
Your first instinct will be to leave the pan on the heat and wait for all that water to boil away. Do not do this. By the time a full cup of water violently boils off, your ground beef will be cooked to an internal temperature of 212°F for ten straight minutes. The meat will be completely ruined, possessing the texture of dry, gritty sand.
Instead, push all the meat to one side of the skillet. Carefully tilt the pan off the heat, and use a spoon or a turkey baster to manually extract the excess liquid. (Do not pour this liquid down your sink drain unless you enjoy paying plumbers to unclog fat deposits).
Once the pan is relatively dry, put it back flat on the burner and crank the heat to high. Add a small drizzle of fresh oil to the pan. This will re-lubricate the surface and immediately transition the cooking method from steaming back to frying, allowing you to develop at least a little bit of color before the meat overcooks.
Fake the Depth with Umami and Acid
If you boiled your meat, you missed out on the Maillard reaction. Your dish is going to taste hollow and one-dimensional. You need to artificially inject the savory depth that you failed to build in the pan.
Create an umami bomb. Stir in a tablespoon of tomato paste and let it fry in the pan for a minute until it darkens. Add a heavy dash of Worcestershire sauce, a splash of soy sauce, or a spoonful of Marmite. These ingredients are packed with naturally occurring glutamates that mimic the deep, savory profile of well-browned meat. Just be careful with acidic additions like tomato paste if you are using an unenameled cast iron skillet; if you simmer highly acidic ingredients in bare cast iron, your sauce tastes metallic and ruined. Stick to stainless steel or enameled cast iron for heavy tomato sauces.
Finally, if you taste your salvaged dish and it still feels heavy or flat, it probably needs acid to wake up the palate. A tiny squeeze of fresh lemon juice or a splash of apple cider vinegar stirred in right off the heat will cut through the dullness and brighten the entire meal.
Conclusion: You Are Now a Meat-Browning Master
You do not need to be a Michelin-starred chef to make incredible food on a random Tuesday night. You just need to stop fighting the physics of your kitchen.
By understanding the limits of your stove’s BTUs, utilizing the thermal mass of heavy cookware, leveraging the alkaline magic of baking soda, and finding the restraint to step away from the spatula, you have completely eliminated the gray meat puddle from your culinary repertoire. You are now armed with the scientific knowledge to execute a flawless, deeply flavorful sear every single time.
Now, go preheat your heaviest skillet, leave that meat alone, and enjoy the best weeknight dinner you have ever made. You’ve earned it.


