Listen, we have all been there. It is 7:00 AM, you are already running late for work, and you just want a decent, healthy green smoothie to kickstart your day. You toss your spinach, frozen mango, half a banana, and almond milk into your blender, hit the power button, and brace yourself for the deafening roar. But instead of a silky, café-quality beverage, you find yourself staring down a pitcher full of stubborn frozen fruit chunks and whole, unbothered spinach leaves that are just spinning in a useless, mocking circle. You sigh. You stop the blender. You take off the lid. You angrily jam a wooden spoon down the sides to push the chunks into the blades, praying you do not accidentally blend the spoon into your breakfast.
You finish your drink, chewing on a rogue piece of kale, and wonder why the $12 smoothie from the local juice bar is always perfectly emulsified while yours is a chunky, frustrating mess. Much like how cheap plastic containers stay greasy forever no matter how hard you scrub them, a poorly designed blender jar is a fundamental kitchen flaw that you simply cannot out-cook.
As a home cook who has burned out more appliances than I care to admit, I am here to deliver some fantastic news: it is not your fault. You do not lack some secret culinary skill. You are just fighting against bad physics. Today, we are going to dive deep into the fascinating, microscopic world of fluid dynamics, cavitation, and pitcher geometry. We are going to explore exactly why traditional round pitchers are a design disaster, why the flat walls of a square jar are essentially kitchen magic, and how you can stop fighting your appliances for good.
Stop Blaming the Motor: The Great Wattage Lie
Appliance manufacturers think you are gullible. There, I said it. Walk down the aisle of any big-box home goods store, and you will see rows of blenders screaming at you with bold, aggressive packaging: “1500 WATTS OF ICE-CRUSHING POWER!” or “30,000 RPM MOTOR!” They want you to believe that the secret to a perfectly smooth puree is sheer, unadulterated horsepower.
But here is the brutally honest truth: wattage is a massive marketing gimmick. Wattage is simply a measurement of how much electrical power a motor can draw from your wall outlet—it is not a direct measure of how efficiently that power is applied to your food. Putting a 1500-watt motor on a poorly designed blender pitcher is exactly like dropping a massive, turbocharged Ferrari engine into a golf cart with bald tires. Sure, the engine is roaring and drawing a ton of power, but because there is no traction, you aren’t going anywhere. The power has nowhere to go.
One of the most frustrating beginner cooking mistakes is believing that a higher number on the box automatically guarantees better food. Blending is not a power problem; it is a circulation problem. If your ingredients never actually touch the spinning blades, it does not matter if your blender has the horsepower of a lawnmower. Smoothies fail in highly predictable ways: thick mixtures stall the motor, frozen fruits form a bridge above the blades, and leafy greens cling desperately to the walls. None of these issues are solved by adding more watts. They are solved by creating a consistent, inescapable flow.
Fluid Dynamics 101: Why Your Blender Pitcher is a Racetrack
To understand why your smoothies are chunky, we need to take a crash course in fluid dynamics. Put on your safety goggles, because we are talking about physics.
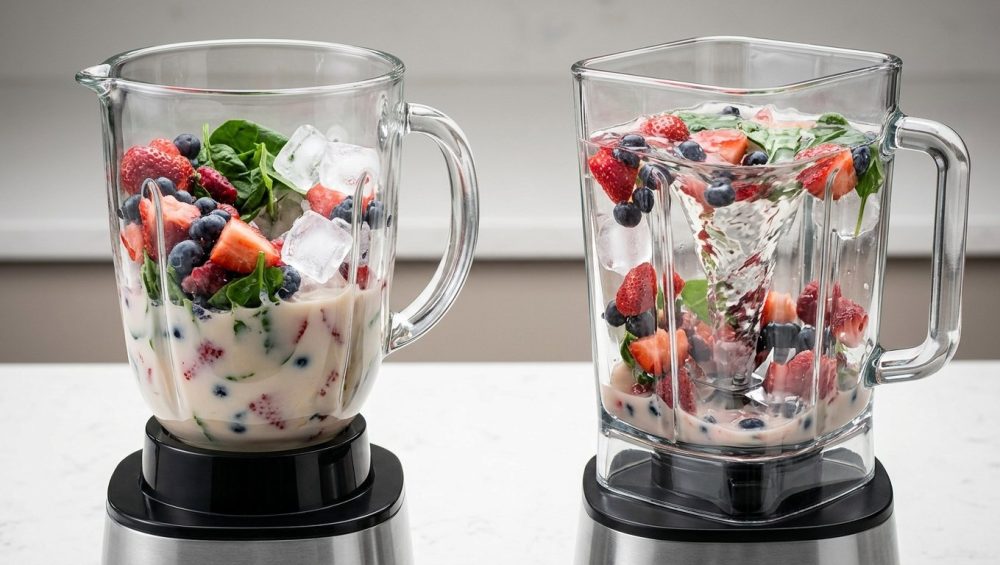
When you turn on a blender, the blades spin at incredibly high speeds—often upwards of 20,000 to 28,000 revolutions per minute (RPM). If those blades are sitting at the bottom of a perfectly round cylinder, physics dictates exactly what happens next: centrifugal force. As the blades spin, they push the liquid outward toward the walls of the pitcher. Because the walls are perfectly curved, the liquid has nothing to stop it. It just rides the curvature of the wall, spinning endlessly in a circle like a racecar on a smooth, circular track.
This phenomenon creates a massive, empty air pocket in the center of the pitcher, right above the blades. We call this the “dead zone.” Your blades are spinning wildly in thin air, while your frozen strawberries and ice cubes are just running laps around the outside perimeter, completely avoiding the cutting zone.
This is exactly why you constantly have to stop your blender, take off the lid, and scrape down the sides. The ingredients are trapped in a centrifugal spin cycle. A smooth, efficient appliance can completely transform a chaotic cooking routine into a streamlined morning, but a perfectly round jar guarantees you will be babysitting your appliance. Some manufacturers try to fix this by adding “baffles”—those vertical ribs or ridges you see molded into the sides of round jars. Baffles are designed to act as speed bumps, disrupting the circular flow and forcing the liquid to fold back inward. While aggressive baffles (like those found on high-end Vitamix machines) certainly help, cheap round blenders usually have shallow, useless ribs that do absolutely nothing to stop the centrifugal racetrack.
The Geometry of a Perfect Blend: Enter the Square Jar
This is where the absolute magic of geometry comes into play. If perfectly round walls allow liquid to spin out of control, how do we force the ingredients back into the blades? We add corners.
When you blend liquid in a square pitcher, the centrifugal force still pushes the ingredients outward. But instead of a smooth curve, the speeding liquid violently slams into a flat wall and a sharp corner. This structural roadblock instantly kills the liquid’s horizontal momentum. Because the liquid can no longer spin in a circle, and because the pressure from the spinning blades is constantly pushing more liquid behind it, the mixture has only one place to go: up.
The ingredients are forced upward along the corners of the jar. Once they reach the top of the mixture, gravity takes over. Combined with the powerful suction created by the blades below, the ingredients are violently pulled right back down through the center of the pitcher, directly into the path of the spinning blades.
This continuous, self-feeding loop—out to the walls, up the corners, and down the center—is known as a vortex. A perfect vortex means every single microscopic particle of your smoothie will pass through the cutting zone multiple times a second. You don’t need to stop the machine. You don’t need a tamper to shove the food down. The geometry of the jar does all the heavy lifting for you. When curating your essential beginner kitchen tools, prioritize this specific pitcher geometry over a flashy digital display or a high wattage rating every single time.
The Magic of Cavitation: How Tiny Bubbles Pulverize Your Spinach
Now that we have the ingredients flowing perfectly into the blades, we need to talk about what the blades are actually doing. This is where things get genuinely mind-blowing. If you think your blender blades are acting like little samurai swords slicing cleanly through your kale, you are completely wrong. High-end blender blades are actually dull.
Wait, what? Why would you want a dull blade?
Because at 28,000 RPM, you aren’t slicing food; you are pulverizing it using a phenomenon called hydrodynamic cavitation. When a thick, blunt metal blade moves through a liquid at extreme, blistering speeds, it pushes the liquid out of the way so fast that it creates a localized low-pressure zone directly behind the trailing edge of the blade,.
According to the laws of thermodynamics, when the pressure in a liquid drops low enough, its boiling point also drops. The pressure behind a high-speed blender blade drops so dramatically that the liquid actually boils at room temperature, forming thousands of microscopic, vapor-filled bubbles,.
But these bubbles don’t last long. As soon as they move out of the low-pressure zone, the surrounding normal pressure causes them to collapse, or implode, violently. When a cavitation bubble implodes, it generates a microscopic, localized shockwave,. Multiply this by millions of bubbles collapsing every second, and you have a chaotic, highly destructive environment that literally rips apart plant cell walls, berry seeds, and ice crystals on a molecular level,.
Unlike standard slicing where kitchen knives get dull from repeated contact with hard foods, blunt blender blades rely entirely on these physics. They never need to be sharpened because they use shockwaves, not sharp edges, to do the work. This is why cheap blenders with razor-sharp blades eventually start making chunky smoothies—the blades dull over time, and because the motor isn’t fast enough to create cavitation, the machine becomes useless.
The WildSide Story: A $24 Million Blender War
If you think I am overstating the importance of jar shape, let me tell you a story about a multi-million dollar war fought over a plastic pitcher.
Enter Tom Dickson, an engineer, inventor, and the founder of Blendtec. Back in the day, Dickson realized that traditional round blenders were terribly inefficient, so he engineered a square jar (the FourSide jar) that utilized the exact fluid dynamics we just discussed,. To prove how effective his blunt blades and square jars were, he launched the legendary “Will It Blend?” marketing campaign, where he successfully blended everything from golf balls and glass marbles to brand-new cell phones into fine dust.
But Dickson wasn’t done innovating. He realized that while a square jar was great, an asymmetrical jar would be even better. He added a narrower fifth side to his pitcher, creating the “WildSide” jar. This asymmetrical, five-sided geometry shifted the vortex slightly off-center, disrupting the flow of the liquid even more violently and completely eliminating the need for a manual tamper,.
The design was an absolute game-changer for commercial juice bars. It was so effective that a major competitor, Vitamix, took notice and eventually released a commercial jar that heavily mimicked this patented design. Blendtec sued for patent infringement. In 2011, a federal court ruled in Blendtec’s favor, awarding them a staggering $24 million—the largest patent judgment in Utah’s history.
When you are mixing frozen margaritas, the art of effortless hosting requires a machine that won’t stall out mid-party, which is exactly why the commercial industry takes these jar patents so seriously. A $24 million lawsuit proves one thing definitively: geometry matters more than anything else in your blender.
The “No-Go” Rule: Pitcher Materials You Need to Trash Immediately
As your Sassy Sous-Chef, I have a few strict rules, and I am absolutely militant about banishing toxic kitchen gear from my countertops. We need to have a very serious conversation about what your blender pitcher is actually made of.
If you are using a cheap, ten-year-old blender with a cloudy, scratched plastic pitcher that smells faintly of old garlic and strawberry, you need to throw it in the recycling bin right now. Historically, cheap blenders used polycarbonate plastic. While durable, polycarbonate is notorious for containing BPA (Bisphenol A), a toxic chemical that disrupts hormones.
When you blend hard ingredients like ice or frozen fruit, they act like sandpaper against the walls of cheap plastic jars, creating thousands of microscopic scratches. These scratches do two things. First, they create a breeding ground for bacteria that is impossible to clean. Second, they accelerate the degradation of the plastic, causing it to leach microplastics and BPA directly into your food—especially when you are blending acidic ingredients like citrus, tomatoes, or berries.
You must protect your health and your food’s flavor. Always look for pitchers made from Tritan plastic. Tritan is a modern, high-impact, BPA-free copolyester that is incredibly durable, shatter-resistant, and won’t leach chemicals into your morning smoothie. Alternatively, you can look for thick, tempered glass jars. However, be aware that glass is rarely used on true high-speed blenders, because the violent shockwaves from cavitation can actually shatter cheap glass. Stick to high-quality Tritan, and your food will stay safe.
Stop Stopping: How to Layer Your Ingredients for a Seamless Vortex
Okay, so you have upgraded to a brilliant, square-pitcher blender made of safe Tritan plastic. You are ready to conquer the kitchen. But wait! A great smoothie setup is essential for breaking your takeout habit, but even the best appliance in the world will fail if you load it like a chaotic toddler.
The architecture of a smoothie is a delicate science. If you throw your ice in first and your liquid in last, you will create an “igloo” over the blades. The blades will spin, carve out a pocket of air, and then spin helplessly while your solid ingredients sit stubbornly on top. To achieve a seamless, hands-free vortex, you must layer your ingredients in this exact order:
Layer 1: The Liquid Foundation
Always, always, always add your liquids first (water, milk, juice). The blades need liquid to initiate the vortex and create the initial hydrodynamic cavitation. Without a liquid primer, you are just dry-chopping.
Layer 2: Powders and Sweeteners
Next, add your protein powders, matcha, cocoa, or honey. By dropping them directly into the liquid pool, they will dissolve immediately once the motor starts. If you put powders on top of your ice, they will fly up and stick to the lid and walls, leaving your smoothie gritty.
Layer 3: Leafy Greens
Add your spinach, kale, or chard next. You want your leafy greens as close to the blades as possible so they are immediately sucked into the liquid vortex and liquefied before the heavier ingredients even enter the chat.
Layer 4: Soft Fruits and Base Ingredients
Now add your bananas, yogurt, tofu, or nut butters. These soft ingredients provide the creamy bulk of the smoothie and blend easily without stalling the motor.
Layer 5: The Heavy Hitters (Ice and Frozen Fruit)
Finally, top it all off with your ice cubes and rock-hard frozen fruits. Why on top? Because ice acts as a weighted lid. As the blades pull the liquid and soft ingredients downward, the heavy frozen items naturally press down from above, forcing everything into the cutting zone. By the time the frozen fruit hits the blades, a powerful vortex is already established, and the ice is easily pulverized by the cavitation shockwaves.
Upgrading Your Setup: What to Look for in a True High-Performance Blender
If you are finally ready to stop fighting your cheap, round, 300-watt nightmare machine, it is time to upgrade. But do not just walk into a store and buy the shiniest machine with the biggest numbers on the box. Mastering the art of the home kitchen means learning to evaluate the engineering of your tools rather than falling for clever marketing fluff.
When shopping for a true high-performance blender, use this checklist:
- Jar Geometry: Look for a square jar, a five-sided jar, or a jar with incredibly deep, aggressive baffles. If the inside of the pitcher is perfectly smooth and round, walk away.
- Blade Design: Look for thick, heavy, blunt blades (often made of cold-forged stainless steel). Avoid thin, razor-sharp blades; they are a hallmark of cheap motors that cannot achieve cavitation and will dull within a month.
- Material Safety: Verify that the pitcher is made of BPA-free Tritan plastic.
- Warranty: High-end blenders (like Blendtec and Vitamix) offer 7-to-10-year warranties because they know their motors and blade assemblies are built to withstand daily cavitation. Cheap blenders offer 1-year warranties because they know the motor will burn out the moment you try to make thick almond butter.
Conclusion: Master Your Tools, Master Your Kitchen
Cooking should be a joy, not a daily wrestling match with your appliances. You do not need a culinary degree to make mind-blowing food at home. You just need to understand a little bit of physics, respect the power of fluid dynamics, and invest in tools that are actually engineered to help you succeed.
Stop settling for chunky, frustrating morning smoothies. Stop stopping your blender every ten seconds to scrape the walls. Embrace the magic of the square jar, load your ingredients like a professional, and let cavitation do the hard work for you. Serve your perfectly smooth, flawlessly emulsified creation alongside a cozy breakfast bowl bar and enjoy your stress-free morning.
Stay sassy, keep blending, and for the love of all things culinary, throw away that toxic, scratched-up plastic pitcher. You deserve better.


