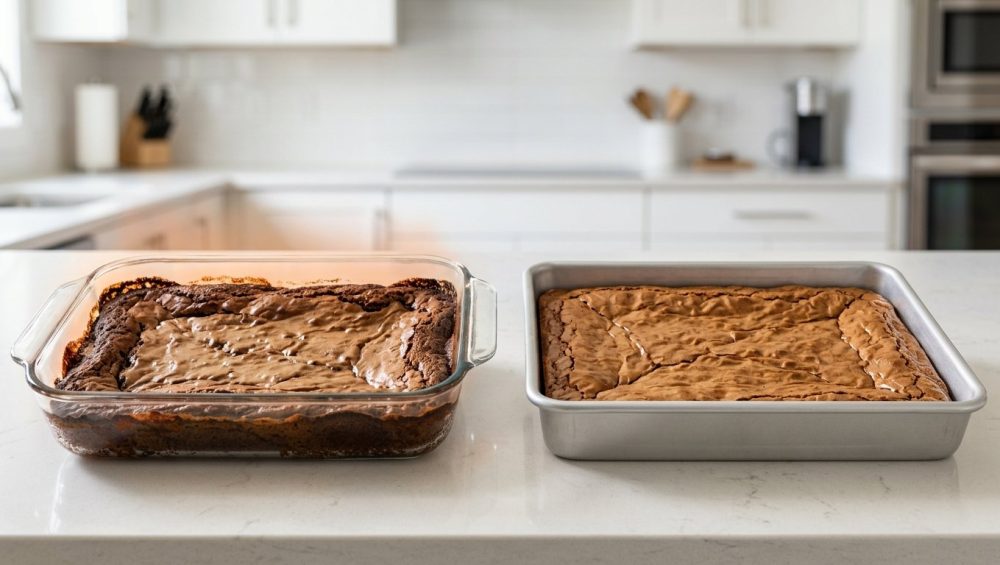
We have all lived through this exact, heartbreaking kitchen tragedy. You crave brownies. You spend your precious weekend afternoon melting high-quality butter, whisking expensive cocoa powder, and carefully folding the batter until it is a glossy, chocolatey masterpiece. You pour that beautiful batter into a heavy, transparent baking dish you probably received as a wedding gift, slide it into a 350°F oven, and wait.
Forty-five minutes later, you pull the pan out, and your excitement immediately evaporates. The outer two inches of your brownies have mutated into a dense, scorched, geological formation that could chip a tooth, while the exact dead-center of the pan is still a lukewarm, liquid puddle of raw batter.
You probably blamed yourself. You probably thought you mismeasured the flour, or that your oven is possessed by some sort of culinary demon. Listen to me, my beautiful weekend bakers: it is not your fault. You did not mess up the recipe. The culprit is sitting right there on your counter, looking innocent and transparent.
It is your glass baking pan.
As a home cook who has set off the smoke detector more times than I care to admit, I have zero patience for pretentious chef-speak, but I have even less patience for bad kitchen science ruining our food. Baking is fundamentally an exercise in thermodynamics. If you do not understand how the material composition of your cookware interacts with the radiant heat of your oven, you will be forever at the mercy of wildly inconsistent results. Today, we are putting an end to the burnt edges and the raw centers. We are going to break down the exact physics of why glass bakeware hates your brownies, when you should actually use it, and how to permanently fix your oven results.
The Physics of Baking: Why Your Pan Material Dictates Your Dessert’s Destiny
To understand why your baked goods are failing, we have to look at how heat moves. Every baking decision you make hinges on three measurable material properties: thermal conductivity, volumetric heat capacity, and emissivity.
Thermal conductivity essentially measures how quickly a material can absorb energy from its environment and transfer that energy through itself. In a standard home kitchen, we are generally baking in either metal (usually aluminum or steel) or glass (borosilicate or tempered soda-lime).
Let us look at the raw numbers, because math does not lie. Aluminum has a thermal conductivity rating of roughly 237 W/m·K (Watts per meter-Kelvin). Tempered glass has a thermal conductivity rating of about 1.1 W/m·K.
That is a 215-fold difference.
What does this mean for your Tuesday night baking project? It means that metal conducts heat almost instantly, while glass acts as a stubborn insulator. When you place an aluminum pan into a preheated 350°F oven, the metal absorbs the ambient heat and reaches 350°F in approximately 4.2 minutes. When you put an identical glass pan into that exact same oven, it takes a staggering 18.7 minutes just for the glass to reach the ambient temperature.
Baking is a game of precision. This is exactly why you need a digital kitchen scale to measure your ingredients perfectly, but even the most perfectly weighed batter will fail if the thermal transfer is broken. For the first twenty minutes your glass pan is in the oven, it is actively blocking heat from reaching your batter. Your leavening agents are activating, your sugars are waiting to melt, but the pan itself is acting like a brick wall, refusing to pass the heat along.
The “Thermal Battery” Effect: Why Glass Sabotages Your Brownies
If glass takes forever to heat up, why do the edges of the brownies burn? This is the grand paradox of glass bakeware, and it comes down to a concept called heat capacity.
Glass conducts heat roughly three times slower than aluminum, but once it finally gets hot, it retains that heat almost three times longer. It essentially acts like a massive thermal battery.
Let us walk through the timeline of a 45-minute brownie bake in a glass dish:
Minutes 1 to 20: The Insulator Phase
You put the dish in the oven. The hot air surrounds the pan, but the glass absorbs the heat incredibly slowly. The batter touching the edges of the glass is barely getting warm. Meanwhile, the top surface of the brownie batter is fully exposed to the oven’s ambient heat and begins to dry out and form a crust.
Minutes 20 to 35: The Blast Furnace Phase
The glass has finally reached 350°F. Because glass has a high emissivity (meaning it absorbs and radiates infrared energy highly efficiently), it is now holding onto a massive amount of thermal energy. It begins blasting the outer edges of your brownie batter with intense, sustained heat. However, because glass is a terrible conductor, it still refuses to push that heat toward the center of the pan. The edges are now rapidly overcooking, while the center is still insulated and raw.
Minutes 35 to 45: The Point of No Return
You look through the oven window. The edges of the brownies are climbing up the sides of the dish, curling inward, and turning dark brown. You panic and pull the pan out of the oven, hoping to save the edges, even though the center jiggles like a water balloon.
Post-Oven: The Carryover Curse
You place the pan on your counter, breathing a sigh of relief. But the baking has not stopped. Because glass is a thermal battery, it will continue to aggressively cook the outer edges of your food for up to 9 minutes after being removed from the oven. The residual heat trapped in the thick glass walls continues to bake the perimeter of your dessert into a dry, crumbly brick. If you have ever wondered why your favorite quick bread sinks in the middle while cooling on the counter, it is often because the intense heat of the pan forced you to pull it from the oven before the center structure could properly set.
The Great Pyrex Lie: Borosilicate vs. Soda-Lime Glass
Before we move on to the solution, we need to address a very common complaint. I hear from home cooks all the time who say, “But my grandmother baked in her clear glass dishes for forty years and never had an issue! Why is my modern glass bakeware so terrible?”
Prepare yourself for a frustrating history lesson about corporate cost-cutting.
When the iconic clear Pyrex cookware was first introduced in the early 20th century, it was manufactured using a low thermal expansion material called borosilicate glass. Borosilicate glass contains boron oxide, which gives it an almost magical resistance to thermal shock. You could take a vintage borosilicate dish out of a blazing hot oven, set it directly on a cold counter, and it would be perfectly fine.
However, in the late 1990s, the brand rights for Pyrex in the United States were sold, and the new manufacturers quietly changed the recipe. They stopped using borosilicate and transitioned to tempered soda-lime silicate glass.
Why? Because soda-lime glass is significantly cheaper to manufacture, and to be fair, it is slightly more resistant to mechanical impact (meaning it is less likely to break if you accidentally drop it on the floor).
But soda-lime glass has a fatal flaw: it has a much higher coefficient of thermal expansion. It absolutely cannot handle rapid temperature changes. If you take a hot, modern soda-lime glass pan out of a 400°F oven and place it on a cold granite countertop, or if a few drops of cold water splash onto it from the sink, the glass will rapidly and unevenly contract.
The resulting thermal stress causes the dish to violently explode. If you have ever had a glass baking dish shattered into thousands of tiny, razor-sharp cubes across your kitchen floor, ruining your dinner and your evening, this exact chemical change is to blame.
(Note: European Pyrex and specialized laboratory glassware are still made from high-quality borosilicate glass. If you are shopping for glass bakeware, always check the manufacturing details. If it doesn’t explicitly say “borosilicate,” it is soda-lime.)
Metal Bakeware: The Undisputed Champion of the Oven
If glass is the enemy of an evenly baked brownie, metal is the undisputed champion. Professional pastry chefs and commercial bakeries use metal pans almost exclusively, and for good reason. Metal responds instantly to the heat of the oven. It promotes rapid, even surface browning, pushes heat straight through to the center of the batter, and most importantly, it cools down within 60 seconds of being removed from the oven, immediately halting the carryover cooking process.
But before you run out and buy the first metal pan you see, we need to establish some ground rules.
I have a very strict, non-negotiable “No-Go” rule in my kitchen regarding toxic gear. I absolutely despise cheap, flimsy, non-stick baking pans. You know exactly the ones I am talking about. They are practically weightless, they cost six dollars at the grocery store, and after three trips through the dishwasher, the mystery chemical coating begins to peel and flake directly into your food. There is no culinary shortcut worth ingesting forever chemicals. We are permanently banishing toxic kitchen gear from our homes, starting today.
The Danger of Dark Metal Pans
Even if a metal pan is high quality, the color of the metal drastically alters how it performs in the oven. Dark-colored metal pans (which make up about 80% of the non-stick bakeware market) are notorious for ruining delicate baked goods.
Because dark colors absorb heat—specifically infrared radiation—much faster than light colors, a dark pan will aggressively sear the outside of your food. If you bake brownies in a dark pan at 350°F, the bottom and edges will scorch before the center has time to set, mimicking the exact same problem you get with glass. If you are tired of burnt bottoms, it is time to throw out your dark nonstick pans and upgrade your equipment.
The Holy Grail: Light-Colored Anodized Aluminum
The ultimate, undisputed king of home bakeware is light-colored, heavy-gauge, anodized aluminum.
Aluminum is an incredible conductor of heat. It ensures that the center of your brownie batter heats up at the exact same rate as the edges, giving you a perfectly level, uniformly baked dessert. By choosing a light-colored finish, you prevent the pan from absorbing excess radiant heat, ensuring the edges stay chewy rather than turning to stone.
Furthermore, you must buy “heavy-gauge” aluminum. Thin, cheap metal cannot handle the thermal stress of a hot oven. If you are constantly terrified by the loud, violent popping sound of metal expanding, and you are exhausted by how your baking sheets keep warping into a twisted mess every time you roast vegetables, heavy-gauge aluminum is the permanent solution. It will never rust, it will never warp, and it will last longer than you will.
The Formula: How to Adjust Your Recipe When Glass is Your Only Option
I am a realist. I know that sometimes you are baking at a friend’s house, or an Airbnb, or you simply haven’t had the time to upgrade your kitchen arsenal yet. Sometimes, a heavy glass dish is the only vessel available to you.
If you are forced to bake a cake, a batch of brownies, or a loaf of bread in a glass pan, you cannot simply follow the instructions on the back of the box. You have to manually adjust the thermodynamics of your oven to compensate for the glass’s massive thermal resistance.
If you want to rescue a ruined dinner or save a dessert before it even goes into the oven, you must memorize this exact three-step formula.
Rule 1: Drop the Temperature by 25°F
This is the golden rule of baking in glass. Because glass retains heat so aggressively once it gets hot, you must lower the ambient temperature of the oven to prevent the edges of your food from burning. If a recipe calls for baking at 350°F (175°C) in a metal pan, you must lower your oven to 325°F (165°C) when using glass. This lower, gentler heat gives the center of the batter more time to slowly come up to temperature before the edges turn into charcoal.
Rule 2: Increase the Baking Time by 10% to 15%
Because you have lowered the oven temperature, and because glass takes nearly twenty minutes just to heat up, the total baking time listed in the recipe is now completely useless. You will need to extend the bake time by roughly 10% to 15%.
For example, if a brownie recipe says to bake for 30 minutes at 350°F, you will bake at 325°F for roughly 33 to 35 minutes. However, you must watch it like a hawk. Do not rely on the clock; rely on your eyes and a toothpick.
Rule 3: The Carryover Calculation
Remember the “Thermal Battery” effect? Glass will continue to bake your food for nearly ten minutes after you take it out of the oven. Therefore, you must pull the glass pan out of the oven before the food looks completely done. If you wait until a toothpick comes out perfectly clean from the center, it is already too late. The residual heat trapped in the glass will push the brownies from “perfectly baked” to “dry and crumbly” while they sit on the counter. Pull them when there are still a few moist, sticky crumbs clinging to the toothpick.
The Art of the Sling: Mitigating Edge Burn in Glass Pans
If you are baking in glass, do not rely on cooking spray. One of the main reasons brownies form a weird, hard, raised lip around the edges is because home cooks aggressively coat the sides of the pan with aerosol non-stick spray. As the batter heats up and tries to climb the sides of the pan, the grease causes it to slip, fold over on itself, and fry against the hot glass.
Instead, you need to create a parchment paper sling.
Cut two long sheets of high-quality parchment paper. Lay one horizontally across the pan, pushing it firmly into the corners, and leave a few inches hanging over the edges. Lay the second sheet vertically over the first, doing the same thing.
This does two things. First, the parchment paper creates a microscopic barrier between the super-heated glass and your delicate batter, slightly insulating the edges from the brunt of the thermal assault. Second, once the brownies have cooled, you can simply grab the overhanging parchment paper and lift the entire block of brownies out of the pan in one flawless motion. Just as you wouldn’t skip resting your dough to develop complex flavors in your cookies, you should never skip lining your pan with a parchment sling. It saves your edges, and it prevents you from violently hacking at your pan with a metal spatula.
When Is Glass Actually Useful? (Because I’m Not Throwing It Away)
I may sound like I harbor a deep, personal vendetta against glass bakeware, but I am a practical cook. Glass is not inherently evil; it simply has a very specific job description. You should never use it for delicate batters, cakes, or brownies, but there are several scenarios where glass is actually the superior choice.
1. Casseroles, Lasagnas, and Gratins
Remember how glass holds onto heat forever? That is a nightmare for brownies, but it is an absolute dream for a baked ziti. When you serve a family-style casserole, you want the dish to stay piping hot on the dining table for as long as possible so people can go back for warm second helpings. The thermal mass of a heavy glass dish acts as a fantastic warming vessel. Furthermore, the intense heat retention of the glass walls helps create those crispy, caramelized cheese edges that everyone fights over.
2. Highly Acidic Foods
Aluminum is a highly reactive metal (unless it is fully anodized). If you bake a tomato-heavy dish, a lemon pudding, or a mixed berry cobbler in a cheap, unlined metal pan, the acid in the food will chemically react with the metal. This can cause a metallic, tinny flavor to leach into your food, and it will eventually pit and ruin your pan. Glass is completely non-reactive and chemically inert. It will never alter the flavor of acidic ingredients.
3. Pie Crusts
Glass is transparent. When you are baking a heavy, wet fruit pie, the greatest fear is the dreaded “soggy bottom.” If you bake your pie in a glass dish, you can literally lift the pan up, look through the bottom, and visually confirm if the pastry dough has achieved a golden, crispy bake.
Other Rookie Baking Mistakes That Are Ruining Your Desserts
Since we are already deep into a culinary masterclass, we need to address a few other common reasons your baked goods might be failing. Blaming the glass pan is accurate for burnt edges, but if your texture is completely wrong, you might be committing one of these cardinal sins.
Measuring Flour by Volume
Baking is chemistry, and chemistry requires precision. If you are plunging a plastic measuring cup directly into a compacted bag of flour, you are forcing excess air out and packing the cup with way too much actual product. If you do not stop scooping your flour by volume, you are unknowingly adding up to 30% more flour to your recipes. This is the number one cause of dry, dense, cakey brownies that taste like sawdust. Buy a digital scale, weigh your ingredients in grams, and watch your baking transform overnight.
Baking on a Hot Pan
If you are making multiple batches of cookies, you cannot take a pan out of a 350°F oven, scrape the finished cookies off, and immediately drop raw dough onto the blistering hot metal. The residual heat of the pan will instantly melt the butter in the raw dough before the oven has a chance to set the structure. If you are wondering why your cookies spread into massive, paper-thin, greasy puddles that fuse together, a hot pan is usually the culprit. Always let your baking sheets cool completely to room temperature before loading them up for round two.
Overmixing the Batter
When you mix flour with a liquid, you begin to develop gluten strands. This is fantastic when you are vigorously kneading a loaf of sourdough bread, because you want a tough, chewy, structural network. It is an absolute disaster when you are making brownies or cakes. Once you add the dry ingredients to your wet ingredients, you must fold them together gently, stopping the exact second the last streak of flour disappears. Overmixing develops gluten, turning your tender dessert into a tough, rubbery sponge.
Take Back Control of Your Oven
The kitchen can be an intimidating place, especially when you follow a recipe perfectly and still end up with a ruined dessert. But the secret that professional chefs don’t often share is that great cooking isn’t just about technique; it is about understanding your tools.
Your oven is not broken. Your recipes are not cursed. You simply needed to learn the physics of thermal transfer. Now that you understand that glass acts as a stubborn insulator and a relentless thermal battery, you have the power to outsmart it. You know to drop the temperature by 25°F. You know to extend the baking time. And most importantly, you know that investing in a high-quality, light-colored aluminum pan is the easiest way to guarantee a perfect, fudgy, evenly-baked brownie every single time.
Stop accepting burnt edges as a natural consequence of baking. Throw out your toxic, peeling non-stick gear. Respect the science of heat transfer, adjust your oven accordingly, and go reclaim your weekend baking projects. You have got this.


