We’ve all been there. It’s a Tuesday night. You’ve had a long, soul-crushing day at the office, you skipped lunch, and the only thing standing between you and a total emotional meltdown is a steaming, comforting bowl of homemade macaroni and cheese. You’ve dutifully boiled the pasta, you’ve warmed the milk, and you’re gently stirring in the cheese, anticipating that glossy, velvety, liquid gold you see in high-end restaurant commercials.
But then, absolute tragedy strikes.
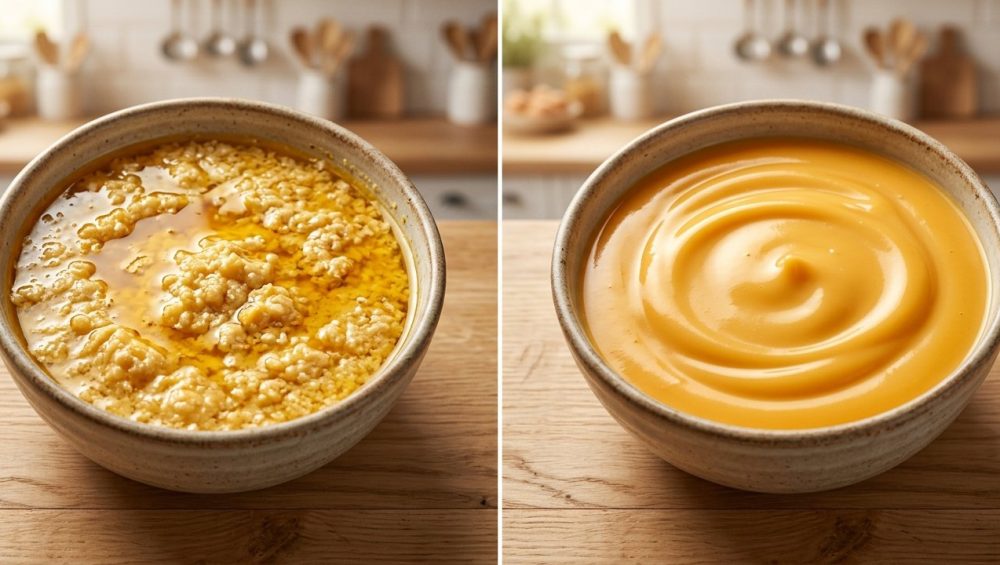
Right before your eyes, the sauce seizes. It separates into a horrifying, oily puddle of yellow grease floating on top of a gritty, clumped-up, sandy mess that looks more like wet sawdust than a rich culinary masterpiece. You stare into the pot, questioning your life choices, your cooking abilities, and the universe itself. You poke at the rubbery clumps with your wooden spoon, wondering how something so simple could go so disastrously wrong.
Take a deep breath, pour yourself a heavy glass of whatever wine you happen to have open, and listen to me very carefully: It is not your fault. You do not need a culinary degree from Le Cordon Bleu to fix this. You just need a little bit of fundamental food science, a dash of patience, and a firm refusal to ever accept mediocrity in your home kitchen.
As a home cook who has set off the smoke detector more times than I care to admit, I have ruined my fair share of cheese sauces. I have made queso that looked like scrambled eggs and fondues that resembled chewing gum. But through trial, error, and a stubborn refusal to eat bad food, I have cracked the code. Today, we are going to dive deep—and I mean extraordinarily deep—into the thermodynamics, the molecular chemistry, and the downright sneaky grocery store traps that are ruining your weeknight dinners. We are going to explore exactly why your cheese sauce gets grainy, and more importantly, how to guarantee a silky, foolproof melt every single time.
The Anatomy of a Perfect Melt: What is Cheese, Anyway?
Before we can accurately diagnose why your sauce is breaking and turning into a gritty nightmare, we have to understand the raw materials we are actually working with. Cheese isn’t just a solid block of deliciousness; it is a highly complex, incredibly delicate chemical structure.
At its core, cheese is an emulsion. It is a finely balanced, microscopic matrix of water, dairy fat, and milk proteins—specifically, a group of proteins known as casein. In a solid block of cheese, these casein proteins are tightly bound together by calcium ions, forming a microscopic three-dimensional net. Suspended delicately inside this protein net are thousands of microscopic droplets of fat and moisture.
When cheese is sitting cold in your refrigerator, this protein net is rigid and inflexible, which is why a block of cheddar holds its solid shape. As you introduce heat to the cheese, the kinetic energy causes the fat molecules to soften and the water to loosen up. At around 90°F (32°C), the milk fat begins to melt into a liquid state. As the temperature slowly creeps up to about 130°F to 150°F (54°C to 66°C), the casein protein bonds begin to relax, stretch, and flow.
This specific temperature range is the magic window. This is exactly when the cheese becomes that beautiful, gooey, stretchy, Instagram-worthy liquid. The proteins are relaxed enough to flow freely, but the calcium-bound net is still intact enough to hold the liquid fat and water together in a perfectly smooth emulsion.
But make no mistake, this emulsion is incredibly fragile. If you push the heat too far, or if you disrupt the delicate balance of fat and water, that microscopic protein net completely collapses. And when it collapses, you get the dreaded grainy, broken sauce.
The Usual Suspects: Why Your Sauce Broke
If your cheese sauce currently looks like a greasy, clumpy disaster, one of four things has gone horribly wrong during your cooking process. Let’s interrogate the usual suspects and figure out exactly who ruined your dinner.
Suspect 1: Heat is Not Your Friend (The Protein Coagulation Factor)
This is unequivocally the number one rookie mistake I see in home kitchens across the world. We are conditioned by television chefs and fast-paced cooking videos to think that to melt something quickly, we need to blast it with roaring fire. But when it comes to delicate dairy proteins, excessive heat is an absolute death sentence.
Remember that delicate casein protein net we just talked about? When the temperature of your sauce exceeds 150°F (66°C)—which is significantly below the boiling point of water—those relaxed proteins violently contract. Think of it exactly like cooking a tough cut of steak; as the muscle fibers get hotter, they tighten up and forcefully squeeze out all of their internal juices.
The exact same physiological reaction happens to your cheese. When overheated, the casein proteins tightly bind together into hard, microscopic clumps. This is the exact grainy, gritty texture you feel coating your tongue. As they violently squeeze together, they forcefully expel all the fat and water they were previously holding in the emulsion. The result? A horrifying pool of separated, yellow grease floating on top of rubbery protein curds.
If your milk or roux base is actively bubbling or boiling when you add the grated cheese, you have already lost the battle. Just as you must stop boiling mulled wine to preserve its delicate flavor profile, you must absolutely remove your pot from the heat source before stirring in your dairy. Temperature control is the single most important skill you can master in the kitchen.
Suspect 2: The Pre-Shredded Trap (A Grocery Store Conspiracy)
I am going to say this loudly for the people in the back, and I want you to internalize it: Step away from the bags of pre-shredded cheese.
I get it. I really do. Time is money, especially on a chaotic Wednesday evening when you have exactly thirty minutes to get dinner on the table before you collapse on the couch. Ripping open a convenient plastic bag of pre-grated cheddar feels like a harmless, totally acceptable shortcut. But if you are making a delicate cheese sauce, that bag is actively sabotaging your efforts.
Commercial pre-shredded cheese is heavily coated in anti-caking agents to prevent the individual shreds from fusing into a solid, unappealing brick during cross-country transport. The most common culprits used by major brands are potato starch, corn starch, and powdered cellulose. Now, if you aren’t familiar with powdered cellulose, it is essentially refined wood pulp or plant waste derived from cotton lint and wood bark. While the FDA deems it technically safe to eat, it behaves disastrously when introduced to a delicate liquid emulsion.
These anti-caking agents act as a stubborn physical barrier. They coat the cheese proteins, preventing them from seamlessly melting together and fusing into a smooth liquid. Furthermore, starches act like microscopic sponges, eagerly absorbing moisture as they heat up. When you dump a bag of pre-shredded cheese into your sauce, the cellulose and potato starch aggressively soak up the liquid base, thickening your sauce unpredictably and leaving behind a distinct, powdery, gritty mouthfeel.
If you want a truly silky sauce, you must grate your own cheese from a solid block. It takes exactly sixty extra seconds of your life. Use a standard box grater or a food processor attachment. It is entirely non-negotiable if you want professional results.
Suspect 3: The Wrong Cheese for the Job
Not all cheeses are created equal, and not all of them belong anywhere near a melting pot. The meltability of a specific cheese is heavily dependent on its exact age, its acidity, and its internal moisture content.
Young cheeses—like mild cheddar, Monterey Jack, Fontina, and Gouda—have a very high moisture content and a relatively loose, relaxed protein structure. Because they have plenty of internal water to maintain the emulsion, they melt beautifully and effortlessly.
Aged cheeses—like extra-sharp cheddar, Parmesan, Pecorino Romano, and aged Gruyere—have spent months or even years sitting in a temperature-controlled cave, slowly losing moisture to evaporation. Their proteins are incredibly tightly bound, and their water content is practically non-existent. When you try to melt an extra-aged sharp cheddar entirely on its own, there simply isn’t enough water present to maintain the emulsion. The tight proteins instantly separate into pools of grease and hard clumps.
You can absolutely use aged cheeses for their robust, punchy flavor, but you must blend them with a high-moisture, excellent-melting cheese. A 50/50 split of sharp cheddar for deep flavor and Monterey Jack for a flawless texture is a classic, foolproof combination that rarely breaks.
Suspect 4: Toxic Cookware Sabotage
I have absolutely zero patience for cheap, peeling, lightweight non-stick pans. Not only are they an environmental hazard and a potential health nightmare when the Teflon begins to flake into your food, but their terrible thermal conductivity will outright ruin your sauces.
Thin, cheap pans heat incredibly unevenly. Because they lack proper thermal mass, they create massive, intense “hot spots” directly over the burner flames. Even if you think your stove dial is set to low, the bottom of a cheap aluminum pan might be scorching at 300°F in one specific, localized spot. When your delicate cheese hits that intense hot spot, it instantly seizes, breaks the emulsion, and turns grainy before you can even whisk it away.
If you are serious about upgrading your weeknight meals, you need to start banishing toxic kitchen gear from your cabinets immediately. Invest in a heavy-bottomed, fully clad stainless steel saucepan or a high-quality enameled cast iron Dutch oven. These premium materials possess excellent thermal mass; they absorb heat slowly and distribute it evenly across the entire surface of the pan, ensuring your cheese melts gently without ever hitting any localized temperature spikes. (If you struggle with food sticking to your new stainless steel, take five minutes to learn the water drop test to master proper temperature control).
The Food Science of Fixing It: Prevention First
Now that we know exactly how we are ruining our sauces, let’s talk about the highly effective scientific methods we can employ to force that emulsion to stay together. We have several incredibly powerful culinary tools at our disposal to ensure a perfect melt.
Method 1: The Starch Barrier (The Classic Béchamel)
This is the traditional French culinary method, and it relies entirely on physical intervention. By starting your sauce with a classic roux—a cooked paste consisting of equal parts melted butter and all-purpose flour—you are intentionally introducing complex starch molecules into the liquid base.
When you slowly whisk warm milk into the cooked roux to create a béchamel sauce, the starch molecules absorb the liquid, swell up, and disperse evenly throughout the pot. These swollen starches essentially act as microscopic bouncers at a crowded nightclub. They physically get in between the casein cheese proteins, actively preventing them from clumping together and coagulating when the cheese is finally added to the pot.
While a roux-based sauce is a fantastic, comforting classic that provides a thick, hearty texture, it does have a few minor drawbacks. The flour tends to slightly mute the sharp, punchy flavor of the cheese, and the sauce can sometimes feel a bit heavy, pasty, or floury on the palate if the raw roux isn’t cooked out properly in the beginning stages.
Method 2: The Acid Trip (The Swiss Fondue Secret)
If you’ve ever hosted a dinner party and found yourself wondering why your fondue breaks into a stringy, unmanageable mess, the answer almost always lies in the acidity levels of your base liquid. Traditional Alpine fondue doesn’t rely on a heavy flour roux to stay smooth; instead, it uses a base of dry white wine and a generous squeeze of fresh lemon juice.
This isn’t just for a bright, tangy flavor profile. Wine contains high levels of tartaric acid, and lemons are packed with citric acid. When you introduce a strong acid to melted cheese, it significantly lowers the pH of the entire mixture. This slight, calculated drop in pH fundamentally changes the electrical charge of the casein proteins, making them naturally repel one another rather than clumping together into grainy curds.
Additionally, the water content in the wine provides the necessary moisture to thin out the incredibly tight proteins of aged Alpine cheeses like Gruyere and Emmental. It’s a brilliant, centuries-old chemical trick that results in a pure, unadulterated, intensely cheesy flavor without the heavy, muted texture of a flour-based roux.
Method 3: The Secret Weapon: Sodium Citrate
If you want to completely eliminate all cooking anxiety and achieve a sauce with the exact flawless, glossy texture of processed Velveeta, but with the complex, sharp, artisanal flavor of an aged cheddar, you need to buy a bag of sodium citrate immediately.
Sodium citrate is a completely food-safe salt derived directly from naturally occurring citric acid. Its chemical formula is Na3C6H5O7 (which, quite hilariously for a cheese-melting agent, spells out NaCHO). It was originally utilized in the early 1900s as a medical anticoagulant for blood transfusions, but the modernist culinary world quickly realized it had miraculous, physics-defying properties when applied to melted dairy.
Here is the deep, fascinating chemistry behind the magic: The casein proteins in your cheese are held together by stubborn calcium ions. When you dissolve a small amount of sodium citrate into a splash of water, milk, or beer and heat it up, the sodium citrate actively strips those calcium ions right out of the cheese matrix and replaces them with sodium ions.
This completely and permanently alters the molecular structure of the cheese. The proteins become highly soluble and physically cannot clump together, no matter how hard they try. The emulsion becomes virtually indestructible. You can boil it, cool it, refrigerate it, and reheat it multiple times, and it will remain a perfectly smooth, glossy, flowing liquid. It is the ultimate modern chef’s cheat code for flawless macaroni and cheese, stadium-style queso dips, and perfectly draped nachos.
Method 4: The Evaporated Milk Hack
If you don’t happen to have modernist chemicals like sodium citrate sitting in your pantry, and you absolutely refuse to make a traditional flour roux, you can use the brilliant evaporated milk method popularized by prominent food science writers.
Evaporated milk is exactly what it sounds like: regular cow’s milk that has been gently heated until about 60% of its water content has slowly evaporated away. What remains in the can is a highly concentrated, thick liquid packed to the brim with milk proteins (known as micelles). When you use evaporated milk as the primary base liquid for your cheese sauce, you are effectively flooding the environment with excess emulsifying proteins. These extra proteins aggressively coat the fat droplets from the melting cheese, stabilizing the emulsion and preventing it from breaking into a greasy mess.
Tossing your freshly grated cheese with a single tablespoon of cornstarch before melting it into the gently simmering evaporated milk adds an extra layer of structural insurance, resulting in a remarkably stable, incredibly cheesy sauce in under ten minutes with almost zero effort.
Step-by-Step: How to Make a Foolproof, Silky Cheese Sauce
We’ve thoroughly covered the scientific theory. Now let’s put it into actionable practice. Here is my definitive, no-nonsense masterclass on making a perfect, traditional cheese sauce using the Béchamel method. Follow these instructions to the letter, and you will never eat a grainy sauce again.
Step 1: Prep Your Ingredients (Mise en Place)
Do not even think about turning on your stove until everything is measured, grated, and ready to go. Cheese sauces move fast, and if you are scrambling to measure milk while your butter burns, you will fail. Grate 8 ounces of high-quality, block cheese (a 50/50 mix of sharp cheddar and high-moisture Monterey Jack is perfect). Measure out exactly 2 tablespoons of unsalted butter, 2 tablespoons of all-purpose flour, and 1 cup of whole milk. Warm the milk slightly in the microwave for thirty seconds; adding ice-cold milk to a hot roux can cause immediate clumping.
Step 2: Build the Roux
Place your heavy-bottomed stainless steel saucepan over medium-low heat. Add the butter and let it melt completely. Once it is bubbling gently and the water has cooked out of the butter, vigorously whisk in the flour. You need a sturdy, reliable tool for this—if you are constantly wondering why your whisk leaks dishwater all over your clean counters, it is definitely time to upgrade to a fully sealed, professional-grade stainless steel model.
Cook the roux, whisking constantly, for about two full minutes. You want to cook out the raw, pasty flour taste, but you absolutely do not want the flour to brown. It should smell slightly nutty, look like wet sand, and maintain a pale blonde color.
Step 3: Whisk in the Liquid
Slowly pour in your warmed whole milk, just a tiny splash at a time, whisking vigorously without stopping. At first, the roux will seize up into a thick, intimidating paste. Don’t panic; this is normal. Keep adding the milk slowly and whisking aggressively. Eventually, it will loosen into a perfectly smooth, creamy liquid. Let it simmer gently over the low heat for about 3 to 5 minutes until it thickens enough to beautifully coat the back of a wooden spoon.
Step 4: The Critical Temperature Drop
This is the moment of truth. This is where sauces are made or ruined. Turn off the heat. Completely remove the saucepan from the hot burner and place it on a cool surface. Let the thickened milk mixture sit undisturbed for about 60 to 90 seconds to allow the intense residual heat to dissipate. You want the liquid to drop to around 140°F—hot enough to gently melt the cheese, but cool enough to prevent the sensitive proteins from coagulating into hard curds.
Step 5: Emulsify the Cheese
Add your freshly grated cheese a small handful at a time. Do not dump the entire mound of cheese in at once, or you will drastically drop the temperature of the sauce and create one giant, unmanageable clump of dairy. Gently stir the cheese into the warm liquid in a slow, figure-eight motion until it is completely melted and incorporated. Repeat this patient process until all the cheese is added and the sauce is glossy.
If the sauce cools down too much during this process and the last bit of cheese stubbornly refuses to melt, you can place the pot back on the burner on the absolute lowest possible setting for just a few seconds, stirring constantly.
Serve immediately. Do not let it sit over an active flame, or it will inevitably break.
Emergency Kitchen Rescue: Can You Save a Broken Sauce?
Let’s say you ignored my advice. You got distracted by a text message, you left the heat on high, you used a bag of pre-shredded cheese coated in sawdust, and now you are staring at a grainy, separated nightmare. Is all hope lost? Can you save it?
Sometimes, yes. If you act quickly and decisively, you can attempt to rescue a ruined dinner using sheer mechanical force or rapid temperature manipulation. Here are the three best emergency triage methods:
The Immersion Blender Trick:
If the proteins have separated from the fat and your sauce looks oily, you can sometimes force the emulsion back together mechanically. Take the pot off the heat immediately. Submerge an immersion blender (stick blender) deep into the sauce and blast it on high speed. The rapidly spinning blades shear the separated fat droplets into microscopic sizes, forcefully driving them back into the protein matrix. It won’t be quite as perfect as a sauce that never broke, but it will be entirely edible and smooth.
The Cold Dairy Shock:
If you catch the sauce right as it begins to look greasy and separate, immediately whisk in a tablespoon of ice-cold heavy cream or whole milk. The sudden, drastic drop in temperature can halt the protein coagulation process in its tracks, while the extra water and fresh milk proteins help re-establish the broken emulsion. Vigorously whisk off the heat until it magically comes back together.
The Lemon Juice Splash:
If the sauce is grainy, gritty, and thick, a tiny splash of lemon juice or white wine vinegar can sometimes lower the pH just enough to encourage the tight, panicked casein proteins to relax and repel each other. Add just a half-teaspoon of acid and whisk aggressively off the heat.
The Best (and Worst) Cheeses for Melting
If you want to set yourself up for ultimate success, you need to curate your ingredients properly before you even turn on the stove. Having the right essential kitchen tools for beginners is only half the battle; the other half is intimately knowing your raw materials. Here is my definitive tier list of melting cheeses for sauces:
God Tier (Flawless Melting, High Moisture)
- Fontina: The absolute undisputed king of melting. It is buttery, nutty, and effortlessly melts into a glorious, silky puddle.
- Gruyère: The classic, traditional fondue cheese. It is nutty, complex, and melts beautifully due to its specific, careful aging process.
- Gouda (Young): Creamy, mild, and highly soluble. (Make sure to avoid extra-aged Gouda with the crunchy calcium crystals if you are making sauces).
- Monterey Jack: It has a very mild flavor, but it is entirely unmatched in its gooey, stretchy texture. It is the perfect blending cheese to pair with sharper, drier varieties.
- American / Velveeta: Say what you want about processed cheese products, but they are absolutely packed with sodium citrate and will melt flawlessly every single time, no matter how badly you mess up the heat.
Mid Tier (Good, But Needs Babysitting)
- Cheddar (Mild to Medium): Melts reasonably well, but can easily separate and turn oily if the heat gets too high or if it isn’t stabilized with a strong roux.
- Provolone: Offers fantastic stretch for sandwiches, but can become a bit stringy, chewy, and rubbery in a sauce if not blended with a softer, higher-moisture cheese.
- Mozzarella (Low Moisture): Fantastic for the iconic pizza cheese pull, but its incredibly long protein strands can make a cheese sauce overly stringy and difficult to eat rather than fluid and pourable.
Danger Tier (Do Not Use Alone in a Sauce)
- Extra Sharp Aged Cheddar: Far too dry. The proteins are tightly bound. It will break and turn grainy almost instantly if not blended with a high-moisture cheese or chemically stabilized with sodium citrate.
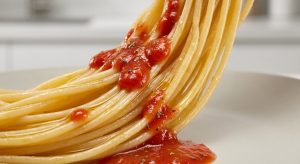
- Parmesan & Pecorino: Extremely low moisture content. They will immediately turn grainy and clump into hard rocks unless very finely micro-planed and whisked vigorously into a highly stabilized starchy liquid (like when emulsifying with pasta water—which, incidentally, is exactly why your pasta sauce separates if you execute the technique poorly).
- Feta, Cotija, Halloumi: These cheeses are literally engineered by their makers to withstand heat and not melt. They will soften slightly in a pan, but they will never, ever form a cohesive liquid sauce. Do not even try.
The Bottom Line on Better Cooking
Cooking is not magic, and it certainly isn’t an exclusive club reserved for people with fancy culinary degrees. It is simply applied physics and chemistry that you get the distinct pleasure of eating at the end of the day. When you finally understand the fundamental “why” behind the techniques, the kitchen stops being a stressful, unpredictable, chaotic environment and starts becoming a place of true creativity, relaxation, and joy.
You now know that excessive heat is the ultimate enemy of delicate dairy proteins. You know that the sneaky anti-caking agents in pre-shredded bags are actively ruining your textures. You know that investing in quality, heavy-bottomed pans prevents scorching, and you finally understand the frustrating reason why your cheap pans are losing their slip and ruining your temperature control.
The next time you crave a comforting bowl of macaroni and cheese or a late-night, spicy queso dip, you are going to do it right. You are going to grab a solid block of high-quality cheddar, you are going to grate it yourself, and you are going to treat that delicate emulsion with the gentle, low-heat respect it deserves.
And if you really want to impress your friends at your next gathering, order a small, inexpensive bag of sodium citrate online. It will fundamentally change the way you look at cheese forever. You’ll be effortlessly churning out glossy, flawless, stadium-quality nacho cheese that tastes like a high-end artisanal dream. Just remember to store your leftovers properly when the night is over—nobody likes it when their plastic containers stay greasy from poorly stored, separated dairy fats.
Now get out of here, grab your grater, step away from the roaring flames, and go make something absolutely delicious. You’ve got this.