Listen, we need to have a serious talk about your meatballs. You know the ones I’m talking about. You spend a Tuesday evening aggressively rolling ground beef into perfect little spheres, toss them in a pan, and forty-five minutes later, you’re serving your family something that closely resembles a collection of seasoned golf balls. You chew, and you chew, and you chew, silently praying for a glass of water to wash down the dry, crumbly despair.
I see you. I was you. I have set off my smoke detector more times than I care to admit trying to get a “perfect sear” on a meatball that ended up tasting like a hockey puck. But here is the brutal truth: you are working too hard for mediocre results. You do not need a culinary degree to make mind-blowing food. You do not need to buy absurdly expensive, ultra-fatty wagyu ground beef just to keep your dinner moist. What you actually need is a little bit of science, a dash of common sense, and—brace yourself—a bowl of profoundly soggy bread.
Yes, you heard me. Soggy. Bread.
In the culinary world, they call it a panade, because the French have a magical ability to make even “wet carbs” sound glamorous. But whatever you want to call it, this simple mixture of starch and liquid is the absolute best-kept secret to achieving incredibly tender, juicy meatballs and meatloaf. It is a foolproof, dirt-cheap technique that will permanently solve your dry meat woes and elevate your simple weeknight dinners from “edible” to “restaurant-quality.”
So, pour yourself a glass of whatever gets you through the evening, grab a mixing bowl, and let’s dismantle the pretentious chef-speak. We are going to dive deep into the microscopic anatomy of ground meat, banish your dry meatballs to the shadow realm, and teach you how to cook like the absolute boss you are.
The Anatomy of a Meatball Disaster (Why Your Meat is Dry)
Before we can fix the problem, we have to understand why your ground meat is staging a rebellion in the first place. The United States Department of Agriculture (USDA) estimates that in 2026, total U.S. beef consumption will reach a staggering 29.38 billion pounds. And you know what makes up nearly 48 percent of that consumption? Ground beef. We are eating a monumental amount of burgers, meatloaves, and meatballs. Yet, despite all this practice, most home cooks are still serving up dry, tough hockey pucks.
Why? Because they are ignoring the fundamental chemistry of cooking meat.
The Protein Matrix: A Microscopic Squeeze
When you buy a package of ground beef, pork, or turkey, you are essentially buying millions of tiny, severed muscle fibers. These fibers are packed with two primary proteins: actin and myosin. When meat is raw, these proteins are relatively relaxed. But the second you introduce them to heat—whether you are searing them in a skillet or baking them in the oven—these proteins wake up and start to panic.
As the internal temperature of the meat rises, the actin and myosin proteins denature and begin to bond with one another, a process known as protein cross-linking. Imagine a microscopic net that is suddenly pulled tight. As the proteins link together and contract, they literally squeeze the moisture out of the muscle fibers. This is why your ground beef steams instead of searing if you overcrowd the pan; it is weeping all of its internal hydration directly into your skillet.
With whole cuts of meat, like a ribeye steak, you can mitigate this moisture loss by simply cooking the meat to a lower temperature (like medium-rare) and letting it rest. But a meatball is a different beast entirely. Due to its spherical shape and the food safety requirements of cooking ground meat, by the time the center reaches a safe temperature, the outer layers have been thoroughly cross-linked, contracted, and wrung dry like a kitchen sponge.
The Lean Meat Myth
“But wait!” you say. “I buy the 93% lean ground turkey because I’m trying to be healthy!”
Oh, honey. Let me gently set my wine glass down and give you some tough love. Using ultra-lean ground meat for meatballs is a one-way ticket to Choke City. Fat is a natural insulator and a lubricant. As the meat cooks and the proteins squeeze out water, melting fat coats the muscle fibers, providing a perception of juiciness and a tender mouthfeel. When you remove the fat, you remove the only natural defense mechanism the meatball has against the tightening protein matrix.
However, I am a realist. I know that time is money, groceries are expensive, and sometimes you just have to work with whatever ground meat happens to be on sale at the supermarket. You shouldn’t have to buy an expensive, custom-ground blend of short rib and pork shoulder just to get a decent dinner on the table. This is exactly where our soggy bread savior enters the chat.
Enter the Panade: Your Soggy Bread Savior
If you have ever wondered how Italian grandmothers manage to make meatballs that practically melt in your mouth, even when using cheap cuts of meat, the answer is a panade.
What Exactly is a Panade?
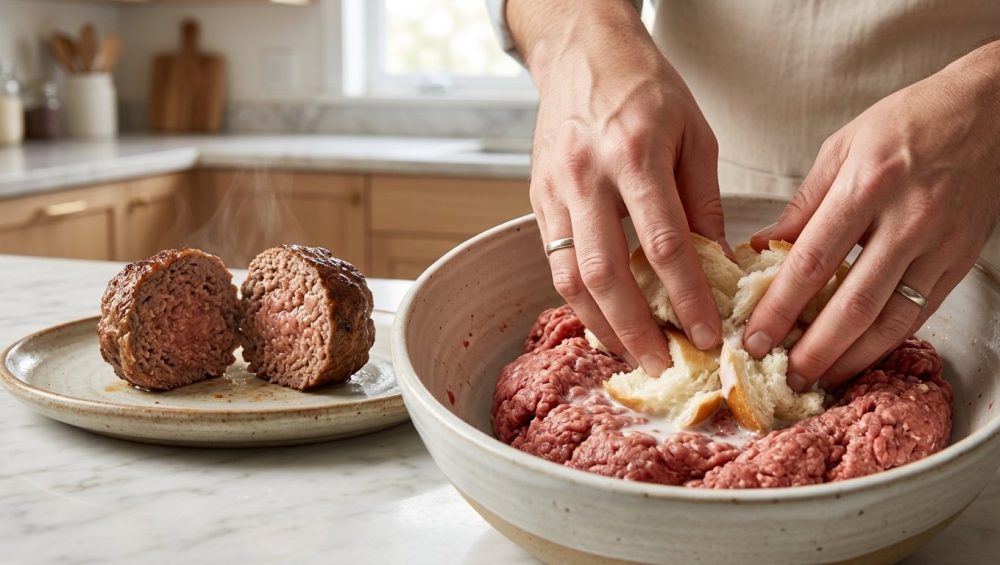
A panade (pronounced pah-NAHD) is a paste made by combining a starch and a liquid. Traditionally, it involves taking stale bread, tearing it into chunks, and soaking it in milk until it turns into a mushy, unappetizing sludge. I know it looks gross. I know the texture feels like something a toddler would make in a mud kitchen. But I need you to trust the process, because this sludge is pure culinary magic.
When you gently fold this starchy paste into your raw ground meat, you are fundamentally altering the way the meat will behave when it hits the heat. You are taking control of the cooking process rather than letting the heat dictate the outcome.
The Science of the Gel: How Starch Saves the Day
Let’s look at the science. Remember those actin and myosin proteins that want to link up and squeeze your meatball dry? When you introduce a panade into the mix, the starch molecules physically get in the way.
As the meatball cooks, the liquid in the panade heats up, causing the starches from the bread to swell and gelatinize. This gelatinized starch acts as a physical barrier, a sort of microscopic buffer zone that coats the meat proteins. Because the starches are physically blocking the proteins from touching each other, the proteins cannot undergo extensive cross-linking.
If the proteins cannot link tightly, they cannot contract. If they cannot contract, they cannot squeeze out the water. The result? The moisture stays trapped inside the meatball, and the texture remains incredibly soft, tender, and juicy, regardless of how lean the meat is. The panade literally holds the meatball together while simultaneously preventing it from turning into a dense brick. It is the ultimate kitchen hack for the everyday home cook.
Building the Perfect Panade: A Step-by-Step Masterclass
Making a panade is not rocket science, but there are a few rules you need to follow to get the best results. Throwing dry, un-soaked breadcrumbs directly into your meat mixture is a rookie mistake that will actually make your meatballs drier, as the dry crumbs will aggressively suck the existing moisture right out of the meat. We want to hydrate the starch before it meets the protein.
Choosing Your Starch (Not All Bread is Equal)
The foundation of your panade is starch, and you have options.
Standard White Bread: This is the gold standard for a classic panade. Cheap, squishy, supermarket white bread lacks the tough crusts and complex crumb structures of artisan loaves, making it incredibly easy to mash into a smooth paste. Just tear it up, crusts and all, and you are good to go.
Panko Breadcrumbs: If you don’t keep sliced bread in the house, panko is a fantastic, shelf-stable alternative. Because panko is airy and light, it absorbs liquid rapidly and creates a very delicate panade.
Crackers: Crushed saltines or buttery round crackers (like Ritz) make a phenomenal panade, adding a subtle hit of salt and fat. This is a classic Southern meatloaf trick that works wonders for weekday dinners when you need to clear out the pantry.
Oats: If you are cooking for someone with a gluten sensitivity, quick-cooking oats are a brilliant substitute. They provide excellent binding power and gelatinize beautifully. Just pulse them in a blender a few times first to break them down so you don’t end up with lumpy meatballs.
What to Avoid: Do not use dense, chewy, artisan sourdough or hearty multigrain breads with giant seeds in them. They will not break down into a smooth paste, and you will end up with weird, chewy, distinct chunks of bread interrupting the texture of your meatball.
Selecting Your Liquid (Milk, Broth, or Water?)
Once you have your starch, you need to hydrate it.
Whole Milk: This is the traditional choice for a reason. Whole milk contains fat and milk proteins that add richness and a subtle sweetness to the meat. If you only have skim milk, that’s fine, but whole milk is superior.
Buttermilk: If you want to add a slight tang and even more tenderizing power, buttermilk is incredible. The acidity in buttermilk further weakens the meat proteins, resulting in an almost criminally tender meatball.
Beef or Chicken Broth: If you have a dairy allergy, or if you just want to double down on the savory, meaty flavor, use a high-quality broth. It hydrates the starch perfectly while injecting extra umami into the mix.
Water: In an absolute pinch, tap water works. The science of the starch gel will still function, but you won’t be adding any extra flavor.
The Golden Ratio: How Much Panade Do You Need?
A common question I get from weekend culinary hobbyists is: “How much of this sludge do I actually need?”
As a general rule of thumb, for every one pound of ground meat, you want to use about 1/2 cup of loosely packed torn bread (or 1/3 cup of panko/breadcrumbs) soaked in roughly 3 to 4 tablespoons of liquid.
You want the bread to be completely saturated and squishy, but it shouldn’t be swimming in a pool of unabsorbed liquid. Let the mixture sit for about five to ten minutes. Once the bread is fully hydrated, use a fork (or your impeccably clean hands) to mash it into a smooth, uniform paste. You want to eliminate any large, recognizable chunks of bread.
Mixing and Shaping: Technique Matters
You have your meat. You have your beautifully mashed panade. Now comes the critical moment where you can either secure your culinary victory or ruin everything.
The Gentle Fold vs. The Aggressive Mash
I need you to treat this ground meat with the reverence it deserves. The fastest way to undo all the wonderful work your panade is about to do is to over-mix the meat. If you aggressively knead the ground beef like it’s a stubborn ball of pizza dough, you will prematurely activate the myosin proteins and create a dense, springy, sausage-like texture.
Instead, spread your ground meat out in a large mixing bowl. Add your panade, your salt, your herbs, and your aromatics. (Pro tip: if you are using fresh garlic, consider preventing your garlic from burning by gently sautéing it before adding it to the raw meat).
Using your hands with your fingers spread wide apart like a rake, gently toss and fold the mixture together just until the ingredients are evenly distributed. The moment it looks cohesive, stop touching it. Walk away.
The Chill Factor (Why Resting the Mix is Crucial)
If you have the time—and I know on a Tuesday night, you might not—cover the bowl and pop it in the fridge for 30 minutes. Chilling the mixture does two things. First, it allows the flavors to meld. Second, it firms up the fat in the meat, making the meatballs much easier to roll and shape without them falling apart in your hands.
When you do shape them, oil your hands lightly. Roll them gently. Do not pack them tightly like you are packing a snowball for a neighborhood war. A loose, gentle pack ensures a tender bite.
Cooking the Meatballs: Searing, Baking, and Simmering
We have arrived at the cooking phase, which means it is time for my favorite part of any recipe: the cookware rant.
Ditch the Toxic Gear: Safe Cooking Equipment
I have zero patience for cheap, toxic kitchenware. If you are about to place these beautifully crafted meatballs onto a flimsy, warped baking sheet coated in peeling Teflon, I am going to reach through this screen and take your spatula away.
Conventional non-stick coatings are often loaded with PFAS (per- and polyfluoroalkyl substances)—also known as “forever chemicals”. These chemicals do not break down in the environment, and when heated to high temperatures, cheap non-stick pans can off-gas toxic fumes. We are trying to nourish our bodies, not subject them to a hazardous materials experiment. It is time you start banishing toxic kitchen gear from your home for good.
For searing meatballs on the stovetop, you want a heavy-bottomed stainless steel skillet, a carbon steel pan, or a classic cast-iron skillet. These materials are incredibly durable, 100% free of PFAS, and they retain heat beautifully, which is exactly what you need to get a proper crust. If you are terrified of your meat sticking to stainless steel, you just need to practice preventing meat from sticking by letting the pan preheat properly before adding your oil.
If you are baking your meatballs (my preferred, time-saving weekday method), use a heavy-duty, uncoated aluminum or stainless steel baking sheet. If you are tired of baking sheets that pop loudly in the oven and warp under heat, invest in a commercial-grade half-sheet pan. They cost about twenty bucks and will outlive you.
The Maillard Reaction: Getting the Perfect Crust
Whether you sear or bake, your goal is to trigger the Maillard reaction. This is the chemical reaction between amino acids and reducing sugars that gives browned food its deeply savory, complex flavor.
If searing on the stove, give the meatballs plenty of space. If you crowd the pan, the temperature will drop, the moisture will release, and you will end up boiling your meatballs in their own juices.
If baking, preheat your oven to a blazing 400°F (200°C). Brush the meatballs lightly with olive oil and roast them until they develop a gorgeous, golden-brown crust. Baking is vastly superior for busy weeknights because it requires zero babysitting, no flipping, and prevents your stovetop from looking like a grease bomb went off.
To Simmer or Not to Simmer?
Once your meatballs have a nice crust, you have a choice. You can serve them as-is, or you can drop them into a pot of simmering marinara sauce.
If you choose to simmer, keep the heat low and gentle. Remember, your panade is protecting the meat, but it is not invincible. A violent, rolling boil will eventually break down the structure of the meatball and turn it to mush. A gentle, lazy simmer for 20 to 30 minutes will allow the meatballs to absorb the flavors of the tomato sauce while remaining impeccably juicy.
Beyond the Meatball: Expanding Your Panade Horizons
Once you master the panade, you will realize this technique is not just for Italian night. It is a universal ground meat hack.
The Ultimate Juicy Meatloaf
Meatloaf has a terrible reputation, largely because an entire generation grew up eating dense, dry blocks of overcooked beef ketchup-cake. But a meatloaf is essentially just a giant meatball.
By incorporating a generous panade into your meatloaf mixture, you completely eliminate the risk of a dry loaf. The starch gel will hold all the savory juices inside the meat as it bakes. You won’t even need to drown it in gravy to make it palatable. Just be sure you are trusting a reliable meat thermometer to pull the meatloaf from the oven exactly when the center hits 160°F (71°C).
Upgrading Your Weeknight Burgers
While a classic smash burger relies on pure, unadulterated beef and a screaming hot griddle, thicker pub-style burgers can actually benefit from a very subtle panade, especially if you are using leaner meat like ground turkey or chicken.
Poultry has very little intramuscular fat, which is why a turkey burger usually tastes like a seasoned coaster. By mashing a couple of tablespoons of milk-soaked panko into your ground turkey before forming the patties, you introduce a moisture-retaining barrier that will survive the grill. (Just remember that salting ground beef too early can also draw out moisture, so season the outside of your burger patties right before they hit the heat).
Troubleshooting Common Meatball Mishaps
Even with a panade, the kitchen can throw you curveballs. Here is how to troubleshoot the most common issues without losing your mind.
Why Are My Meatballs Falling Apart?
If your meatballs are crumbling into your sauce, you likely committed one of three sins:
- Your panade was too wet. If you didn’t let the bread absorb the liquid, or if you added a half cup of milk to a single slice of bread, you introduced too much free liquid into the meat. The mixture became soup.
- You didn’t mix it enough. While over-mixing makes meat tough, under-mixing means the proteins never got a chance to bind at all. You need a little bit of cross-linking to hold the sphere together. Fold gently, but ensure it is fully cohesive.
- You rolled them while warm. If the fat in the meat is too warm, it melts the second it hits the pan, causing the structure to collapse. Chill your mixture!
Why Are They Tough Even With a Panade?
If you used a panade and still ended up with a tough meatball, I can almost guarantee you over-mixed the meat. It is the most common rookie mistake. You cannot knead ground beef. Treat it like a delicate pastry dough.
Alternatively, you may have cooked them into absolute oblivion. A panade provides a massive buffer against overcooking, but it cannot defy the laws of thermodynamics indefinitely. If you bake a meatball at 450°F for an hour, it is going to turn to ash. Use a thermometer, and pull them when they are done.
Why Do They Taste Bland?
A panade dilutes the flavor of the meat slightly because you are adding neutral starch and liquid. You must compensate by seasoning your meat mixture aggressively. Do not be shy with the kosher salt. Add a mountain of Parmigiano-Reggiano. Throw in a handful of finely chopped fresh herbs. And please, for the love of all things culinary, consider blooming spices in hot oil before you add them to the bowl to wake up their essential oils.
And if you are baking your meatballs in a glass dish, be incredibly careful with high heat. We have all experienced the trauma of shattering glass baking dishes when they experience thermal shock. Stick to heavy-duty metal baking sheets for high-temperature roasting.
Conclusion: Embrace the Soggy Bread
Cooking doesn’t have to be an anxiety-inducing chore, and you do not need to rely on expensive ingredients to make food that makes people close their eyes and sigh at the dinner table. The difference between a struggling novice and a confident home cook usually comes down to understanding a few basic scientific principles.
The panade is the ultimate proof of this. By simply taking a piece of stale bread, soaking it in a splash of milk, and folding it into your ground meat, you are outsmarting the microscopic proteins that want to ruin your dinner. You are taking control of the moisture, guaranteeing a tender texture, and saving yourself from the tragedy of the dry meatball.
So the next time you are staring down a package of ground beef on a busy weeknight, don’t panic. Grab a bowl, tear up some bread, and let the science do the heavy lifting. You’ve got this. Now go pour yourself another glass of wine—you’ve earned it.


