
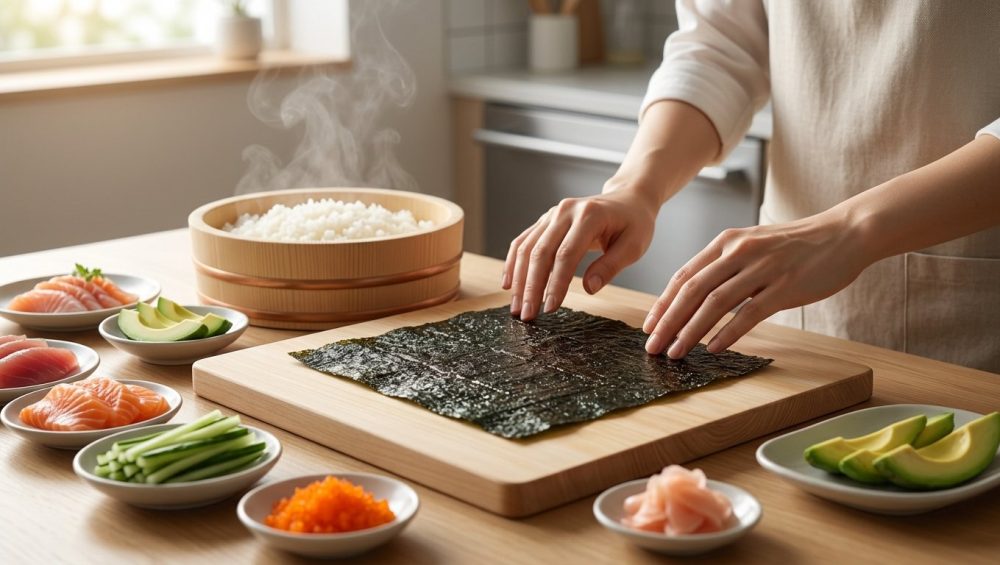
Picture this: You have spent the better part of your Saturday sourcing premium sushi-grade salmon, meticulously slicing cucumbers into perfect matchsticks, and fanning a pot of rice until your arm aches. You invite your friends over, lay out a gorgeous, Instagram-worthy spread, and eagerly wrap your very first piece of DIY sushi. You take a bite, fully expecting that satisfying, delicate, shatteringly crisp crunch of premium seaweed.
Instead, your teeth meet the resistance of a Michelin tire.
You chew. And chew. And chew some more, desperately trying to politely swallow what has essentially become a sheet of marine-flavored rubber. Welcome to the tragic, jaw-aching reality of the weekend sushi night.
Listen, we have all been there. I have personally ruined enough dinner parties in my early cooking days to know exactly how demoralizing it is to watch your guests politely struggle through a meal you spent hours preparing. But here is the good news: you do not need a culinary degree, a ten-year apprenticeship in Tokyo, or a private chef to fix this. You just need to understand a little bit of basic kitchen science. If you are tired of serving soggy homemade sushi rolls to your friends, pull up a chair and pour yourself a glass of wine. We need to have a serious, no-nonsense masterclass about moisture migration, thermal dynamics, and the secret to hosting a stress-free hand roll bar.
The Science of the Sog: Why Your Seaweed Hates You
To understand why your sushi falls apart, we first have to understand the temperamental diva of the Japanese pantry: nori.
The Biology of Nori: From Ocean to Oven
Nori is the Japanese term for dried, edible seaweed, specifically made from red algae species like Pyropia yezoensis and Pyropia tenera. Long before it reaches your kitchen, this algae undergoes an incredibly rigorous journey. It is cultivated in the freezing ocean bays of Japan, Korea, and China during the winter months. The young shoots, known as Hatsunori, are harvested, washed, and fed into shredding machines.
From there, the process looks surprisingly similar to traditional papermaking. The shredded algae is mixed with fresh water, poured into square wooden frames lined with bamboo mats, and allowed to drain. Finally, these sheets are passed through highly calibrated drying ovens—usually kept strictly under 50°C (122°F) to preserve their delicate flavor compounds—bringing the moisture content of the seaweed down to a bone-dry 18% or lower. The premium sheets are then roasted to develop that signature dark color, brittle texture, and umami-rich flavor.
The Thermodynamics of Moisture Migration
Here is the fundamental scientific problem: because nori is dried to such an extreme degree, it is violently hygroscopic. That is a fancy scientific term meaning it acts like a microscopic sponge, desperately pulling moisture out of its surrounding environment the second the relative humidity creeps past 40%.
Now, think about what you are putting inside that nori. You are wrapping it around a mound of steaming, wet, freshly vinegared rice. When you place a delicate, moisture-starved sheet of roasted seaweed directly against a hot, wet carbohydrate, the unforgiving laws of thermodynamics take over. The steam from the rice rapidly transfers into the seaweed, instantly hydrating the cellular structure of the algae and causing it to swell. Within seconds—literally seconds—that crisp, delicate sheet transforms into a chewy, unbiteable disaster.
You cannot fight physics, but you can outsmart it. And outsmarting it starts with the rice.
Shari 101: The True Star of the Sushi Bar
There is a massive misconception among weekend culinary hobbyists that the star of a sushi dinner is the fish. I hate to break it to you, but the fish is just the garnish. The true soul of the dish, the element that separates a masterful sushi experience from a mediocre one, is the seasoned rice, known as shari.
The Chemistry of Short-Grain Rice
You absolutely cannot make sushi with standard long-grain white rice, jasmine rice, or basmati. You must use Japanese short-grain or medium-grain rice cultivars, such as Koshihikari or Sasanishiki.
Why? It all comes down to the molecular structure of the starch. Rice contains two main types of starch: amylose and amylopectin. Long-grain rice is high in amylose, which cooks up fluffy and separate. Japanese short-grain rice, however, contains a much higher proportion of amylopectin. When heated with water, amylopectin gelatinizes and becomes slightly sticky. This is what allows the rice grains to cling together just enough to form a beautiful sushi roll without turning into a solid block of paste. However, if you add too much water, you will end up serving mushy sushi rice, which completely ruins the textural contrast of the dish.
The 95-Degree Rule: Mastering Thermal Dynamics
Most home cooks make the catastrophic mistake of serving their sushi rice either piping hot directly from the cooker, or refrigerator cold. Both are culinary crimes.
If the rice is too hot, it acts like a miniature sauna. The aggressive clouds of steam will immediately attack your nori, rendering it soggy before you even have a chance to take a bite. Furthermore, overly hot rice will actually begin to cook your raw, sushi-grade fish upon contact, melting the delicate fats and turning the texture mushy.
On the flip side, if the rice is too cold, the gelatinized starches undergo a process called retrogradation. The grains harden, losing their supple, bouncy texture, and the delicate aroma of the vinegar vanishes, leaving the rice tasting aggressively salty and flat.
The golden rule of shari is precise temperature control. Perfect sushi rice must be served at exact body temperature—roughly 35°C to 40°C (95°F to 104°F). At this precise thermal sweet spot, the starch gels remain soft enough to meld beautifully with soy sauce and fish fats, but cool enough that they are no longer emitting nori-destroying steam.
The Hangiri: The Unsung Hero of Authentic Sushi
So, how do you rapidly cool a massive pot of steaming, vinegared rice down to exactly 95°F without turning it into a gummy, waterlogged mess? Enter the hangiri, the most important piece of equipment you probably do not own.
Why Wood Wins (And Plastic Fails)
A hangiri (sometimes called a sushi-oke or handai) is a traditional, wide, flat-bottomed wooden tub, usually crafted from Japanese cypress wood like Sawara or Hinoki, and bound with copper rings. This is not just a rustic serving piece designed to look pretty on your kitchen counter; it is a highly engineered thermodynamic tool.
When you dump hot, freshly cooked rice into a bowl and pour liquid sushi vinegar (sushi-zu) over it, you are introducing a massive amount of excess moisture. If you use a deep glass bowl, a metal mixing bowl, or—heaven forbid—one of those cheap plastic storage containers, the liquid has absolutely nowhere to go. It pools at the bottom, the rice suffocates in its own steam, and you end up with a gluey swamp.
Wood, however, is a porous, living material. The unvarnished cypress acts as a natural desiccant. Through capillary action, the wood rapidly absorbs the excess moisture from the vinegar, while the wide, shallow surface area of the tub allows the heat to dissipate evenly across the batch. Furthermore, the natural oils present in high-quality cypress possess incredible antibacterial properties, and they impart a faint, beautiful, woody aroma that perfectly complements the acidity of the rice.
Banishing Toxic Gear from Your Sushi Setup
Since we are on the topic of equipment, I need to go on a brief, highly necessary tangent. I have absolutely zero patience for home cooks who spend top dollar on premium sushi-grade tuna, only to prepare their rice in a scratched, peeling, ten-year-old non-stick rice cooker.
There is a special place in culinary purgatory for people who hoard toxic kitchen gear. You do not want flakes of mystery chemical coatings leaching into your beautiful, pristine food. This is a strict, non-negotiable rule in my kitchen. If you are going to invest in this hobby, throw away your damaged Teflon. Invest in a high-quality rice cooker with an uncoated ceramic or stainless steel inner pot. Alternatively, learn to cook your rice the old-fashioned way in a heavy-bottomed, multi-clad stainless steel saucepan. It is incredibly easy, entirely safe, and will outlast you.
Architecting the Mindful Temaki Bar
Now that we understand the intricate science of moisture and temperature, let us talk about the actual execution of your dinner party.
If you invite six people over and attempt to stand at your kitchen counter rolling traditional maki (cut rolls) to order, you are going to have a miserable time. You will spend your entire evening sweating over a bamboo mat, stressing about your presentation, while your guests drink all your wine in the living room without you.
Why Hand Rolls Are the Ultimate Hosting Hack
The ultimate solution for hosting a relaxed dinner party is the DIY Temaki (hand roll) bar. Temaki are casual, cone-shaped sushi rolls that are meant to be assembled and eaten immediately by hand.
By setting up a temaki bar, you completely eliminate the host’s burden. You prep the ingredients, lay them out beautifully on platters, and let your guests do the manual labor. More importantly, because each guest builds their own hand roll and takes a bite the very second it is constructed, the nori spends almost zero time in contact with the warm rice. You completely bypass the moisture migration problem. The seaweed stays shatteringly crisp, the rice stays perfectly warm, and you actually get to sit down and enjoy the meal you paid for.
Strategic Mise en Place: Eliminating Kitchen Bottlenecks
To pull off a seamless temaki bar, you need to employ some clever food staging techniques. The goal is to have every single ingredient prepped, sliced, and chilling in the refrigerator long before your first guest rings the doorbell.
The Proteins:
Source the highest quality sushi-grade fish you can find—salmon, yellowtail, and tuna are crowd-pleasers. Keep the fish severely chilled right up until serving. When it comes time to slice the fish into long, thin strips, please do not butcher the delicate flesh by struggling with a dull knife. You need a razor-sharp blade (preferably a carbon steel yanagiba or a well-honed chef’s knife) to make clean, single-stroke cuts. And while you are upgrading your tools, ditch the bamboo cutting boards. Bamboo is notoriously dense and high in silica; it will absolutely destroy the edge of your knife faster than you can say “omakase.” Stick to a high-quality end-grain wood or a soft Japanese synthetic rubber board.
The Plant-Based Options:
Do not leave your vegetarian or vegan guests eating plain cucumber rolls. Offer variety. Slice avocado, julienne some crisp daikon radish, and prepare some savory shiitake mushrooms. If you want a truly spectacular protein alternative, try taking a block of extra-firm tofu and freezing it before marinating. The freezing process expands the water inside the tofu, creating a porous, spongy, meat-like texture that absorbs soy sauce and sesame oil like an absolute dream.
The Step-by-Step Guide to a Stress-Free Sushi Night
We have covered the theory. Now, let us put it into practice. Here is your foolproof, step-by-step timeline for executing the perfect, mindful temaki bar.
Phase 1: The Morning Prep
Do all of your heavy lifting in the morning. Slice your fish, prep your vegetables, make your spicy mayo, and organize your platters. Cover everything tightly with plastic wrap and store it in the coldest part of your refrigerator.
Next, prepare your sushi-zu (sushi vinegar). While you can buy pre-made seasoned vinegar, making it from scratch takes two minutes and tastes infinitely better. Gently heat high-quality rice vinegar on the stove and dissolve in sugar and kosher salt. The exact ratio is a matter of chef preference, but a standard starting point is roughly 4 parts vinegar, 2 parts sugar, and 1 part salt. Let this mixture cool completely to room temperature.
Phase 2: The Rice Ritual (One Hour Before)
About an hour before you plan to eat, it is time to tackle the rice. The secret to perfect shari starts at the sink. You must be absolutely meticulous about washing your rice thoroughly. You are not just getting it wet; you are gently polishing the grains against each other to strip away the excess surface starch that causes gummy, gluey clumping. Wash the rice in a bowl, gently agitating it with your fingers, draining and repeating the process until the water runs completely clear (usually 4 to 6 times). Let the washed rice drain in a fine-mesh sieve for 30 minutes before cooking to ensure even hydration.
While the rice cooks, prep your hangiri. You must soak the wooden tub with water (and a splash of vinegar) for about 30 minutes prior to use. This pre-hydrates the wood just enough so that it absorbs the excess moisture from your rice, rather than aggressively sucking the rice completely dry. Wipe out the standing water with a clean towel before adding the rice.
Once the rice cooker finishes, immediately transfer the steaming hot rice into the damp hangiri. Do not scrape the crusty bits off the bottom of the pot; only use the pristine, fluffy grains. Pour your cooled sushi-zu evenly over the hot rice. This temperature differential is crucial: hot rice expands and absorbs the seasoning, whereas cold rice will simply repel it, leaving you with a puddle of vinegar.
Using a wooden rice paddle (shamoji), use a sharp, slicing motion to gently fold the vinegar into the rice. Do not smash, stir, or mash the grains. While you fold, use a hand fan (or enlist a guest to help) to rapidly blow cool air across the surface. This rapid cooling process evaporates the excess moisture, gives the rice its signature glossy shine, and brings the temperature down to that magical 95°F body-temperature sweet spot. Once it hits the right temperature, cover the hangiri with a damp kitchen towel to keep it warm and prevent it from drying out until showtime.
Phase 3: The Nori Unveiling (Showtime)
Your guests have arrived. The wine is poured. The platters of chilled fish and vibrant vegetables are on the table. The warm, perfectly seasoned shari is resting in its beautiful wooden tub. Now, and only now, do you deal with the nori.
Keep your seaweed locked away in its airtight packaging, right alongside its trusty silica gel packet, until the absolute last possible second. If you live in a particularly humid climate, or if you simply want to show off your culinary prowess, you can quickly re-toast the nori before serving. Simply grab a sheet with a pair of tongs and pass it swiftly over an open gas stove flame or lay it in a hot, dry skillet for just a few seconds. The heat will drive off any residual ambient moisture, and the sheet will tighten up and become shatteringly crisp.
Cut the large sheets of nori in half crosswise to create the perfect size for hand rolls. Demonstrate the folding technique for your guests: take a half-sheet of nori in the palm of your hand. Gently spread a small, thin layer of the warm rice on the left third of the sheet. Add a slice of salmon, a sliver of cucumber, and a dash of spicy mayo. Fold the bottom left corner up and over the filling, and continue rolling it into a tight, ice-cream-cone shape.
Then, deliver the most important instruction of the entire night: Eat it immediately.
Do not set it down on a plate. Do not wait for everyone else to finish rolling theirs. Do not spend five minutes trying to get the perfect lighting for a photo. Eat it the very second it is assembled.
When you bite into it, you will experience the ultimate culinary triumph. The nori will snap audibly between your teeth, giving way to the gentle, body-temperature warmth of the sweet and acidic rice, followed by the rich, buttery coolness of the fresh fish. It is a textural masterpiece, achieved entirely through proper sequencing and temperature control.
Conclusion: Reclaiming Your Kitchen
You do not need to be a certified sushi master with decades of experience to make mind-blowing Japanese food in your own home. You just need to understand the basic mechanics of your ingredients, respect the fragile, moisture-hating nature of seaweed, and refuse to settle for mediocre, toxic equipment.
By controlling your thermal dynamics, utilizing the brilliant moisture-wicking properties of a traditional wooden hangiri, and outsourcing the assembly process to your guests, you can completely eliminate the stress of hosting. You can elevate a casual weekend gathering into an interactive, culturally rooted, and unforgettable culinary experience.
Now, go scrub your rice, sharpen your knives, and reclaim your kitchen. You have a dinner party to host.






