
The Polenta Paradox: Why Your Cornmeal Hates You (And How to Fix It)
Listen up, weekend culinary warriors. We need to have a serious heart-to-heart about the yellow concrete you’ve been serving your dinner guests. You know exactly what I am talking about. You invite your friends over, promising a rustic, soul-warming Italian feast, but instead of cascading a river of golden, velvety cornmeal onto their plates, you end up aggressively chiseling chunks of gritty, lukewarm spackle out of a saucepan.
Polenta is supposed to be the ultimate peasant food—a humble, forgiving, and deeply comforting dish that has sustained generations. Yet, somehow, modern home cooks have turned it into an anxiety-inducing chore. You stand over the stove, sweating, whisking until your forearm goes numb, only to be rewarded with stubborn little dry pockets of raw cornmeal that crunch unpleasantly between your teeth. Just like when your mashed potatoes turn to glue, lumpy polenta is an entirely avoidable tragedy born from a fundamental misunderstanding of kitchen science.
I am here to tell you that you do not need a culinary degree, a nonna from Lombardy, or a bionic whisking arm to make mind-blowing, perfectly smooth polenta. You just need to understand how starch actually works, how to control your heat, and how to ditch the outdated, pretentious chef-speak that overcomplicates a dish meant to be simple. We are going to master the science of starch hydration, and then, we are going to take your newfound skills and turn them into the ultimate, stress-free weekend gathering: the interactive polenta board.
The Hard Science of Starch Hydration (Without the Culinary School Pretense)
To stop ruining your polenta, you have to stop treating it like pasta and start treating it like a living, breathing sponge. Let’s strip away the fluff and look at what is actually happening in your pot on a microscopic level.
Anatomy of a Cornmeal Granule
Long before corn was brought to Italy from the New World in the 16th century, the ancient Romans were boiling a primitive version of polenta called pulmentum, made from crushed spelt, millet, or farro. Today, we use dried, ground corn. Every single grain of that cornmeal is essentially a tightly packed microscopic vault of starch molecules (specifically amylose and amylopectin) wrapped in a tough, fibrous exterior.
When you dump raw cornmeal into a pot, those starch vaults are locked shut. Your goal as a cook is to introduce enough heat and liquid to force those vaults to swell, burst open, and release their starches into the surrounding water. This creates a beautifully suspended, creamy gel. If you fail to unlock them, you get wet sand.
The Gelatinization Temperature Zone
Starch gelatinization does not happen the second cornmeal touches water. It requires a sustained thermal reaction. Corn starch begins to hydrate and swell at around 140°F (60°C), but it doesn’t fully gelatinize and thicken until it reaches the 150°F to 160°F (65°C to 71°C) range. This is why patience is non-negotiable. If you try to rush the process by blasting the heat to a rolling boil, the water evaporates before the granules have time to fully absorb it. It is the exact same reason your pancakes are tough when you aggressively overmix them and apply the wrong heat—you are fighting the chemistry instead of working with it.
Why Clumps Form (The Dry-Core Phenomenon)
So, why does polenta clump? It happens because of a phenomenon I call the “dry-core trap.” When you dump a massive mountain of dry cornmeal into boiling water all at once, the granules on the outside of that mountain instantly gelatinize. They swell up, turn sticky, and fuse together, forming a waterproof barrier around the dry granules trapped in the center. No matter how hard you whisk after the fact, that gelatinized outer shell will refuse to let water inside. You have essentially created a waterproof dumpling of raw, dry cornmeal.
The Golden Rules of Lump-Free Polenta
Now that we know why the clumps form, we can engineer a cooking process that makes them mathematically impossible. Forget the old wives’ tales about having to stir in only one direction (a ridiculous myth). Just follow these non-negotiable rules.
The Liquid-to-Polenta Ratio Reality Check
If you look at the back of a standard grocery store bag of cornmeal, it will often tell you to use a 1:3 ratio (one cup of polenta to three cups of water). This is a lie designed to make the cooking time seem shorter. A 1:3 ratio will yield a stiff, sliceable brick of polenta.
For the luxurious, porridge-like consistency required for a proper polenta board, the golden, scientifically backed ratio is 1:5—and sometimes even 1:6 depending on the humidity and the coarseness of your grind. That means for every one cup of coarse stone-ground cornmeal, you need five to six cups of liquid.
What should that liquid be? While many modern recipes insist on milk or heavy cream, traditionalists swear by plain, well-salted water to let the sweet, earthy flavor of the corn shine through. I prefer a compromise: four parts water and one part whole milk added at the very end for richness. You can absolutely use chicken or vegetable stock, but be warned that the flavor of the stock will completely overpower the corn—especially if your homemade chicken broth turns cloudy and alters the clean texture of the dish.
The “Rain Drop” Whisking Method
To avoid the dry-core trap, you must introduce the cornmeal to the water gradually. Bring your liquid to a rapid simmer, grab a sturdy balloon whisk, and create a whirlpool in the water. Slowly—and I mean painfully slowly—pour the cornmeal into the vortex in a thin, steady stream, like a gentle rain. Whisk vigorously the entire time. By introducing the grains individually while the water is in motion, you ensure that every single granule is surrounded by liquid before it has a chance to stick to its neighbor.
Temperature Control: The Simmering Sweet Spot
Once all the cornmeal is incorporated, the mixture will start to spit and bubble like a volcanic mud pot. Turn the heat down to the absolute lowest setting your stove can manage. You want a slow, lazy, barely-there bubble. Cover the pot with a tight-fitting lid to trap the steam and prevent evaporation. You do not need to stir constantly. Just come back every 10 minutes, give it a vigorous scrape along the bottom to prevent scorching, and put the lid back on. Let it cook for at least 45 to 50 minutes. Yes, nearly an hour. The cornmeal needs that time to fully hydrate, soften, and lose its raw, bitter edge.
Ditch the Toxic Cookware (Seriously, Throw It Out)
As your biggest cheerleader in the kitchen, I am going to give you some tough love. You cannot achieve culinary perfection if you are cooking in toxic, peeling, garbage cookware. I have zero patience for mystery-metal pans, and when it comes to a slow-simmering dish like polenta, your equipment matters almost as much as your technique.
The Non-Stick Nightmare
Do not, under any circumstances, cook your polenta in a cheap, scratched Teflon or non-stick pot. The fastest way of ruining your nonstick pans is to subject them to the prolonged, abrasive stirring required for cornmeal.
More importantly, traditional non-stick coatings are a chemical nightmare. They are manufactured using PFAS (per- and polyfluoroalkyl substances), commonly known as “forever chemicals” because they refuse to break down in the environment or the human body. A groundbreaking 2022 study by researchers at the University of Newcastle found that just one tiny scratch on a non-stick pan can release up to 9,100 microplastic and nanoplastic particles directly into your food. If the coating is severely damaged, that number skyrockets to 2.3 million particles per cooking session.
The regulatory landscape is finally catching up to this nightmare. In February 2024, the FDA announced the removal of PFAS-containing grease-proofing agents from food packaging, and by 2025 they formally declared dozens of these chemical authorizations effectively dead. Meanwhile, the European Union is currently pushing forward with a sweeping ban on PFAS in consumer kitchenware, expected to be fully implemented by 2025-2026. If global health authorities are aggressively banning these chemicals from our food supply, you have absolutely no business using them to cook dinner for your family. Throw the scratched pans in the trash.
The Only Pots You Should Actually Use
For a long, slow simmer, you need cookware with massive thermal mass—meaning it absorbs heat slowly and distributes it evenly across the bottom, preventing the polenta from scorching.
- Enameled Cast Iron: A heavy Dutch oven is the gold standard. The thick cast iron bottom holds a low, steady temperature perfectly, and the glass-enamel coating is completely non-toxic and non-reactive.
- Fully Clad Stainless Steel: A heavy-bottomed, multi-ply stainless steel saucepan is virtually indestructible. And don’t worry about sticking; if your stainless steel pan sticks, it simply means your heat is too high or you aren’t stirring the bottom thoroughly every ten minutes.
- Traditional Unlined Copper (The Paiolo): If you want to be an absolute traditionalist, Northern Italians historically cook polenta in a paiolo—a round-bottomed, unlined copper pot hung over an open fire. While you don’t need to go this far, copper’s unmatched thermal conductivity makes it a brilliant choice if you have the budget.
The Polenta Board: The Ultimate Low-Stress Dinner Party
Now that you know how to make flawless, creamy polenta without poisoning your guests with forever chemicals, it is time to talk about how to serve it.
Enter the Polenta Board.
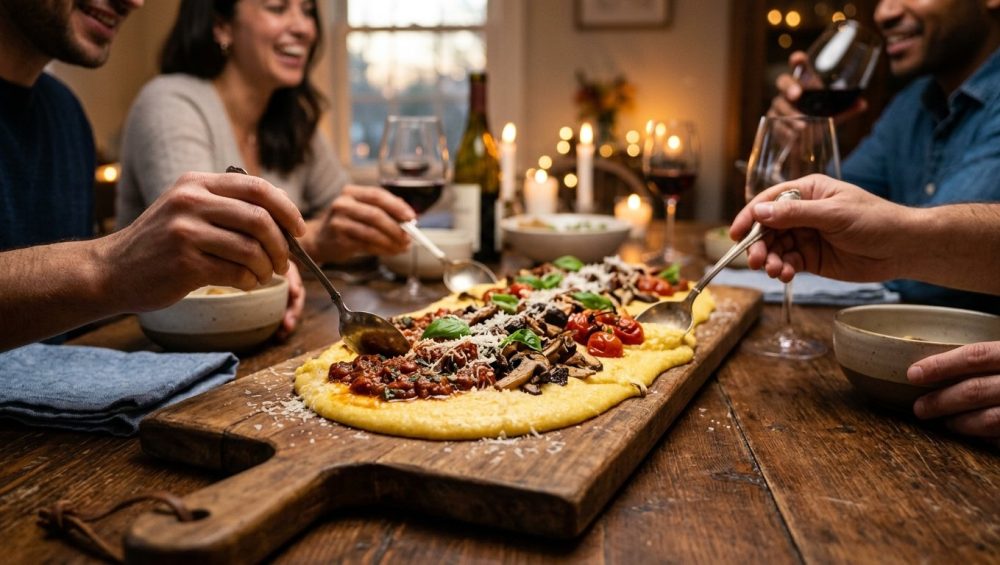
If you are a busy professional who uses clever shortcuts during the week, the weekend is your time to shine. But hosting a dinner party usually comes with the immense stress of timing multiple dishes and plating individual portions while your food gets cold. The polenta board completely eliminates this bottleneck. It is a highly communal, interactive dining trend where creamy polenta is poured directly down the center of a massive wooden board right in the middle of your dining table.
Instead of plating, you surround the golden river of cornmeal with bowls of rich, braised meats, roasted vegetables, fresh herbs, and cheeses. Your guests are handed a spoon and a plate, and they serve themselves, scraping up the polenta and customizing their own toppings. It is rustic, visually spectacular, and deeply intimate. It is the absolute best strategy when you want to host a relaxed dinner party without the anxiety of formal service.
How to Engineer the Perfect Mindful Polenta Board
A successful polenta board is not just dumping food on a table; it requires mindful staging and a balance of flavors. Here is how you engineer it like a pro.
The Base: Spreading the Wealth
First, you need a food-safe surface. A massive, well-oiled edge-grain wooden cutting board is ideal. If you don’t have one large enough, you can line the center of your dining table with a wide strip of culinary parchment paper.
When the polenta is finished cooking, you want to pour it immediately while it is still molten and flowing. Spread it out with a large offset spatula so it forms a thick, even layer (about half an inch to an inch thick) down the center of the board. It will begin to set and firm up within minutes as it hits the cool air, creating a soft, scoopable base.
The Toppings: Texture, Acid, and Fat
Polenta is incredibly rich, buttery, and earthy. To prevent palate fatigue, your toppings must introduce contrasting elements: sharp acidity, deep umami, and aggressive crunch.
- The Heavy Hitter (The Braise): You need a rich, saucy protein to anchor the meal. A slow-braised beef short rib ragù, a spicy pork sausage and fennel stew, or a wild mushroom and red wine fricassee are perfect. The juices from the braise will seep into the polenta, flavoring it from the top down.
- The Acidic Crunch: Polenta desperately needs brightness. Blistered cherry tomatoes tossed in balsamic vinegar, or a sharp, lemony gremolata (parsley, lemon zest, and garlic) will cut right through the heavy dairy.
- The Roasted Veggies: Charred broccolini, roasted asparagus, or caramelized fennel add a necessary bitter edge. Just make sure you stop eating soggy roasted veggies by roasting them on a blazing hot, preheated sheet pan so they actually develop a crispy char.
- The Cheese Integration: While you will mix parmesan into the polenta itself, having extra cheese on the board is mandatory. Crumbled gorgonzola dolce, dollops of fresh ricotta, or shaved pecorino romano allow guests to add sharp, funky notes to their bites. And to prevent the tragedy of why your cheese sauce breaks, always grate your cheese from a solid block—pre-shredded bagged cheeses are coated in anti-caking starches that will turn your polenta gritty.
The Logistics: Keeping It Warm
The most common fear with a polenta board is that the food will get cold. The trick is thermal mass. Warm your wooden board slightly before pouring (you can wipe it down with a hot, damp towel and dry it quickly). Ensure your ragù and roasted vegetables are piping hot when they hit the table. Because the polenta is poured in a thick, dense layer, it actually insulates itself quite well, remaining warm and creamy for at least 30 to 40 minutes—more than enough time for your guests to devour it.
Step-by-Step: The Master Recipe for Foolproof Polenta
Here is your definitive, no-nonsense recipe for the creamy base of your board.
Ingredients:
- 1 cup coarse, stone-ground yellow cornmeal (Do not buy instant or quick-cooking polenta. It is parboiled garbage that tastes like cardboard.)
- 4 cups cold water
- 1 cup whole milk (or heavy cream if you are feeling decadent)
- 4 tablespoons high-quality unsalted butter, cut into cubes
- 1 cup freshly grated Parmigiano-Reggiano
- 1 tablespoon kosher salt (plus more to taste)
- Freshly cracked black pepper
The Method:
- The Boil: In a heavy-bottomed Dutch oven or clad stainless steel pot, bring the 4 cups of water and the kosher salt to a rolling boil.
- The Raindrop: Reduce the heat to medium so the water is at a vigorous simmer. Take a balloon whisk in your dominant hand and start stirring the water to create a whirlpool. With your other hand, slowly pour the cornmeal into the vortex in a thin, steady stream. Whisk continuously until all the cornmeal is incorporated.
- The Simmer: The mixture will immediately begin to thicken and spit. Turn your burner down to the absolute lowest possible setting. Cover the pot with a tight-fitting lid.
- The Wait: Let the polenta cook for 45 to 50 minutes. Every 10 minutes, remove the lid, grab a flat-edged silicone spatula, and aggressively scrape the bottom and corners of the pot to prevent sticking. Replace the lid immediately.
- The Enrichment: After 45 minutes, taste a small spoonful. The grains should be tender and soft, with absolutely no hard, gritty crunch. If it is still crunchy, add a splash of hot water and cook for 10 more minutes.
- The Finish: Once perfectly tender, remove the pot from the heat. Vigorously stir in the whole milk, the cubed butter, and the grated parmesan. Whisk until the butter is completely emulsified and the polenta looks like liquid gold. Taste for seasoning—corn requires an aggressive amount of salt, so do not be shy.
- The Pour: Immediately carry the pot to your dining table and pour the polenta directly down the center of your prepared wooden board. Top with your hot ragù, roasted vegetables, and a drizzle of high-quality olive oil. (Pro tip: if you’re wondering why your garlic always burns in the topping pan, make sure you add it at the very end of your vegetable sauté, not the beginning).
Troubleshooting Polenta Disasters (Because We All Mess Up)
Even with the best science, things can go sideways. Here is how to rescue your dinner when the chemistry betrays you.
It’s Too Thick (The Cement Block)
If you turn your back for too long and the water evaporates, your polenta will seize up into a stiff, unyielding paste. Do not panic. Simply bring a small saucepan of water or milk to a simmer on a separate burner. Slowly stream the hot liquid into your stiff polenta while whisking vigorously until the creamy texture is restored. Never add cold liquid to hot polenta, or the starches will instantly seize and clump.
It’s Too Thin (The Corn Soup)
If your polenta is swimming in liquid after 50 minutes, your heat was likely too low, or your lid trapped too much condensation. Simply remove the lid, turn the heat up to medium-low, and stir continuously for 5 to 10 minutes to allow the excess moisture to evaporate.
It’s Still Gritty (The Sand Trap)
If you followed the 50-minute cooking time and the cornmeal still tastes like sand, you likely bought an extremely coarse, artisanal grind that requires more hydration. Add another half cup of boiling water, put the lid back on, and let it cook for another 15 minutes. Polenta is incredibly forgiving; you cannot really “overcook” it as long as you keep it hydrated. Just keep stirring, and if your wooden spoons keep cracking under the weight of the thick porridge, upgrade to a solid, one-piece silicone spatula with a stainless steel core.
The Mindful Hosting Philosophy
At the end of the day, cooking should not be an exercise in perfectionism or a stressful performance for your friends. It is about understanding a few basic, foundational rules of kitchen science—like starch hydration and temperature control—and using them to buy yourself the freedom to actually enjoy your own dinner parties.
A polenta board is the ultimate manifestation of this philosophy. It strips away the pretentious plating, the frantic timing, and the stiff formality of traditional entertaining. It forces your guests to lean in, share space, pass bowls, and interact with their food. You get to stand back with a glass of wine, completely relaxed, knowing that you mastered the science, ditched the toxic cookware, and created a spectacular, memorable meal using nothing more than water, heat, and a humble bag of crushed corn.
Now go throw out that peeling non-stick pan, buy a bag of good stone-ground cornmeal, and invite your friends over. You’ve got this.






