
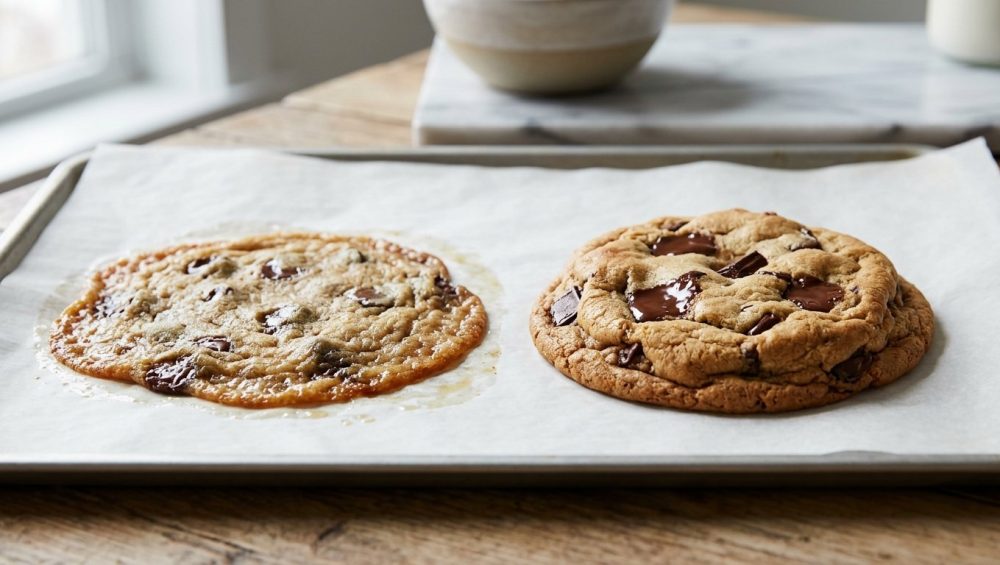
Listen up, weekend warriors. We need to have a serious, brutally honest talk about the tragedy currently unfolding on your baking sheets. You spent good money on premium vanilla extract, you dirtied every single mixing bowl in your kitchen, and you waited patiently by the oven door like an expectant parent. But when the timer finally chimed, you didn’t pull out beautifully domed, bakery-style masterpieces. You pulled out a single, greasy, aggressively flat unibrow of a cookie that covers the entire pan.
I’ve been there. I’ve ruined more sheet pans of cookies than I care to admit, and I’ve set off the smoke detector enough times that my neighbors probably assumed I was running a very incompetent crematorium. But here is the unvarnished truth that you need to hear: baking is not magic. It is edible chemistry. And right now, your chemistry is fundamentally broken.
When your cookies spread into sad, translucent puddles, it is not because the universe hates you. It is because you are failing to respect the thermal dynamics of your fats, the hydration needs of your starches, and the chemical reactions of your leaveners. I have zero patience for pretentious chef-speak, so we are going to break this down into practical, highly actionable science.
The Anatomy of a Cookie Meltdown: Why Your Hard Work Turns into Puddles
When you slide a sheet of raw cookie dough into a 350-degree oven, you are kicking off a high-stakes, microscopic race against time.
On one side of the track, you have the fats (usually butter) and sugars melting into a liquid. As they liquefy, gravity takes over, causing the dough to flatten and spread outwards across the pan. On the other side of the track, you have the structural proteins (gluten) and the starches racing to heat up, absorb moisture, coagulate, and set into a firm scaffolding.
If the butter melts and liquefies long before the gluten and starches can set, your cookie loses its structural integrity. It spreads out into a thin puddle. If the starches and proteins set before the butter completely melts out, you get a beautiful, thick, chewy cookie with a glorious dome. It is literally that simple. Every single tip, trick, and hack you will ever read about preventing cookie spread ultimately boils down to manipulating this one specific race. You either need to slow down the melting of the fat, or speed up the setting of the structure.
The Thermodynamics of Butter: Your Kitchen’s Biggest Frenemy
Let’s talk about butter, the absolute diva of the baking world. Butter is an emulsion of butterfat, water, and milk solids. But its most critical attribute for our purposes is its surprisingly low melting point.
The 90-95°F Danger Zone
Butter has a melting point that typically ranges from 90 to 95 degrees Fahrenheit. This means that on a warm summer day, the butter sitting on your kitchen counter is already dangerously close to liquefying. When you put dough made with room-temperature butter into a hot oven, that fat doesn’t need much time at all to cross the threshold into a total liquid state.
Some people try to hack this structural failure by swapping butter for vegetable shortening. Shortening is 100% fat and has a much higher melting point (often between 98 and 110 degrees Fahrenheit). Because it stays solid longer in the oven, the flour has ample time to set before the fat melts, resulting in a very puffy, thick cookie. Sure, shortening will stop your cookies from spreading, but it also leaves a weird, waxy film on your palate and tastes like absolutely nothing. We are home cooks who demand flavor, so we are sticking with real butter. You just have to learn how to control its temperature.
While there are hyper-specific recipes where melted butter makes cookies chewier, for a standard, thick drop cookie, temperature control is everything.
Creaming Butter and Sugar: The Aeration Equation
Every standard cookie recipe tells you to “cream the butter and sugar together until light and fluffy.” What you are actually doing here is mechanical aeration. You are using the sharp, jagged edges of the sugar crystals to punch millions of microscopic air pockets into the butter.
These air pockets act as tiny balloons that will later catch the carbon dioxide gases released by your baking soda. However, if your butter is too warm (above 70°F), it won’t be able to hold those air pockets. The structure will collapse, the butter will turn into a greasy paste, and when it hits the oven, it will flow outward with zero resistance, resulting in a flat cookie. Your butter should be “cool room temperature”—around 65°F to 68°F. It should yield slightly to a firm press of your thumb, but it should not be shiny, greasy, or melting.
Hydration and Gluten: The Structural Scaffolding of Your Dough
If butter is the wrecking ball trying to flatten your cookies, flour is the steel scaffolding trying to hold them up. But flour cannot do its job if you treat it like an afterthought.
Why Flour Needs a Nap (The Magic of Resting Dough)
Here is a non-negotiable rule for my kitchen: you must rest your cookie dough. When you mix wet ingredients (eggs, butter) with dry ingredients (flour, sugar, cocoa), the hydration process does not happen instantly. It takes time for the starches and proteins in the flour to act like sponges and fully absorb the ambient moisture.
If you bake the dough immediately, that free, unabsorbed moisture turns into a slippery liquid in the oven, encouraging the dough to spread rapidly. But if you put that dough in the fridge for 24 to 48 hours, something magical happens. The flour fully hydrates, soaking up the free liquid and swelling up. The dough becomes noticeably firmer and significantly drier to the touch. When you finally bake it, there is far less free liquid available to cause spreading, meaning resting your dough changes everything about the final structural integrity of your bake.
The Role of Starches in Halting the Spread
Let’s get nerdy for a second. As the dough rests, enzymatic activity continues. The enzymes in the flour and egg yolks begin breaking down complex carbohydrates into simple sugars (fructose and glucose). This not only makes the cookies taste exponentially better—yielding those deep, complex caramel and butterscotch notes—but it also fundamentally alters the texture.
Furthermore, how you measure that flour dictates everything. If you are blindly jamming a measuring cup into a compacted bag of all-purpose flour, you are packing up to 30% more flour into your recipe than intended. Conversely, if you lightly scoop and don’t use enough flour, there won’t be enough starch to absorb the melting fat, resulting in a greasy puddle. You need to stop scooping your flour with volume cups and start weighing it. Precision is the enemy of the puddle.
The Chemical Leaveners: Baking Soda vs. Baking Powder
I cannot tell you how many home bakers I’ve met who think baking soda and baking powder are completely interchangeable. They are not. Swapping them out without understanding their chemistry is a one-way ticket to a culinary disaster.
Baking Soda: The Spreader and Browner
Baking soda (sodium bicarbonate) is an alkaline base. It requires an acidic ingredient—like the molasses in brown sugar, buttermilk, or natural cocoa powder—to activate and create carbon dioxide bubbles,. But more importantly for our cookie spread dilemma, baking soda actively raises the overall pH level of the dough.
Why does this matter? Because a higher, more alkaline pH environment weakens the gluten structure, causing the cookie to spread out more horizontally. It also aggressively accelerates the Maillard reaction, which is the chemical process responsible for browning,. So, baking soda gives you a wider, flatter, browner, and chewier cookie.
Baking Powder: The Puffer and Lifter
Baking powder, on the other hand, already contains its own powdered acid (usually cream of tartar) and a buffer like cornstarch to keep them separated until liquid is introduced. Most modern baking powders are “double-acting,” meaning they react once when they hit the wet ingredients, and a second time when they hit the heat of the oven,.
Because baking powder provides a much more robust, sustained vertical lift without significantly altering the pH of the dough, it encourages cookies to puff up rather than spread out horizontally. The texture becomes slightly cakier and more tender.
Over-Leavening: When Good Intentions Go Flat
More leavening does not mean a thicker cookie. If you add too much baking soda, the cookie will rapidly produce too much gas too quickly. The air pockets will over-expand, pop, and the entire cookie will violently collapse in the oven, leaving you with a dense, flat disc that tastes like metallic soap. Follow the recipe’s leavening ratios to the letter.
Ambient Temperature and The “Hot Pan” Mistake
You can mix the perfect dough, hydrate it beautifully, and balance your leaveners like a master chemist. But if you mess up the ambient temperature logistics right before the bake, you will still end up with puddles.
Why Chilling Your Dough is Non-Negotiable
We already discussed resting dough for hydration, but the thermal aspect of chilling is equally vital. When you chill cookie dough in the refrigerator, you are dropping the temperature of the butter back down to around 35 to 40 degrees Fahrenheit.
When this ice-cold dough hits the hot oven, the exterior begins to absorb radiant heat and bake while the interior core of butter is still solid. This buys you precious minutes. By the time the butter in the center finally reaches its 90-95°F melting point, the outer edges of the cookie have already coagulated and formed a physical dam, trapping the rest of the cookie inside and forcing it to stay thick. Never underestimate the magic of chilled dough.
The Sin of the Warm Baking Sheet
This is a rookie mistake that makes my eye twitch. You bake your first batch of cookies, pull them out of the oven, slide them off the pan, and immediately drop your second batch of raw dough onto that screaming hot metal sheet.
What happens? The butter in the dough begins melting instantly, before the pan even goes back into the oven. The cookies spread prematurely, losing their structure before the baking process officially begins. Always, always let your baking sheets cool completely to room temperature before loading them up with your next batch of dough. Run them under cold water if you are impatient, but never put dough on hot metal.
Toxic Gear and Cheap Tools: What’s Actually Sabotaging Your Bake
As your sassy culinary guide, I have a strict, zero-tolerance policy for cheap, toxic kitchenware. If you are baking on flimsy, scratched-up, peeling non-stick pans that you bought at a discount store in 2012, we need to have an intervention right now.
Ditch the Flimsy Non-Stick and Mystery Metals
Cheap baking sheets are thin, which means they conduct heat terribly and unevenly. They develop hot spots that burn the bottoms of your cookies, and because they lack structural integrity, they inevitably violently warp and loudly pop in the hot oven. If you’ve ever seen your baking sheets warp mid-bake, launching your carefully spaced cookies into each other, you know exactly what I mean.
Invest in heavy-gauge, bare aluminum half-sheet pans. They are inexpensive, professional-grade, and distribute heat flawlessly. And for the love of all that is holy, do not spray them with aerosol cooking sprays. Those sprays contain propellants and emulsifiers (like soy lecithin) that bake into an impenetrable, sticky, polymer residue that ruins your pans and adds a chemical taste to your food. I have said it before and I will say it again: cooking spray is the enemy.
The Silicone Mat Debate: Insulation vs. Crispiness
Silicone baking mats have become incredibly popular, but they are a double-edged sword when it comes to cookie spread. Silicone is an insulator. When you place a silicone mat on your baking sheet, you are putting a thick thermal barrier between the heat of the metal pan and the bottom of your cookie dough.
Because the heat transfers more slowly through silicone, the bottom of the cookie takes longer to set. Furthermore, silicone has an incredibly slick, frictionless surface. Without any grip, the melting dough just slides outward, spreading further than it would on a textured surface. This lack of friction and heat transfer is the hidden flaw in silicone baking mats when you are trying to bake thick cookies.
If you want cookies that hold their shape and develop perfectly crispy, caramelized bottoms, you need to switch to unbleached parchment paper. Parchment paper allows for direct, rapid heat transfer from the pan to the dough, and its slightly fibrous texture gives the dough something to physically grip onto, resisting the urge to spread,.
The Sassy Sous-Chef’s Master Plan for Perfect, Puddle-Free Cookies
Alright, enough theory. It is time to put this science into action. If you are tired of baking flat, greasy puddles, here is my definitive, no-nonsense checklist for your next weekend baking project.
Step-by-Step Dough Triage
- Ditch the Measuring Cups: Baking is a science of precise ratios. A cup of flour can weigh anywhere from 120 grams to 160 grams depending on how aggressively you pack it. If you shortchange your dough on flour, it lacks the structural starches needed to hold the butter in place, guaranteeing a spread. Buy a digital kitchen scale and weigh your ingredients in grams. It is the single fastest way to instantly upgrade your baking.
- Monitor Your Butter Temp: Your butter should be “cool room temperature,” which means around 65°F to 68°F. It should yield slightly to a firm press of your thumb, but it should not be shiny, greasy, or melting. If it is 90 degrees in your kitchen, your butter is already too warm.
- Cream Responsibly: Beat the butter and sugar on medium speed for about 2 to 3 minutes until it lightens in color. Do not walk away and let the stand mixer run for ten minutes. Over-creaming beats too much air into the dough, which will cause the cookies to puff up dramatically in the oven and then violently collapse into flat, dense discs.
- Check Your Expiration Dates: Baking soda and baking powder lose their potency over time. If your chemical leaveners have been sitting in the back of your pantry since the last presidential election, throw them in the trash. Dead leaveners won’t provide the lift needed to combat the downward spread of melting fat.
- Portion Before You Chill: Scooping rock-hard, refrigerated dough is a great way to bend your spoons and hurt your wrist. Instead, use a spring-loaded cookie scoop to portion the soft, freshly mixed dough into perfectly uniform balls. Then, place those balls in an airtight container and refrigerate them. Uniform portioning ensures that every cookie bakes at the exact same rate.
- The 48-Hour Nap: Let those portioned dough balls rest in the fridge for a minimum of 24 hours, but ideally 48 hours. This allows the flour to fully hydrate, the starches to break down into complex sugars, and the gluten to relax,. Your cookies will bake up thicker, chewier, and with a flavor profile that will make a professional pastry chef weep.
- Verify Your Oven Temperature: Your oven is lying to you. When it beeps to tell you it has reached 350°F, it is probably hovering around 315°F. If your oven is too cool, the butter will melt slowly and spread out before the ambient heat can trigger the starches to set. You absolutely must buy a simple oven thermometer and hang it from the center rack. Wait for the thermometer to read 350°F before you put the cookies in.
- Parchment, Not Silicone: Line your heavy-gauge bare aluminum baking sheets with a fresh sheet of unbleached parchment paper. Give your dough the thermal contact and physical grip it needs to stand tall.
- Bake Cold: Take the dough balls directly from the refrigerator and place them onto the room-temperature, parchment-lined baking sheet. Do not let them sit on the counter and warm up. Hit them with the heat while the butter is still ice cold.
Frequently Asked Questions (Because I Know You’re Going to Ask)
Can I just add more flour to stop the spreading?
Technically, yes, adding more flour will stiffen the dough and physically halt the spread. But it will also dilute the sugar, fat, and flavor ratios, leaving you with a dry, crumbly, flavorless hockey puck. Do not blindly dump extra flour into the bowl. Fix your temperature control and hydration times first.
What if I prefer thin, crispy cookies instead of thick, chewy ones?
If you actually want your cookies to spread and crisp up, just reverse engineer everything I just taught you. Use slightly warmer butter, skip the chilling process, bake on a silicone mat to encourage sliding, and use a recipe that relies heavily on baking soda rather than baking powder,. See? Science is fun when you know how to wield it.
Why do my cookies spread unevenly and look like amoebas?
This is usually due to uneven portioning, uneven heat distribution in your oven, or baking on a warped, cheap baking sheet. Use a scoop for uniform sizing, rotate your pan halfway through the baking time, and invest in quality, thick-gauge aluminum pans.
Does the type of sugar affect the spread?
Absolutely. White granulated sugar melts quickly and encourages spreading and crispiness. Brown sugar contains molasses, which is slightly acidic and adds moisture. The moisture in brown sugar creates steam in the oven, which encourages a thicker, chewier, more puffed-up cookie. A recipe with a higher ratio of brown sugar to white sugar will inherently resist spreading better than a recipe made entirely with white sugar.
Is it possible to over-chill the dough?
From a structural standpoint, no. You can leave cookie dough in the fridge for up to 72 hours. However, after about three days, the dough will start to dry out excessively and take on the ambient odors of your refrigerator (nobody wants an onion-flavored chocolate chip cookie). If you want to store dough for longer than 48 hours, freeze the pre-portioned balls in an airtight freezer bag. You can bake them straight from frozen; just add an extra minute or two to the baking time.
In conclusion, you do not need a degree from Le Cordon Bleu to bake a phenomenal batch of cookies. You just need to stop treating your ingredients with reckless abandon. Respect the melting point of your butter, give your flour the time it needs to hydrate, optimize your oven environment, and throw your cheap, toxic baking gear in the trash where it belongs. Now get off your phone, go weigh out some flour, and let’s bake something spectacular.






