
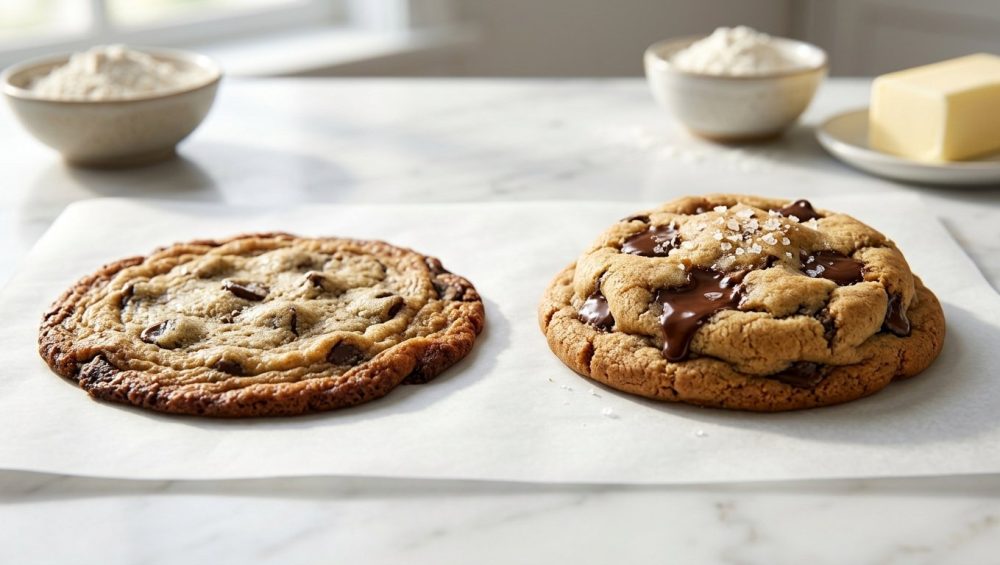
You just pulled a tray out of the oven, expecting plump, bakery-style chocolate chip cookies with crispy edges and gooey centers. Instead, you’re staring at a sheet of sad, greasy, lacey frisbees that have melted together into one giant, unholy mega-puddle of despair. You are frustrated. I completely get it. I’ve been there, setting off the smoke detector while aggressively scraping burnt sugar off a cheap baking pan at 11:00 PM.
But here’s the brutal, unfiltered truth: baking isn’t some mystical art form reserved for people with pastry degrees and perfectly aesthetic kitchens. It is chemistry. It is applied thermodynamics. And right now, your chemistry is fundamentally broken. When your cookies spread into a thin, sad puddle, it is a structural failure. But the good news? You don’t need to be a professional chef to fix this. You just need to stop making the same easily avoidable rookie mistakes every weekend.
As someone who fiercely advocates for the everyday home cook, I promise you that achieving perfectly thick, chewy cookies is entirely within your grasp. We are going to pour a glass of wine, roll up our sleeves, and break down the exact baking science behind why your cookies are melting into oblivion. More importantly, we are going to fix it before your dough ever sees the inside of an oven.
The Science of the Spread: What Actually Happens in the Oven?
To stop your cookies from spreading, you first have to understand what happens when you subject raw dough to 350 degrees of radiant heat. Baking a cookie is essentially a high-stakes race between the melting point of your fats and the setting point of your structural proteins.
When you slide that pan into the oven, the dough immediately begins to heat up. At around 92°F (33°C), the butter inside the dough begins to melt. As the solid fat turns to liquid, the dough loses its structural integrity and begins to flatten and spread outward.
Simultaneously, the water inside the dough (from the butter and the eggs) begins to heat up, eventually turning into steam. This steam, combined with the carbon dioxide gas produced by your leavening agents (baking soda or baking powder), pushes upward, causing the cookie to puff.
But here is the critical moment: the cookie will continue to spread outward and flatten until it gets hot enough for the structural ingredients to set. At around 144°F (62°C), the proteins in the eggs begin to coagulate and firm up. Shortly after, at around 158°F (70°C), the starches in the flour begin to gelatinize, absorbing moisture and solidifying the cookie’s final shape.
If your butter melts entirely before your flour and eggs have a chance to set, you lose the race. The result? A flat, greasy puddle. Every single trick to baking thick cookies revolves around manipulating this timeline: slowing down the melting of the fat, and speeding up the setting of the structure.
Culprit 1: The Butter Temperature Disaster
Let’s talk about the single most common reason your cookies are failing: your butter is completely wrong. When a recipe calls for “room temperature” butter, it is not suggesting you leave a stick of butter on the counter in the middle of a sweltering July afternoon until it resembles a melted wax candle.
The Myth of “Room Temperature”
In the pastry world, room temperature does not actually mean the ambient temperature of your kitchen. It refers to a very specific thermal window: between 62°F and 68°F (16°C to 20°C). At this temperature, the butter is pliable enough to be creamed with sugar, but the butterfat crystals are still fully intact and solid. If you press your finger into the butter, it should make an indentation, but it should offer some resistance and the stick should hold its shape completely.
If your butter is warmer than 68°F, the emulsion begins to break down. The fat is already on the verge of liquefying. When you put that dough into the oven, the butter doesn’t need to absorb much heat before it completely melts, causing the cookie to spread rapidly before the flour can set.
The Creaming Process
When you beat butter and sugar together, the sharp edges of the sugar crystals slice into the solid fat, creating thousands of microscopic air pockets. This aeration is what gives cookies their lift. If your butter is too warm, those air pockets collapse, and your cookies will be dense and flat. If you are intentionally trying a recipe where the melted butter makes cookies chewier, that is a different scientific process entirely, usually relying on higher flour ratios to compensate. But for a standard creamed dough, temperature is everything.
Culprit 2: The Flour Hydration Equation
Flour is the primary structural backbone of your cookie. It is the architectural framework that catches the melting fat and holds everything together. If your cookies are spreading, there is a very high probability that your flour-to-fat ratio is skewed.
The Measuring Catastrophe
If you are just scooping your flour directly out of the bag with a measuring cup, you are committing a cardinal baking sin. Scooping compresses the flour, meaning one cup could weigh anywhere from 120 grams to 160 grams depending on how aggressively you packed it. However, ironically, flat cookies are usually the result of too little flour. If you lightly spooned your flour and shortchanged the recipe, there isn’t enough starch to absorb the melting butter.
The only way to guarantee structural consistency is to weigh your ingredients. You absolutely need a reliable digital kitchen scale to bake like a pro. Once you start measuring by weight (grams), your failure rate will plummet.
Protein Content and Gluten Development
Not all flour is created equal. Standard all-purpose flour in the United States typically hovers around 10% to 11.5% protein. This is perfectly fine for a standard cookie. However, if you want a remarkably thick, chewy, bakery-style cookie, you should consider swapping half (or all) of your all-purpose flour for bread flour. Bread flour has a higher protein content (usually 12% to 14%). More protein means more gluten development, which creates a stronger, more elastic network that holds the cookie together and prevents it from spreading outward.
Culprit 3: The Secret Power of Chilling Dough
This is my absolute favorite piece of advice because it requires zero extra effort, just a little bit of patience. If you are baking your cookie dough immediately after mixing it, you are actively sabotaging yourself.
The Science of Hydration
Cookie dough is surprisingly dry compared to bread or cake batter. The primary liquid comes from the eggs and the minimal water content in the butter. Flour is essentially a dry sponge, and it takes time for it to fully absorb that moisture. When you practice resting your dough in the refrigerator, you are giving the flour starches the time they need to hydrate fully.
Fully hydrated dough is stiffer, thicker, and significantly more resistant to spreading in the oven. The moisture is trapped within the starches rather than sitting freely in the dough, which means less steam escapes and the cookie holds its shape.
Flavor Maturation and Fat Solidification
Beyond hydration, chilling solidifies the butter. Remember the race between the melting fat and the setting flour? Starting with rock-hard, chilled dough gives the flour a massive head start. The oven has to work much harder to melt cold butter, buying the proteins and starches precious time to coagulate and set the structure before the spread occurs.
Furthermore, chilling allows the enzymes in the flour and egg yolks to break down complex carbohydrates into simple sugars (fructose and glucose). This process, which peaks around the 48-hour mark, leads to a significantly darker, richer, more complex caramelization (the Maillard reaction) during baking. You get a thicker cookie that tastes like a professional pastry chef made it, all while you were sleeping. Time is money, and passive flavor development is the ultimate kitchen hack.
Culprit 4: The Baking Surface and Oven Thermodynamics
You can have the perfect dough, perfectly chilled, and still ruin it by tossing it onto the wrong piece of equipment. Your oven and your baking sheets play a massive role in the physical geometry of your final cookie.
The Oven Thermometer Reality Check
First, your oven is probably lying to you. Most home ovens are wildly inaccurate, often running 25 to 50 degrees hotter or cooler than the digital display claims. If your oven runs too cool, the fat melts slowly over a longer period before the structure sets, leading to excessive spreading. You need to verify your temperature with a simple oven thermometer placed in the center rack. It costs less than a fancy coffee and will save countless batches of baked goods.
The Warping Pan Problem
I have a strict “no-go” rule on cheap, flimsy kitchenware. Thin, discount-store aluminum pans are a nightmare for baking. When exposed to the high heat of an oven, the thin metal cannot handle the thermal stress differential between the flat bottom and the rolled edges. This causes the pan to violently buckle and twist. When your baking sheets warp mid-bake, the melting dough pools into the newly formed sloped corners of the pan, resulting in lopsided, weirdly shaped, flat cookies.
Furthermore, I actively warn readers against using peeling, scratched, mystery-metal non-stick pans. Not only are they terrible at conducting heat evenly, but you do not want toxic kitchen gear leaching chemicals into your food. Invest in heavy-gauge, commercial-grade uncoated aluminum or aluminized steel half-sheet pans (18-gauge or lower). They are highly conductive, practically immune to warping, and will last a lifetime.
Silicone vs. Parchment
What you line your pan with also dictates the spread. While I love reusable tools, there is a time and a place for everything. Heavy silicone baking mats act as thermal insulators. They slow down the transfer of heat from the metal pan to the bottom of the cookie. While this prevents burning, it also delays the setting of the bottom crust, allowing the cookie to spread more horizontally. For the thickest cookies with the crispiest edges, unbleached parchment paper is vastly superior.
Culprit 5: The Sugar Ratio and Chemical Leaveners
Baking is a delicate chemical balancing act. The types of sugar and leaveners you use aggressively dictate the final physical footprint of your cookie.
White Sugar vs. Brown Sugar
Granulated white sugar is highly hygroscopic (it attracts water) and melts quickly, promoting outward spread and a crispy texture. Brown sugar, on the other hand, contains molasses. Molasses introduces moisture and acidity to the dough. This acidity reacts with baking soda to create a rapid upward lift, while the extra moisture keeps the cookie chewy and thick.
If your recipe yields flat cookies, try tweaking the ratio to include more brown sugar and less white sugar. However, make sure your ingredients are fresh. If you are aggressively chipping away at rock-hard brown sugar that has been sitting in your pantry since 2019, your measurements by volume will be wildly inaccurate, and the crystallized molasses won’t integrate properly into the butter emulsion.
The Leavening Agents
Baking soda (sodium bicarbonate) and baking powder are not interchangeable. Baking powder contains its own acid and activates with moisture and heat, causing the dough to puff upward. Baking soda requires an external acid (like brown sugar) to activate, and it generally promotes outward spreading and browning. If you want thicker cookies, ensure your baking powder is fresh (it expires faster than you think) and consider slightly reducing the baking soda if spreading is out of control.
Culprit 6: The Over-Mixing and Under-Portioning Trap
Sometimes the recipe is perfect, but your physical manipulation of the dough ruins the structure.
The Dangers of Over-Creaming
Many home bakers assume that if creaming the butter and sugar for two minutes is good, creaming it for ten minutes must be better. False. Over-creaming incorporates too much air into the dough. While this sounds like it would make the cookies light and fluffy, it actually creates a fragile structure. In the oven, this highly aerated dough puffs up rapidly like a balloon, and then, lacking the structural integrity to hold that height, completely collapses into a dense, flat puddle. Cream your butter and sugar just until it is lightened in color and fluffy—usually 2 to 3 minutes on medium speed.
Portioning for Height
The physical shape of the raw dough dictates the shape of the baked cookie. If you roll your dough into perfectly smooth, flat little pucks, they are going to bake into flat puddles.
To achieve thick cookies, you need to bake taller mounds of dough. Using a spring-loaded cookie scoop not only ensures that every cookie bakes at the exact same rate, but it also creates a dome shape. For extreme thickness, you can even shape the dough into cylinders that are taller than they are wide. The top of the cylinder takes longer to heat up and melt, meaning the edges set firmly before the center can collapse outward.
Step-by-Step Masterclass: The Foolproof Thick Cookie Method
Now that we have dismantled the science, let’s put it all together into a practical, time-saving workflow for the weekend warrior. Here is your foolproof method for ensuring your cookies never spread flat again.
Step 1: Prep and Temperature Control
Start by verifying your oven temperature with a standalone thermometer. Take your butter out of the fridge exactly 45 to 60 minutes before you plan to bake. It should be around 65°F. It should yield slightly to a firm press but not look greasy or melted. Weigh your flour, sugars, and leaveners using a digital scale.
Step 2: The Perfect Emulsion
In a stand mixer or with a hand mixer, beat the room-temperature butter and sugars together on medium speed for exactly 2 to 3 minutes. Scrape down the sides of the bowl halfway through. You are looking for a pale, fluffy texture, not a melted soup. Add your room temperature eggs one at a time, mixing just until incorporated. Cold eggs will shock the butter and break the emulsion, so place them in a bowl of warm water for 5 minutes before using if you forgot to take them out.
Step 3: Folding, Not Beating
Whisk your dry ingredients (flour, baking soda, baking powder, salt) together in a separate bowl. Add the dry ingredients to the wet ingredients. Mix on the absolute lowest speed possible, and stop the moment the last streak of flour disappears. Overmixing at this stage develops too much gluten, making the cookies tough, but more importantly, the friction from the mixer can heat up the butter and start the melting process prematurely. Fold in your chocolate chips by hand.
Step 4: The Strategic Chill
Do not bake this dough yet. Portion the dough into tall, generous mounds (about 3 to 4 tablespoons each) onto a parchment-lined baking sheet. Cover the sheet tightly with plastic wrap and place it in the refrigerator for a minimum of 24 hours, but ideally 48 hours. This is the ultimate time-saving hack: do the messy prep work on a Thursday night, clean the kitchen, and bake fresh, incredible cookies on Saturday afternoon with zero stress.
Step 5: The Bake and The Pan-Bang
Preheat your oven fully. Place the chilled mounds of dough directly onto a heavy-gauge, unlined or parchment-lined aluminum half-sheet pan. Bake them straight from the fridge. If you notice them puffing up a bit too much in the center, you can utilize the famous “pan-banging” technique: lift the baking sheet a few inches off the oven rack and let it drop down. This forces the puffed center to collapse slightly, creating beautiful, crinkly edges while maintaining a thick, dense center.
Troubleshooting Quick-Fix Guide
Even with the best preparation, variables like extreme kitchen humidity or an unexpectedly warm day can throw off your baking chemistry. If you peek into the oven and see your cookies spreading wider than you’d like, don’t panic. You can still save them.
The “Spoon Scoot” Method
This is the greatest emergency trick in the baker’s arsenal. The moment you pull the overly spread cookies out of the oven, while they are still boiling hot and pliable, grab a large round biscuit cutter, a mug, or even just two spoons. Place the circular cutter over the cookie (it should be slightly larger than the cookie itself) and gently swirl it around in a circular motion. The edges of the hot cookie will hit the sides of the cutter and be forced back inward, thickening the cookie and creating a perfectly round, professional-looking shape. You only have a 60-second window to do this before the starches set completely, so move quickly.
Adjusting the Formula for Next Time
If your cookies spread despite chilling the dough and controlling your butter temperature, your recipe’s hydration ratio is flawed. For your next batch, try implementing these structural adjustments:
- Increase the flour: Add 2 to 3 extra tablespoons of flour to the dough to provide more structural starch.
- Swap the flour: Replace half of the all-purpose flour with bread flour for enhanced gluten structure.
- Adjust the leavener: Reduce the baking soda by 1/4 teaspoon to minimize outward spread.
- Change the sugar ratio: Increase the brown sugar by 1/4 cup and decrease the white sugar by the same amount to add moisture and lift.
Baking is a science, but it is a highly forgiving one once you understand the rules of the game. You don’t need to tolerate sad, flat, greasy cookies ever again. By respecting the temperature of your butter, weighing your ingredients, investing in safe, heavy-duty gear, and embracing the magic of a long chill, you can effortlessly produce bakery-tier cookies in a standard home kitchen. Now get back in there, preheat that oven, and show that dough who is boss.






