
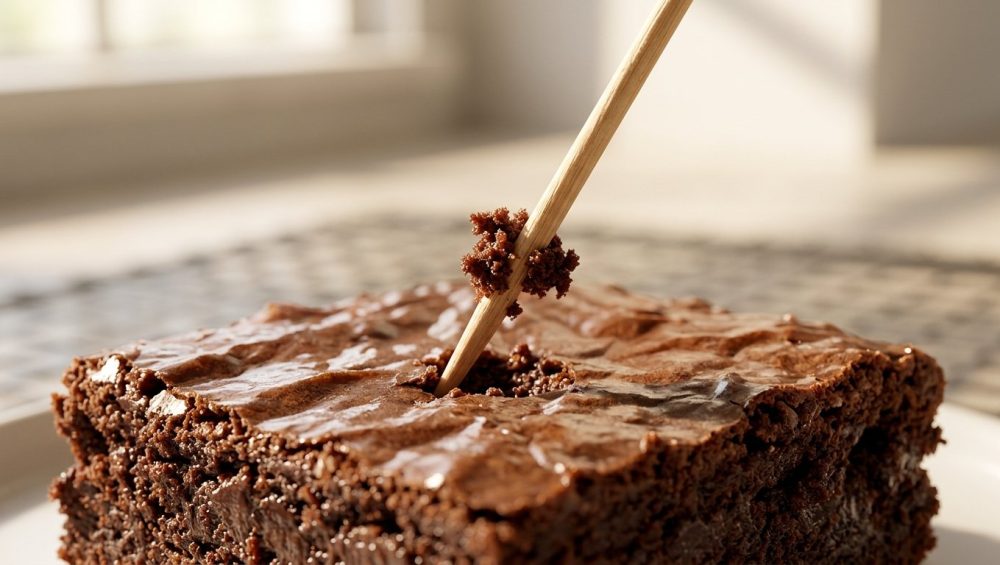
Listen, I love you, but if you are still poking your baked goods with a wooden stick and waiting for it to come out looking like it just came fresh out of the box, we need to have a serious intervention.
We have all been there. You spend your precious weekend melting premium chocolate, whisking eggs until your arm goes numb, and perfectly swirling the batter into a pan. You pop it in the oven, set a timer, and wait. When the timer goes off, you stab the center with a toothpick. It comes out wet. You give it five more minutes. Still slightly wet. You give it another five minutes until that toothpick finally emerges completely clean. You pull the pan out, feeling like a domestic god or goddess, only to cut into the brownies two hours later and discover you have baked a pan of dry, crumbly, chocolate-flavored bricks.
I know this pain intimately. I learned to cook by trial, error, and setting off the smoke detector a few too many times so that you don’t have to. As a home cook who prioritizes time-saving hacks on weekdays so I can be an absolute perfectionist on the weekends, I have made it my mission to banish dry desserts from our lives forever.
The truth is, professional-level results are completely achievable in a standard home kitchen without a culinary degree. You just need to unlearn a few terrible habits passed down through generations of home economics classes. Today, we are going to completely dismantle the “clean toothpick” myth, dive deep into the thermodynamics of your baking pans, and teach you the actual science of pulling a perfectly fudgy, bakery-quality brownie out of your oven.
The Anatomy of a Perfect Brownie
Before we can talk about how to bake a brownie, we need to talk about what a brownie actually is. I have zero patience for pretentious chef-speak, but we do need to look at the basic chemistry of your batter.
A brownie is not a cake. It is essentially a baked chocolate ganache held together by a fragile web of egg proteins and a suspiciously small amount of flour. When you bake a chocolate cake, you are relying on a robust gluten structure and chemical leaveners (like baking powder or baking soda) to create a light, airy sponge. When you bake a fudgy brownie, you are actively trying to suppress cake-like tendencies.
The Fat-to-Flour Ratio
The defining characteristic of a dense, chewy brownie is a high ratio of fat to flour. Flour absorbs moisture and provides structure. If you use too much of it, your dessert will inevitably dry out. This is why relying on measuring cups can be a fatal error; scooping flour packs it down, meaning you might be adding up to 30% more dry ingredients than the recipe intended. Getting this exact ratio right is exactly why a digital kitchen scale is your best friend in the kitchen. Weighing your ingredients guarantees that the delicate balance of butter, chocolate, and flour remains mathematically perfect every single time.
The Magic of Sugar and Eggs
Sugar does far more than just sweeten your dessert. In the world of baking, sugar is considered a “wet” ingredient because it is highly hygroscopic, meaning it attracts and holds onto water. Using the right sugar is critical, and there is a massive difference between fresh ingredients and rock-hard brown sugar that refuses to dissolve into your wet ingredients. Brown sugar contains molasses, which adds chewiness and retains moisture far better than standard granulated white sugar.
Furthermore, the coveted tissue-thin, crinkly top on a perfect brownie is actually a micro-layer of meringue. It forms when the sugar is completely dissolved into the eggs before the flour is introduced. If you ever end up with a dull, matte finish on your brownies, it is because your sugar didn’t fully dissolve.
Cocoa Powder vs. Melted Chocolate
Your source of chocolate also dictates how your brownie behaves in the oven. Recipes that rely heavily on cocoa powder tend to be chewier, but cocoa powder is essentially a dry starch that absorbs a massive amount of liquid. To combat this, smart recipes utilize the intense flavor that comes from blooming cocoa powder in warm butter or oil, which hydrates the starches and releases fat-soluble flavor compounds before the baking even begins.
On the other hand, recipes utilizing pure chocolate bars rely on the cocoa butter for texture. You have to be incredibly careful when melting your chocolate over a double boiler; if you scorch it or let a single drop of water seize it, the fat separates, and your entire batter is compromised before it even hits the pan.
The Great Toothpick Lie: Why You Are Chronically Overbaking
Let’s get one thing straight: the clean toothpick test is a lie. Well, it is a lie for brownies.
The toothpick test was originally popularized for testing deep, heavy cakes like pound cakes and Victoria sponges. For a cake to be structurally sound, the starches in the flour must fully gelatinize and the egg proteins must firmly coagulate. This chemical milestone happens when the internal temperature of the cake reaches roughly 210°F (99°C). At this temperature, the crumb is set, and a wooden toothpick inserted into the center will pull out completely clean because the batter has transformed into a dry sponge.
Applying this cake-baking logic to a brownie is a culinary felony.
The Internal Temperature Reality
If you wait for a brownie to reach an internal temperature of 210°F, you have murdered it. At that temperature, all the available moisture has converted to steam and evaporated, leaving behind a chalky matrix of overcooked cocoa solids.
For a perfectly moist, fudgy brownie, the ideal internal temperature is between 180°F and 190°F (82°C to 88°C). At 180°F, the eggs have cooked just enough to provide a fragile structure, and the flour has hydrated enough to hold the fat, but the chocolate and butter are still essentially in a molten state.
If you poke a brownie that is sitting at a perfect 185°F, your toothpick is going to look wet. It is going to be coated in thick, gooey chocolate. And if you panic and leave the pan in the oven until that toothpick comes out clean, you are actively choosing to dry out your dessert.
Carryover Cooking: The Invisible Force Dictating Your Dessert
To truly master the home kitchen, you have to understand that taking your food out of the oven does not mean your food has stopped cooking. This brings us to the most important scientific concept in this entire masterclass: carryover cooking.
The Thermodynamics of Your Baking Pan
When you bake a pan of brownies at 350°F, the metal pan itself absorbs that heat. The edges of the batter, which are in direct contact with the hot metal walls, heat up much faster than the dead center of the pan. By the time the center of your brownie reaches 180°F, the edges might be sitting at 200°F or higher.
When you remove the pan from the oven and place it on your counter, the laws of thermodynamics take over. The food continues to seek thermal equilibrium. The intense heat trapped in the metal pan, combined with the extreme heat of the brownie’s edges, begins to travel inward toward the cooler center.
This means that while your pan is sitting innocently on your cooling rack, the internal temperature of the center of your brownies will continue to rise by as much as 10 to 15 degrees.
If you pull the brownies out of the oven when the center is perfectly cooked to your liking, carryover cooking will ruin them as they sit on the counter. They will coast right past fudgy and land squarely in dry, cakey territory. You must pull the pan out of the oven before the center is done. You are not baking the center of the brownie in the oven; you are using the oven to build up enough heat in the edges so that the center bakes itself on the counter.
Just like the science behind resting your dough allows cookies to hydrate and bake perfectly, respecting the resting period for your brownies allows carryover cooking to do the heavy lifting.
The Ice Bath Trick for the Overzealous Baker
If you accidentally leave your brownies in the oven a couple of minutes too long and you realize they are dangerously close to being overcooked, you can forcefully halt carryover cooking. Prepare a roasting pan with a shallow layer of ice water. When you pull the hot brownie pan from the oven, carefully lower the bottom of the baking pan into the ice water (do not splash water onto the brownies!). The ice bath rapidly drops the temperature of the metal, stopping the residual heat from overcooking the center. It is a desperate measure, but it works flawlessly.
The New Rules of Doneness: Mastering the “Moist Crumb” Test
If we are throwing the clean toothpick rule out the window, how do you actually know when to take the pan out of the oven? You are going to use your senses, and you are going to look for a very specific set of visual and tactile cues.
1. The Visual Edge Pull
Keep a close eye on the perimeter of the pan. You want to pull the brownies when the outer half-inch of the batter looks fully set, slightly puffed, and is just barely beginning to pull away from the sides of the pan. If the edges look dark, crusty, and heavily separated from the walls, you have gone too far.
2. The Glossy, Crinkly Top
The surface of the brownies should look completely dry and feature a shiny, paper-thin crust. There should be no wet, shiny puddles of raw batter visible on the surface. As the brownies bake, the top layer dries out and sets, creating that beautiful meringue-like skin.
3. The Center Jiggle
Put on your oven mitts, grab the edge of the pan, and give it a gentle, firm shake. The outer edges should not move at all. However, the inner two inches of the pan should have a distinct, heavy wobble. It should not slosh like a liquid—if it ripples like water, it is still raw. But it should jiggle like a dense gelatin. Remember, carryover cooking will firm up that jiggle as it cools.
4. The “Moist Crumb” Toothpick Test
You can still use a toothpick, but you have to change how you read it. Do not insert the toothpick into the dead center of the pan. Instead, insert it about two inches away from the edge of the pan.
When you pull the toothpick out, it should not be clean. It should be coated in thick, sticky, moist crumbs. It should look like clumps of wet soil clinging to the wood. If the toothpick comes out coated in smooth, liquid batter that drips, it needs more time. If it comes out clean, or with just one or two dry crumbs, immediately remove the pan from the oven and pray you haven’t completely dried them out.
Your Bakeware Is Sabotaging You (A Rant on Toxic and Terrible Pans)
I have a strict, non-negotiable rule in my kitchen: absolutely no cheap, toxic, or improperly designed kitchenware. You can have the best recipe in the world, perfectly calibrated ingredients, and the timing of a Swiss watch, but if you put your batter into the wrong vessel, you will fail.
The Insulating Nightmare of Glass
The absolute worst thing you can do is insist on baking in glass pans when making brownies. Glass is a thermal insulator, not a thermal conductor. This means that glass takes an incredibly long time to heat up in the oven.
When you put a glass dish of brownie batter into a 350°F oven, the glass slowly absorbs the heat. Because it takes so long for the heat to penetrate the glass and reach the batter, you have to leave the pan in the oven much longer than a recipe dictates. By the time the center of the brownie finally starts to cook, the outer edges have been sitting in the oven for an eternity, resulting in rock-hard, overbaked borders.
Worse still, once glass finally gets hot, it stays hot for a very long time. This supercharges the carryover cooking process. Even after you take the glass dish out of the oven, it continues to aggressively pump heat into your brownies, completely drying them out. Add in the risk of a catastrophic temperature shock resulting in a shattered glass dish if you place it on a cold granite counter, and it becomes clear that glass should be reserved strictly for casseroles and fruit crisps. Keep it away from your chocolate.
The Scorching Reality of Dark Nonstick Pans
The second worst offender in the bakeware aisle is the dark, nonstick metal pan. I actively warn home cooks about the hidden flaw of dark nonstick baking pans. Dark colors absorb and radiate infrared heat much faster and more aggressively than light colors.
If you bake brownies in a black or dark grey nonstick pan, the pan will absorb the oven’s heat so rapidly that the bottom and sides of your brownies will scorch before the center even has a chance to warm up. This is why boxed brownie mixes always tell you to lower the oven temperature by 25 degrees if you are using a dark pan.
Furthermore, cheap nonstick coatings (like low-grade Teflon) degrade over time. If your pan is peeling, bubbling, or looks like it has a skin condition, throw it in the trash immediately. You do not want mystery chemical polymers flaking off into your premium desserts. We don’t do toxic gear in this kitchen.
The Holy Grail: Light-Colored Bare Aluminum
If you want professional results, you need to use the equipment the professionals use. You need to start tossing out those flimsy baking sheets and thin supermarket pans, and invest in heavy-gauge, light-colored bare aluminum or aluminized steel bakeware.
Aluminum is an exceptional conductor of heat. It heats up quickly and evenly, ensuring that the heat transfers uniformly through the batter. Because of its light color, it gently reflects radiant heat rather than aggressively absorbing it, preventing the edges and bottom from scorching. Best of all, aluminum cools down rapidly once removed from the oven, which gives you absolute control over the carryover cooking process.
Line your aluminum pan with an oversized sheet of parchment paper (leaving an overhang to act as handles), and you will never struggle with stuck, overbaked, or ruined brownies again.
Controlling the Hidden Variables in Your Home Kitchen
Baking is a science, which means you need to control your variables. The most chaotic variable in any home kitchen is the oven itself.
Your Oven Is Lying to You
When you set your digital oven display to 350°F, it beeps to tell you it has preheated. Do not believe it. Most home ovens are wildly inaccurate, often fluctuating by as much as 25 to 50 degrees. Your oven might beep when the air hits 350°F, but the walls of the oven are still cold, meaning the ambient temperature will immediately plummet the second you open the door to put your pan inside.
Furthermore, ovens cycle on and off to maintain heat. Your “350°F” oven might actually be swinging wildly between 315°F and 390°F. If your oven runs hot, the outside of your brownies will burn before the inside sets. If it runs cold, your brownies will take forever to bake, drying out in the process.
This is why a cheap oven thermometer is mandatory equipment. Hang a five-dollar analog thermometer from the center rack of your oven and bake according to what that dial says, not what the digital display claims.
The Importance of the Parchment Sling
Never grease a pan and pour brownie batter directly into it. Always build a parchment paper sling. Cut a sheet of parchment paper long enough to line the bottom of the pan and extend up and over two opposite sides. This does two things: First, it provides a non-stick surface without the need for toxic chemical sprays. Second, the parchment overhang acts as a slight thermal buffer, reducing the heat transfer to the edges by just enough to keep them soft. Most importantly, it allows you to physically lift the entire slab of brownies out of the pan once they have cooled, making cutting them infinitely easier.
Troubleshooting Your Brownie Disasters
Even with the best intentions, things can go wrong. If you have been struggling with your bakes, let’s diagnose the symptoms so you can fix them next time.
Symptom: The brownies are greasy and bubbling with butter.
Diagnosis: Your emulsion broke. This usually happens if you melt your butter and chocolate together and get them too hot, or if you don’t whisk your eggs and sugar together vigorously enough before combining the wet ingredients. The batter must be thoroughly emulsified.
Symptom: The center sank completely into a crater.
Diagnosis: You severely underbaked them, or you whipped too much air into the batter. If you aggressively beat the batter after adding the flour, you develop gluten and incorporate air bubbles. Those bubbles expand in the oven, creating a false rise, and then collapse violently when the pan cools. Fold the dry ingredients in gently.
Symptom: The brownies are rock hard on the edges but raw in the middle.
Diagnosis: Your oven was too hot, or you used a dark nonstick pan. The outside cooked and hardened before the heat could penetrate the center. Lower your oven temperature by 25 degrees and use a light-colored aluminum pan.
Symptom: There is no shiny, crinkly crust on top.
Diagnosis: Your sugar did not dissolve. The crinkly top is a meringue. You must whisk the sugar into the eggs (or the hot melted butter/chocolate mixture) until the grittiness disappears.
The Agony of the Cooling Process
I know exactly what happens when you pull a pan of brownies out of the oven. The kitchen smells like a Parisian chocolate shop. The chocolate is warm and inviting. You want to grab a knife, hack into the pan, and eat a molten square immediately.
Do not do it. Cutting hot brownies is a crime against pastry.
When brownies come out of the oven, the fats—specifically the butter and the cocoa butter—are completely liquefied. The starches are incredibly fragile. If you cut into the pan while it is still hot, the brownies will literally fall apart into a gooey, structural mess, and you will compress the delicate crumb into a gummy paste.
You must allow the brownies to cool completely in the pan, on a wire rack, for a minimum of two hours. As the temperature drops, the cocoa butter solidifies, the starches set, and the residual moisture redistributes evenly throughout the entire slab. This cooling phase is what transforms a fragile, molten batter into a dense, chewy, fudgy masterpiece.
If you want warm brownies, the correct method is to let them cool completely, cut them into pristine squares using a hot, clean knife (wiping the blade between each cut), and then individually microwave a square for exactly 10 seconds before serving.
Final Thoughts for the Weekend Baker
You do not need a culinary degree to make mind-blowing food. You don’t need expensive gadgets, and you certainly don’t need to stress over complex techniques. What you need is a basic understanding of how heat works, a refusal to use terrible equipment, and the confidence to trust your own senses over a timer.
Baking is just edible chemistry. Once you understand that residual heat is your silent sous-chef, and that a clean toothpick is actually a warning sign rather than a goal, you will never bake a dry dessert again.
So throw away the glass bakeware, invest in a good digital scale, and embrace the moist crumb test. Your weekend baking projects are about to get infinitely better, and your friends and family are going to wonder what bakery you secretly ordered from. Now get into the kitchen, preheat that oven (and check your thermometer!), and go make something incredible.






