
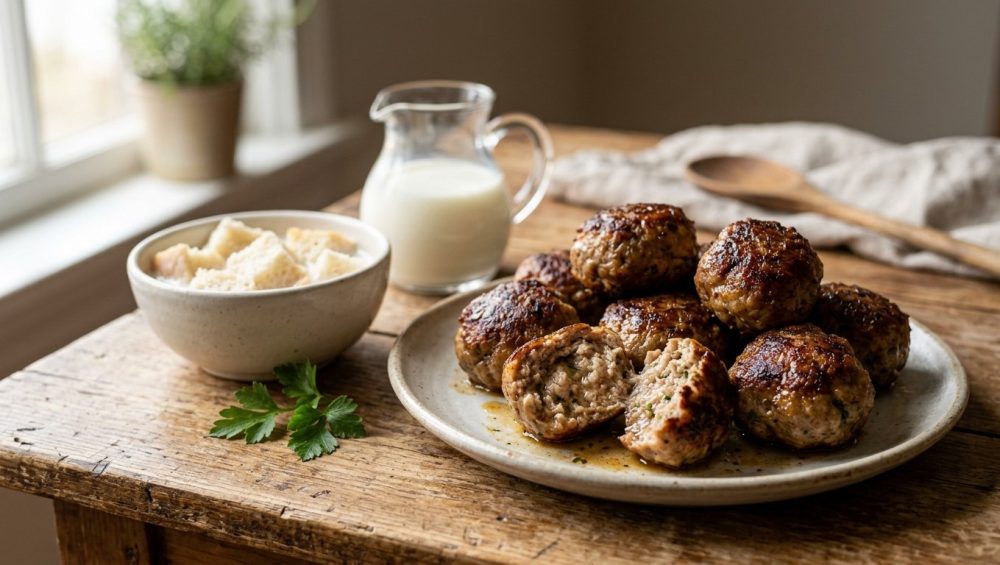
There is a distinct, universally understood disappointment that occurs when you bite into a meatball and realize it has the bouncy, resilient texture of a racquetball. You bought premium ground meat, you meticulously chopped your garlic (because hopefully, you know by now that you need a bench scraper to scoop it up, not your blade edge), and you followed the recipe to the letter. Yet, your dinner guests are politely chewing a single bite for three minutes straight.
Listen to me: it is not your fault. Ground meat is a finicky, dramatic diva. When exposed to heat, it desperately wants to shrink, squeeze, and expel every single drop of moisture it possesses. But there is a ridiculously simple, completely foolproof culinary trick to stop this from happening. It doesn’t require a culinary degree, a pricey sous-vide machine, or pretentious chef jargon. It requires something you already have sitting on your counter right now: bread and milk.
Welcome to the masterclass on the “panade.” Let’s fix your dinner.
The Anatomy of a Tragic Meatball (And Why It’s Not Your Fault)
Before we solve the problem, we need to understand the crime scene. Why do meatballs turn tough in the first place? To get to the bottom of this, we have to look at the food science happening inside your skillet.
The Protein Matrix: What Happens When Ground Meat Cooks
Meat is essentially muscle, and muscle is made up of bundles of protein fibers—specifically, two proteins called myosin and actin. In their raw state, these proteins are relaxed. But the second you introduce them to heat, they panic.
Starting at around 104°F (40°C) and accelerating wildly as the temperature hits 140°F (60°C) to 160°F (71°C)—which is the FDA’s recommended safe internal temperature for ground beef—these proteins denature. They uncoil, link up with each other, and forcefully contract. Imagine a microscopic net that suddenly pulls itself tight. This cross-linking creates a rigid, dense structure. The more you cook the meat, the tighter the net gets. If you’ve ever wondered why your burger patties shrink into thick little hockey pucks or your meatballs end up looking like golf balls, this aggressive protein contraction is the culprit.
The Moisture Exodus: Why Your Dinner Tastes Like Sawdust
As that protein net tightens, it acts like a sponge being ruthlessly wrung out by a giant invisible hand. What gets squeezed out? Water and fat. These are the two exact things that make meat taste juicy and delicious.
If you are cooking a premium steak, you can avoid this extreme moisture loss by simply cooking it medium-rare (around 130°F). But ground meat is a completely different beast. Because the surface of the meat has been ground and mixed into the center, any surface bacteria is now distributed throughout the entire batch. You cannot safely serve a medium-rare pork or poultry meatball to your family unless you want to spend the rest of the evening regretting your life choices.
You have to cook meatballs all the way through. But by the time the center of a meatball reaches a safe 160°F, the outer layers have been sitting at 200°F+ for several minutes. The proteins have completely seized, the fat has rendered and leaked into the pan, and the water has evaporated. The result? A dry, crumbly, tragic mess.
Enter the Panade: The Culinary Magic Trick You Need
So, how do we cook ground meat all the way through without letting those proteins tighten up and squeeze out the juices? We physically get in their way.
What Exactly is a Panade?
“Panade” (pronounced pah-NAHD) is just a fancy French culinary term for a paste made of starch and liquid. That’s it. I promised you no pretentious chef-speak, so let’s call it what it is: wet bread.
I know, it sounds deeply unappetizing. The idea of mashing up soggy bread and mixing it into your premium ground beef feels like an insult to the cow. But trust me, you actually need soggy bread to achieve that melt-in-your-mouth texture you get at high-end Italian restaurants.
The Science of Starch and Protein Disruption
Here is the brilliant science behind why this works. When you mix a panade into your raw ground meat, you are dispersing hydrated starches throughout the protein matrix.
When the meat hits the hot pan or oven, the proteins start their usual routine: they heat up, they unfold, and they try to link together to shrink. But now, there are swollen, gelatinized starch molecules standing in the way. The starches physically coat the meat proteins and act like microscopic roadblocks. Because the proteins can’t easily link up with one another, the network cannot tighten.
Furthermore, the panade acts like an internal sponge. As the meat cooks and inevitably tries to expel some of its juices and rendered fat, the bread paste absorbs and traps that moisture right inside the meatball. You get a tender, cohesive structure that holds its shape but yields instantly to a fork. This is the secret power of soaked bread.
Building the Perfect Panade: Ingredients Matter
Not all panades are created equal. While you can technically use any starch and any liquid, some combinations yield vastly superior results. Let’s break down your pantry options so you don’t ruin Tuesday night’s dinner.
Choosing the Right Bread: From Panko to Sourdough
The starch component is the backbone of your panade. Here is how the usual suspects stack up:
- Standard White Sandwich Bread: This is the unsung hero of the meatball world. Standard, squishy, supermarket white bread (crusts removed) is absolutely perfect for a panade. It breaks down easily, absorbs liquid rapidly, and turns into a completely smooth, homogenous paste. It leaves no weird textural chunks behind in the finished meatball.
- Panko Breadcrumbs: Panko is an airy, flaky Japanese breadcrumb made from crustless white bread that is baked using electrical currents. Panko is fantastic because it is incredibly dry and acts as a highly efficient sponge. If you use panko, you don’t even have to mash it into a paste first; you can often just mix the panko and milk directly into the meat and let it hydrate naturally.
- Traditional Dry Breadcrumbs: The sandy stuff in the cardboard canister. Use this only as a last resort. Because the crumbs are so fine and dense, they don’t hold as much moisture and can occasionally make your meatballs feel heavy or gritty.
- Artisan Sourdough or Baguettes: Proceed with caution. While crusty artisan breads taste amazing, their crumb structure is very dense and chewy. If you use them, you must remove the crusts entirely, and you will need to soak them much longer to ensure they break down. Nobody wants to bite into a meatball and hit a hard, un-hydrated chunk of sourdough crust.
- Crackers (Saltines or Ritz): A classic mid-century American trick. They work well in a pinch because they break down into a smooth paste, but keep in mind they bring a lot of added salt to the party, so adjust your seasoning accordingly.
The Liquid Component: Why Whole Milk Reigns Supreme
Now that you have your bread, what are you soaking it in?
- Whole Milk: The absolute gold standard. The fat in whole milk adds richness, and the dairy proteins help tenderize the meat further. A quick milk soak creates a creamy, luxurious paste that blends seamlessly into ground beef or pork.
- Buttermilk or Yogurt: Excellent choices, especially for poultry meatballs. The mild acidity in buttermilk helps tenderize the meat proteins even before the heat hits them, providing an extra layer of insurance against toughness.
- Beef or Chicken Stock: A great option if you want to double down on savory, umami flavors. Stock won’t give you the creamy richness of milk, but it will hydrate the starches perfectly while boosting the meaty flavor profile.
- Plain Water: Don’t do it. Water hydrates the starch, sure, but it adds zero flavor and zero fat. You are passing up a prime opportunity to build flavor from the inside out.
Dairy-Free and Gluten-Free Alternatives That Actually Work
If you have dietary restrictions, you can still achieve meatball perfection.
- Gluten-Free: Substitute standard bread with gluten-free white bread or even quick oats. Oats are incredibly starchy and absorb liquid beautifully. Just pulse them a few times in a food processor first so you don’t end up with an oatmeal-textured meatball.
- Dairy-Free: Swap the whole milk for an unsweetened, unflavored non-dairy milk (like oat milk or almond milk), or simply use a rich, high-quality chicken or beef stock.
The Golden Ratio: How Much Panade Do You Really Need?
Cooking is an art, but baking and binding are sciences. You cannot just eyeball a handful of bread, splash a lake of milk into a bowl, and hope for the best. If you use too little panade, your meatballs will still be tough. If you use too much, your meatballs will turn into savory bread pudding and fall apart in the sauce.
Meat-to-Panade Proportions for Optimal Tenderness
Food scientists and test kitchens have extensively tested this to find the exact mathematical sweet spot. The consensus is that you need a binder ratio of roughly 12% to 15% by weight to the meat.
For the everyday home cook who doesn’t want to pull out a digital scale on a Tuesday, here is the golden volumetric rule: For every 1 pound (450g) of ground meat, you need 1/2 cup of panade paste.
How do you make exactly 1/2 cup of panade?
- If using fresh white bread: Tear up 1 to 1.5 slices of crustless white bread (about 1 cup of loosely packed torn pieces) and mix it with 2 to 3 tablespoons of milk.
- If using Panko: Mix 1/3 cup of panko with 1/4 cup of milk.
The Hydration Sweet Spot
When you combine your bread and milk, let it sit for about 5 to 10 minutes. The bread needs time to fully absorb the liquid. Once hydrated, take a fork and aggressively mash it until it forms a thick, uniform, starchy paste. It should look a bit like thick oatmeal or mashed potatoes. If there are dry spots, add another teaspoon of milk. If it is a soupy puddle, add a pinch more bread.
Meat Selection: You Can’t Polish a Lean Turkey Turd
We need to have a serious talk about fat. The panade is a miracle worker, but it is not a wizard. It cannot completely rescue meat that has zero fat content.
The Holy Trinity: Beef, Pork, and Veal
The classic Italian-American meatball is built on a foundation of fat and flavor, usually utilizing a mix of beef, pork, and veal.
- Beef: Provides the robust, meaty backbone. You want an 80/20 ratio (80% lean, 20% fat). Do not buy 96% lean ground beef for meatballs. It will be dry, flavorless, and sad.
- Pork: Ground pork is naturally fatty, sweet, and incredibly tender. A 50/50 mix of 80/20 beef and ground pork is the absolute sweet spot for home cooks.
- Veal: Traditional, but expensive and sometimes hard to find. It contains a lot of natural gelatin which gives meatballs a beautiful, silky mouthfeel. If you skip it, the beef/pork combo is more than sufficient.
Making Lean Meats Work
If you are trying to eat healthier and insist on using ground turkey or chicken, you are starting at a severe disadvantage. Poultry is incredibly lean, meaning it lacks the natural fat necessary to lubricate the protein fibers during cooking.
When using ground turkey, the panade is no longer optional; it is mandatory. Furthermore, always buy the 93/7 ground turkey rather than the 99% lean breast meat, and consider adding a splash of olive oil or a spoonful of whole milk ricotta cheese directly into the meat mixture to artificially introduce some much-needed fat.
Technique: Mixing and Shaping Without Ruining Everything
You have your 80/20 meat. You have your perfectly hydrated panade. You have your garlic, parmesan, herbs, and an egg (which acts as a secondary binder to provide structural integrity). Now, you have to mix it.
The “Claw” Method: Why Over-Mixing is the Enemy
If there is one rookie mistake that ruins more dinners than anything else, it is over-working ground meat. When you aggressively knead, squeeze, and compress ground meat, you are prematurely extracting that sticky myosin protein we talked about earlier. The meat will become dense, gummy, and sausage-like before it even hits the pan.
To prevent this, use the “Claw” method. Spread your ground meat out in a large bowl. Spread your panade, egg, and seasonings evenly over the top. Form your hand into a loose claw shape, and gently toss and fold the mixture together just until the ingredients are incorporated. Do not squeeze the meat through your fingers. Treat it like you are handling a delicate pastry dough. The moment it looks uniform, stop touching it.
The Essential Chilling Phase
Here is a secret that will change your culinary life: once you mix and gently roll your meatballs, put them in the refrigerator for at least 30 minutes before cooking.
Why? Because human hands are warm (around 98.6°F). As you roll the meatballs, the heat from your hands begins to melt the solid fat in the ground beef and pork. If that fat melts before it hits the pan, it will leak out immediately during cooking, leaving you with dry meat and a greasy skillet. Chilling the meatballs drops the temperature of the fat back down to around 38°F, ensuring it stays trapped inside the protein matrix where it belongs.
Cooking Your Meatballs: Heat, Pans, and Avoiding Toxic Gear
You’ve done the prep work. The meatballs are perfectly formulated, gently mixed, and properly chilled. Now it’s time to apply heat.
Searing vs. Baking: The Great Debate
There are two primary ways to cook a meatball before simmering it in your marinara sauce: pan-searing or oven-baking. Both are acceptable, but they require different techniques.
- Oven-Baking: This is the easiest, least messy method. Preheat your oven to 400°F (200°C). Place the chilled meatballs on a rimmed baking sheet and roast them for 15 to 20 minutes until they develop a nice brown crust. Baking applies gentle, even, ambient heat, which is very forgiving on the protein structure.
- Pan-Searing: This method develops the best flavor thanks to the Maillard reaction (the chemical reaction between amino acids and reducing sugars that gives browned food its distinctive flavor). However, you must respect the pan. Do not overcrowd the skillet. If you jam twenty meatballs into a ten-inch pan, the temperature of the pan will plummet. The meat will release its juices, and suddenly your ground beef steams instead of browning. Cook in batches, leaving an inch of space between each meatball.
Ditch the Peeling Teflon: Safe Cookware for the Perfect Crust
As the Sassy Sous-Chef, I have a zero-tolerance policy for cheap, toxic kitchenware. If you are still searing your meatballs in a scratched, peeling, fifteen-dollar non-stick pan you bought at a discount store five years ago, we need to have an intervention.
Traditional non-stick pans are coated in PTFE (Teflon), which belongs to a family of synthetic chemicals known as PFAS—often referred to as “forever chemicals.” Recent 2025 and 2026 data and consumer reports have heavily scrutinized these chemicals due to their environmental persistence and potential health risks when overheated or ingested via flaking coatings. If your non-stick pan is scratched, you are quite literally seasoning your meatballs with microplastics and toxic chemicals. I am fiercely passionate about banishing toxic kitchen gear from the home kitchen.
For searing meat, you need high heat to develop a crust. Non-stick pans are explicitly not designed for high heat. You need a heavy-bottomed stainless steel skillet, a carbon steel pan, or an enameled cast-iron skillet.
“But everything sticks to my stainless steel pan!” you cry.
No, it doesn’t. You just aren’t heating it correctly. If you want to sear meatballs in stainless steel without them tearing in half when you try to flip them, you must utilize the magic of the water drop test (also known as the Leidenfrost effect). Heat your dry stainless steel pan over medium heat for about two to three minutes. Flick a tiny drop of water into the pan. If the water sizzles and evaporates instantly, the pan is too cold. If the water forms a perfect, cohesive bead that glides around the pan like a mercury marble, the pan is perfectly preheated.
Once you achieve this, add your high-smoke-point oil (like avocado oil or clarified butter), let it shimmer, and carefully add your meatballs. And please, for the love of culinary decency, do not use aerosol cooking sprays. The chemical propellants in those cans build up an invisible, sticky polymer residue on your pans that is impossible to wash off, which is exactly why cooking spray is the enemy of good cookware. Use real, liquid oil in the magic of a preheated pan, and your meatballs will release effortlessly with a gorgeous, dark brown crust.
Beyond the Meatball: Expanding Your Panade Horizons
The beauty of the panade is that it is a universal technique. Once you master this simple bread-and-milk paste, you can apply it to almost any ground meat application to drastically elevate your cooking game.
Meatloaf That Doesn’t Resemble a Brick
Meatloaf is essentially just a giant, loaf-shaped meatball. Because it spends 45 to 60 minutes in a hot oven, it is incredibly susceptible to drying out. The outer edges often turn to leather before the center reaches a safe temperature.
By incorporating a generous panade into your meatloaf mixture, you ensure that the interior stays incredibly moist and tender while the exterior develops a beautiful glaze. The panade traps the rendered beef and pork fat inside the loaf, preventing it from pooling in a greasy, unappetizing moat around the edges of your baking dish.
Burgers, Patties, and Weeknight Hacks
While a panade is not traditional for a standard smash burger (where you rely on pure beef flavor and high-heat caramelization), it is an absolute lifesaver for thick pub-style burgers, especially if you are forced to use leaner beef or ground turkey.
If you are a busy professional trying to master simple weeknight dinners, the panade allows you to stretch expensive proteins further while guaranteeing a juicy result. You can mix up a large batch of panade-enhanced ground meat on a Sunday, form it into meatballs, patties, and koftas, and freeze them raw. Because the starch protects the protein structure, these items freeze and thaw beautifully without weeping excess moisture.
The Sassy Sous-Chef’s Final Verdict
Cooking doesn’t have to be an exercise in frustration. You don’t need a Michelin star to make mind-blowing food in a standard home kitchen, and you certainly don’t need to accept dry, tough, rubbery meatballs as a fact of life.
The secret to culinary success is often found in the most humble, overlooked ingredients. A slice of squishy white bread and a splash of milk might not look like much, but together, they form a microscopic shield that protects your expensive ground meat from the harsh realities of thermodynamics.
So the next time you decide to tackle a Sunday gravy or a quick weeknight meatloaf, take five extra minutes. Tear up some bread. Pour over some milk. Let it soak, mash it into a paste, and gently fold it into your meat. Your family will thank you, your palate will thank you, and you will finally experience the absolute joy of a truly tender, melt-in-your-mouth meatball. Now, grab your heavy stainless steel skillet, ditch that toxic peeling Teflon, and get cooking!






