
Picture this: You are hosting a dinner party. You have spent the last two hours meticulously curating a beautiful tablescape, pouring wine, and playing the role of the effortlessly chic host. The centerpiece of your menu is a classic potato gratin—a bubbling, golden-brown masterpiece of heavy cream, gruyère cheese, and thinly sliced potatoes. You pull it from the oven, the aroma of roasted garlic and caramelized dairy filling the kitchen. You serve a generous scoop onto your guest’s plate. They take a bite.
And then, you hear it.
That dreaded, unmistakable, soul-crushing crunch.
Your potatoes are raw in the middle. The top is beautifully browned, the cream has reduced into a rich sauce, but the actual potatoes possess the texture of a water chestnut. It is a culinary betrayal of the highest order. You followed the recipe to the letter. You baked it for a full hour at the exact temperature specified. You even covered it with foil for the first forty-five minutes just like the celebrity chef on television told you to do. So, what went wrong?
Look, I am going to give it to you straight: It is not your oven’s fault. It is not the recipe’s fault. And it certainly isn’t the potato’s fault. The uncomfortable truth is that your knife skills are ruining your dinner.
When it comes to baked casseroles, gratins, and scalloped potatoes, mathematical uniformity is not a suggestion; it is the fundamental law of thermodynamics. You cannot hack your way through a dense root vegetable with a dull chef’s knife, toss those wildly uneven wedges into a baking dish, and expect them to cook at the same rate. You need precision. You need consistency. You need a V-blade mandoline.
Grab a glass of wine, pull up a stool, and let’s get nerdy. We are going to completely deconstruct the science of why your scalloped potatoes are stubbornly crunchy, and why upgrading your prep gear is the only way to banish raw root vegetables from your kitchen forever.
The Thermal Dynamics of Dense Root Vegetables
To understand why a gratin fails, we first have to understand the biological and thermodynamic realities of the common potato. A potato is not just a lump of starch; it is a complex matrix of water, starch granules, and rigid cell walls held together by a biological glue called pectin.
When you apply heat to a potato, two entirely separate chemical processes must occur for it to become tender and palatable. First, we have starch gelatinization. As the internal temperature of the potato rises, the starch granules absorb the surrounding water, swell up like microscopic water balloons, and eventually burst. This process of gelatinization begins at roughly 58ºC (136ºF) and is usually complete by the time the potato reaches 66ºC (150ºF).
If you were to stop cooking at this exact moment, you would have a potato where the starch has cooked, but the vegetable itself is still unpleasantly firm. Why? Because of the pectin. Pectin is the structural cement that binds the plant’s cell walls together. Unlike starch, pectin is incredibly stubborn. It does not begin to actively break down and dissolve until the internal temperature of the potato reaches a blistering 90ºC (194ºF).
Here is where the physics of heat transfer ruin your dinner party. Potatoes are terrible conductors of heat. In scientific terms, an unfrozen raw potato has a thermal conductivity of roughly 0.56 Watts per meter-Kelvin (W/m K). To put that into perspective, they are essentially dense, watery insulators. Heat moves through a potato at an agonizingly slow pace.
When you place a baking dish full of sliced potatoes into a 400ºF oven, the heat must slowly penetrate from the outside of the slice to the very center. If your potato slice is exactly 1/8-inch (about 3mm) thick, the thermal energy can easily reach the core, pushing the internal temperature past that magical 90ºC threshold, melting the pectin, and rendering the potato melt-in-your-mouth tender.
But what happens if your knife slips and you cut a slice that is 1/4-inch thick? Or 3/8-inch thick? The math changes exponentially. Because of the potato’s low thermal conductivity, that thicker slice will take significantly longer for its core to reach 90ºC. By the time the thick slice finally breaks down its pectin, the thinner slices around it will have completely disintegrated into mush.
The Fallacy of “Rustic” Hand-Cutting
In the modern culinary world, we throw around the word “rustic” to excuse a multitude of sins. We call a lopsided pie crust “rustic.” We call a chunky, unevenly chopped vegetable stew “rustic.” But when it comes to scalloped potatoes, “rustic” hand-cutting is a guaranteed ticket to a ruined meal.
Let’s be brutally honest about our knife skills. Unless you have spent years working the prep line in a Michelin-starred French kitchen, your hand-chopped slices are not uniform. You might start strong with the first half of the potato, producing beautiful, thin disks. But as the potato gets smaller, your grip falters, your fingers get dangerously close to the blade, and you inevitably end up hacking the remaining vegetable into thick, clumsy wedges. It is even worse when your kitchen knives go dull, forcing you to use downward pressure rather than a smooth slicing motion, which only exacerbates the unevenness.
In a gratin, uneven slices trigger the “Weakest Link” theory of cooking. A casserole is only as successful as its thickest, most undercooked ingredient. You could have ninety-nine perfectly sliced, tender pieces of potato in that baking dish, but if your guest bites into the one thick, crunchy wedge that you hastily chopped at the end, their entire experience is ruined. They won’t remember the ninety-nine perfect bites; they will only remember the one that cracked their molar.
Furthermore, time is money. As a home cook trying to balance a career, a family, and a semblance of a social life, you do not have forty-five minutes to stand over a cutting board on a Tuesday night, meticulously measuring potato slices with a ruler. You need professional-level precision, and you need it delivered in under ninety seconds.
The Anatomy of a Slicer: Straight Blade vs. V-Blade
If hand-cutting is out of the question, the obvious solution is a mandoline slicer. But not all mandolines are created equal. The geometry of the blade dictates the biological integrity of your food.
Historically, standard mandolines feature a straight, horizontal blade. When you push a dense root vegetable across a straight blade, you are relying entirely on blunt force. The straight blade hits the vegetable head-on, requiring you to exert significant forward pressure to force the steel through the dense flesh.
This frontal assault is highly destructive at a microscopic level. Instead of cleanly severing the potato’s cells, a straight blade often crushes and tears the cellular walls. When potato cells are violently ruptured, they prematurely bleed their internal starches and enzymes. This excess surface starch immediately begins to oxidize, turning your beautiful potatoes an unappetizing shade of grey. Furthermore, releasing too much crushed starch into your gratin can cause the dairy to become overly gummy and cloying. It is the exact same biological reason why overworked mashed potatoes turn into glue when you aggressively process them.
Enter the V-blade mandoline.
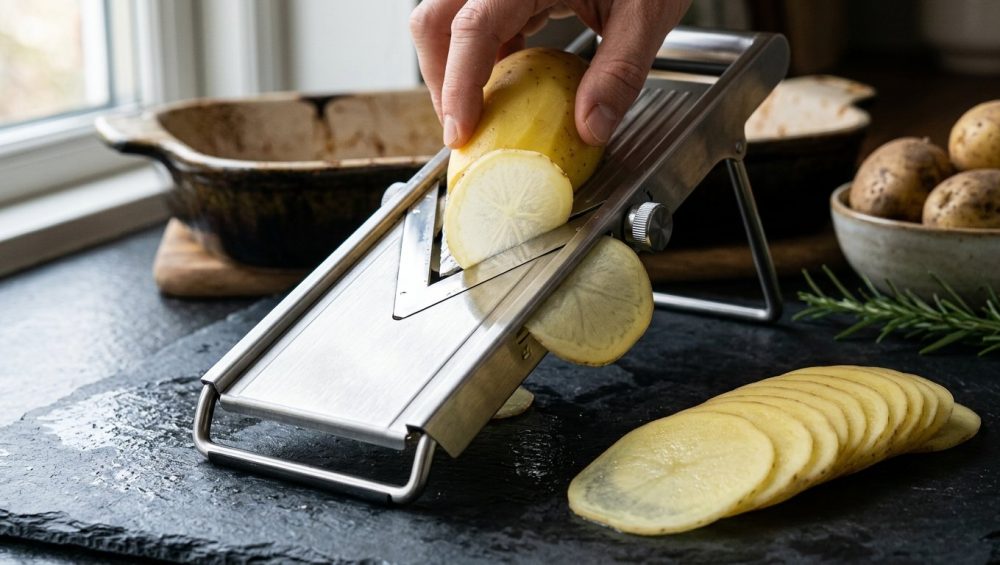
The V-blade is an engineering marvel that utilizes the physics of a shearing angle. Instead of a single, straight piece of steel hitting the food head-on, the V-blade consists of two angled blades that meet at a point, forming a “V” shape.
When you push a potato across a V-blade, the steel attacks the vegetable from two converging angles simultaneously. This creates a slicing, shearing motion rather than a crushing motion. Think of it like a guillotine versus a pair of high-quality fabric scissors. The V-blade effortlessly glides through the densest root vegetables, cleanly severing the cellular walls without bruising or tearing them.
Because the cut is so clean, the structural integrity of the potato slice remains intact. The starch stays trapped inside the cells where it belongs, only releasing gently and evenly as the potato cooks in the oven. The result is a gratin with a silky, perfectly emulsified sauce and potatoes that hold their shape beautifully until they melt on your tongue.
The “No-Go” Zone: Toxic, Cheap Plastic Mandolines
Now, we need to have a serious conversation about the gear you are allowing into your kitchen. I have zero patience for pretentious chef-speak, but I have even less patience for cheap, toxic, poorly manufactured kitchenware.
If you walk into a big-box discount store, you will inevitably see a display of brightly colored, ten-dollar plastic mandolines. Do not buy them. Do not look at them. If someone gifts one to you, throw it directly into the recycling bin.
These cheap plastic slicers are an absolute menace. First of all, the plastic bodies are notoriously flimsy. When you apply pressure to slice a firm vegetable, the plastic bed flexes and bows. This completely negates the entire purpose of a mandoline, which is mathematical uniformity. If the bed flexes while you are slicing, your potato will end up thicker on one side and thinner on the other, putting you right back where you started.
Secondly, the blades on these budget gadgets are stamped from mystery metals that lose their edge after three uses. Once a mandoline blade goes dull, it stops slicing and starts tearing, making it incredibly dangerous to use.
Finally, let’s talk about food safety and material degradation. Cheap plastics are not built to withstand the high heat of a modern dishwasher. Over time, hot water and harsh detergents cause the plastic to become brittle, micro-crack, and potentially leach toxic compounds into your food. We are aggressively banishing toxic gear from our homes. Just as we have learned that cheap bamboo cutting boards harbor bacteria and destroy knife edges, and that aerosol sprays are secretly ruining your nonstick pans, we must recognize that a cheap plastic slicer is a liability, not a tool.
You must invest in a heavy-duty, surgical-grade stainless steel V-blade mandoline. Yes, it will cost more upfront. But stainless steel does not flex. It does not warp in the dishwasher. It does not harbor bacteria in micro-fissures. A high-quality stainless steel mandoline provides a rigid, uncompromising runway for your vegetables, ensuring that every single slice is exactly the same thickness, down to the millimeter. It is, without a doubt, one of the essential tools every beginner needs to elevate their cooking from amateur to extraordinary.
The Statistics of Slicing: Masterclass on Safety
We cannot discuss mandolines without addressing the elephant in the room: the very real danger they pose to your fingers. A professional-grade V-blade mandoline is essentially an exposed razor blade sitting on your countertop.
Let’s look at the sobering data. According to the US Consumer Product Safety Commission, kitchen-tool lacerations send roughly 350,000 Americans to the emergency room every single year. Mandolines and sharp graters account for a massive percentage of the most severe finger and thumb injuries among hand tools. We are talking about serious amputations of the fingertip.
Why is the injury rate so astronomically high? Because home cooks get cocky. They start slicing a potato, the rhythm feels good, the slices are flying perfectly into the bowl, and they think, “I don’t need the hand guard. I have total control.” Then, they try to slice that last, stubborn one-inch nub of the potato. The vegetable slips, the hand plunges forward, and the V-blade does exactly what it was engineered to do: it shears cleanly through whatever crosses its path.
This is completely preventable. If you are going to embrace the magic of the V-blade mandoline, you must adhere to a strict, non-negotiable safety protocol.
Step 1: The Level 5 Cut-Resistant Glove
Do not rely solely on the plastic hand guard that comes in the box. Your very first line of defense must be a Level 5 cut-resistant glove. These gloves are woven from advanced synthetic fibers (often containing strands of stainless steel or fiberglass) and are the standard in commercial kitchens. You can buy a pair for under twenty dollars. Put the glove on your dominant hand—the hand that will be holding the food.
Step 2: The Hand Guard is Mandatory
Once your glove is on, you must use the hand guard. Press the metal prongs of the guard deeply and securely into the vegetable. The guard is designed to take the brunt of the blade if your hand slips. Your bare skin should never come within three inches of an exposed V-blade.
Step 3: The Glide Technique
A V-blade mandoline rewards smooth, controlled movements, not erratic speed. Do not aggressively slam the potato into the blade. Start at the very top of the runway. Apply gentle, even, downward pressure, and push the vegetable in one fluid motion all the way past the blade. Let the shearing angle of the “V” do the actual cutting. If you find yourself having to use extreme force, either your blade is dull, or you are pushing at the wrong angle.
Step 4: Accept the Nub
When the vegetable is whittled down to a small, unstable nub, stop. Do not risk a trip to the emergency room just to get three more slices of potato. Throw the nub in the compost, or save it in a freezer bag to make vegetable stock later.
The Foolproof Scalloped Potato Blueprint
Now that you have your stainless steel V-blade mandoline, your cut-resistant gloves, and a healthy respect for the physics of the blade, it is time to build the ultimate, foolproof gratin.
Dialing in the Thickness
The dial on your mandoline is your control panel for thermal dynamics. For a classic potato gratin, you want to set the thickness to exactly 1/8 inch (roughly 3 millimeters). At this precise thickness, the potato slices are thin enough to allow rapid heat penetration to their core, ensuring the pectin breaks down completely. However, they are just thick enough to maintain their structural integrity during a long bake, preventing them from turning into a homogenous mush.
The Starch Management Strategy
Once you have effortlessly glided your way through three pounds of Russet or Yukon Gold potatoes, you will have a mountain of mathematically perfect slices. Here is a crucial rule: Do not rinse them!
Many amateur recipes tell you to rinse sliced potatoes in cold water to prevent browning. In a gratin, this is a fatal error. You desperately need the natural surface starch that is clinging to those slices. When the gratin bakes, that surface starch will gently release into the heavy cream, acting as a natural thickening agent. This is the secret to a luxurious, velvety sauce. If you rinse the starch down the drain, your cream will remain thin and watery, and the fat will separate from the dairy, which is exactly why a poorly constructed cheese sauce breaks in the oven.
When you build a gratin with uniform, unrinsed slices, the starch releases at an identical rate across the entire baking dish. This creates a perfectly stable emulsion. If your slices were uneven, the thin ones would dump all their starch immediately, while the thick ones held onto theirs, leading to a gritty, broken texture—the same dreaded phenomenon that occurs when a stovetop cheese sauce gets grainy due to uneven heat and starch distribution.
The Shingling Technique
Because every single slice is identical, layering them becomes a joy rather than a puzzle. Shingle the slices in overlapping, concentric circles in your buttered baking dish. This tight, uniform overlapping ensures that there are no massive air pockets or uneven gaps where the cream can pool and curdle. The heat of the oven will move through the dense, uniform layers at a steady, predictable rate.
Bake it covered for the first forty-five minutes to trap the steam and force the internal temperature past 90ºC to melt the pectin. Then, remove the cover to allow the top to caramelize and the cream to reduce. The result? Absolute perfection. Tender, melting potatoes in a rich, cohesive sauce. No crunch. No surprises.
Beyond the Potato: The V-Blade as a Weeknight Lifesaver
While mastering the weekend gratin is incredibly satisfying, the true magic of the V-blade mandoline reveals itself at 6:15 PM on a chaotic Tuesday evening. This tool is the ultimate weeknight lifesaver, buying you back precious minutes when you are desperately trying to get dinner on the table.
Think about the tedious prep work that usually deters you from cooking healthy, vegetable-forward meals. Shaving fennel for a bright winter salad with a chef’s knife takes immense concentration and time. With a V-blade, you can reduce an entire bulb of fennel to paper-thin, translucent ribbons in twenty seconds.
Want to make a quick, crunchy slaw for fish tacos? Do not buy the expensive, pre-shredded cabbage in the plastic bag that smells vaguely of sulfur. Set your V-blade to 1mm, run a wedge of purple cabbage down the runway, and watch as perfectly delicate shreds pile up effortlessly.
The V-blade is also the ultimate weapon against the misery of allium prep. Slicing onions with a dull chef’s knife crushes the cell walls, releasing massive amounts of the volatile lachrymatory compounds that irritate your eyes and make you cry chopping onions. The surgical shear of a V-blade cleanly severs the onion’s cells with minimal crushing, drastically reducing the chemical release. You can slice two whole onions for a quick caramelization in under a minute, completely tear-free.
And let’s talk about garlic. If you are making a quick pan sauce or a stir-fry, unevenly chopped garlic is a disaster waiting to happen. The tiny minced pieces will scorch and turn bitter, while the larger chunks remain raw and pungent. This inconsistency is exactly why your garlic always burns in the skillet. By running peeled garlic cloves over the V-blade (using the hand guard, of course!), you create mathematically identical garlic chips that will toast evenly in the oil, infusing your dish with a sweet, mellow flavor.
Finally, consider your standard sheet pan dinners. Tossing haphazardly chopped root vegetables onto a baking sheet guarantees a disappointing side dish. The tiny pieces will incinerate into charcoal, while the massive chunks will steam in their own juices, which is why so many home cooks complain that their roasted veggies get soggy. A quick pass of zucchini, carrots, and sweet potatoes over the V-blade ensures that every single piece roasts at the exact same rate, caramelizing beautifully.
The Art of Maintenance and Care
A high-quality stainless steel V-blade mandoline is a precision instrument, and it demands to be treated as such. If you want this tool to last a lifetime and continue delivering professional-level results, you must master the art of maintenance.
First and foremost: The dishwasher is strictly forbidden. I do not care if the manufacturer claims the mandoline is “dishwasher safe.” The harsh, abrasive detergents and the prolonged exposure to high-pressure hot water will degrade the microscopic edge of the V-blade, turning a surgical tool into a blunt instrument.
To clean your mandoline safely and effectively, you must wash it by hand immediately after use, before the starches and vegetable juices have a chance to dry and cement themselves to the steel.
Put on your cut-resistant glove. Use a long-handled dish brush—never a sponge where your fingers are pressed close to the blade. Apply a drop of dish soap to the brush and scrub the mandoline from the back side of the blade (the dull side), brushing away from the sharp edge. Rinse it thoroughly under hot running water.
Once it is clean, you must dry it immediately. Allowing water to sit on the blade can cause micro-oxidation and dulling. Moisture is the enemy of high-carbon stainless steel. Just as failing to properly heat and oil a pan is the primary reason why meat sticks to stainless steel, failing to dry your mandoline will lead to a degraded, sticky blade that drags and tears your food rather than slicing it. Use a thick, dry kitchen towel, and carefully wipe the body of the mandoline, always keeping your hands clear of the blade’s edge. Store it in a safe place, ideally with a protective cover over the V-blade, far out of reach of children or careless hands reaching into a dark cabinet.
The Final Slice
Cooking beautiful, complex meals at home does not require a culinary degree, and it certainly does not require you to possess the knife skills of a seasoned executive chef. What it does require is a basic understanding of the science of heat, and the willingness to invest in the right tools to manipulate that science in your favor.
Raw, crunchy scalloped potatoes are not a failure of your cooking ability; they are a failure of your prep geometry. By understanding that dense root vegetables demand mathematical uniformity to break down their stubborn pectin, you can stop fighting a losing battle with a dull chef’s knife.
The stainless steel V-blade mandoline is not just a fancy gadget to take up space in your kitchen drawer. It is a non-negotiable instrument of precision. It respects the cellular biology of your ingredients, it drastically slashes your weeknight prep time, and it guarantees that every single gratin, casserole, and roasted vegetable tray you pull from the oven is cooked to absolute, melt-in-your-mouth perfection.
So, ditch the cheap plastic slicers, order your cut-resistant gloves, and embrace the sheer joy of the perfect glide. Your dinner party guests—and their molars—will thank you. Now, pour yourself another glass of wine, preheat that oven, and go make something spectacular. You’ve got this.






