
Picture this: You have invited your friends over for a weekend cookout. You went out of your way to buy the good brioche buns from the bakery down the street. You spent twenty minutes meticulously weighing and forming perfect, symmetrical, quarter-pound discs of ground beef. You crack open a cold beverage, fire up the grill, and gently lay those beautiful patties over the heat. You are feeling like an absolute backyard culinary god.
Ten minutes later, you are staring at a disaster.
Those wide, perfectly flat discs have somehow mutated. They have shrunk in diameter by thirty percent and violently puffed up in the center. You are no longer looking at hamburgers; you are looking at aggressively bloated, beefy golf balls. You try to assemble the sandwich anyway, but placing a spherical meatball onto a flat bun is a structural nightmare. The patty teeter-totters like a seesaw. Your first bite is ninety percent dry bread. Your second bite is an uncomfortably thick, unseasoned mouthful of gray meat. You feel like you are salvaging your weeknight dinners yet again, apologizing to your guests while they politely chew on your culinary failures.
Listen to me: it is not your fault, and you are not a bad cook. You are simply fighting a losing battle against the immutable laws of thermodynamics and meat science.
As a home cook who has ruined more dinners than I care to publicly admit, I am here to tell you that achieving a perfectly flat, restaurant-quality pub burger does not require a culinary degree, an expensive cast-iron burger press, or a pact with a barbecue demon. It requires exactly one thing: your thumb.
Welcome to the definitive, no-nonsense masterclass on why your burgers stubbornly turn into meatballs, the fascinating biology of connective tissue, and the brilliantly simple, zero-cost magic of the thumbprint trick.
The Anatomy of a Burger: Why Your Meat Hates You
To understand the solution, we first have to deeply understand the enemy. And in this case, the enemy is the very biological structure of the meat itself. Ground beef is not just a homogenous, red paste that magically takes whatever shape you mold it into. It is a highly complex, chaotic matrix of chopped muscle fibers, liquefied fat, and—most importantly for our discussion—connective tissue.
When you buy ground chuck at the butcher counter (which you absolutely should be doing, but we will get to that rant later), you are buying meat that comes from the shoulder of the cow. The shoulder is a heavily utilized, hard-working muscle group. Hard-working muscles are naturally packed with collagen, the primary structural protein that makes up connective tissues, tendons, and ligaments in mammals.
When this shoulder meat is sent through an industrial meat grinder, the sharp grinding blades chop these long, tough muscle fibers and thick collagen sheaths into much smaller pieces. However, the grinding process does not destroy the collagen network entirely; it merely minces it. When you take that ground meat out of the butcher paper and use your warm hands to form it into a patty, you are essentially weaving those shortened collagen fibers back together into a tight, cohesive, sticky network.
Here is where the problems begin. Most weekend grillers wildly overwork their meat. They knead it like they are making a sourdough boule. They slap it back and forth between their palms with the force of a professional tennis player. When you pack ground beef too tightly, you cross-link the sticky meat proteins (specifically myosin), turning what should be a tender, airy burger into a dense, impenetrable sausage.
But even if you are incredibly gentle and form your patties with the lightest touch imaginable, you still have to contend with the biology of the collagen. And collagen, my friends, has a very specific, very aggressive, and highly predictable reaction to high heat.
Thermodynamics and the “Meatball Effect” Explained
Let’s talk about the exact physics of what happens the millisecond your raw beef patty hits a ripping hot cast iron skillet or a blazing charcoal grill grate.
Raw meat is roughly seventy percent water. When it is exposed to intense, direct heat, the proteins inside the meat begin to denature. Denaturation is a fancy scientific term meaning the tightly coiled proteins begin to unwind, lose their original structure, and change shape. Right around the 140°F (60°C) mark, the collagen network inside your ground beef begins to violently contract and shrink.
Now, I want you to visualize the geometry of a standard, flat hamburger patty cooking on a hot surface. The heat is not penetrating the meat perfectly evenly. The exterior perimeter of the patty—specifically the bottom surface touching the metal and the outer circumference exposed to the ambient heat—is subjected to the most intense thermal energy first.
Because the outer edges of the burger cook significantly faster than the insulated, raw center, the collagen fibers around the perimeter of the patty are the first to hit that crucial shrinkage temperature. Imagine tying a thick leather belt around the waist of a water balloon and suddenly pulling it as tight as you can. As the outer ring of the burger cooks and contracts, it acts like a tightening noose around the rest of the patty.
The center of the burger, which is still relatively raw, cold, and expansive, is suddenly being aggressively squeezed by the shrinking outer edges. It has absolutely nowhere to go. It cannot go downward, because the solid cooking surface or grill grate is in the way. It cannot go outward, because the perimeter is actively tightening inward.
Therefore, the meat takes the path of least resistance: it goes up.
The center of the patty bulges toward the sky. The internal juices, fat, and expanding steam are forced inward and upward, inflating the middle of the burger. Within minutes, your beautiful, flat disc has transformed into an engorged, domed meatball.
This thermodynamic distortion is not just a cosmetic issue; it actively ruins the cooking process. A domed, spherical burger cooks incredibly unevenly. The thick, bloated center stays raw and unappetizing while the thinner outside edges overcook, dry out, and turn into leather. Furthermore, if you are cooking indoors in a skillet, the domed shape means the center of the patty literally lifts completely off the hot cooking surface, preventing you from why ground meat steams instead of searing, leaving you with a sad, gray, crustless exterior.
The Simple Magic of the Thumbprint Technique
So, how do we defeat the immutable laws of thermodynamics and protein contraction? We cheat.
Since we know with absolute, predictable scientific certainty that the outer edges of the burger are going to shrink and force the center mass upward, we simply remove the center mass before the cooking even begins.
Enter the thumbprint trick. This technique, heavily championed by culinary science nerds like J. Kenji López-Alt of The Food Lab and celebrity grill masters like Bobby Flay, is the ultimate preemptive strike against protein contraction.
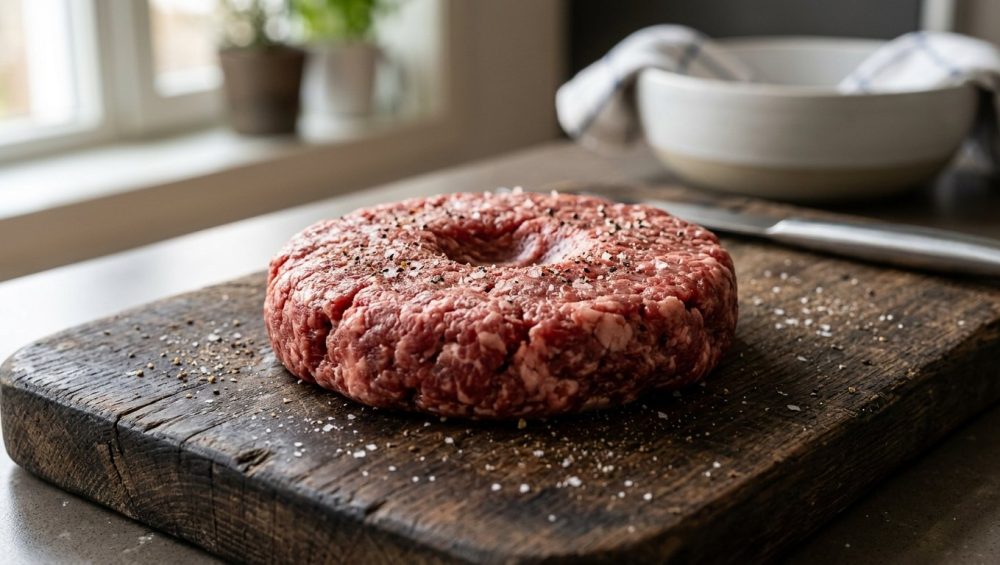
After you have gently formed your ground beef into a flat, wide disc, you take your thumb (or the back of a measuring spoon, if you prefer not to get your hands dirty) and press a distinct, shallow indentation directly into the dead center of the raw meat. You want to create a little crater that is about an inch and a half wide, and roughly half an inch deep. Your raw burger should look like a weird, savory donut that didn’t quite get its center hole punched all the way through.
It looks slightly ridiculous when it is sitting raw on the cutting board. But just watch what happens when it hits the heat.
As the outer edges of the patty begin to cook, denature, and contract, they start squeezing the center of the burger, exactly as they did before. But this time, there is no excess volume of meat in the middle to be forced upward. Instead, the contracting edges push the remaining meat into the empty, negative space of the dimple you created.
As the cooking process continues, the juices rush to the center, and the dimple slowly rises, puffing up and filling in the crater until—like absolute kitchen magic—the top of the patty becomes perfectly, uniformly flat.
By intentionally making the center of the patty physically thinner than the outer edges, you have perfectly compensated for the meat’s natural, biological tendency to swell. The result is a burger that cooks evenly from edge to edge, develops a gorgeous, uniform crust across its entire surface, and actually fits symmetrically on your carefully chosen bun.
It is a zero-cost, zero-effort, scientifically validated technique that instantly elevates you from a frustrated amateur to a backyard wizard. It is the ultimate everyday cooking hack for skipping the drive-thru and producing mouth-watering, restaurant-quality food in your own home.
The Masterclass: A Step-by-Step Guide to the Perfectly Flat Patty
Knowing the science behind the thumbprint trick is only half the battle. If you want to make a truly mind-blowing, unforgettable burger, you have to nail the fundamental building blocks of the recipe. A thumbprint cannot save terrible meat, and it cannot save terrible technique.
Here is your highly detailed, Sassy Sous-Chef masterclass on building the perfect patty from scratch, leaving absolutely no room for error.
Step 1: Respect the Fat Ratio
If you are buying 90% or 93% lean ground beef to make hamburgers, I am silently judging you. I understand the desire to eat healthier, but a hamburger is not health food. It is a glorious, indulgent treat, and treating it like diet food ruins the experience.
Lean beef makes dry, crumbly, sad burgers that fall apart on the grill. Fat is flavor. Fat is moisture. Fat is the magical, rendering glue that binds the ground meat together without requiring you to add breadcrumbs, eggs, and diced onions like you are baking a mid-century meatloaf.
You need a strict 80/20 ratio of meat to fat. Ground chuck is the undisputed gold standard here. It possesses the perfect fat content and a deeply rich, beefy flavor profile that can stand up to high heat and aggressive seasoning. If you want to get incredibly fancy, you can ask your local butcher to grind a custom artisanal blend of chuck, brisket, and short rib, but for a standard, highly satisfying weekend cookout, standard 80/20 ground chuck is your absolute best friend.
Step 2: The Gentle Form
Temperature control begins long before the meat hits the pan. Keep your ground beef in the refrigerator until the exact moment you are ready to form the patties. Warm, room-temperature beef fat smears, melts, and sticks to your hands; cold, solid fat stays trapped inside the meat matrix where it belongs.
Take about five to six ounces of cold meat per burger. Do not squish it. Do not squeeze it through your fingers. Do not knead it. Gently toss the portion of meat back and forth between your cupped hands just enough to form a loose, cohesive ball, and then gently press it down onto a piece of parchment paper into a disc.
You want to form the disc so that it is roughly one inch wider than your hamburger bun. (Remember the science: the entire patty will shrink in overall diameter as the collagen contracts, so you must start wider than your target size). The edges of your raw patty should look a little ragged and cracked. That is a wonderful thing! Ragged edges mean you have not overworked the proteins. Those little craggy nooks and textural imperfections will crisp up beautifully when they hit the hot fat in the pan.
Step 3: Executing the Thumbprint
Once your patties are formed and resting on the parchment paper, it is time for the magic. Press your thumb directly into the dead center of each patty. Do not be shy about this—press down firmly until the meat underneath your thumb is roughly half the thickness of the outer edges. It should look like a highly pronounced, shallow bowl. If you are making a massive, half-pound pub burger, you may even need to use two fingers to make the depression wide enough.
Step 4: The Chemistry of Salting
This is a crucial rule that separates the amateurs from the experts: DO NOT mix salt directly into your raw ground beef before forming the patties.
Salt is a magical, flavor-enhancing mineral, but it is also a highly powerful solvent. If you mix salt directly into the raw ground meat and let it sit, the sodium chloride will immediately begin dissolving the myosin proteins inside the beef. Those dissolved proteins turn incredibly sticky and act like a biological glue, cross-linking and binding the meat together into a dense, springy, sausage-like texture. If you have ever eaten a burger that felt bouncy and rubbery, early salting was the culprit.
Instead, you must aggressively season only the outside exterior of the patty, and you must do it right before the meat hits the heat. A generous, snowy shower of coarse kosher salt and freshly cracked black pepper on both sides of the dimpled patty is all a high-quality burger truly needs.
Step 5: The High-Heat Sear
Whether you are grilling outdoors over white-hot hardwood charcoal or cooking indoors on a stovetop, you need intense, unrelenting heat. You are chasing the Maillard reaction—the complex, beautiful chemical reaction between amino acids and reducing sugars that gives browned, seared food its distinctive, savory, caramelized flavor.
If your cooking surface is too cold, the meat will just sit there, leaking its internal juices, slowly simmering and boiling in its own gray liquid. Get that surface ripping hot. When the meat hits the metal, it should sing with a loud, aggressive sizzle.
The “No-Go” Gear Warning: Stop Poisoning Your Patties
Since we are discussing the necessity of extreme, high-heat searing, we need to pause and have a very serious, brutally honest conversation about your kitchen equipment.
I am going to say this once, and I want you to hear me clearly: You cannot cook a decent, respectably seared hamburger in a cheap, scratched, lightweight non-stick skillet.
I have absolutely zero patience for toxic, disposable kitchenware. If your primary frying pan has a mysterious, dull black coating that is actively peeling off into your food in little chemical flakes, you need to throw it in the garbage immediately. You are eating forever chemicals, you are ruining your dinner, and you are actively disrespecting the animal that provided your meal.
Traditional non-stick pans (coated with PTFE, commonly known as Teflon) are fundamentally not designed for the extreme high heat required to properly sear a burger. If you heat a standard non-stick pan past 500°F (260°C)—which is the temperature you need for a great crust—the chemical coating begins to rapidly degrade and break down, releasing toxic, invisible fumes that can literally kill pet birds and cause flu-like symptoms in humans.
If you are finally ready to commit to throwing out toxic kitchenware, you need to invest in durable, heavy-duty materials that can handle intense thermal shock and hold onto heat like a vault.
For stovetop burger perfection, you have three highly acceptable, professional-grade options:
- Cast Iron: A heavy, properly seasoned cast iron skillet is the undisputed, heavyweight king of the indoor burger. It possesses massive thermal mass. When you drop a half-pound of cold, raw beef into it, the temperature of the pan does not plummet. It recovers instantly and sears the meat relentlessly.
- Carbon Steel: This is the lighter, smoother, highly responsive cousin of cast iron. It heats up incredibly fast, takes on a naturally non-stick seasoning beautifully, and is the absolute darling of professional restaurant kitchens around the world.
- Heavy-Clad Stainless Steel: A thick, multi-ply stainless steel skillet will give you an undeniably incredible, deeply browned crust. And before you start complaining about your meat tearing and sticking to the pan, you simply need to learn the proper temperature control techniques for keeping meat from sticking. Once the Maillard crust fully forms, the meat will naturally and cleanly release itself from the stainless steel surface.
Do not disrespect your carefully crafted, thumb-printed patties by tossing them onto a warped, paper-thin aluminum pan that you bought on clearance at a grocery store a decade ago. Treat your food with respect, and use the right tools for the job.
Troubleshooting Your Burger Disasters
Even with the brilliant thumbprint trick, the correct 80/20 meat ratio, and a blazing hot cast iron pan, things can still go horribly wrong if your technique is flawed. Let’s address the most common, infuriating rookie mistakes that are turning your weekend cookouts into tragic, dry events.
Mistake 1: The Spatula Smash
I see this happen at almost every backyard barbecue I attend, and it makes my eye twitch every single time. You put the beautiful, dimpled burger on the grill. It starts sizzling. It smells amazing. And then, for some inexplicable, primal reason, you take your spatula and press down as hard as you can on the top of the cooking patty.
Why? What exactly do you think you are accomplishing?
When you press down on a cooking burger, you are literally acting like a juice press. You are violently squeezing the flavorful, rendered fat and internal moisture out of the meat and into the fire below. Those dripping juices are the exact difference between a luscious, melt-in-your-mouth burger and a dry, chalky hockey puck. Stop touching the meat.
A crucial point of clarification: The only exception to this strict “no-smash” rule is if you are intentionally making a “Smashburger.” But a smashburger uses a completely different scientific technique. For a smashburger, you smash a raw, un-dimpled ball of meat into a screaming hot griddle in the very first ten seconds of cooking, before the fat has had time to warm up and render. Once the meat actually starts cooking and rendering fat, you never, ever press it again.
Mistake 2: The Helicopter Chef
Stop flipping the meat every fifteen seconds. Stop poking it with tongs. Stop prodding it to see if it feels firm. Let the heat do its job.
Place the burger in the hot pan or on the grill grates and physically step back. Let it cook completely undisturbed for at least three to four minutes to allow that deep, mahogany crust to form. You should ideally only flip a thick, pub-style burger one single time. When it is time to flip, use a thin, flexible metal flipper. Better yet, if you are cooking on a flat cast iron griddle, get comfortable using a bench scraper to confidently cleanly scrape up every single bit of that beautiful, hard-earned crust from the metal surface.
Mistake 3: The Doneness Guessing Game
“Is it done? I don’t know, let’s cut it open and check.”
Absolutely not. Do not take a knife and slice your burger open on the grill to check the internal color. You are instantly letting all the trapped, boiling juices bleed out onto the grates, ruining the moisture level of the patty.
If you want to cook like a confident professional, you need to stop guessing and start measuring. You need to purchase a reliable instant-read meat thermometer. It is, without a doubt, the single most important tool in any carnivore’s kitchen arsenal. For a perfectly juicy, medium-rare burger, you should pull the patties off the heat when the very center registers between 130°F and 135°F. For a medium cook, aim for 140°F to 145°F. (Please note that the USDA officially recommends cooking all ground beef to an internal temperature of 160°F for food safety, which equates to well-done. How you choose to balance official safety guidelines and culinary juiciness in your own kitchen is entirely your call).
Mistake 4: The Bun Neglect
You just spent all this time perfectly executing the thumbprint trick. You managed your heat flawlessly. You succeeded in achieving a perfect crust without drying out the interior.
Do not ruin all of that hard work by serving your masterpiece on a cold, sad, un-toasted, clammy bun pulled straight out of a condensation-filled plastic bag.
A properly toasted bun is not just about enhancing the flavor; it is about crucial structural integrity. Toasting the inside cut of the bun creates a crispy, caramelized barrier that prevents the dripping meat juices, melted cheese, and wet condiments from immediately turning the bottom piece of bread into a dissolving, mushy sponge. Take the extra sixty seconds to lightly butter the cut sides of your brioche or potato buns and toast them face-down in the hot pan until they are deeply golden brown and rigid. Your burger architecture depends on it.
Conclusion: Embrace the Science, Enjoy the Burger
Cooking is not magic, even though it sometimes feels like an arcane art form. It is simply applied physics, chemistry, and thermodynamics, wrapped up in a delicious, edible package.
The reason your burgers have been turning into frustrating, bloated meatballs your entire life is not because you are a fundamentally bad cook. It is simply because nobody ever took the time to explain to you how bovine collagen fibers react to conductive heat, or how the geometry of a patty influences its expansion.
But now you know. You are fully armed with the science of protein contraction, the culinary wisdom of the 80/20 fat ratio, the importance of high-heat searing, and the brilliantly simple, totally free magic of the thumbprint trick.
You do not need to be a Michelin-starred chef, and you do not need a kitchen full of expensive, single-use gadgets to make mind-blowing food in a standard home kitchen. You just need to understand the basic rules of the game, ditch the toxic non-stick gear, treat your ingredients with respect, and trust your instincts.
So this weekend, skip the pre-formed frozen hockey pucks. Go to the butcher and buy the good, freshly ground chuck. Form your patties gently with cold hands. Press that thumbprint deep into the center of the meat. Get your heavy cast iron smoking hot. And get ready to eat the best, flattest, most perfectly cooked burger of your entire life.
Class dismissed. Now go wash your hands; you’ve got raw meat on your thumb.






