
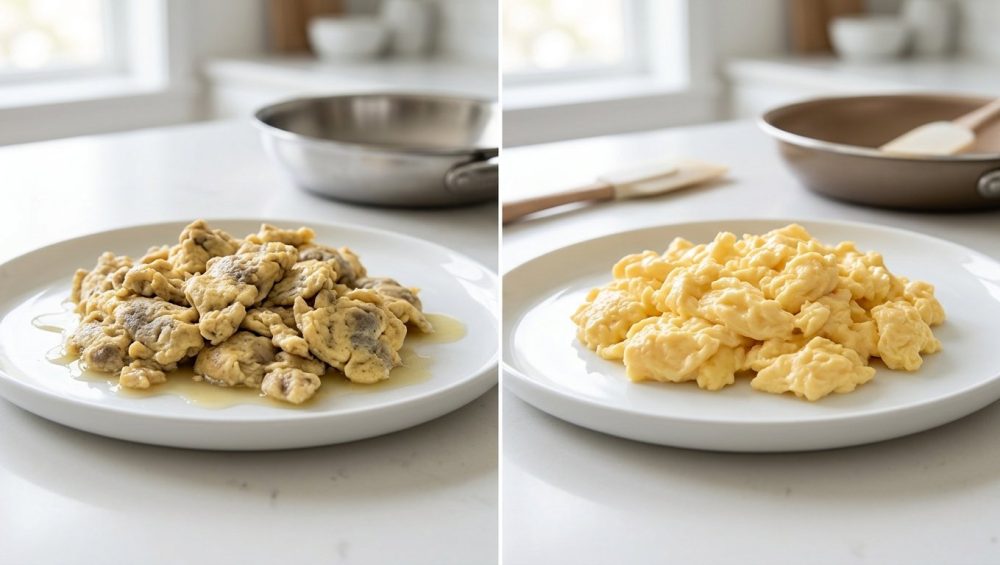
Listen, we need to have a serious heart-to-heart about your breakfast. I know you’re busy. I know the dog is barking, the coffee hasn’t kicked in yet, and you’re just trying to get some protein into your system before you have to log onto another soul-crushing morning Zoom meeting. But that does not excuse the culinary crime scene happening in your skillet.
If you are routinely scraping a pale, weeping, rubbery sponge off the bottom of a scratched pan and calling it “scrambled eggs,” it is time for an intervention. You are better than this. Your tastebuds are better than this. And frankly, the chickens who worked hard to provide those eggs deserve a little more respect.
You might think that making restaurant-quality, cloud-like, velvety scrambled eggs requires a culinary degree, a fancy French chef’s hat, or a kitchen staffed with prep cooks. It doesn’t. What it requires is a basic understanding of food science, a little bit of patience, and the willingness to stop treating your stovetop dial like it only has two settings: “Off” and “Blast Furnace.”
Today, we are going to completely deconstruct the humble scrambled egg. We are going to look at the chemistry of protein coagulation, settle the great salt debate once and for all, introduce a mind-blowing secret ingredient that will change your mornings, and actively fix your chaotic cooking routine. By the end of this masterclass, you will be churning out soft, fluffy, life-affirming curds every single time. Grab your coffee. Let’s get to work.
The Chemistry of a Tragedy: Why Your Eggs Turn into Erasers
To understand how to fix your eggs, you first need to understand how you are ruining them. Cooking is not magic; it is applied physics and chemistry. And eggs are some of the most scientifically complex, temperamental little protein bombs in your kitchen.
An egg is primarily composed of water, fat, and proteins. The egg white is about 90% water and 10% protein (mostly ovalbumin and ovotransferrin), while the yolk brings the fat, emulsifiers (like lecithin), and more protein to the party. In their raw state, these proteins are folded up into tight, microscopic little balls, floating peacefully in water.
When you introduce heat to the equation, everything changes. The thermal energy causes those tightly wound protein molecules to bounce around, unfold, and bump into one another. As they crash together, they form new bonds, creating a three-dimensional web that traps the water inside. This process is called coagulation. When coagulation happens gently and slowly, you get soft, tender, fluffy curds.
But here is where you go wrong: you blast the pan with high heat.
When egg proteins are exposed to aggressive, high temperatures, they don’t just bond; they panic. They violently contract and link together so tightly that they literally wring themselves out like a wet sponge. The space between the protein bonds shrinks, and all that trapped water is forcefully expelled.
This tragic phenomenon is known in the culinary science world as syneresis. If you have ever plated your breakfast only to watch a sad, milky puddle of liquid slowly spread across your toast, you have been a victim of syneresis. You haven’t just cooked the egg; you have chemically dehydrated it, leaving behind a tight, rubbery, sulfur-smelling matrix of overcooked protein.
Understanding exactly why your scrambled eggs leak is the first step to recovery. The solution is simple: respect the protein. Control your heat.
The Great Salt Debate: Busting the Gordon Ramsay Myth
If you’ve spent any time watching cooking shows, you have undoubtedly seen a very angry, very British chef yelling at someone for salting their scrambled eggs before cooking them. The conventional culinary wisdom—preached for decades in professional kitchens—was that adding salt to raw eggs breaks down the proteins and draws out moisture, resulting in a tough, watery scramble. We were all told to strictly season our eggs at the very end, right before serving.
I am here to tell you, with the utmost respect to the shouting chefs of the world, that this is scientifically false.
Food scientists and exhaustive kitchen testers, most notably J. Kenji López-Alt, have thoroughly debunked the “salt at the end” myth. In fact, the secret to salting them early is exactly what prevents that rubbery texture you hate.
Here is what actually happens when you salt your raw eggs: salt contains ions that neutralize the electrical charges on the egg proteins. By neutralizing these charges, the salt physically prevents the proteins from bonding too tightly to one another when they are exposed to heat. It acts as a microscopic buffer.
When you whisk salt into your raw eggs and let them sit for about 15 minutes before they hit the pan, the salt dissolves and goes to work. The eggs will actually deepen in color, turning a richer, more translucent yellow, which is a visual indicator that the proteins have slightly uncoiled. Because the proteins can no longer form those super-tight, moisture-squeezing bonds, the resulting curds are dramatically more tender, and the risk of syneresis (weeping) is massively reduced.
So, ignore the outdated kitchen dogma. Salt your eggs the moment you crack them into the bowl. Let them hang out on the counter while you toast your bread and brew your coffee. This one simple step will completely transform your daily meals.
The Secret Weapon: A Little Starch Goes a Long Way
Now that we have the salt situation handled, we need to talk about a modern kitchen hack that will absolutely blow your mind. If you want guaranteed, foolproof, creamy eggs even on a rushed Tuesday morning, let me introduce you to the magic of a little cornstarch.
This brilliant technique was popularized by food blogger Mandy Lee (Lady and Pups) and later championed by culinary scientists. It sounds completely bizarre. Cornstarch belongs in gravy and stir-fry sauces, right? Why on earth would you put it in your breakfast?
Because it is the ultimate insurance policy against overcooking.
When you dissolve a tiny amount of cornstarch (about half a teaspoon per egg) into a splash of milk or water, and then aggressively whisk that slurry into your raw eggs, you are introducing a powerful liquid-binding agent to the mix. As the eggs hit the heat, the starch molecules swell and gelatinize. They physically get in the way of the egg proteins, acting like a molecular roadblock that stops the proteins from linking up and squeezing out water.
Furthermore, if you accidentally leave the pan on the heat for ten seconds too long (which we all do), the moisture that would have leaked out into a sad watery puddle is immediately absorbed by the cornstarch, creating a rich, velvety, sauce-like binder that coats the curds.
It allows you to cook your eggs faster, over slightly higher heat, without suffering the rubbery consequences. It feels like cheating, but it’s just good science.
The Anti-Toxic Gear Rant: Your Pan is Ruining Your Breakfast
I cannot teach you how to make perfect eggs if you are cooking them in a toxic, heavily scratched, peeling nightmare of a pan. We need to have a serious talk about your equipment.
Far too many home cooks buy a cheap, ten-dollar non-stick Teflon skillet, use metal forks on it, burn it over high heat, and then continue to use it for five years while the chemical coating slowly flakes off into their food. Not only is this a potential health hazard, but it is also destroying your food. A damaged non-stick pan has microscopic jagged edges that grab onto delicate egg proteins, tearing them apart and causing them to stick and burn.
If you are going to invest in the tools you actually need, start by throwing away your peeling non-stick skillets.
What You Should Be Using Instead
You do not need a pan coated in mystery chemicals to cook eggs. You have three excellent, durable, and safe options:
1. Carbon Steel: This is the darling of professional kitchens. It is lighter than cast iron, heats incredibly fast, and when properly seasoned with polymerized oil, it becomes wildly slick. With good heat management, you can easily stainless steel pan non-stick or carbon steel skillet perform just as well as Teflon, without the toxic baggage.
2. High-Quality Ceramic: If you absolutely insist on buying a pan with a non-stick coating out of the box, opt for a high-end, reputable ceramic-coated skillet. They are free of PFAS and PTFE. However, be warned: ceramic pans lose their non-stick properties quickly if you abuse them with high heat or abrasive sponges.
3. Well-Seasoned Cast Iron: Yes, you can cook scrambled eggs in cast iron. The trick is ensuring the pan has a bulletproof layer of seasoning, preheating it properly on low, and using enough butter to create a lipid barrier between the metal and the egg.
The Cooking Spray Trap
While we are on the subject of pans, let me be crystal clear: aerosol cooking spray is the enemy of your cookware. Most commercial cooking sprays contain soy lecithin and other propellants that burn at relatively low temperatures. When they burn, they polymerize onto the surface of your pan, creating a sticky, invisible, impossible-to-remove residue. Over time, this residue builds up, and ironically, makes your “non-stick” pan incredibly sticky. Use real butter, ghee, or a high-quality oil dispensed from a pump bottle.
The Right Spatula
Do not use a wooden spoon to scramble eggs. It is too thick and clunky to properly sweep the bottom of the pan, leaving a thin layer of egg behind to overcook and scorch. Do not use metal, as it will scratch your pan.
You need a seamless, heat-resistant, single-piece silicone spatula. It bends to the exact contour of your skillet, acting like a squeegee to gently fold the curds without leaving any protein behind. And please, invest in a high-quality one; if you buy a cheap knockoff and find that your silicone spatulas taste like soap or retain the smell of last week’s garlic, it’s because low-grade silicone contains fillers that absorb dishwasher detergents and food odors.
The Liquid Equation: Milk, Water, or Cream?
Before we get to the stovetop, we need to address the liquid you are whisking into your eggs. Everyone has an opinion on this, but let’s look at what the liquids actually do.
Adding a liquid to your beaten eggs serves two purposes: it dilutes the proteins (making them less likely to bond tightly) and it creates steam during the cooking process, which puffs up the curds, making them fluffier.
- Water: Adding a splash of water (about 1 tablespoon per two eggs) is the secret to maximum fluffiness. The water turns to steam quickly in the pan, expanding the curds. However, it adds zero flavor or richness.
- Milk: Milk adds a bit of water for steam, plus some sugars and fats for flavor. It is the standard middle-ground choice for a classic scramble.
- Heavy Cream: Cream is mostly butterfat. It will not create as much steam, meaning your eggs won’t be quite as airy and fluffy, but it will make them obscenely rich, dense, and custardy.
The Sassy Sous-Chef recommendation? For weekday fluffy eggs, use whole milk. For weekend decadence, use heavy cream or a dollop of crème fraîche at the very end.
The Whisking Technique: Aeration is Key
Do not lazily drag a fork through your eggs three times and call it a day. If you want fluffy eggs, you need to put some elbow grease into it.
You need to whisk the eggs vigorously until the yolks and whites are completely homogenized. There should be no distinct ropes of clear egg white floating in the bowl. Proper whisking incorporates air bubbles into the mixture. When those trapped air bubbles hit the heat of the pan, they expand, giving your eggs that beautiful, light-as-air lift.
Whisk them right before they go into the pan. If you whisk them, let them sit for twenty minutes, and then pour them in, all that trapped air will have escaped.
The Weekday Scramble: Time is Money
Alright, it is 7:30 AM on a Tuesday. You do not have thirty minutes to stand over a stove performing a culinary ballet. You need protein, you need it fast, and you need it to not taste like a flip-flop. This method prioritizes efficiency without sacrificing texture, utilizing the cornstarch hack and residual heat.
Step-by-Step Weekday Method
1. The Prep: Crack 3 large eggs into a bowl. Add a generous pinch of kosher salt. In a separate tiny dish, mix 1.5 teaspoons of whole milk with 1/2 teaspoon of cornstarch until completely smooth (no lumps!). Pour this slurry into the eggs.
2. The Whisk: Whisk the mixture aggressively until it is a uniform, pale yellow liquid full of tiny bubbles.
3. The Preheat: Place your skillet (carbon steel or ceramic) on the stove over medium heat. Do not blast it on high. Let the pan warm up for about 60 to 90 seconds. You want it warm enough to melt butter instantly without immediately browning it.
4. The Fat: Drop in half a tablespoon of unsalted butter. Swirl it around so it coats the entire bottom and the lower edges of the pan.
5. The Pour: The moment the butter stops foaming (but before it turns brown), pour in your eggs. You should hear a very gentle sizzle, not an aggressive crackle.
6. The Sweep: Let the eggs sit completely undisturbed for about 5 to 10 seconds, just until a thin layer sets on the bottom. Now, take your silicone spatula and gently push the eggs from the outside edge of the pan directly toward the center. You will see beautiful, large, fluffy curds form. Liquid egg will rush in to fill the empty space you just created.
7. The Carryover Pull: Continue this gentle sweeping motion. Do not hack, chop, or aggressively stir the eggs. Just push and fold. Now, here is the most critical step of your morning: Turn off the heat when the eggs still look wet.
I cannot stress this enough. If the eggs look perfectly done in the pan, they will be overcooked by the time they reach your plate. Pans retain a massive amount of heat. This is called carryover cooking. The eggs will continue to cook from the residual heat of the metal even after the burner is off. Pull them while they are slightly glossy and runny.
Transfer them immediately to a warm plate. You now have impossibly fluffy, tender eggs in under three minutes.
The Weekend Masterpiece: Low and Slow Custard Eggs
It is Sunday morning. You have nowhere to be. You are wearing a comfortable robe, listening to some jazz, and you want to treat yourself to the kind of eggs they serve in five-star Parisian hotels. We are throwing efficiency out the window. This is about luxury.
This method (often referred to as French-style or Gordon Ramsay-style) relies on extremely low heat, constant agitation, and a ridiculous amount of butter. The goal here is not large, fluffy curds. The goal is a dense, rich, spreadable egg custard with microscopic curds.
Step-by-Step Weekend Method
1. The Prep: Crack 4 high-quality, pasture-raised eggs into a cold, unheated saucepan (not a skillet). Add a pinch of salt. Do not whisk them yet. Add one tablespoon of cold, cubed, high-quality European butter directly into the pan with the raw eggs.
2. The Heat: Place the saucepan over medium-low heat. Now, take your silicone spatula and begin stirring constantly. As the pan warms up, the butter will slowly melt, and you will begin to break the yolks and blend the mixture together in the pan.
3. The Dance: This is where you earn your brunch. You must keep the eggs moving constantly. Scrape the bottom, scrape the sides. Do not let the eggs sit still for even a second.
4. On and Off: As the pan gets hotter, the eggs will slowly begin to thicken. To prevent them from overcooking, you must manage the heat manually. Take the pan completely off the burner for 30 seconds while continuing to stir. Then, put it back on the heat for 30 seconds. Off the heat, on the heat. You are controlling the thermal energy, ensuring the proteins coagulate at a glacial pace.
5. The Finish: After about 5 to 8 minutes of this, the eggs will transform into a thick, velvety custard. The curds will be so small they are almost imperceptible. Right before they finish, take them off the heat for the final time.
6. The Enricher: To stop the cooking process dead in its tracks and add a final punch of luxury, vigorously stir in one teaspoon of cold crème fraîche, sour cream, or even a tiny knob of cold butter. Fold in some finely minced fresh chives.
Spoon this masterpiece over a thick slice of toasted, garlic-rubbed sourdough bread. It is rich, it is decadent, and it is proof that mastering simple techniques can eliminate kitchen chaos for good.
Troubleshooting FAQ: What Went Wrong?
Even with the best instructions, things happen. Let’s troubleshoot your egg disasters.
“My eggs turned gray or green.”
You severely overcooked them, likely in a cast iron or untreated aluminum pan. The iron in the pan reacted with the sulfur in the egg whites to create ferrous sulfide. It’s safe to eat, but it looks horrifying and smells like a hot spring. Lower your heat and use a well-seasoned or non-reactive pan.
“My eggs stuck to the pan like glue.”
Three possible culprits. First, your pan was too hot, causing the proteins to instantly bond to the metal. Second, your pan was too cold, meaning the butter didn’t create a proper lipid barrier before the eggs hit the surface. Third, your non-stick pan is dead and needs to be retired.
“My eggs are sitting in a pool of water.”
Syneresis strikes again. You cooked them too fast over high heat, or you added a watery vegetable (like raw tomatoes or zucchini) directly into the eggs. If you want to add veggies to your scramble, sauté them thoroughly first to cook off their internal moisture, then add the eggs.
“Can I fix rubbery eggs?”
No. Once protein is fully denatured and tightly bonded, you cannot un-cook it. You cannot add water back into a squeezed-out sponge. If you have ruined a batch of eggs, your best bet is to chop them up finely and fold them into a breakfast burrito with a lot of salsa and cheese to mask the texture. Consider it a lesson learned.
The Final Word
Cooking is a lifelong journey of making mistakes and learning the science behind them. There is no shame in having cooked bad eggs in the past; the only shame is refusing to change your methods once you know better.
You now possess the chemical knowledge of protein coagulation, the truth about salt timing, the secret cornstarch hack, and the heat management skills of a line cook. You are fully equipped to banish rubbery, weeping, sad breakfasts to the annals of history.
Treat your ingredients with respect, baby your pans, and remember that when it comes to the stovetop, patience is the ultimate ingredient. Now go make yourself a proper plate of eggs. You’ve earned it.






