
The Great Charcuterie Catastrophe: Why Your Cheese is Shattering
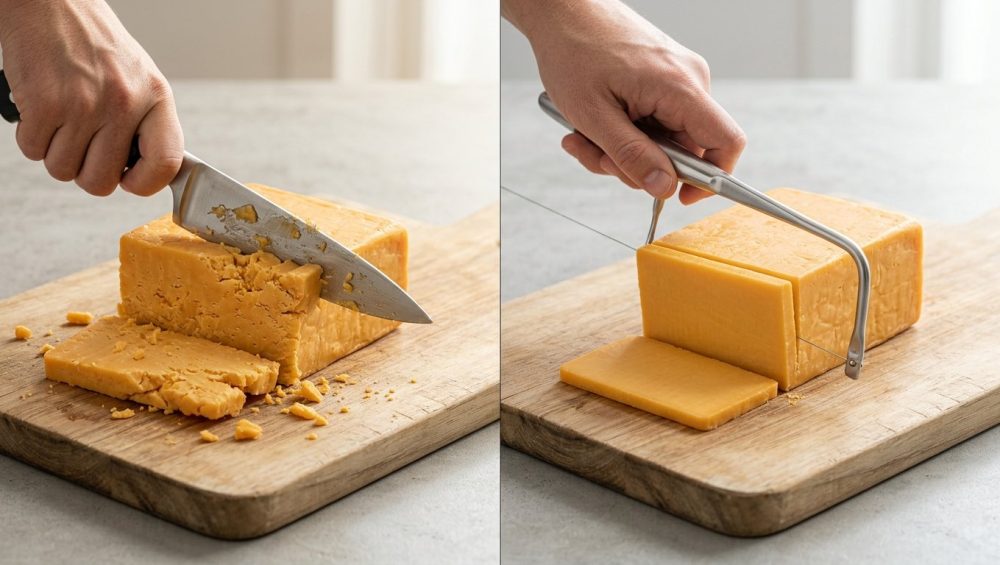
Picture this: It is a beautiful Saturday afternoon. You have just dropped an embarrassing amount of money on a gorgeous, two-year-aged block of sharp cheddar and a wedge of crystalline Gouda. You are assembling a charcuterie board that is going to make your friends weep with envy. You pull out your trusty chef’s knife, line up the blade for that first perfect, Instagram-worthy slice, and press down.
Crack.
The cheese fractures. A massive, jagged chunk breaks off, followed by a shower of uneven, sad-looking crumbles. You try again, pressing more gently this time. The blade gets stuck halfway through. You pull it up, and the cheese splinters into a dozen irregular shards. Your elegant charcuterie board suddenly looks like a construction site, and you are left holding a knife covered in a sticky, greasy residue.
If this scenario raises your blood pressure, take a deep breath. You are not a bad cook, and you did not buy bad cheese. You are simply using the wrong tool for the job. As a home cook, you do not need a culinary degree to understand why this happens—you just need a basic lesson in kitchen physics. Today, we are going to dive deep into the infuriating science of why your standard kitchen knives crush, stick to, and obliterate semi-hard cheeses, and why a simple, unpretentious wire slicer is the absolute magic bullet for this problem.
The Kitchen Physics of the Crumble
To understand why a wire slicer is a non-negotiable tool in your kitchen arsenal, we first have to examine why your expensive chef’s knife is failing you so spectacularly. It all comes down to two undeniable forces of physics: the wedge effect and lipid drag.
The Wedge Effect and Structural Failure
Take a close look at your favorite kitchen knife. Even if it is razor-sharp at the very edge, the blade itself has thickness. It tapers from a wider spine down to that fine cutting edge. When you press that blade into a firm block of cheese, you are not just cutting; you are wedging.
As the blade moves downward, the thicker metal of the knife physically forces the cheese apart. In soft foods like tomatoes or raw chicken, the flesh simply yields and glides out of the way. But aged cheese is a different beast entirely. It is dense, packed tightly with a rigid protein matrix, and has lost a significant amount of its moisture during the aging process. Because it lacks the elasticity of a softer food, it cannot stretch or bend out of the way of your knife’s thick spine.
Instead, the wedging action creates immense lateral pressure inside the block. Long before the sharp edge of the blade actually reaches the bottom of the cheese, the structural integrity of the block fails. The cheese takes the path of least resistance and simply snaps along its natural internal fault lines. This is why you end up with those jagged, uneven crumbles instead of a clean slice. The knife didn’t cut the cheese; it split it like a piece of firewood.
Surface Area Friction and Lipid Drag
If the wedge effect wasn’t bad enough, we also have to talk about friction. Cheese is essentially a delicious, solidified emulsion of water, proteins, and fats (lipids). When you drag a wide, flat piece of steel through that emulsion, the fat and moisture smear against the sides of the blade.
This creates an intense microscopic vacuum seal—a phenomenon known in the culinary world as “lipid drag.” The flat side of your knife acts like a suction cup against the sticky interior of the cheese. The deeper you cut, the more surface area is exposed to the blade, and the stronger that suction becomes. This is why your knife often feels like it is glued in place halfway through a block of cheddar. When you inevitably try to wiggle or force the blade to break the suction, you put even more uneven stress on the brittle cheese, causing it to shatter into a million pieces.
This sticky, high-friction environment is also one of the hidden reasons your kitchen knives get dull so quickly. You end up using excessive downward force to fight the friction, ultimately slamming the delicate edge of your blade into your cutting board with way more aggression than necessary.
The Magic of the Wire Slicer: A Masterclass in Minimal Resistance
So, if a thick blade and a large surface area are the enemies of perfectly sliced cheese, what is the solution? You eliminate both. Enter the wire cheese slicer.
The Power of Microscopic Surface Area
A high-quality cheese wire is typically made from a single, ultra-thin strand of stainless steel or molybdenum, often measuring somewhere between 0.015 and 0.032 inches in diameter. When you pull a wire through a block of cheese, the physical dynamics of the cut change entirely.
Because the wire is uniformly microscopic, there is no wedge effect. The wire does not taper; it does not get thicker at the top. It simply creates a microscopic incision through the protein matrix of the cheese without displacing any of the surrounding mass. The lateral pressure that normally causes aged cheese to fracture simply does not exist.
Furthermore, because the wire has virtually zero surface area, lipid drag and friction are completely eradicated. There is no flat plane of metal for the fat and moisture to cling to, which means no vacuum seal can form. The wire glides effortlessly through the block from top to bottom, leaving a perfectly smooth, uniform surface behind.
Clean Severance vs. Blunt Force Trauma
Think of the difference between chopping down a tree with a blunt axe versus slicing through a piece of paper with a laser. The wire slicer acts as a precision instrument. It severs the bonds of the cheese cleanly without inflicting blunt force trauma on the rest of the block.
This is exactly why, when you are first building your collection of beginner kitchen tools, a wire slicer should be high on your list. It is not a unitasker; it is a specialized tool that solves a specific physical problem that no other tool in your kitchen can handle. It allows you to produce deli-quality slices at home, completely transforming your sandwiches, burgers, and charcuterie boards.
The Anatomy of Cheese: Why Some Blocks Crumble Worse Than Others
Now, you might be thinking, “But my knife cuts through block mozzarella just fine! Why does it completely destroy my Parmesan and aged Gouda?” To answer that, we have to look at the anatomy of the cheese itself. Not all cheeses are created equal, and their physical properties dictate how they respond to being cut.
Moisture Content and the Aging Process
The primary factor that determines a cheese’s texture is its moisture content, which is directly tied to how long it has been aged. Fresh cheeses, like mozzarella, brie, or young mild cheddar, retain a massive amount of water. This water acts as a lubricant and gives the protein matrix a high degree of elasticity. When you press a thick knife into a high-moisture cheese, the cheese has enough “give” to stretch and deform around the blade without snapping.
However, as a cheese ages, that water slowly evaporates. The proteins pack closer and closer together, creating a dense, firm, and highly concentrated structure. This is why aged cheeses pack so much incredible flavor, but it is also why they become incredibly brittle. Without moisture to provide elasticity, the cheese cannot bend. When faced with the wedge of a knife, it simply breaks.
The Culprit of the Crunch: Calcium Lactate Crystals
If you are a true cheese lover, you already know about the absolute best part of eating a well-aged Gouda or an extra-sharp cheddar: those tiny, delightful, crunchy crystals scattered throughout the paste.
These are calcium lactate crystals (and sometimes tyrosine crystals, depending on the cheese). They form naturally as the bacteria in the cheese break down lactose into lactic acid over months or years of aging. While these crystals are a culinary treasure that provide a highly sought-after texture and savory flavor, they are absolute nightmares for a knife blade.
These hard microscopic crystals act as structural weak points—literal fault lines—within the dense cheese block. When the wedge of a knife applies pressure, the cheese will naturally snap along the lines where these crystals have formed. A wire slicer, however, is thin enough to pop right through or glide around these crystals without triggering a massive structural collapse, leaving your beautiful slices perfectly intact.
Temperature Dynamics: The Cold vs. Room Temp Debate
We cannot talk about the physics of cheese without talking about temperature. The fats in cheese are highly sensitive to thermal changes. When cheese is sitting in your refrigerator at 37 degrees Fahrenheit, those milk fats are completely solid. This makes the entire block significantly more rigid and prone to shattering.
Conversely, when cheese warms up to room temperature, the lipids soften, and the protein matrix relaxes. This is why the flavor of cheese is exponentially better at room temperature—the volatile aromatic compounds are released when the fats soften.
However, when it comes to cutting, temperature is a double-edged sword. If you try to wire-slice a block of cheese that has been sitting on the counter for two hours, it might be too soft and gummy, causing the wire to drag or the slice to deform. For the absolute best results with a wire slicer, you want the cheese to be slightly chilled. Pull it out of the fridge about 15 minutes before you plan to slice it. This takes the harsh, brittle chill off the block, allowing the wire to glide smoothly, but keeps the fats firm enough to hold a perfect, uniform shape. This careful temperature management is similar to why your meat sticks to stainless steel when the temperature is wrong—thermal control dictates physical behavior in the kitchen.
The “No-Go” Rule on Toxic and Cheap Cheese Slicers
As your resident Sassy Sous-Chef, I have zero patience for kitchen equipment that breaks after three uses, and I have even less patience for gear that actively poisons your food. When it comes to wire cheese slicers, the market is unfortunately flooded with absolute garbage.
Beware the Peeling Chrome and Mystery Metals
If you walk into a big-box discount store and buy a $4 handheld wire slicer, you are making a massive mistake. These cheap tools are almost always made from low-grade, porous metals coated in a shiny layer of chrome or nickel plating to make them look presentable.
Here is the brutal truth: that cheap plating is going to flake off. The constant tension of the wire, combined with the acidic nature of cheese and the moisture from washing, will cause that cheap coating to blister and peel. Before you know it, you will be serving your guests beautiful slices of aged cheddar garnished with toxic, microscopic shards of heavy metals.
Furthermore, cheap cutting wires are often made from low-carbon steel that has not been properly treated. The second you wash it and put it away slightly damp, it will begin to oxidize and rust. I am a massive advocate for banishing toxic kitchen gear from your home, and cheap wire slicers are public enemy number one.
The Only Materials You Should Trust
If you want a tool that will last a lifetime and keep your food safe, you must pay attention to materials.
For the wire itself, you want 304 food-grade stainless steel. It has an incredibly high tensile strength, meaning it will not snap under pressure, and it is highly resistant to corrosion and rust. Some high-end specialty slicers use molybdenum wires, which are even thinner and stronger than steel, but 304 stainless is the gold standard for home use.
For the body of the slicer, look for solid, unplated materials. A high-quality zinc-aluminum alloy is fantastic for handheld slicers because it is durable, naturally rust-resistant, and doesn’t require toxic plating. If you are buying a board-mounted slicer, look for solid hardwoods like maple, walnut, or bamboo, paired with a solid stainless steel cutting arm. Do not settle for cheap plastic bases that will warp in the dishwasher or leach endocrine-disrupting chemicals into your food.
Types of Wire Slicers: Choosing Your Weapon
Now that you know why you need one and what materials to look for, let’s talk about the different styles of wire slicers available. Choosing the right one depends entirely on your cooking habits and what kind of cheese you consume most frequently.
The Handheld Roller Slicer
This is the classic, Y-shaped tool with a handle, a metal roller, and a wire stretched across the top. It is the absolute workhorse of the weekday kitchen.
The Pros: It is compact, fits easily in a utensil drawer, and is incredibly fast. Most models allow you to adjust the thickness of the slice by changing the angle of your wrist or adjusting the roller.
The Cons: It struggles with massive, wide blocks of cheese. If the block is wider than the wire, you have to cut the block in half first.
This is your go-to tool for making sandwiches. When you are rushing to throw together simple weeknight dinners, you don’t have time to perform surgery on a block of cheddar with a chef’s knife. A handheld roller slicer gives you perfect, deli-thin slices in a fraction of a second.
The Board-Mounted Wire Slicer
This is the heavy artillery. It consists of a solid base (usually wood or marble) with a wire stretched across a movable metal arm. You place the block of cheese on the board, line it up with the slot, and pull the arm down, pushing the wire through the cheese.
The Pros: It offers unparalleled stability and leverage. Because the board supports the bottom of the cheese, you can easily cut through much harder, denser cheeses without the block slipping or cracking. It also allows you to make perfectly uniform, thick planks or delicate, paper-thin shavings with absolute precision.
The Cons: It takes up cabinet space and is slightly more annoying to wash than a handheld tool.
If you are someone who loves to host a beautiful dinner party and wants to build immaculate, professional-looking charcuterie boards, a board-mounted slicer is a mandatory investment. It turns a chaotic chunk of cheese into perfectly geometric, aesthetically pleasing portions.
The Harp Slicer
The harp slicer looks exactly like its namesake: a D-shaped metal frame with a wire stretched across the straight edge.
The Pros: It is incredibly gentle. Because there is no roller or board to get in the way, it is perfect for extremely soft, delicate cheeses like fresh mozzarella, goat cheese logs, or even blocks of foie gras and butter.
The Cons: It relies entirely on your hand-eye coordination for thickness. If your hand wobbles, your slice will be uneven.
Stop Wasting Time and Money on Pre-Sliced Cheese
Let’s have a serious talk about the economics and efficiency of your kitchen. I constantly preach that “time is money,” especially during the chaotic Monday-through-Friday grind. Because slicing block cheese with a dull knife is such a miserable, crumbly experience, millions of home cooks resort to buying pre-sliced cheese or pre-shredded bags to save time.
This is a culinary tragedy.
First of all, pre-sliced cheese is aggressively marked up. You are paying a massive premium for the convenience of having a machine do what a wire slicer can do in ten seconds. Over the course of a year, the money you waste on pre-sliced cheese could easily pay for the highest-end, artisan-crafted board slicer on the market.
Secondly, pre-packaged cheese suffers in quality. The moment cheese is sliced and exposed to air, its surface begins to oxidize. It loses moisture, the flavor degrades, and the edges often turn hard and waxy. Slicing your cheese fresh from the block guarantees maximum flavor, moisture, and aroma.
And don’t even get me started on the shredded stuff. The reason your melting cheese turns into a gritty, oily mess is directly related to the anti-caking agents (like cellulose and potato starch) dusted over commercial shreds. These powders prevent the cheese from clumping in the bag, but they also prevent the proteins from melting smoothly together, which is exactly why those pre-shredded bags ruin your homemade pizzas and grilled cheese sandwiches. It is the same structural instability that explains why your cheese sauce breaks when you overheat it.
A good wire slicer eliminates the need for any of this pre-packaged nonsense. It takes the frustration out of block cheese, saving you money and dramatically elevating the quality of your weekday meals.
A Step-by-Step Guide to Flawless Wire Slicing
Having the right tool is only half the battle; you also have to know how to use it. Using a wire slicer is not complicated, but a few subtle technique adjustments will ensure you get perfect, unbroken slices every single time.
Step 1: Temperature Triage
As we discussed earlier, do not try to slice a block of cheese the second you pull it out of the coldest drawer in your fridge. Cold cheese is brittle cheese. Let the block sit on your counter for 10 to 15 minutes. You do not want it to get warm and sweaty, but you do want to take the harsh chill off. This slight relaxation of the protein matrix allows the wire to glide through without the block fracturing at the bottom of the cut, setting the stage for a perfectly smooth cheese night that doesn’t end in tears.
Step 2: The Setup and Anchor
If you are using a board-mounted slicer, place it on a flat, stable surface. If the board slides around on your counter, put a damp paper towel underneath it to lock it in place. Place the cheese block firmly against the cutting slot.
If you are using a handheld roller slicer, place your block of cheese on a sturdy wooden cutting board. Do not try to hold the block of cheese in one hand while slicing with the other. You need the stability of the board to ensure an even cut, just like you need a bench scraper to safely move ingredients without dulling your blades.
Step 3: The Smooth Pull (Never Saw)
This is the most critical rule of the wire slicer: Do not saw.
A wire is not a serrated bread knife. It does not have teeth, and moving it back and forth does absolutely nothing except create friction, warp the wire, and mangle the face of your cheese.
Instead, you want one fluid, continuous motion. If using a board slicer, grip the handle firmly and press down with smooth, even pressure. Let the tension of the wire do the work. If using a handheld slicer, anchor the roller flat against the top of the cheese block, angle your wrist to determine the thickness, and pull straight back toward your body in one confident stroke.
If you hit a dense spot or a cluster of calcium lactate crystals, do not aggressively force or jerk the wire. Maintain steady, firm pressure, and the wire will pop right through.
Step 4: Maintenance and Wire Tension
A wire slicer is a low-maintenance tool, but it is not a zero-maintenance tool. After you finish slicing, do not throw it into the sink to sit in a puddle of dirty, soapy water for three days. The wire is under high tension, and prolonged exposure to acidic food residue and standing water can degrade even the best stainless steel over time.
Hand wash your slicer immediately with warm, soapy water and a soft sponge. Dry it thoroughly with a clean towel before putting it away. If you have a board-mounted slicer, occasionally check the tension of the wire. Most high-quality models have a small screw or tensioning mechanism near the handle. If the wire feels loose or bends significantly when you touch it, tighten it up. A loose wire will bow as it moves through the cheese, resulting in slices that are thick on the edges and paper-thin in the middle.
Embrace the Wire, Save the Cheese
Cooking at home should be a joyful, empowering experience, not a daily battle against your own ingredients. You do not need a culinary degree or a kitchen full of pretentious gadgets to make incredible food. You just need to understand the basic physical properties of what you are cooking, and you need tools that respect those properties.
Trying to force a thick, wedge-shaped chef’s knife through a delicate, brittle block of aged cheese is a recipe for frustration. It defies the laws of physics, invites the dreaded vacuum of lipid drag, and turns a beautiful, expensive ingredient into a pile of jagged, uneven crumbles.
By embracing the magic of a high-quality, non-toxic wire slicer, you eliminate the friction, you eradicate the wedge effect, and you take back control of your kitchen. You save time on busy weeknights, you save money by ditching overpriced pre-sliced products, and you unlock the ability to present food that looks as incredible as it tastes.
So, the next time you are building a charcuterie board or prepping a simple grilled cheese, put the chef’s knife down. Pick up the wire, trust the science, and slice with absolute confidence. Your cheese—and your sanity—will thank you.






