
Let’s get one thing straight right out of the gate: you deserve better than mediocre, gluey, clumped-up carbs. You’ve spent your hard-earned money on a beautiful cut of salmon, you’ve meticulously built a complex, fragrant Thai green curry from scratch, and yet, when it comes time to plate, you are spooning your masterpiece over a sad, dense block of white rice that looks and slices like drywall spackle.
I see this happen all the time. It is a culinary tragedy, and frankly, I have zero patience for it. You do not need a culinary degree to make restaurant-quality, distinct, fluffy grains of rice at home. What you need is a basic understanding of food science and the right hardware. Accepting mushy, wallpaper-paste rice as an inevitability of the home kitchen is one of those incredibly frustrating beginner cooking mistakes that we are going to permanently eradicate today.
We are going to dive deep into the molecular biology of a rice grain, expose the absolute futility of your standard kitchen colander, and introduce you to an inexpensive, brilliantly engineered tool that will change your weeknight dinners forever: the Japanese rice washing bowl. Pour yourself a glass of wine, grab a notepad, and let’s fix your food.
The Starch Chemistry: Why Your Grains Are Gluing Themselves Together
To understand why your rice is currently acting like a biological superglue, we have to look at what a grain of rice actually is. At its core, rice is a botanical energy storage unit packed tightly with carbohydrates. But not all carbohydrates behave the same way when introduced to heat and water.
Meet Amylose and Amylopectin: The Architects of Rice Texture
The starch in your rice is primarily composed of two different polysaccharide molecules: amylose and amylopectin. These two molecules are the absolute dictators of your final dish’s texture.
Amylose is a linear, straight-chain molecule. Because of its neat, orderly structure, it packs tightly together and doesn’t easily break down or gelatinize when cooked. Rice varieties that are high in amylose (like long-grain Indica varieties, such as Basmati) cook up firm, dry, and naturally separated.
Amylopectin, on the other hand, is the clingy ex of the molecular world. It is a massive, highly branched molecule. When amylopectin is exposed to hot water, its sprawling branches unravel, swell, and form a highly viscous, sticky gel. Short-grain Japonica varieties (like sushi rice) are packed with amylopectin, giving them their signature cohesive, sticky chew.
The Milling Process and the Starch Dust Problem
Here is where the chemistry directly impacts your Tuesday night dinner. Unless you are eating whole-grain brown rice, the white rice sitting in your pantry has been heavily processed. To turn brown rice into white rice, the grains are run through abrasive milling machines that violently strip away the outer bran and germ.
While modern milling is incredibly efficient, this aggressive mechanical friction fractures the starch cells on the very outer surface of the grain. This leaves behind a microscopic layer of “starch dust”—a highly concentrated coating of sheared, easily accessible amylopectin and short-chain amylose. This dust is not safely locked inside the cellular matrix of the grain; it is electrostatically suspended on the surface, just waiting for moisture.
When you dump unwashed rice directly into your rice cooker or pot, that surface dust hydrates instantly. Because it is completely unbound, it leaches directly into your cooking water, turning it into a thick, gelatinous slurry. As the rice finishes cooking and begins to cool, this starchy slurry acts as an irreversible adhesive, cementing the grains into a solid, gummy block. This surface glue is exactly why your fried rice is always mushy; you cannot properly stir-fry a bonded block of starch. You must remove the dust.
The Futility of the Standard Kitchen Colander
“But I do wash my rice!” I can hear you screaming through the screen. “I put it in my wire mesh strainer and run it under the tap!”
Please, for the love of all things culinary, stop doing this. Western kitchen tools are brilliantly designed for Western cooking tasks, but they are catastrophic failures when it comes to preparing rice.
Let’s look at the standard wire mesh strainer. When you soak rice, the grains immediately begin to absorb water and soften. If you aggressively swirl those softened grains against a sharp, woven wire mesh, you are essentially running them over a cheese grater. The wire scratches and fractures the delicate surface of the rice, actively creating more starch dust. You are defeating the entire purpose of washing the grain, and you’re likely clogging your strainer with a paste that takes ten minutes to scrub out.
The alternative is the standard mixing bowl. You pool the water, swish the rice around, and then attempt the perilous balancing act of pouring the milky water down the sink while using your hand as a makeshift dam to hold the rice back. Inevitably, your hand slips, and a quarter cup of premium Koshihikari goes spiraling down the drain. Frustrated, you leave half the starchy water in the bowl, which gets absorbed right back into the rice.
If you want to cook efficiently during the week, you cannot rely on makeshift dams and the wrong equipment. A dedicated washing vessel is a non-negotiable addition to the tools you actually need to run a functional, stress-free kitchen.
Enter the Japanese Rice Washing Bowl: A Masterpiece of Functional Design
To solve a problem perfectly, you must look to the culture that has spent centuries perfecting the ingredient. In Japan, washing rice is not an annoying chore; it is an essential, respected preparatory step known as togu (研ぐ), which translates literally to “sharpening” or “polishing”.
To facilitate this sharpening process, Japanese engineers designed a highly specific, deceptively simple tool: the rice washing bowl (or rice colander).
The Mechanics of Aggressive Agitation
A proper Japanese rice washing bowl features a solid, flat bottom with specifically angled, sloped sides. Crucially, the bottom of the bowl is often lined with subtle, raised ridges.
Historically, rice milling was an imperfect science, and the grains retained a stubborn layer of bran that had to be violently scrubbed off by hand. Today, modern milling removes the bran, but we still need to dislodge that electrostatically bound starch dust. You cannot just passively run water over the rice; you must actively knead and agitate it. The ridges at the bottom of the Japanese wash bowl act like a gentle washboard. They provide the exact amount of friction required to polish the grains and lift the starch without shattering the kernel. This precise mechanical friction is exactly why you need a Japanese wash bowl in your culinary arsenal.
The Hydrodynamics of the Side Drain
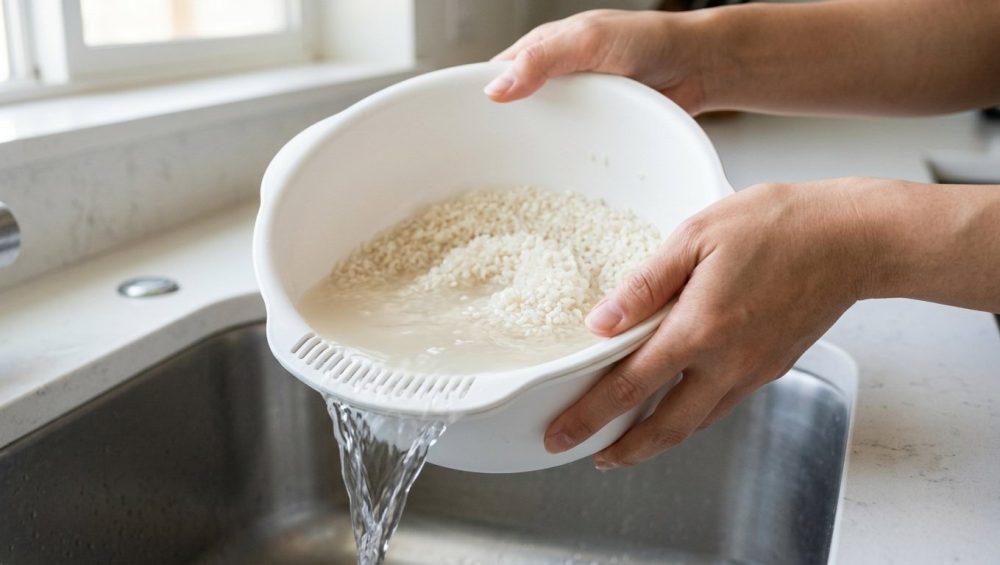
The true genius of the bowl lies in its drainage system. Instead of holes at the bottom, a Japanese wash bowl features a cluster of fine slits or perforations located on the side or along a specialized pouring lip.
This allows you to pool water in the solid bottom to aggressively agitate the rice. When it’s time to drain, you simply tilt the bowl. The fluid dynamics take over: the water rushes out of the side slits, carrying the suspended, microscopic starch particles with it, while the precision-cut holes act as an impenetrable barrier for the grains. You can drain the bowl completely dry in seconds with one hand, zero anxiety, and zero lost food.
Banishing Toxic Plastics: Choosing the Right Rice Washing Bowl
Because I am your biggest cheerleader, I am also going to be your harshest critic when it comes to the gear you bring into your kitchen. I have a strict “No-Go” rule on toxic, cheap kitchenware, and I am a relentless advocate for banishing toxic kitchen gear from your home. Do not go to a discount dollar store and buy a mystery-plastic bowl that smells like a chemical factory.
Cheap plastics are notoriously unstable. They leach endocrine-disrupting chemicals like phthalates and BPA into your food, especially when exposed to temperature fluctuations or acidic environments. Furthermore, cheap polymers are incredibly soft. The abrasive friction of washing rice will quickly cover the inside of a cheap bowl with microscopic scratches.
These micro-scratches become safe havens for bacteria, mold, and rancid oils. It is the exact same porous degradation that makes your plastic containers stay greasy no matter how many times you run them through the dishwasher. You are preparing a delicate, highly absorbent staple food; you cannot wash it in a vessel that harbors old odors.
This absorption of ambient kitchen smells is a massive problem with low-grade synthetic materials, and explains why your cheap silicone spatulas taste like soap after a few months. To protect the flavor of your rice and the health of your family, you have two acceptable choices for your washing bowl:
- High-Quality Stainless Steel: Look for 18/8 food-grade stainless steel bowls (like the popular Japanese 3-Way designs). They are visually stunning, completely non-reactive, indestructible, and will outlive you.
- Certified Japanese Plastics: If you prefer something lightweight, buy a bowl manufactured in Japan by a reputable brand (like Inomata). These are made from highly regulated, food-safe, BPA-free, heat-resistant polymers designed specifically to withstand the friction of rice washing without degrading.
The Masterclass: How to Wash Rice Like a Perfectionist
You have the science, and you have the hardware. Now, let’s execute. This is the definitive, step-by-step masterclass on the togu method. According to food safety and texture compression tests, properly washing your rice can reduce surface amylose by up to 68% and drastically lower the cooked grain adhesion force. Here is how you achieve perfection.
Step One: The Initial Plunge and Rapid Drain
Measure your rice into the bowl. Add cold water vigorously. The moment the water hits the dry rice, the surface starch and residual bran dust will dissolve, instantly turning the water a thick, milky white.
Listen to me very carefully: dry rice acts like a sponge. If you let your rice sit in this dirty, bran-scented water, it will absorb those off-flavors right into the core of the grain. You must execute the “10-Second Rule.” Add the water, give the rice one rapid swish with your hand, and immediately tilt the bowl to drain the water through the side slits. Do not let it sit.
Step Two: The “Sharpening” Phase (Kneading the Grains)
With the initial dirty water drained, your rice is now damp but not submerged. This is where the actual cleaning happens. Form your fingers into a stiff claw. Plunge your claw into the damp rice and gently but firmly stir and knead the grains against the ridged bottom of the bowl in a rapid, circular motion.
Do not crush the rice in your palms; you are just using your fingertips to create friction. Do this circular kneading motion about 30 times. The true magic of rinsing your grains lies in this precise friction. You are physically buffing the stubborn starch dust off the surface of the kernels.
Step Three: The Rinse and Repeat Cycle
Now that you have buffed the starch loose, add a pool of fresh, cold water to the bowl. Swirl the rice gently to lift the loosened starch into the water, and immediately drain it out the side slits.
Repeat this cycle—add water, swirl, drain—two to three more times. Your goal is not to achieve perfectly crystal-clear water. If you aggressively wash the rice until the water looks like glass, you have stripped away all the surface nutrients and the delicate flavor compounds. You want to stop washing when the water looks like heavily diluted lemonade or slightly frosted glass.
Step Four: The Final Soak (For the Weekend Overachievers)
If you are rushing to get a weeknight dinner on the table, you can proceed directly to cooking. But if you are chasing absolute weekend perfection, you need to soak the washed grains.
Add your precisely measured cooking water to the washed rice and let it sit at room temperature for 30 minutes before turning on the heat. This resting period allows the moisture to slowly penetrate the dense, crystalline core of each grain. When you finally apply heat, the rice will cook evenly from the inside out, preventing that tragic phenomenon where the outside of the grain turns to mush while the center remains a hard, chalky pebble. This soak guarantees the prized Japanese texture known as shikkari—firm to the bite, yet deeply tender.
A quick note on fried rice: If you are making fried rice, you must still wash your grains to remove the surface glue. However, to survive the intense heat of a wok without turning to mush, the internal starch structure needs to harden. This process, called retrogradation, happens when cooked rice is chilled in the refrigerator, which is exactly why day-old rice changes everything when you fire up the wok.
Beyond Rice: The Unexpected Versatility of Your New Favorite Tool
I am a busy professional, and I know you are too. I absolutely despise unitaskers that clutter up precious cabinet space. While it is called a Japanese rice washing bowl, the brilliant hydrodynamics of the side-drain design make it a multi-tasking powerhouse for your daily prep work.
Quinoa: Quinoa seeds are coated in a natural, bitter-tasting pesticide called saponin. You must wash it aggressively, but the seeds are so tiny they escape standard colanders. The fine side-slits of a Japanese wash bowl trap the seeds perfectly while you scrub the bitterness away.
Dried Beans and Lentils: Before you soak dried legumes, you need to wash off the agricultural dust and field debris. The solid bottom allows you to pool water and easily spot and remove floating stones or shriveled beans before draining.
Delicate Produce: When you buy expensive farmers’ market berries, cherry tomatoes, or grapes, you don’t want to blast them under a harsh faucet. The Japanese wash bowl allows you to create a gentle, still pool of water (perhaps with a splash of vinegar to kill mold spores), let the delicate produce soak, and then effortlessly drain the water away without bruising the fragile skins.
Streamlining these tedious prep tasks is a cornerstone habit for transforming your daily cooking from a stressful chore into a highly efficient, enjoyable system.
The Final Verdict: Stop Settling for Mediocre Carbs
You do not have to accept gummy, clumpy rice as a fact of life. The difference between the sad, heavy starch-blocks of your past and the light, distinct, restaurant-quality grains of your future comes down to a few minutes of intentional technique and a fifteen-dollar tool.
By understanding the chemistry of amylopectin and respecting the physical mechanics of the togu washing method, you are taking complete control of your ingredients. Ditch the wire mesh strainer, invest in a high-quality Japanese rice washing bowl, and treat your grains with the respect they deserve. Your curries, your stir-fries, and your palate will thank you. Now get into the kitchen and show those carbs who is boss.






