
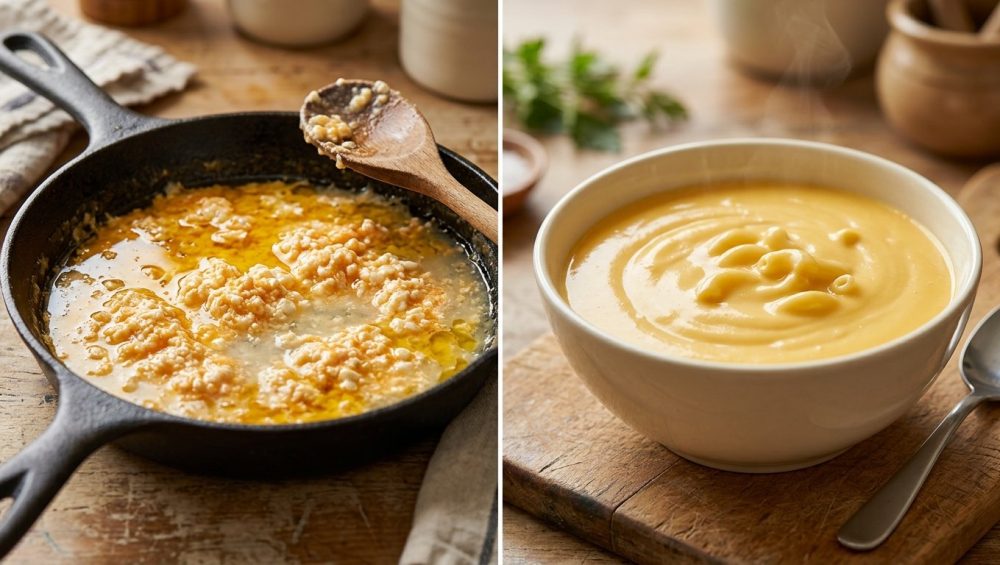
Let me guess. You were craving a rich, velvety macaroni and cheese, or perhaps a luxurious, bubbling fondue for a weekend dinner party. You bought the ingredients, you stood over the stove, you heated the milk, you stirred in the cheese, and suddenly—absolute, unmitigated disaster. Instead of a glossy, magazine-worthy sauce that cascades beautifully off a spoon, you are staring into a pot of stringy, rubbery clumps swimming helplessly in a slick pool of neon-orange grease. It looks less like dinner and more like a failed high school chemistry experiment.
Take a deep breath and step away from the stove. First of all, put down the takeout menu. You are not a bad cook, and this is not a personal failure. If your cheese sauce gets grainy, it is simply because you misunderstood the fundamental culinary science of what you were working with. You treated cheese like butter, assuming it would just melt into a smooth liquid if you threw enough heat at it. But cheese is not butter. Cheese is a highly complex, incredibly delicate structural matrix, and when you abuse it with high temperatures or industrial shortcuts, it violently rebels.
Today, we are going to fix this permanently. No pretentious chef-speak, no culinary degree required—just hard, practical kitchen science. We are going to break down the exact thermodynamics of protein coagulation, the hidden dangers lurking in your grocery store dairy aisle, and the foolproof stabilizing techniques that will guarantee you a flawlessly smooth, velvety cheese sauce every single time. Grab your whisk, and let’s get to work.
The Anatomy of Cheese: What You’re Actually Melting
To understand why your sauce broke, you first have to understand what cheese actually is. It is not a single, uniform ingredient. From a biochemical perspective, cheese is an emulsion—a delicate, fragile balancing act of water, dairy fat, and milk proteins.
The Delicate Emulsion of Fat, Water, and Protein
When we talk about the protein in cheese, we are primarily talking about casein. Casein proteins group together into microscopic spherical structures called micelles. These micelles are held together by calcium phosphate bridges, creating a three-dimensional structural network. Think of this casein network like a microscopic sponge. Trapped inside the pockets of this protein sponge are droplets of water and globules of dairy fat.
When the cheese is sitting cold in your refrigerator, that dairy fat is solid, and the protein network is rigid. The emulsion is stable. But when you apply heat, that dynamic changes entirely. Just like when your salad dressing separates, a broken cheese sauce is simply an emulsion that has been pushed past its physical breaking point. The goal of melting cheese is to apply just enough heat to turn the solid fat into a liquid and relax the protein sponge so it sags and flows, without applying so much heat that the sponge shrinks and violently wrings out all the liquid it is holding.
Moisture Content and the Age Factor
Not all cheeses are created equal, and their ability to melt beautifully is directly tied to their moisture content and age. When a cheese is young—think fresh mozzarella, young cheddar, Monterey Jack, or fontina—it has a very high water content. The casein protein network is loose, flexible, and fully hydrated. Because the proteins are spaced further apart by the water, they flow easily when heated, creating that iconic, stretchy cheese pull we all love.
As a cheese ages in a cave or a cellar—think sharp cheddar, aged Gruyère, or Parmigiano-Reggiano—it loses a significant amount of its moisture through evaporation. As the water leaves, the casein proteins pack tightly together, and the structure becomes rigid, dry, and crumbly. Furthermore, the aging process allows natural enzymes to break down the proteins into smaller fragments. When you try to melt an aged, low-moisture cheese on its own, there simply isn’t enough water left to maintain the emulsion. The tightly packed proteins instantly separate from the fat, leaving you with a gritty, oily mess. This is why you can’t just toss a block of aged Parmesan into a hot pan and expect a liquid sauce.
The Thermodynamics of a Broken Sauce: Why It Gets Oily and Grainy
Cooking is applied physics, and melting cheese is an exercise in strict temperature control. The reason your sauce turned into a greasy, grainy nightmare is almost certainly because you got impatient, cranked up the burner, and boiled it. Let’s look at the exact temperature thresholds where the magic—and the disaster—happens.
Temperature Thresholds: The Danger Zones
When you place shredded cheese into a warm pan, the transition happens in distinct thermal phases. At approximately 90°F (32°C), the solid milk fat trapped inside the casein network begins to soften and transition into a liquid state. At this point, the cheese might look like it is “sweating” in the pan, but it hasn’t actually melted yet.
As the temperature climbs between 130°F and 150°F (54°C to 66°C), the real structural changes occur. The calcium bonds holding the casein micelles together begin to weaken and break apart. The protein network relaxes, sags, and disperses evenly throughout the liquefied fat and water. For a standard cheddar, 150°F (66°C) is the absolute sweet spot for a perfect, stretchy, fluid melt. This is the phase you want to reach and maintain. Understanding why your fondue breaks comes down to respecting this exact thermal boundary.
The Protein Squeeze: How Fat Escapes
Here is where the weekend cook ruins dinner. If you allow the temperature of the cheese to exceed 150°F (66°C) and approach a simmer or a boil, the casein proteins undergo a drastic physical reaction. Just like a raw steak seizes up, shrinks, and squeezes out its juices when thrown onto a blazing hot grill, the casein proteins in the cheese aggressively contract and tighten.
As these proteins shrink, they literally wring themselves out like a wet dish towel. They expel all the liquefied dairy fat and water that they were holding. Because oil and water naturally repel each other, the fat immediately pools on the surface of your sauce as a slick, unappetizing layer of grease. Meanwhile, the dehydrated, contracted proteins bump into each other and bind together into tight, rubbery, microscopic clumps. This is the grainy, gritty texture you feel on your tongue. Once the proteins have contracted and expelled their fat, the emulsion is broken.
The Villain in the Bag: Why Pre-Shredded Cheese is Sabotaging You
Before we talk about how to stabilize your sauce, we need to address the elephant in the grocery store. You are busy, I am busy, and the allure of buying a bag of pre-shredded cheese to save five minutes of prep time is incredibly tempting. But if you are using pre-shredded cheese to make a sauce, you are actively sabotaging your own dinner.
Cellulose and Anti-Caking Agents Explained
When dairy manufacturers produce bags of shredded cheese, they face a logistical problem: if they just put naked cheese shreds into a plastic bag, the weight and moisture would cause the shreds to compress and fuse back together into a solid brick during shipping. To prevent this, they coat the cheese in anti-caking agents.
The most common anti-caking agent used in the industry is powdered cellulose—which is, quite literally, refined wood pulp. Other manufacturers use a blend of potato starch, corn starch, or calcium sulfate. These powders are highly effective desiccants. They absorb excess surface moisture and create a physical barrier between the shreds, ensuring they stay loose and fluffy in the bag.
The Gritty Aftermath of Bagged Cheese
While these anti-caking agents are perfectly food-safe, they are absolute poison to a delicate cheese emulsion. Those convenient pre-shredded bags are loaded with starches that refuse to melt. When you introduce this coated cheese into a hot liquid, the cellulose and starches do not dissolve. Instead, they act as an abrasive physical barrier, preventing the casein proteins and liquefied fats from merging into a smooth, cohesive sauce.
Furthermore, because these agents are designed to absorb moisture, they aggressively suck up the water in your sauce base, leaving the cheese proteins dehydrated. The result is a sauce that feels profoundly powdery, gritty, and thick on the palate. You cannot achieve a glossy, mirror-like finish with cheese that has been dusted in wood pulp. Please, for the love of culinary sanity, stop buying pre-shredded cheese. Buy a block, grab a box grater, and do the work. It takes sixty seconds and is the single most important step in achieving a flawless melt.
The Holy Trinity of Cheese Stabilization: How to Prevent the Break
Now that we know we need freshly grated cheese and strict temperature control, we need to introduce a stabilizing agent. Because cheese is an inherently unstable emulsion, simply melting it into a pot of warm milk is a massive gamble. To guarantee a smooth sauce that won’t break, we need to alter the chemistry of the pot using one of three proven methods: starch, acid, or concentrated proteins.
Starch: The Physical Barrier (The Roux Method)
The most traditional method for stabilizing a cheese sauce—and the foundation of classic macaroni and cheese—is utilizing a starch barrier, typically in the form of a roux. A roux is equal parts fat (usually butter) and flour, cooked together to eliminate the raw flour taste, before whisking in milk to create a béchamel sauce.
When you heat flour in a liquid, the starch granules swell, burst, and release starch molecules into the sauce. This process is called gelatinization. These long, microscopic starch chains weave their way through the liquid, creating a thick, viscous web. When you add your grated cheese to this starchy matrix, the starch molecules physically coat the casein proteins. Much like how starchy water binds a pan sauce, the roux acts as a physical buffer. It physically prevents the cheese proteins from bumping into each other, clumping up, and squeezing out their fat. Even if the temperature accidentally creeps a little too high, the starch barrier holds the emulsion together.
Acid: The Chemical Transformer (The Fondue Secret)
If you are making a traditional Swiss fondue, a floury roux will ruin the delicate, elegant texture. Instead, fondue relies on the chemical power of acid. This is why every authentic fondue recipe demands a generous pour of dry, crisp white wine.
The secret lies in the tartaric acid naturally present in the wine. Tartaric acid is a powerful, natural emulsifier. When you introduce this acid to the cheese, it lowers the overall pH of the mixture. This drop in pH fundamentally alters the electrical charge of the casein proteins. Instead of wanting to tightly bond to one another and coagulate into a rubbery mass, the altered proteins repel each other just enough to remain dispersed and highly soluble in the liquid. The acid effectively binds the dairy fat and water together, ensuring a flawlessly smooth, velvety cream that coats your bread perfectly without separating. If you don’t want to use wine, a squeeze of fresh lemon juice provides citric acid, which performs the exact same chemical function.
Evaporated Milk: The Concentrated Protein Hack
If you want the ultimate shortcut to a silky cheese sauce without the heavy, floury taste of a roux or the distinct flavor of white wine, you need to reach for a can of evaporated milk. This brilliant technique, popularized by food science writers like J. Kenji López-Alt, relies on the power of concentrated milk proteins.
Evaporated milk is simply regular milk that has had about 60% of its water content removed through a gentle heating process. What remains is a liquid that is incredibly dense in casein and whey proteins. When you use evaporated milk as the base liquid for your cheese sauce, you are flooding the environment with extra, stable proteins. These excess proteins act as emulsifiers, wrapping around the fat droplets released by the melting cheese and suspending them perfectly in the liquid. Toss the cheese with a tiny pinch of cornstarch before adding it to the warm evaporated milk, and you will have a bulletproof, incredibly rich sauce in under five minutes.
The Sodium Citrate Cheat Code: Molecular Gastronomy for the Home Cook
If you are a weekend culinary hobbyist who wants to experiment with modern food science, there is a literal cheat code for melting cheese: Sodium Citrate. This is the exact ingredient that gives processed American cheese and Velveeta their supernatural melting abilities, but you can buy it in pure powder form and use it on high-quality, artisanal cheeses.
What is Melting Salt?
Sodium citrate is a crystalline salt derived from citric acid. In the food industry, it is known as a “melting salt.” When you dissolve a small amount of sodium citrate into a liquid (like water, milk, or even beer) and whisk in grated cheese, a fascinating molecular exchange occurs. The sodium ions in the citrate swap places with the calcium ions that hold the cheese’s casein protein network together.
By removing the calcium bridges, the protein network becomes incredibly loose and highly soluble. The proteins act as hyper-efficient emulsifiers, binding the fat and water together so perfectly that the emulsion becomes virtually unbreakable.
How to Use It (If You Want to Skip the Roux)
With sodium citrate, you can take a notoriously stubborn, low-moisture aged cheese—like a 3-year aged sharp cheddar or an aged Gouda—and melt it into a liquid pool of absolute perfection. You simply dissolve about half a teaspoon of sodium citrate into a half cup of simmering liquid, turn the heat to low, and whisk in a half pound of freshly grated cheese. The result is a sauce that has the intense, complex flavor of an expensive aged cheese, but the absurdly smooth, glossy texture of processed stadium nacho cheese. It is a brilliant trick to have in your culinary arsenal.
A Step-by-Step Masterclass to Flawless Cheese Sauce
We have covered the science, the pitfalls, and the stabilizers. Now, let’s put it all together into a practical, foolproof workflow. Follow these rules strictly, and you will never break a cheese sauce again.
Choosing the Right Cheese Blend
Do not rely on just one type of cheese. You need to balance flavor with meltability. Aged cheeses (sharp cheddar, Gruyère, Parmesan) bring complex, nutty, intense flavors, but they lack the moisture and intact protein structure needed for a good melt. Young cheeses (mozzarella, fontina, Monterey Jack, young Gouda) melt like an absolute dream but can taste a bit bland and milky on their own. The secret is to blend them. Use a 50/50 ratio: 50% young, high-moisture cheese for the structural melt, and 50% aged cheese for the flavor punch.
The Grating Mandate and Proper Cookware
As established, you must grate your own cheese from a block to avoid anti-caking starches. Grate it while it is cold, but let the shreds sit on the cutting board for 20 minutes to come up to room temperature. Cold cheese drops the temperature of your sauce base too rapidly and melts unevenly.
Before we get into the stirring technique, let me make one thing abundantly clear regarding your kitchen equipment. If you are trying to make a delicate, temperature-sensitive sauce in a scratched, warped, mystery-metal pan you bought for ten dollars a decade ago, you are setting yourself up for failure. Ditch those cheap, peeling non-stick pans that leach chemicals and scorch your dairy. You need cookware with excellent thermal mass to distribute heat evenly. I highly recommend using a curved saucier pan to ensure your whisk can reach every corner, preventing the proteins from catching and burning on the bottom edges.
Temperature Control and the “Off-Heat” Rule
This is the most critical step in the entire process. Whether your base is a starchy béchamel, an acidic wine, or evaporated milk, you must bring that liquid to a gentle simmer first. Once the liquid is hot, turn the burner completely off and remove the pan from the heat source.
Do not add cheese to a pan that is sitting over an active flame. The residual heat of the liquid (which is hovering around 180°F) is more than enough to gently bring the cheese up to its 150°F melting point.
Add the room-temperature grated cheese a small handful at a time. Stir constantly with a flat-edged wooden spoon or a silicone whisk. Do not add the next handful of cheese until the previous handful has completely melted and incorporated into the sauce. Patience is your greatest asset here. Rushing the process by dumping all the cheese in at once will drop the temperature too fast, causing the cheese to clump into a giant, stubborn ball.
How to Rescue a Broken Cheese Sauce (If It’s Not Too Late)
Let’s say you got distracted. The phone rang, the burner was left on high, the sauce boiled, and now you are staring at a grainy, greasy mess. The proteins have squeezed out their fat, and the emulsion has shattered. Can you save it? Sometimes, yes. It requires immediate, aggressive triage.
The Cold Milk Shock
The very first thing you must do is stop the proteins from contracting any further. Pull the pan off the heat immediately. Pour in one to two tablespoons of ice-cold milk or heavy cream. This rapid introduction of cold liquid serves two purposes: it instantly drops the temperature of the sauce, halting the protein coagulation, and it introduces fresh water and stable dairy proteins back into the environment to help re-establish the broken emulsion.
If the sauce is particularly stubborn, you can create a rapid starch slurry. Whisk one teaspoon of cornstarch into a tablespoon of cold water until dissolved, then pour this slurry into the broken sauce. The concentrated burst of starch will aggressively coat the clumping proteins.
The Vigor of the Whisk
Once you have added the cold liquid or starch slurry, you need mechanical force. You have to physically force the separated oil droplets back into the water phase. Grab your whisk and beat the sauce vigorously off the heat. And please, use proper equipment. If your cheap whisk leaks dishwater into your food from a poorly sealed handle, throw it in the trash and buy a fully sealed, professional-grade stainless steel wire whip.
Whisk aggressively for at least sixty seconds. If the temperature has dropped too much and the cheese is stiffening, place the pan back over the absolute lowest possible heat for just a few seconds while continuing to whisk. In many cases, the combination of the temperature drop, the new liquid, and the mechanical shearing force of the whisk will coax the proteins to relax and the fat to re-emulsify, bringing your sauce back from the brink of death.
Conclusion: Go Forth and Melt Safely
Creating a perfectly smooth, glossy, luxurious cheese sauce is not a dark art reserved for restaurant chefs. It does not require a culinary degree or a kitchen full of expensive gadgets. It simply requires a basic respect for the ingredients and an understanding of the underlying kitchen chemistry.
By grating your own cheese, respecting the strict temperature thresholds, and utilizing the stabilizing power of starch, acid, or concentrated proteins, you are taking total control of the emulsion. You now know exactly why the fat separates, why the proteins clump, and exactly how to prevent it. So ditch the processed jars, step up to the stove with confidence, and show that cheese who is boss. Perfectly velvety macaroni and cheese is well within your grasp.






