Listen up, my beautiful weekend culinary warriors. We need to have a serious heart-to-heart about one of the most devastating tragedies that can occur in a home kitchen. You know exactly what I am talking about. You’ve just spent a small fortune on a beautiful block of aged Gruyère and a sharp farmhouse cheddar. You’ve grated it by hand. You’ve melted butter, whisked in milk, and eagerly folded in your glorious cheese, fully expecting a cascading, velvety waterfall of liquid gold.
But instead of a smooth, luxurious sauce, you look down into your pot and see a horrifying, separated nightmare. You are left staring at a greasy, translucent oil slick floating desperately above a bed of rubbery, gritty, stringy clumps of dairy protein. Your heart sinks. Your dinner guests are arriving in twenty minutes. You are furiously whisking, sweating, and praying to the culinary gods, frantically trying to figure out how to fix a grainy cheese sauce before anyone notices your rising panic.
Take a deep breath. Put down the whisk. Pour yourself a glass of wine. I have been exactly where you are, and I am here to tell you that this is not a personal failure; it is simply a misunderstanding of food physics. You do not need a culinary degree to cook like an absolute expert, but you do need to respect the science of what happens when heat meets dairy. Today, we are going to completely demystify the chemistry of cheese emulsions. We are going to banish broken sauces from your life forever. And then, we are going to take your newfound, fail-safe sauce skills and build the ultimate, stress-free entertaining concept: The Mindful Macaroni Bar.
No pretentious chef-speak. No fluff. Just hard science, brilliant weeknight shortcuts, and a masterclass in hosting a dinner party where you actually get to sit down and enjoy your own food.
The Anatomy of a Cheese Sauce (Or, Why Heat Is Your Frenemy)
To understand why your sauce breaks, you first need to understand what cheese actually is. At its core, cheese is a delicate, highly volatile matrix made up of three primary components: water, dairy fat, and a network of proteins. The most important of these proteins are casein micelles. Think of casein micelles as microscopic, spherical clusters of milk proteins that are tightly bound together by calcium phosphate bridges.
When you apply heat to cheese, the fat begins to melt and turn liquid, while the water begins to turn to steam. But the proteins? The proteins are the absolute drama queens of the dairy world. If you look at the food science, right around 149°F (65°C), those casein micelles start to irreversibly cross-link and aggregate. They essentially squeeze together like a microscopic sponge being wrung out by an invisible hand.
When those proteins violently contract, they expel all the liquid fat and water they were previously holding onto. The fat floats to the top (creating that nasty oil slick), and the proteins bind together into tight, unyielding curds (creating that gritty, sandy texture). Once this separation—known in the scientific community as syneresis—happens, it is incredibly difficult to force the fat and proteins back into a harmonious relationship. Heat is necessary to melt the cheese, but unchecked, aggressive heat is the exact mechanism that destroys it.
The Usual Suspects: Why Your Sauce Keeps Sabotaging You
Before we talk about how to achieve the perfect emulsion, we need to identify the bad habits that are setting you up for failure. If your cheese sauce is constantly breaking, I can almost guarantee you are committing one of these three cardinal sins.
The Pre-Shredded Trap
I will say this until I am blue in the face: stop buying pre-shredded cheese for your sauces. I know it saves you three minutes of prep time on a busy Tuesday night, but it is actively ruining your food. Those convenient little bags of shredded cheese are heavily coated in anti-caking agents—usually cellulose (which is literally processed wood pulp) or potato starch. These powders are added at the factory to absorb moisture and keep the shreds from clumping together into a solid brick during transit.
However, when you drop those coated shreds into a hot liquid, those starches and powders prevent the cheese from melting into a smooth, cohesive emulsion. Instead, they create a grainy, sandy, horribly gritty mouthfeel. If you want a truly velvety, professional-level sauce, you absolutely must avoid the trap of pre-shredded bags and take the extra sixty seconds to grate your own cheese from a solid block.
The Temperature Tantrum
The second most common mistake home cooks make is treating their cheese sauce like a pot of boiling pasta water. We just established that casein proteins violently contract and expel fat at 149°F (65°C). Water boils at 212°F (100°C). If you have your burner cranked up to high and your milk is bubbling away when you drop your cheese in, you are subjecting those delicate proteins to massive thermal shock. The proteins instantly seize, denature, and break the sauce before you even have a chance to stir it. Cheese should never be boiled. It should be gently, lovingly coaxed into melting using residual heat.
The Moisture Mismatch
Not all cheeses are created equal. Aged cheeses—like a sharp 3-year-old cheddar, a complex Gruyère, or a crystalline Parmigiano-Reggiano—have spent months or years sitting in a cave, slowly losing their moisture. Because their water content is so low and their protein matrix is so tight, they are incredibly prone to breaking when melted. Young cheeses—like Monterey Jack, fontina, or mild cheddar—have a much higher moisture content and a looser protein structure, making them incredibly easy to melt smoothly. If you try to make a sauce using only dry, aged cheese without introducing a powerful emulsifier, you are fighting a losing battle against physics.
The Holy Trinity of Emulsifiers (How to Actually Fix It)
Now that we know why the sauce breaks, how do we force the fat and water to hold hands and play nicely? We need an emulsifier. An emulsifier is a stabilizing agent that prevents the fat molecules from separating from the water molecules. In the world of cheese sauces, you have three primary scientific pathways to achieve this.
Method 1: The Classic Roux (The Old Guard)
This is the traditional French method, and it is the foundation of a classic Mornay sauce. You melt butter, whisk in an equal amount of all-purpose flour, and cook it for a minute to remove the raw flour taste. Then, you slowly whisk in cold milk until the mixture thickens into a béchamel, before finally folding in your cheese off the heat.
How does it work? When the flour hits the hot liquid, the starch granules swell up, absorb water, and gelatinize. These swollen starch molecules act as physical barricades inside the sauce, getting in the way of the casein proteins and physically preventing them from clumping together. While this method is a classic for a reason, it requires constant whisking, it can occasionally mute the sharp flavor of the cheese due to the heavy flour presence, and if you let it get too hot, the starch retrogrades and loses its thickening power.
Method 2: Sodium Citrate (The Secret of the Gods)
If you want to achieve absolute perfection on a weekend and create a sauce that defies the laws of nature, you need sodium citrate. This is not a viral internet hack; this is precise, reproducible food science. Sodium citrate (E331) is a pH-regulating, emulsifying salt. Originally used in the 1890s as a medical anticoagulant for blood transfusions, it is the exact ingredient that gives processed American cheese and Velveeta their famously unnatural, gooey melting properties.
When you add sodium citrate to a liquid and heat it, it works a molecular miracle. It actively binds to the calcium ions inside the cheese, swapping them out for sodium ions. Without those calcium bridges tightly holding the proteins together, the casein matrix relaxes, stays loose, and allows the fat and water to disperse uniformly without separating.
By using a ratio of about 2% to 3% sodium citrate by weight relative to your total cheese and liquid mass, you lower the cheese’s thermal coagulation threshold by a massive 15°C. This means you can take a stubborn, dry, aged cheddar and turn it into a pourable, reheat-friendly, silky-smooth liquid that will never, ever break. It is culinary magic.
Method 3: Evaporated Milk and Cornstarch (The Weeknight Shortcut)
While I love sodium citrate for my elaborate weekend projects, I do not always have time to break out my digital gram scale on a Wednesday night. When I need to master simple weeknight dinners with maximum efficiency, I turn to the evaporated milk and cornstarch method, brilliantly popularized by food science writers like J. Kenji López-Alt.
This method leverages two distinct scientific properties. First, cornstarch is composed entirely of amylose and amylopectin, lacking the interfering gluten proteins found in wheat flour. Its granules swell incredibly rapidly between 144°F and 185°F (62°C–85°C), creating an immediate, stable gel network that locks the fat in place.
Second, evaporated milk is fresh milk that has had 60% of its water content removed via a vacuum process. This leaves behind a highly concentrated dose of milk proteins. Furthermore, commercial evaporated milk often contains dipotassium phosphate (to prevent the milk from curdling under heat) and carrageenan (a powerful hydrocolloid that stabilizes and emulsifies). When you combine the starch network of the cornstarch with the concentrated proteins and stabilizers of the evaporated milk, you create an indestructible emulsion in under ten minutes.
The Gear: Stop Sabotaging Yourself With Toxic Junk
Before we get to the master recipe, we need to have a brutally honest conversation about your cookware. You can understand the food science perfectly, but if you are trying to execute a delicate dairy emulsion in a scratched, warped, peeling non-stick pan from 2014, you are going to fail.
I have an absolute zero-tolerance policy for cheap, toxic kitchenware. When a non-stick Teflon coating begins to scratch and peel, it not only leaches synthetic forever-chemicals into your family’s food, but it also completely loses its thermal integrity. Thin, cheap pans warp over heat, creating vicious hot spots that will scorch your milk, burn your proteins, and break your sauce in seconds. It is time to respect your health and your food by banishing toxic kitchen gear from your home once and for all.
To make a proper sauce, you need a curved saucier pan made of heavy-bottomed, fully-clad stainless steel. A saucier has sloping, rounded sides rather than the sharp 90-degree angles of a standard saucepan. This ergonomic design ensures that your whisk can seamlessly reach every single square inch of the pan’s interior, preventing rogue proteins from hiding in the corners, sticking, and scorching. The thick aluminum or copper core of a high-quality stainless steel pan will distribute the heat evenly, giving you the precise temperature control required to keep your casein micelles happy.
The Master Recipe: A Foolproof, Silky Cheese Sauce
We are going to use the Evaporated Milk and Cornstarch method for this blueprint, as it is the most accessible, fail-safe route for the home cook who wants professional results without ordering specialty chemicals online.
The Ingredients:
- 8 oz (225g) high-quality block cheese (I recommend a 50/50 blend of sharp cheddar for flavor and Gruyère for meltability)
- 1 tablespoon cornstarch
- 1 cup (8 oz) evaporated milk (NOT sweetened condensed milk—check your labels!)
- 1 teaspoon hot sauce (optional, but the acidity cuts the fat beautifully)
- A pinch of salt (only if needed, taste your cheese first)
The Technique:
- Grate and Coat: Using a box grater, manually shred your blocks of cheese. Place the freshly grated cheese into a large mixing bowl, sprinkle the tablespoon of cornstarch over the top, and toss it thoroughly with your hands until every single shred is lightly dusted. This ensures the starch is evenly dispersed and won’t clump when it hits the liquid.
- Heat the Milk: Pour the evaporated milk into your heavy-bottomed stainless steel saucier. Place it over medium-low heat. Add your hot sauce if using. You want to heat the milk until it is steaming and small bubbles form at the very edges of the pan (around 140°F). Do not let it come to a rolling boil.
- Kill the Heat: This is the most crucial step. Once the milk is steaming, turn the burner off completely. If you are using an electric stove that retains heat, move the pan to a completely cool burner.
- The Emulsion: Grab a wire whisk. Add the cornstarch-coated cheese into the hot milk a small handful at a time, whisking continuously. The residual heat of the milk is more than enough to melt the cheese gently. As you whisk, you will see the magic happen. The sauce will transition from looking slightly thin and clumpy to a glossy, thick, perfectly homogenous liquid.
- Troubleshooting: If the sauce gets too thick as it cools, simply whisk in a splash of warm water or an extra splash of evaporated milk until you reach your desired consistency. If, by some act of defiance, the sauce looks slightly grainy, do not panic. Pour it into a blender or hit it with an immersion blender for thirty seconds. The sheer mechanical force of the blender blades will physically smash the fat droplets back into the liquid phase, rescuing the emulsion.
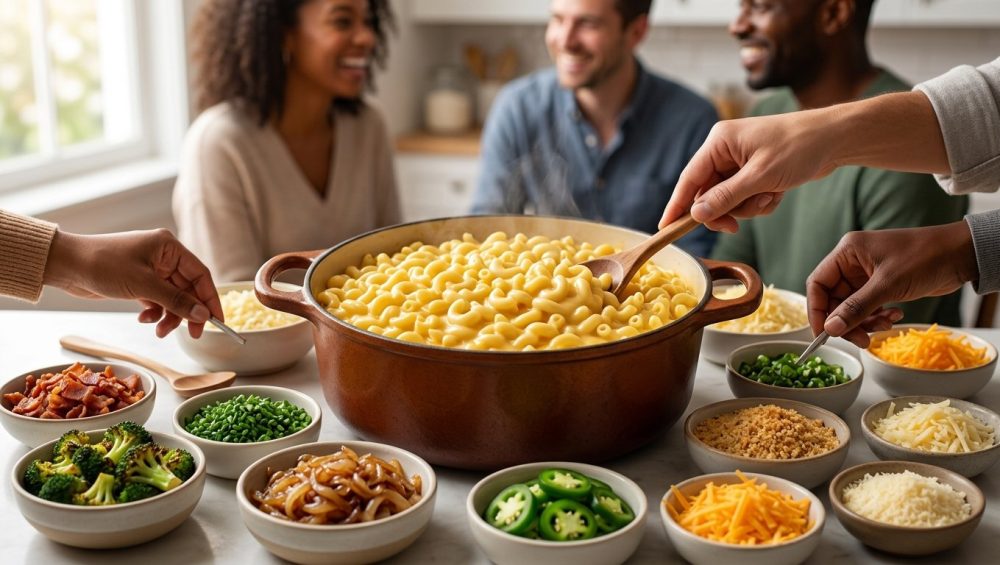
The Mindful Macaroni Bar: A Stress-Free Hosting Blueprint
Now that you possess the ultimate, unbreakable cheese sauce, it is time to put it to work. We are going to build a “Mindful Macaroni Bar.”
Why do we host dinner parties? We host to connect with our friends and family, to share stories, and to create warmth. Yet, so many weekend culinary hobbyists trap themselves in the kitchen, furiously flipping steaks, managing four different pans, and plating individual portions while their guests sit awkwardly in the living room wondering if they should offer to help. That is not hospitality; that is a stressful restaurant shift.
If you want to master the art of effortless hosting, you need a dining system that shifts 90% of the labor to the prep phase. A Macaroni Bar does exactly this. It is a communal, interactive, highly customizable buffet that allows you to step away from the stove, pour yourself a drink, and actually be present with your guests. It inherently accommodates picky eaters, vegetarians, and adventurous foodies all at the exact same time.
Selecting and Cooking the Pasta
For a macaroni bar, you need a pasta shape that acts as a structural vessel for the sauce. Do not use long noodles like spaghetti or linguine; they are a nightmare to serve on a buffet line and don’t hold thick sauces well. You want tubular, textured shapes with ridges (rigate) that grip the cheese. Cavatappi (corkscrews), medium shells (conchiglie), or classic elbow macaroni are your best friends.
When boiling the pasta, salt the water aggressively—it should taste like the sea. And please, use a heavy stockpot that is actually large enough for the volume of water you are boiling, so you don’t have to constantly babysit the stove and panic as the pasta pot boils over onto your freshly cleaned burners.
Cook the pasta until it is perfectly al dente. Because it will be sitting in a warm chafing dish, it will continue to soften slightly; if you overcook it in the water, it will turn to mush on the buffet line. Before you drain the pasta, scoop out a cup of the starchy cooking water. The magic of starchy water cannot be overstated; if your cheese sauce thickens up too much while sitting on the buffet, whisking in a splash of this hot, starchy water will thin it out beautifully without breaking the emulsion. Once drained, toss the pasta with a very light drizzle of neutral oil to prevent the noodles from sticking together while they sit in the serving dish.
The Science of Safe Holding Temperatures
When you are setting up a buffet, food safety is paramount. You cannot simply leave a pot of dairy-based cheese sauce sitting on a cold table for three hours. The FDA Food Code explicitly defines the “Temperature Danger Zone” as the range between 41°F and 135°F (5°C to 57°C). Within this lukewarm zone, harmful bacteria can double in number in as little as 20 minutes.
To keep your guests safe and your sauce perfectly fluid, hot foods must be held at an internal temperature of 135°F (57°C) or higher. However, if you hold the cheese sauce too hot (above 160°F), the proteins will eventually tighten up, the sauce will break, and a thick, rubbery pellicle (skin) will form on the surface.
Your target holding temperature for the cheese sauce is the sweet spot between 140°F and 150°F. The best way to achieve this at home is to use a slow cooker on the “Keep Warm” setting, but with a crucial modification: do not pour the sauce directly into the ceramic insert, as the heating element at the bottom will scorch it. Instead, fill the slow cooker basin with an inch of hot water, and place a smaller heat-safe glass or metal bowl inside the water to hold the cheese sauce. This creates a gentle, insulated bain-marie (water bath) that will keep the sauce perfectly warm and fluid without burning the bottom. Give it a quick stir every twenty minutes to keep the surface glossy. (Note: The FDA states that perishable food left out at room temperature for more than two hours must be discarded, but let’s be honest, your guests will devour this long before the clock runs out.)
The Toppings: Elevating the Macaroni Experience
A bowl of pasta and cheese is pure comfort, but without contrasting textures and flavors, it can quickly become heavy and monotonous. Just as you wouldn’t serve a massive plate of gluey mashed potatoes without some bright chives, cracked pepper, or rich gravy to break up the texture, you cannot serve a macaroni bowl without a highly curated topping station. You need to hit three specific culinary notes: crunch, acid, and protein.
The Crunch Factor
Texture is everything. You need something crispy to contrast the soft, yielding texture of the pasta and sauce.
- Toasted Panko: Melt butter in a skillet, add a smashed garlic clove, and toast Japanese panko breadcrumbs until they are deeply golden brown.
- Crispy Bacon: Bake thick-cut bacon in the oven until shattered-glass crispy, then chop it into fine dust.
- Crushed Kettle Chips: A bowl of heavily crunched jalapeño or salt-and-vinegar potato chips adds an incredible, trashy-chic crunch.
The Acid Trip
Cheese sauce is incredibly rich in butterfat. To prevent palate fatigue, you need sharp, bright acidity to cut through the richness and cleanse the palate.
- Quick-Pickled Red Onions: Thinly slice red onions and let them sit in a mixture of warm water, white vinegar, sugar, and salt for an hour.
- Pickled Jalapeños: For that classic nacho-cheese bite.
- Hot Sauces: Provide a lineup of varying heat levels, from a mild, vinegary Louisiana hot sauce to a smoky chipotle habanero blend.
- Fresh Scallions: Thinly sliced green onions provide a sharp, fresh, oniony bite that wakes up the heavy dairy.
The Heavy Hitters (Proteins)
For guests who want to turn their macaroni bowl into a massive, coma-inducing main course, offer a few hearty proteins kept warm in small chafing dishes.
- Smoked Pulled Pork: Tossed in a tangy, mustard-based Carolina BBQ sauce.
- Buffalo Chicken Bites: Crispy chunks of chicken thigh tossed in a fiery buffalo sauce.
- Garlic Butter Shrimp: Quickly sautéed shrimp for a decadent, surf-and-turf vibe.
Curated Flavor Profiles for Your Bar
To help your guests overcome choice paralysis, write out a few suggested “Bowl Builds” on a cute chalkboard next to the buffet:
- The BBQ Pitmaster: Macaroni, pulled pork, crispy fried onions, pickled jalapeños, and a drizzle of BBQ sauce.
- The Buffalo Wing: Macaroni, buffalo chicken bites, blue cheese crumbles, and fresh scallions.
- The Truffle Pig: Macaroni, sautéed wild mushrooms, a drizzle of white truffle oil, and toasted garlic panko.
Hosting Logistics: A Timeline for Zero Kitchen Panic
The entire point of the Mindful Macaroni Bar is to eliminate stress. To throw a flawless dinner party, you cannot rely on willpower; you must rely on a timeline. Here is your fail-safe schedule for a Saturday night gathering.
Three Days Ahead
- Grocery Run: Buy your block cheeses, evaporated milk, cornstarch, pasta, and toppings.
- Pickling: Make your quick-pickled red onions and store them in a mason jar in the fridge. They only get better as they sit.
The Morning Of
- Shred the Cheese: Grate all of your block cheese. Toss it with the cornstarch, place it in an airtight Tupperware container, and leave it in the fridge.
- Prep the Crunch: Toast your panko breadcrumbs and fry your bacon. Store them in airtight containers at room temperature.
- Chop the Veggies: Slice your scallions and prep any other fresh toppings. Store them in their serving bowls in the fridge, covered with plastic wrap.
- Cook the Proteins: If you are making pulled pork or buffalo chicken, cook it now. You can easily reheat it right before guests arrive.
One Hour Before Arrival
- Set the Stage: Arrange your serving bowls, plates, forks, and napkins on the buffet table. Write out your chalkboard menu. Put on your dinner party playlist.
- Boil the Pasta: Cook the pasta, drain it (saving that starchy water!), toss it lightly in oil, and place it in your warm chafing dish.
- Make the Sauce: Because your cheese is already grated and coated in cornstarch, making the sauce will literally take you five minutes. Heat the evaporated milk, kill the heat, whisk in the cheese until silky, and transfer it to your prepared slow-cooker water bath.
- Reheat Proteins: Warm up your pulled pork or chicken and place them in their respective serving dishes.
- Breathe: You are completely done. Pour yourself a glass of wine. When the doorbell rings, your kitchen is clean, your food is safely holding at the perfect temperature, and you are entirely free to be the charming, relaxed host you were always meant to be.
Conclusion: Reclaim Your Kitchen
Cooking is not about adhering to pretentious, inaccessible rules, and it is certainly not about stressing yourself out to the point of tears over a broken emulsion. It is about understanding the basic, underlying science of your ingredients so you can bend them to your will.
By ditching the toxic, cellulose-coated pre-shredded cheese, tossing out your warped Teflon pans, and embracing the molecular magic of cornstarch and evaporated milk (or sodium citrate, if you’re feeling particularly ambitious), you have permanently eliminated the threat of a broken cheese sauce. You have taken a notoriously finicky culinary technique and turned it into a bulletproof, stress-free party trick.
So go forth, my friends. Grate your own cheese. Respect the thermal coagulation threshold of your casein proteins. Build a magnificent, towering Macaroni Bar, and most importantly, sit down, raise a glass, and actually enjoy the incredible meal you just created. You’ve earned it.


