Picture this: It is Tuesday morning. You are standing over your kitchen sink, running late for work, desperately trying to meal-prep a quick, protein-packed breakfast. You grab a hard-boiled egg from the fridge, give it a confident tap on the countertop, and begin to peel. But instead of the shell slipping off to reveal a pristine, glossy, perfectly smooth egg, disaster strikes.
The shell has seemingly welded itself to the egg white. You start picking at it with your fingernails, chipping away microscopic, jagged fragments of calcium carbonate. With every tiny piece of shell you remove, a massive chunk of the egg white comes with it. By the time you are finished, your sink is covered in debris, and what remains in your hand looks less like a nutritious breakfast and more like a sad, mangled golf ball that was aggressively chewed by a feral raccoon. You throw it in the trash in a fit of pure, unadulterated culinary rage.
We have all been there. Mangled hard-boiled eggs are a universal kitchen tragedy. For decades, home cooks have been plagued by this infuriating phenomenon, passing down old wives’ tales, weird hacks, and dubious advice in a desperate attempt to find a solution. But here is the brutal, honest truth that no one tells you: peeling an egg isn’t about luck, and it certainly isn’t a curse. It is pure, unyielding chemistry and thermodynamics.
You do not need a culinary degree to cook like an expert. You do not need to be a Michelin-starred chef to master the basics. You just need to stop listening to outdated kitchen myths and start understanding the science of what is actually happening inside that shell. Today, we are going to tear down everything you thought you knew about boiling eggs. We are going to explore the microscopic anatomy of albumen, the critical role of pH, and the absolute magic of temperature shock. By the end of this definitive masterclass, you will be equipped with a scientifically proven, foolproof method that guarantees a perfectly cooked, effortlessly peelable egg every single time.
Leave your kitchen anxiety at the door. Let’s get into the science.
The Anatomy of an Egg: Why It Hates You
To understand why an egg refuses to peel, you first have to understand what an egg actually is. It is a marvel of biological engineering, designed to protect a growing embryo from the outside world while allowing it to breathe. Unfortunately for you, the very mechanisms that make an egg a fortress of life also make it a nightmare to peel.
The Calcium Carbonate Shell and the Keratin Membranes
Let’s start from the outside and work our way in. The outermost layer is the shell, composed almost entirely of calcium carbonate. To the naked eye, the shell looks like a solid, impenetrable wall. In reality, it is highly porous. A standard chicken egg contains anywhere from 7,000 to 17,000 microscopic pores. These pores are essential for allowing gases—specifically oxygen and carbon dioxide—to pass in and out of the egg.
Just beneath the hard shell lie two incredibly thin, remarkably strong layers known as the outer and inner shell membranes. These membranes are made primarily of keratin—the exact same tough, fibrous protein that makes up human hair and fingernails. They act as a secondary defense system against bacterial invaders. The outer membrane clings tightly to the inside of the calcium carbonate shell, while the inner membrane encases the liquid egg white.
When you struggle to peel an egg, you are not actually fighting the hard outer shell. You are fighting that inner keratin membrane. When an egg is notoriously difficult to peel, it is because the egg white has physically and chemically fused itself to the inner membrane during the cooking process.
The Albumen and the Role of pH in Egg Adhesion
Inside the protective membranes sits the egg white, scientifically known as the albumen. The albumen is roughly 90% water and 10% protein. It contains a complex mixture of specialized proteins, including ovalbumin, conalbumin, ovomucoid, and lysozyme (a potent antibacterial agent).
Here is where the chemistry gets fascinating. When a hen first lays an egg, the liquid albumen is packed with dissolved carbon dioxide gas. This high concentration of carbon dioxide makes the raw egg white look slightly cloudy and, more importantly, it makes the egg white acidic. A freshly laid egg has a relatively low internal pH of around 7.6.
Why does pH matter? Because proteins are incredibly sensitive to their chemical environment. At a low, acidic pH, the proteins in the albumen are tightly folded. When you introduce heat—like dropping the egg into boiling water—these proteins begin to rapidly vibrate, unfold, and denature. As they unfold, they desperately look for other molecules to bond with. Because the pH is low, the unfolding albumen proteins aggressively cross-link with the keratin proteins in the inner shell membrane. They form a bond so tight that they essentially become one single entity.
If you’ve ever watched in horror as your scrambled eggs leak water across a breakfast plate, you already know that egg proteins are notoriously finicky and highly reactive to stress. When you boil a low-pH, highly acidic egg, you are guaranteeing that the white will fuse to the membrane. You will end up chipping away at it for ten minutes, cursing your existence.
The Great Egg Debate: Fresh vs. Aged
Now that we understand the chemistry of protein adhesion, we have to address one of the most common pitfalls of the modern home cook: the obsession with freshness.
Why Farm-Fresh Eggs Are Your Worst Enemy Here
I am a massive advocate for supporting local farmers. I love wandering through a weekend farmers’ market, picking up gorgeous, multi-colored heirloom eggs with bright, sunset-orange yolks. For frying, poaching, or making a delicate French omelet, farm-fresh eggs are unparalleled. Because their proteins are so tightly bound, fresh eggs hold a beautiful, tight shape in a hot skillet.
However, when it comes to hard-boiling, farm-fresh eggs are your absolute worst enemy. If you take an egg that was laid yesterday and drop it into a pot of water, you are setting yourself up for failure. The pH is simply too low, and the carbon dioxide levels are too high. The albumen will cement itself to the keratin membrane, and no amount of clever peeling techniques will save you.
The Science of Carbon Dioxide and Alkalinity
As an egg ages, it undergoes a slow, invisible chemical transformation. Remember those 17,000 microscopic pores in the shell? Over the course of a few days or weeks, the dissolved carbon dioxide trapped inside the albumen slowly escapes through those pores and dissipates into the air.
As the carbon dioxide leaves the egg, the internal chemistry shifts. The loss of acidic CO2 causes the pH of the egg white to steadily rise. Over a week or two, the pH of the albumen will climb from an acidic 7.6 to a highly alkaline 9.2, or even as high as 9.7.
This shift in alkalinity is the secret to a clean peel. At a higher, alkaline pH, the albumen proteins behave completely differently when exposed to heat. They still denature and coagulate, but they no longer have the chemical desire to aggressively cross-link with the inner keratin membrane. Instead of fusing to the shell, the cooked egg white naturally pulls away from it.
If you want foolproof hard-boiled eggs, you need aged eggs. Buy your eggs from the grocery store and let them sit in the back of your refrigerator for at least a week—preferably two—before you even think about boiling them. Just like you absolutely loathe dealing with greasy plastic containers that refuse to get clean, you will loathe trying to peel a stubbornly fresh egg. Let time and chemistry do the hard work for you.
The Temperature Shock Doctrine: Hot vs. Cold Starts
We have covered the chemical composition of the egg, but now we must address the physics of cooking it. The method you use to apply heat to the egg will make or break your peeling experience. For generations, cookbooks have debated the best way to boil an egg, but modern food science has finally settled the score.
The Cold Water Start: A Recipe for Disaster
If you ask your grandmother how to boil an egg, she will likely tell you to place the eggs in a pot, cover them with cold water, place the pot on the stove, and slowly bring the water to a boil.
I am telling you right now: stop doing this. The cold water start is a culinary crime that has ruined millions of breakfasts.
When you place an egg in cold water and slowly raise the temperature, you are giving the proteins in the albumen far too much time to think. As the water gradually warms, the proteins slowly unfold. Because the temperature change is gradual, the proteins have ample time to reach out and form strong, permanent chemical bonds with the inner keratin membrane. By the time the water actually reaches a rolling boil, the egg white has effectively glued itself to the inside of the shell. You have created a permanent fusion.
The Hot Water (or Steam) Start: Your Foolproof Solution
The scientifically correct way to cook an egg for easy peeling is to subject it to immediate, violent temperature shock. You must drop cold eggs directly into a fiercely hot environment—either rapidly boiling water or, even better, a cloud of 212°F (100°C) steam.
When a cold egg hits boiling water or hot steam, the outermost layer of the albumen—the part touching the membrane—experiences a massive, instantaneous spike in temperature. The proteins in this extreme outer layer rapidly denature and coagulate in a fraction of a second. Because they cook so incredibly fast, they instantly shrink and pull away from the keratin membrane before they even have a chance to form a chemical bond.
This rapid coagulation creates a microscopic gap between the egg white and the shell membrane. That tiny gap is the difference between an egg that peels in two flawless halves and an egg that requires ten minutes of surgical picking. I know you are impatient and hate waiting for water to boil on a busy Tuesday, but this is the one time you must be entirely patient. Let the water come to a furious, rolling boil before the eggs ever touch the pot.
The Thermodynamics of Rapid Coagulation
If you don’t believe me, look to the exhaustive research conducted by food scientists and culinary experts like J. Kenji López-Alt. In his legendary deep dives into food science, Kenji tested thousands of eggs in massive double-blind experiments to definitively prove the hot start versus cold start theory. The results were indisputable: eggs started in boiling water or hot steam peeled cleanly and effortlessly at a vastly higher rate than eggs started in cold water.
We are going to subject these eggs to extreme thermal shock. Don’t worry, an eggshell isn’t going to violently explode the way a cheap glass baking dish shattered when you foolishly moved it straight from the fridge to a 450-degree oven. Eggshells are designed to withstand internal pressure, and while a few might develop a hairline crack, the vast majority will survive the hot start perfectly intact, rewarding you with a flawless peel.
The Masterclass Method: How to Boil and Peel Flawlessly
We have covered the anatomy, the pH, and the thermodynamics. Now, it is time to put the science into practice. Here is your definitive, no-nonsense, step-by-step masterclass on how to execute the perfect hard-boiled egg.
Step 1: The Setup (Gear Matters)
I am the Sassy Sous-Chef, which means I have zero patience for cheap, gimmicky, toxic kitchen gadgets. You know I am fiercely dedicated to banishing toxic kitchen gear from your home, and boiling eggs is no exception.
Do not use those cheap, plastic, microwave egg-cooking contraptions that leach endocrine disruptors into your food. Do not use flimsy, scratched-up non-stick pots where the Teflon coating is actively flaking off into your boiling water. I despise cheap cookware. Just as it infuriates you when your baking sheets keep warping the second they hit a 400-degree oven, you should absolutely refuse to use sub-par pots for basic tasks.
You need exactly two pieces of equipment: a high-quality, heavy-bottomed stainless steel saucepan, and a stainless steel steamer basket insert. That’s it. Safe, durable, lifetime-guaranteed metal.
Step 2: The Steam (Yes, Steam, Not Boil)
Here is the biggest plot twist of this entire masterclass: the absolute best way to make a hard-boiled egg is to not boil it at all. You should be steaming it.
Why is steaming superior to submerging eggs in boiling water? Two reasons. First, steam is incredibly gentle on the shells. When you drop eggs into a pot of violently churning boiling water, the eggs bounce around, smashing into each other and the sides of the pot, leading to cracked shells and leaked whites. In a steamer basket, the eggs sit peacefully in a single layer, undisturbed.
Second, and more importantly, steam vapor is highly penetrative. The 212°F (100°C) steam easily permeates the thousands of microscopic pores in the eggshell. As the hot vapor enters the shell, it physically helps separate the keratin membrane from the egg white, loosening the bond and making the egg infinitely easier to peel.
The Steaming Process:
- Place your stainless steel steamer basket into your saucepan.
- Add about one inch of water to the bottom of the pan—just enough so it sits below the steamer basket.
- Place the pot on the stove over high heat and bring the water to a rapid, rolling boil.
- Once the steam is billowing, take your aged, cold eggs directly from the fridge and gently place them into the steamer basket in a single layer.
- Cover the pot tightly with a lid to trap the steam.
The Timing:
Timing is everything, and because steam maintains a constant, aggressive 212°F (100°C), it is incredibly consistent. Set your timer the exact second the lid goes on.
- 6 to 6.5 Minutes: A perfect soft-boiled egg with fully set whites and a completely liquid, runny yolk.
- 8 to 9 Minutes: A jammy, medium-boiled egg with a fudgy, custard-like yolk (perfect for ramen).
- 12 to 13 Minutes: A classic hard-boiled egg with a firm, opaque, creamy yolk (perfect for deviled eggs or egg salad).
Step 3: The Ice Bath (Crucial and Non-Negotiable)
When your timer goes off, the cooking process is not over. If you take the eggs out of the pot and leave them on the counter, the residual heat trapped inside the shell will continue to cook the yolk for another five to ten minutes, resulting in a chalky, overcooked disaster.
You must immediately execute an ice bath. Before your timer goes off, fill a large bowl with cold water and a massive handful of ice cubes. When the eggs are done, do yourself a massive favor and use a stainless steel spider skimmer to gently lift them out of the steamer basket and plunge them directly into the freezing water.
The ice bath serves two critical functions. First, it instantly halts the carryover cooking process, locking in the exact yolk texture you timed out. Second, the extreme cold causes the egg white to physically contract and shrink away from the shell, further widening that microscopic gap we created with the hot start. Leave the eggs submerged in the ice bath for a minimum of 15 minutes. Do not rush this step.
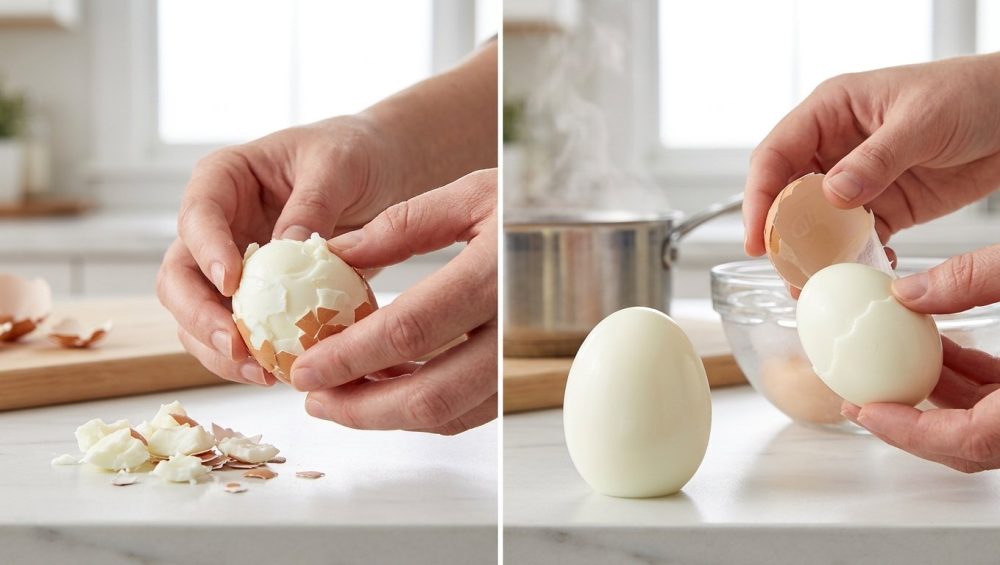
Step 4: The Crack and Peel
Once the eggs are completely chilled to the core, it is time to peel.
Take an egg and gently tap the wide, bottom end on your countertop. The wide end houses a small pocket of air (the air cell). Cracking this end first gives you an easy entry point. Next, gently roll the egg along the counter under the palm of your hand, applying just enough pressure to create a mosaic of tiny cracks all over the shell.
Now, peel the egg while it is fully submerged in the ice water bath, or hold it under a gentle stream of cold running tap water. The water will seep through the cracks, slipping underneath the inner membrane and acting as a hydraulic lubricant, helping the shell slide off in large, satisfying sheets.
The Dreaded Green Ring: Iron Sulfide Chemistry
If you have ever sliced into a hard-boiled egg only to be greeted by a ghastly, greenish-gray ring surrounding the yolk, you know the feeling of culinary defeat. It looks unappetizing, it smells faintly of sulfur, and it turns a beautiful deviled egg into a swampy mess. But what exactly is that green ring, and how do we banish it forever?
What Causes the Yolk to Turn Green?
Once again, we turn to chemistry. That green ring is a chemical compound known as ferrous sulfide (FeS), and it is the direct result of overcooking your eggs.
The albumen (egg white) is rich in amino acids that contain sulfur. When the egg white is exposed to prolonged, high heat, these sulfur-containing proteins begin to break down and release hydrogen sulfide gas (H2S). If you have ever smelled a rotten egg, you know exactly what hydrogen sulfide smells like.
Meanwhile, the egg yolk contains high levels of naturally occurring iron. When the hydrogen sulfide gas from the white meets the iron in the yolk, a chemical reaction occurs, forming iron(II) sulfide (ferrous sulfide) right at the boundary where the yolk and white meet. This compound is entirely harmless and perfectly safe to eat, but it tastes chalky and looks terrible.
How the Ice Bath Prevents It
The formation of the green ring is heavily dependent on temperature and gas solubility. According to the laws of chemistry, gases are highly soluble in cold environments and much less soluble in hot environments.
When you boil an egg, the heat penetrates from the outside in. The outer egg white gets blazing hot, while the inner yolk remains relatively cooler for a longer period. Because the hydrogen sulfide gas wants to move toward the cooler environment, it migrates inward, directly toward the iron-rich yolk, where it reacts and forms the green ring.
This is exactly why the ice bath is your savior. When you take a hot egg and plunge it into freezing ice water, you rapidly reverse the temperature gradient. Suddenly, the outside of the egg is freezing cold, while the center yolk is still warm. The hydrogen sulfide gas is immediately drawn outward, migrating away from the yolk and toward the icy shell. Because the gas never has a chance to sit and react with the iron, the green ring never forms, leaving you with a brilliant, sunshine-yellow yolk.
If your yolks are turning green, your timing is off—much like when your meat thermometer is lying to you about the internal temp of a steak. It means you either left the eggs in the hot water for far too long, or you completely skipped the ice bath. Respect the timer, and respect the ice.
Debunking Ridiculous Egg-Peeling Myths
Because peeling eggs has been a universal struggle for so long, the internet is absolutely flooded with ridiculous hacks, myths, and old wives’ tales. Let’s scientifically debunk the nonsense so you can stop wasting your time.
Vinegar and Baking Soda: Do They Actually Work?
You will find hundreds of blogs telling you to add a splash of vinegar or a tablespoon of baking soda to your boiling water to make the eggs peel easier. This is fundamentally flawed logic.
The idea behind baking soda is that it raises the pH of the water, making it highly alkaline. While it is true that a high pH makes eggs easier to peel (as we discussed with aged eggs), the baking soda in the boiling water does not actually penetrate the shell fast enough to alter the internal pH of the albumen during a quick 12-minute boil.
The idea behind vinegar is that the acidic acid will begin to dissolve the calcium carbonate shell, making it thinner and more brittle. While vinegar does dissolve eggshells (if you leave an egg in vinegar for 48 hours, the shell will completely vanish), a splash of vinegar in a 12-minute boiling pot does virtually nothing to the inner keratin membrane, which is the actual culprit of sticking.
The Thumbtack Hole Trick
Another popular hack involves using a thumbtack to pierce a tiny hole in the wide end of the eggshell before boiling. The theory is that this allows water to seep in and separate the membrane.
In reality, poking a hole does serve a minor purpose, but not for peeling. The hole allows the expanding pocket of air inside the egg to escape during the rapid heating process, which can slightly reduce the chances of the shell cracking under pressure. However, it does not magically un-fuse the proteins from the membrane. If you use fresh eggs and a cold start, a thumbtack hole will not save you.
The “Shake in a Glass” Method
You’ve probably seen the viral videos where someone places a hard-boiled egg in a small glass with a splash of water, covers the top with their hand, and shakes it violently until the shell falls off.
This is a fun party trick, and if the egg was cooked properly with a hot start, it actually works quite well because the membrane is already detached. However, if the egg white is fused to the membrane, shaking it violently in a glass will simply tear the egg to shreds, leaving you with a watery cup of pulverized egg-white mush.
Relying on old wives’ tales is just as frustrating as wondering why your silicone spatulas taste like soap after a run through the dishwasher—the answer is always rooted in bad chemistry, not kitchen magic. Stop relying on gimmicks and start relying on thermal shock.
Storing and Prepping for the Week
Now that you have mastered the science of the perfect, easily peelable hard-boiled egg, you can finally incorporate them into your weekly meal prep routine without the looming dread of a peeling disaster.
Maximizing Shelf Life and Freshness
Hard-boiled eggs are the ultimate convenience food, but they must be stored correctly. Once you have steamed your eggs and shocked them in the ice bath, dry them off and place them directly into the refrigerator.
Do not peel them until you are ready to eat them! The calcium carbonate shell and the inner keratin membrane act as the ultimate natural Tupperware. Leaving the shell on protects the delicate egg white from absorbing the ambient odors of your refrigerator (nobody wants an egg that tastes like yesterday’s leftover garlic salmon). Unpeeled hard-boiled eggs will easily last for a full seven days in the fridge.
If you absolutely must peel them in advance for a large batch of egg salad or deviled eggs, store the peeled eggs in a tightly sealed glass container lined with a damp paper towel to prevent them from drying out, and consume them within two to three days.
When you have a fridge full of perfectly prepped, easy-to-peel eggs, you can skip the morning stress of ruining your nonstick pans with rushed, messy frying. You simply grab a cold egg, give it a tap, watch the shell slide off in two perfect, satisfying sheets, and enjoy a flawless, protein-packed breakfast on the go.
Conclusion: Reclaiming Your Kitchen Sanity
Cooking should never be a source of stress. It should be an empowering, creative, and deeply satisfying practice. When we allow ourselves to be intimidated by something as seemingly simple as a hard-boiled egg, we surrender our confidence in the kitchen.
But as we have proven today, the kitchen is not a place of mystery or magic. It is a laboratory of applied science. The moment you stop viewing a stuck eggshell as a personal failure and start viewing it as a predictable chemical reaction between denaturing albumen proteins and a low-pH keratin membrane, you take back your power.
You now know the secrets. You know that farm-fresh eggs are meant for the frying pan, while aged, alkaline eggs belong in the steamer basket. You know that the cold-water start is a generational lie that promotes permanent protein adhesion. You know that aggressive, 212°F steam vapor is the key to rapid exterior coagulation, and that a freezing ice bath is the ultimate weapon against the dreaded, sulfurous green ring.
You don’t need a culinary degree to cook like a master. You just need the right knowledge, a refusal to compromise on the quality of your gear, and a basic respect for thermodynamics. So go forth, buy a carton of eggs, let them age gracefully in the back of your fridge, and fire up that steamer basket. Your days of chipping away at mangled, crater-filled egg whites are officially over. Welcome to the era of the flawless peel.


