The Scrambled Egg Tragedy: A Morning Ruined by Mystery Specks
Picture this: It is a beautiful Sunday morning. You have finally carved out a little time for yourself, and you are feeling like an absolute weekend culinary warrior. You have decided to treat yourself to a gorgeous, slow-cooked scramble. You expertly crack your farm-fresh eggs, whisk them to a frothy perfection, and pour them into your trusty, heavy-duty cast iron skillet. You are flipping and folding, feeling like a true kitchen artist, especially since you are finally banishing toxic kitchen gear from your life and embracing the traditional tools of our ancestors.
You slide those beautiful, pillowy eggs onto a warm plate, grab your fork, and look down.
There they are. Mysterious, unappetizing, jet-black specks peppered throughout your pristine yellow eggs like some sort of culinary cruel joke. Panic immediately sets in. Did you just ruin the pan? Are you feeding your family toxic metal shavings? Do you need to throw the whole skillet in the trash and order takeout?
Take a deep breath, pour yourself a mimosa, and listen to me closely: You did not ruin your pan, and you are not poisoning anybody. As a home cook who has set off the smoke detector more times than I care to admit, I can promise you that this is one of the most common, frustrating, and deeply misunderstood phenomena in the modern kitchen. Cast iron is essentially a hunk of metal forged in the fires of Mount Doom; you are not going to destroy it by cooking breakfast.
However, I have absolutely zero patience for the pretentious, gatekeeping kitchen bros on the internet who act like maintaining cast iron requires a degree in metallurgy and the tears of a unicorn. We are busy people. We need our kitchen tools to work for us, not the other way around. Today, we are going to dive deep into the actual, verified science of why your cast iron skillet is shedding black flakes. We are going to bust the ridiculous myths that your grandmother passed down, and I am going to give you a foolproof, step-by-step masterclass on how to fix your skillet so it never, ever ruins your Sunday breakfast again.
What Exactly Are You Eating? The Anatomy of a Black Speck
Before we can fix the problem, we need to diagnose it. When you see black residue or solid black flakes coming off your cast iron, you are looking at one of two distinct culprits.
First, it could simply be carbonized food remnants. If you seared a steak on Thursday, gave the pan a lazy, half-hearted wipe with a dry paper towel, and then tried to cook eggs on Sunday, those specks are just burnt-on dinner. When organic substances—like food particles, leftover cooking oils, and animal fats—are subjected to high heat, they undergo a chemical breakdown called carbonization. This process strips away everything but the pure carbon structure, leaving behind a hard, black, charcoal-like deposit. While it looks alarming, it is completely harmless to consume. It is, however, objectively gross. You might wonder why your plastic containers stay greasy while your cast iron sheds dry, brittle flakes; it all comes down to how different materials react to residual lipids under heat.
The second, and far more frustrating culprit, is flaking seasoning. If your pan is meticulously clean but you are still getting black chips in your food, your actual seasoning layer has structurally failed and is peeling off.
To understand why this happens, we have to strip away the culinary folklore and look at the actual science of what “seasoning” a pan truly means.
The Hardcore Chemistry of Cast Iron Seasoning
If you hang around online cooking forums long enough, you will hear people talk about “seasoning” as if it is a magical, mystical aura that blesses the pan. It is not magic. It is chemistry.
When you apply a thin layer of cooking oil to bare iron and heat it past its smoke point, the oil does not just “dry out.” It undergoes a complex series of chemical reactions, primarily thermal oxidation and polymerization. During polymerization, the individual fatty acid molecules in the oil break down and release free radicals. These tiny molecules then aggressively link up with one another, cross-linking to form massive, strong, interconnected chains.
The result of this molecular dance is a hard, slick, hydrophobic (water-repelling) layer that is chemically bonded to the porous surface of the iron. You have essentially created a layer of natural, food-safe plastic. Unlike synthetic, factory-applied chemical coatings that keep losing their slip after a few months of heavy use, a polymerized cast iron surface is continuously renewable. Every time you cook with fats at high heat, you are laying down another microscopic layer of polymer, strengthening the bond and improving the non-stick properties.
However, this chemical bond is only as strong as the foundation it is built upon. If the polymerization process is interrupted, or if the conditions are wrong, the cross-linked chains become weak. And when those weak bonds are subjected to the thermal shock of cooking, they shatter, crack, and flake off into your food.
The Four Horsemen of Flaking Seasoning
So, why did your polymer bonds fail? In my years of fixing ruined dinners and rescuing abused cookware, I have found that flaking seasoning almost always comes down to one of four critical mistakes. I call them the Four Horsemen of Flaking Seasoning.
1. The “Too Much Oil” Catastrophe
This is the most common mistake made by well-meaning weekend hobbyists. The logic seems sound: if a little oil makes the pan non-stick, then slathering it in a thick, heavy coat of oil must make it super non-stick, right? If you want to stop ruining your nonstick pans, you have to understand that oil does not work like paint.
When you leave a thick layer of oil on the cast iron and put it in the oven, only the very top surface of the oil makes direct contact with the intense heat and oxygen required to polymerize. The top layer forms a hard crust, while the oil trapped underneath remains semi-liquid, gummy, and unbonded. Because the foundation is essentially a layer of sticky goo, the hard crust on top has nothing to hold onto. The moment you scrape it with a spatula or shock it with cold food, that thick, brittle top layer chips right off.
2. The Great Flaxseed Oil Fallacy
Around 2010, an incredibly popular blog post circulated the internet claiming that flaxseed oil was the absolute, scientifically proven ultimate fat for seasoning cast iron. The reasoning was based on woodworking: flaxseed oil is the food-grade equivalent of linseed oil, a “drying oil” that polymerizes rapidly and creates a rock-hard finish on furniture.
The internet went wild. People stripped their pans and spent a fortune on organic, cold-pressed flaxseed oil. It looked amazing at first—the pans came out of the oven looking like slick, black glass. But then, real home cooks started actually using them. And almost universally, the seasoning began to violently flake off.
Why? Because chemistry in a vacuum does not account for thermodynamics in a kitchen. Yes, flaxseed oil creates a very hard polymer matrix. But it is too hard. Cast iron expands when it is heated and contracts when it cools. A polymer layer that is too rigid cannot stretch and flex with the expanding metal beneath it. It acts like dry paint on a balloon. When the iron expands, the brittle flaxseed polymer shatters and flakes off. The best oils for durable seasoning are those that create a strong but slightly flexible bond, like standard vegetable oil, canola oil, grapeseed oil, or good old-fashioned Crisco.
3. The Acidic Food Ambush
Cast iron is tough, but it has an Achilles’ heel: acid. Simmering highly acidic foods—like tomato sauce, wine-heavy braises, or vinegar-based marinades—for extended periods will actively eat away at the polymerized oil layer. The acid breaks down the chemical bonds of the seasoning, causing it to lift from the iron and flake into your sauce.
Does this mean you can never cook tomatoes in cast iron? Of course not. A quick pan-sauce or a brief deglaze is perfectly fine for a well-seasoned skillet. But if you are slow-simmering a Sunday gravy for four hours, do yourself a favor and use an enameled Dutch oven or a stainless steel pot.
4. The “Never Use Soap” Myth (My Personal Nemesis)
We have arrived at my absolute biggest pet peeve in the culinary world. If I see one more pretentious internet chef screaming at a home cook for washing their pan, I am going to lose my mind. Let’s get this straight right now: The primary reason your cast iron has black specks is likely because your pan is downright filthy.
People are so terrified of soap that they worry their silicone spatulas taste like soap if they even look at a bottle of Dawn. This fear comes from a very real historical fact that has been completely taken out of context. A hundred years ago, your great-grandmother made soap using rendered animal fat and wood ash, which creates lye (sodium hydroxide). Lye is a highly caustic, alkaline substance. It is so powerful at breaking chemical bonds that we actually use lye-based oven cleaners today to intentionally strip vintage cast iron down to the bare metal. If you washed your pan with 19th-century lye soap, yes, it would absolutely destroy your seasoning.
But it is not the 1800s anymore. Modern liquid dish detergents (like Dawn) do not contain lye. They are pH-balanced synthetic surfactants. These modern soaps are chemically designed to surround loose, free-floating grease molecules and suspend them in water so they can be rinsed down the drain. They are physically incapable of breaking the rock-hard, cross-linked covalent bonds of polymerized oil.
When you refuse to use soap, you are not “protecting your seasoning.” You are simply leaving a layer of rancid, unpolymerized cooking grease rotting on the surface of your pan. The next time you heat the pan, that rancid grease burns, carbonizes, and turns into—you guessed it—black specks. Wash your pan. Use the soap. I promise you, science is on my side.
Why I Will Take Carbon Flakes Over Toxic Teflon Any Day
At this point, you might be feeling overwhelmed. You might be staring at your flaking cast iron skillet and thinking, “Why do I bother? I should just go buy a cheap non-stick pan from the big box store.”
Stop right there. As your Sassy Sous-Chef, I have a strict, non-negotiable rule against toxic kitchenware. When your cheap baking sheets pop in the oven, it is a minor annoyance. But when a cheap non-stick pan starts to flake, it is a legitimate health hazard.
Traditional non-stick pans are coated with PTFE (Polytetrafluoroethylene), commonly known by the brand name Teflon. When these pans are scratched by metal utensils, or heated past 500°F (which happens incredibly fast on a standard gas stove), the chemical coating begins to break down, off-gas toxic fumes, and physically peel off into your food. Those flakes are synthetic “forever chemicals” that your body cannot process.
Conversely, the black specks coming off your cast iron are literally just carbon and iron. It is the exact same carbon you consume when you eat a piece of toast that got a little too dark, or a burger with a nice char from the grill. It is entirely non-toxic, completely safe, and naturally occurring. Yes, it ruins the aesthetic of your scrambled eggs, and yes, it alters the texture of your meal, but it will not harm you.
Cast iron is a lifetime investment. A cheap non-stick pan is destined for a landfill in 18 months. We are going to fix your iron, and we are going to do it right now.
The Masterclass Fix: How to Strip, Clean, and Rebuild Your Skillet
If your pan is leaving black specks on your food or your paper towels, you have a weak layer of carbon or failing polymer that needs to be evicted. We are not going to baby it. We are going to strip the weak bonds and rebuild a rock-hard, bulletproof surface.
Step 1: The Exfoliation (Stripping the Weak Bonds)
First, we need to aggressively remove anything that is loose. If a piece of seasoning is weak enough to flake off into your eggs, it does not deserve to be on your pan.
Take your dry skillet and place it in the sink. Grab a handful of coarse kosher salt and dump it into the pan. Using a slightly damp rag, a paper towel, or even half of a raw potato, bear down and scrub the living daylights out of the cooking surface. The coarse salt acts as a brilliant, natural abrasive that will sheer off the loose, brittle flakes without damaging the strong, healthy polymer underneath.
If the flaking is severe, or if you have thick, stubborn ridges of burnt-on carbon, you may need to escalate. While there are times you should stop scrubbing your skillet to preserve flavor for a pan sauce, this is not one of them. Fill the skillet with an inch of water, add two tablespoons of baking soda, and bring it to a rolling boil on the stove. The alkaline baking soda combined with the boiling water will help soften and lift the weakened carbon bonds. Take a flat metal spatula and aggressively scrape the bottom of the pan while the water boils. Dump the dirty water and marvel at how much black sludge you just removed.
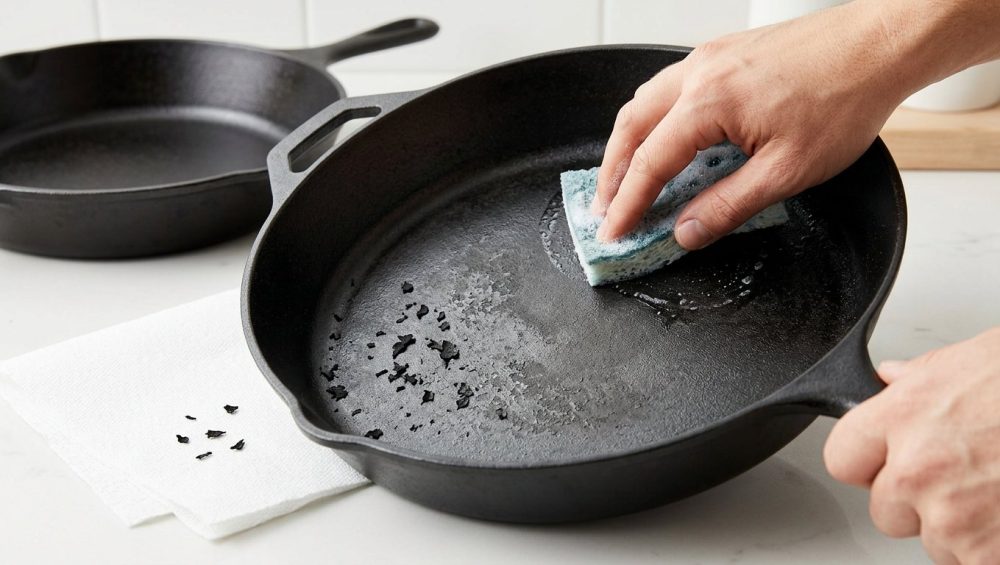
Step 2: The Deep Clean (Yes, Bring Out the Suds)
Now that the loose flakes are gone, we need to remove the microscopic layer of unbonded grease that is preventing new seasoning from sticking.
Take your skillet to the sink, turn the water as hot as you can stand it, and squirt a generous amount of standard liquid dish soap directly into the pan. Grab a stiff-bristled nylon brush or a dedicated sponge. A good scrubbing brush is absolutely one of the essential tools every beginner needs for cast iron care. Scrub the pan vigorously until the soap suds remain bright white. If the suds are turning brown or gray, your pan is still dirty. Keep scrubbing and rinsing until the bubbles are pure white.
Step 3: The Bone-Dry Heat
Water is the enemy of iron. If you simply wipe your pan with a dish towel and put it away, the microscopic moisture trapped in the porous surface will cause flash rust, completely ruining your hard work.
Place your freshly washed skillet on the stovetop over medium-low heat. Let it sit there for 3 to 5 minutes until every single molecule of water has evaporated and the pan is bone-dry and warm to the touch.
Step 4: The Micro-Layer Re-Seasoning
Now we rebuild. Turn your oven to 450°F (or 500°F depending on the smoke point of your oil).
While the pan is still warm from the stove, add a tiny drop (no more than a teaspoon) of a reliable, high-smoke-point oil. Canola, grapeseed, or melted vegetable shortening (Crisco) are the gold standards. Take a paper towel and rub the oil over every square inch of the pan—inside, outside, and the handle.
Now, here is the secret that separates the amateurs from the pros: Take a brand new, clean paper towel, and wipe all the oil out of the pan. Wipe it as if you suddenly realized applying the oil was a terrible mistake and you want to remove every single trace of it.
Your pan should look completely dry, with only a dull, microscopic sheen remaining. This micro-layer is the exact thickness required for perfect polymerization. If the pan looks wet or glossy, you have too much oil, and you will end up right back at Horseman Number One.
Place the skillet upside down on the top rack of your preheated oven. Place a sheet of aluminum foil on the bottom rack to catch any potential drips (though if you wiped it correctly, there shouldn’t be any). Bake it for exactly one hour. Turn the oven off and let the pan cool completely inside the oven.
Congratulations. You have just forged a rock-hard, non-stick, flake-free polymer shield.
Everyday Maintenance: How to Keep the Specks Away Forever
You have put in the hard work to restore your skillet. Now, you need to maintain it. Cast iron thrives on routine. Just like how ignoring a honing rod guarantees your kitchen knives get dull, ignoring daily maintenance guarantees your pan will start flaking again.
The Post-Cook Wash
Wash your pan after every single use. Do not let it sit on the stove overnight with bacon grease congealing in it. Use warm water, a squirt of dish soap, and a brush. Remove the food residue before it has a chance to turn into a permanent carbon deposit.
The Stovetop Dry
Never, ever let your cast iron air dry on a rack. After washing, immediately put it on the stovetop over low heat to evaporate the moisture. Once it is dry, while the iron is still warm, apply three drops of oil and wipe it completely dry with a paper towel. This acts as a protective rust barrier until your next cook.
The Right Utensils
Stop using thick, clumsy wooden spoons or soft silicone spatulas when cooking in cast iron. You want a thin, flexible, flat-edged metal spatula. Using the wrong tools is a recipe for disaster, much like how bad cutting boards are ruining your knives. A flat metal spatula acts like a subtle scraper while you cook. Every time you flip a burger or toss your hash browns, the sharp metal edge levels out the seasoning, shaving off microscopic high spots of carbon before they can build up into flakes. It keeps the cooking surface smooth, uniform, and perfectly non-stick.
Final Thoughts from the Sous-Chef
Cooking with cast iron is not a delicate art reserved for pioneer reenactors and professional chefs. It is a rugged, forgiving, and deeply rewarding way to cook everyday meals in a standard home kitchen.
Those black specks in your eggs are not a sign of failure; they are simply a sign that your pan is begging for a spa day. Stop babying your skillet. Scrub away the weak bonds, embrace the cleaning power of modern dish soap, and learn to apply your oil in microscopic layers. Once you respect the basic chemistry of polymerization, you will unlock a lifetime of perfect, golden sears, sliding eggs, and absolutely zero black flakes.
Now, go scrub that pan, pour yourself another mimosa, and make those Sunday eggs the way they were meant to be eaten. You’ve got this.


