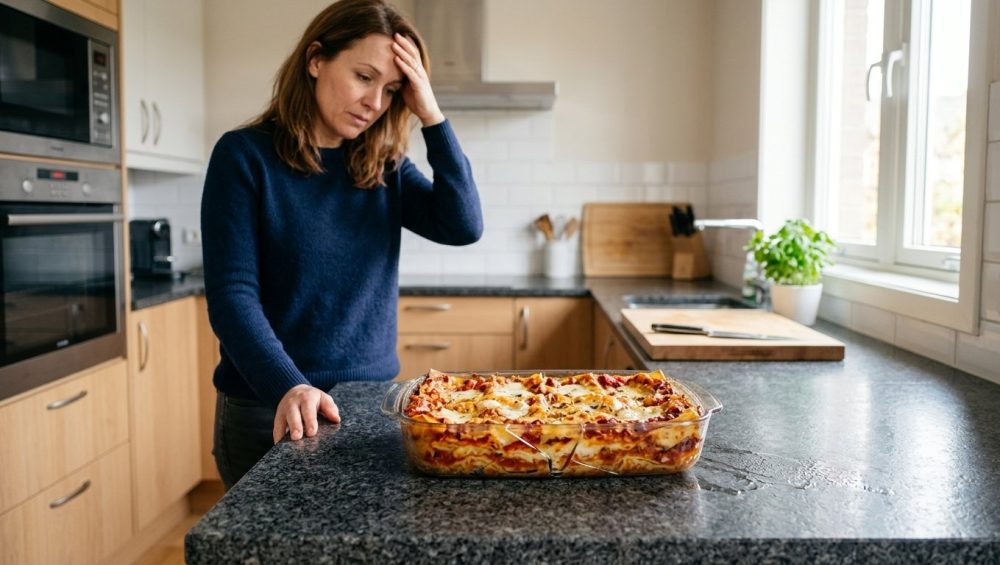
Picture this: It is 7:30 PM on a random Tuesday. You have just survived another soul-crushing day of back-to-back meetings, endless emails, and commuting traffic. By some absolute miracle of sheer willpower, you actually managed to meal-prep a gorgeous, bubbling, multi-layered lasagna over the weekend. You pull that heavy glass baking dish out of the 400-degree oven, feeling like an absolute domestic god, and confidently set it down on your pristine granite countertop. You turn around to grab a serving spatula, and then—BANG.
It sounds like a literal shotgun went off in your kitchen.
You whip around to find your beautiful, meticulously crafted lasagna completely obliterated, sitting in a terrifying, glittering pile of razor-sharp glass shards. Dinner is ruined, your kitchen is a hazardous disaster zone, and you are left staring at the mess, wondering what on earth you did to anger the culinary gods.
Welcome to the infuriating, mildly terrifying world of exploding glass bakeware.
As a busy professional who relies on clever weekday cooking hacks to buy time for my elaborate weekend culinary projects, I have absolutely zero patience for kitchen gear that actively sabotages me. I firmly believe that anyone can cook like an expert in a standard home kitchen without a fancy culinary degree, but you cannot do that if your equipment is literally blowing up in your face. Today, we are going to dive deep into the exact science of why your trusty glass casserole dish suddenly turned into a fragmentation grenade, the hidden industry secrets behind modern glass manufacturing, and the strict, no-nonsense rules you must follow to ensure this never happens to you again. Grab a glass of wine, take a deep breath, and let’s talk about thermal shock.
The Physics of the Exploding Casserole: What Exactly is Thermal Shock?
To understand why your dish shattered, we need to strip away the pretentious chef-speak and look at some basic, undeniable physics. The invisible culprit behind your ruined dinner is a scientific phenomenon known as thermal shock.
Everything in the physical world expands when it gets hot and contracts when it gets cold. This is a fundamental law of thermodynamics. If your baking sheet pops in the oven, that loud metallic clang is just the metal expanding unevenly under the intense heat. Metal is highly flexible and ductile; it warps, it bends, and it eventually settles into its new temperature. Glass, however, is an entirely different beast. Glass is an amorphous solid that is incredibly rigid and notoriously poor at conducting heat.
When you pull a hot glass pan out of the oven, the entire vessel is in a state of thermal expansion. The molecules are energized and spaced out. If you place that 400-degree glass onto a significantly colder surface—like a room-temperature stone countertop, a wet towel, or a cold metal sink—the specific area of the glass that touches the cold surface rapidly drops in temperature and immediately tries to contract. However, the rest of the dish (the thick sides and the handles) is still screaming hot and remains fully expanded.
This creates a massive internal tug-of-war on a molecular level. The cold bottom is aggressively shrinking, while the hot sides are stubbornly staying stretched out. Because glass has virtually zero elasticity, the stress builds up in a fraction of a second until the structural integrity completely fails. The material cannot bend or stretch to accommodate the difference in temperature, so it snaps. Violently. The result is a catastrophic shatter that sends shards flying across your kitchen at high speeds.
The Great Glass Deception: Borosilicate vs. Soda-Lime
Here is where the story gets juicy, and where I get to unleash a little well-deserved snark at corporate corner-cutting. You might be reading this and thinking, “But my grandmother used the exact same glass pie dish for fifty years and it never exploded!” You are absolutely right. But your grandmother’s glass dish and the one you bought at a big-box store three years ago for twelve dollars are fundamentally, chemically different materials.
The Golden Era of Borosilicate Glass
Back in 1893, a brilliant German chemist and glass technologist named Otto Schott developed a revolutionary new material called borosilicate glass. By adding boron trioxide to the traditional glassmaking mix of silica and sand, he created a glass with a remarkably low coefficient of thermal expansion. In plain English: it barely expands or contracts when exposed to extreme temperature changes.
In 1908, Eugene Sullivan, the director of research at Corning Glass Works, utilized this borosilicate technology to develop a shock-resistant glass called Nonex. The original purpose had absolutely nothing to do with baking. Railroad lantern globes and battery jars kept shattering when the hot glass was struck by cold rain or snow, and they needed a material that could survive the elements. The legend goes that the wife of a Corning scientist, Bessie Littleton, asked to use a sawed-off Nonex battery jar to bake a sponge cake. It baked beautifully, and in 1915, Corning introduced this borosilicate wonder-material to the American public under the brand name Pyrex.
It was marketed as “oven to icebox” cookware because it was virtually bulletproof against thermal shock. According to modern engineering data, borosilicate glass has a thermal expansion coefficient of around 3.3 to 5.1 µm/m-K. It was the undisputed gold standard of the American kitchen, built to survive the chaotic, messy realities of everyday home cooking without breaking a sweat.
The 1998 Switch to Soda-Lime Glass
Fast forward to the late 1990s. Corning decided to pivot its business model and spin off its consumer kitchenware division, and the brand was eventually acquired by World Kitchen (now known as Corelle Brands). In 1998, the new manufacturers made a massive, highly controversial change to the U.S. production lines: they stopped using the expensive, heat-resistant borosilicate glass and switched to a much cheaper alternative called tempered soda-lime glass.
Soda-lime glass is the exact same stuff used to make cheap beverage bottles, jam jars, and windowpanes. While the tempering process makes it highly resistant to physical impact (meaning it is less likely to break into dangerous shards if you accidentally drop it on the floor), its thermal resistance is absolute garbage compared to borosilicate. Soda-lime glass has a thermal expansion coefficient of roughly 8.8 to 9.0 µm/m-K, meaning it expands and contracts almost twice as much as borosilicate when exposed to heat.
The real-world consequences of this corporate switch have been dramatic. Between 1998 and 2007, the Consumer Product Safety Commission (CPSC) reported that nearly 12,000 people ended up in emergency rooms due to injuries from shattering glass bakeware. In 2010, Consumer Reports conducted an exhaustive laboratory test to see just how fragile these modern pans were. They heated both types of glass to extreme temperatures and placed them directly on wet granite countertops. The vintage borosilicate dishes survived the abuse, but the modern soda-lime dishes violently shattered ten out of ten times.
Just like when your favorite ceramic pan lost its non-stick coating after only a month of regular use, cheap manufacturing materials always reveal their true colors eventually. The industry traded thermal safety for impact resistance and cost savings, leaving the home cook to deal with the explosive consequences.
How to Identify What You Actually Own
So, how do you know if you are cooking with a sturdy vintage treasure or a modern ticking time bomb? It is actually quite simple if you know what to look for, and you don’t need a chemistry degree to figure it out.
First, flip your dish over and look at the logo stamped on the bottom. If it reads PYREX in all capital letters, congratulations! You likely have a vintage American piece manufactured before 1998, or a modern European piece, both of which are made of high-quality borosilicate glass. If the logo reads pyrex in all lowercase letters, you are holding modern, American-made tempered soda-lime glass.
If the logo is worn off or ambiguous, you can perform the classic rim test. Hold the glass dish up to a source of natural light and look closely at the exposed edge or rim. Borosilicate glass will appear perfectly clear or slightly yellow. Soda-lime glass, due to its specific chemical composition, will have a distinct, unmistakable bluish-green tint along the edges. Finding out you own the cheap stuff is a frustrating realization, much like discovering your trusty meat thermometer is lying to you right before you carve an expensive holiday roast.
The Seven Deadly Sins of Glass Bakeware
Now that we have established the underlying science and the sneaky manufacturing changes that compromised our cookware, let’s talk about human error. Even the highest-quality borosilicate glass has its breaking point. If you want to keep your dinners intact and your kitchen free of flying shrapnel, you must absolutely avoid these seven everyday habits.
1. The Hot Pan, Cold Countertop Trap
This is, without a doubt, the number one killer of glass bakeware. Granite, marble, quartz, and stainless steel are incredibly dense materials that act as massive heat sinks. When you place a 400-degree glass dish directly onto a room-temperature stone counter, the stone rapidly sucks the heat out of the bottom of the glass. The heat transfer is instantaneous. If that countertop happens to be even slightly wet from a recent wipe-down, the heat transfer happens exponentially faster. The bottom of the dish shrinks instantly, the sides stay expanded, and you are left with a shattered mess. Never, ever put hot glass on bare stone or metal.
2. The Fridge-to-Oven Fantasy
We all love the idea of efficient meal prep. Assembling a casserole on Sunday, keeping it in the fridge, and popping it straight into the oven on a busy Wednesday night sounds like the ultimate weekday cooking hack. Do not do this with glass. Taking a 35-degree dish out of the refrigerator and shoving it immediately into a 400-degree environment is begging for a thermal shock explosion. You think you are saving time by skipping the thawing process, but you are just setting yourself up to frantically rescue a ruined dinner at eight o’clock at night when you should be relaxing. Always let refrigerated glass sit on the counter for at least 30 to 45 minutes to take the chill off before baking.
3. Adding Cold Liquids to a Hot Roasting Pan
Let’s say you are roasting a beautiful pork loin or a whole chicken, and you notice the bottom of the glass dish is starting to dry out and burn. Your immediate instinct is to grab a measuring cup of cold chicken broth or tap water and pour it right into the pan to keep things moist and create a pan sauce. Stop right there. Pouring a cold liquid directly onto screaming hot glass causes an immediate, localized temperature drop that will crack the dish in seconds. If you need to add liquid during the cooking process to deglaze or baste, you must heat the liquid in the microwave or on the stove first. You wouldn’t throw ice water into a hot skillet unless you wanted to stop making greasy gravy and start making a massive, dangerous mess.
4. The Damp Towel Disaster
Using a folded kitchen towel as a makeshift trivet is a very common kitchen habit, but it comes with a massive, highly dangerous caveat: the towel must be absolutely, 100% bone dry. Water conducts heat roughly 25 times faster than air. If your kitchen towel or potholder is even slightly damp from wiping your hands or cleaning up a minor spill, it will rapidly accelerate the heat transfer away from the hot glass. Setting a hot dish on a damp cloth triggers the exact same thermal shock response as a wet granite countertop.
5. Preheating Roulette
I see home cooks do this constantly: they turn the oven on, set the temperature, and immediately stick their cold glass dish inside while the oven preheats. This is a terrible idea. Most modern ovens preheat by blasting the top broiler element and the bottom baking element at maximum capacity to reach the target temperature as quickly as possible. This means your glass dish is being subjected to intense, direct, uneven radiant heat rather than the gentle, ambient heat of a fully preheated oven. This intense, directional heat blast is exactly why your brownies keep burning on the bottom while the center stays raw. You must wait until the oven completely beeps and cycles off its preheat phase before inserting any glass bakeware.
6. The Broiler is a Strict No-Go Zone
This rule is completely non-negotiable. Glass bakeware should never, under any circumstances, be placed under an active broiler. A broiler is essentially an upside-down grill that applies intense, concentrated infrared heat directly to the surface of the food (and the dish). The top rim of the glass will heat up hundreds of degrees faster than the bottom, causing an almost guaranteed shatter. If a recipe calls for broiling cheese on top of a casserole for the last three minutes to get that perfect golden-brown crust, you must use a metal pan or enameled cast iron. Glass simply cannot survive the broiler.
7. Ignoring Micro-Scratches
Glass is a strong material, but its structural integrity relies entirely on a smooth, uncompromised surface. Every time you use a metal knife to cut lasagna directly in the dish, or aggressively scrape the bottom with a metal spatula to get those crispy corner pieces, you create microscopic scratches in the glass. These tiny fissures act as stress concentrators. When thermal expansion occurs, the glass is significantly more likely to fail along these pre-existing weak points. Scraping glass with metal utensils is one of the fastest ways to destroy your gear, right up there with ruining your nonstick pans by coating them in cheap, chemical-laden aerosol cooking sprays. Always use silicone, wood, or plastic utensils when serving from glass.
How to Actually Prevent the Shatter (My Ironclad Rules)
Now that I have thoroughly terrified you about the fragility of your bakeware, let me offer some much-needed encouragement. You do not have to throw away all your glass dishes and live in fear. You just need to handle them with the respect the material demands. By adopting a few simple, professional-level habits, you can eliminate kitchen chaos for good and bake with total, unshakeable confidence.
- Rule #1: Always Use a Buffer. Never, ever place a hot glass dish directly on a bare countertop, a glass stovetop, or a metal sink. Before you even open the oven door, set up a designated landing zone. Use a thick, dry cork trivet, a sturdy wooden cutting board, or a metal wire cooling rack. These materials do not conduct heat rapidly, allowing the glass to cool down slowly and evenly.
- Rule #2: Pre-Heat Your Liquids. If you are roasting meat or vegetables and the recipe calls for a liquid braise, ensure the liquid is hot or at least room temperature before it touches the glass. Keep a small saucepan of hot broth on the stove specifically for basting.
- Rule #3: The 45-Minute Thaw. If you are baking a meal that has been stored in the refrigerator, take it out and let it sit on the counter for at least 45 minutes while the oven preheats. This simple step narrows the temperature gap and significantly reduces the risk of thermal shock.
- Rule #4: Dry Potholders Only. Periodically check your oven mitts and potholders while cooking. If they are wet from a spill or from washing dishes, do not use them to grab a hot glass pan. The moisture will transfer the heat too quickly and could cause the dish to crack right in your hands as you lift it.
The “No-Go” Rule on Toxic & Cheap Gear: What to Buy Instead
If you know me, you know I have a notoriously short fuse when it comes to poorly manufactured kitchen equipment. I am incredibly strict about banishing toxic kitchen gear from my home. I absolutely despise peeling Teflon, cheap mystery metals that leach metallic flavors into food, and, yes, cheap soda-lime glass that poses a physical danger to my family.
If you have been traumatized by an exploding dish in the past, or if you simply want to upgrade your culinary arsenal to something more reliable, you have some fantastic, durable alternatives that will last a lifetime.
Enameled Cast Iron
This is the holy grail of heavy-duty bakeware. Brands like Le Creuset or Staub make incredible cast iron roasting pans coated in a thick layer of smooth, non-reactive glass enamel. They heat incredibly evenly, hold their temperature beautifully for table service, and are nearly indestructible. You can take them from the stovetop, directly to the oven, and straight to the broiler without batting an eye.
High-End Stoneware
Ceramic stoneware is fired at incredibly high temperatures in a kiln, making it naturally resistant to thermal shock. It provides the same beautiful, rustic presentation as glass but with far more structural stability. It is absolutely perfect for baked ziti, fruit cobblers, and creamy scalloped potatoes. Just be sure to buy from reputable brands that use lead-free glazes.
Authentic European Borosilicate
If you absolutely insist on the visual aesthetic of clear glass—perhaps you like seeing the layers of your tiramisu or the browning on the bottom of a pie crust—you must buy the right stuff. Look for brands like OXO Good Grips (which explicitly advertises their bakeware as thermal-shock resistant borosilicate) or purchase authentic European Pyrex, which is still manufactured by Arc International using the original borosilicate formula. It costs a few dollars more than the cheap grocery store versions, but the peace of mind is truly priceless.
What to Do When the Worst Happens (Cleanup Protocol)
Let’s say you are reading this article a little too late, and your casserole has already detonated across your kitchen floor. First of all, I am so incredibly sorry. It is a heartbreaking, frustrating mess. But you need to handle it safely to prevent injury.
First, secure the area. Put on thick, closed-toe shoes immediately. Do not walk around barefoot. Keep children and pets entirely out of the kitchen until the cleanup is one hundred percent complete.
Second—and I cannot stress this enough—do not try to salvage the food. I don’t care if it is a beautiful, expensive wild-caught filet and you finally mastered the technique to stop ruining your salmon. If the dish shattered, microscopic glass dust is completely embedded in your meal. You cannot rinse it off. You cannot pick around the big shards. Eating glass is a hard, non-negotiable no. The entire meal goes into the trash can.
To clean up, use a broom and dustpan for the large pieces. Do not use your expensive vacuum cleaner right away, as large shards can puncture the hose or destroy the internal motor. Once the big pieces are swept up, you need to deal with the tiny, invisible splinters. Take a slice of soft sandwich bread or a damp, thick paper towel and gently press it across the floor and countertops. The soft texture will safely pick up the microscopic glass dust that your broom missed. Double-bag the trash before taking it outside to protect your sanitation workers.
Conclusion
Cooking should be a joyful, creative release, not an extreme sport where you have to dodge flying shrapnel just to get dinner on the table. By understanding the simple physics of thermal shock and learning to identify the crucial difference between cheap soda-lime and durable borosilicate glass, you take total control of your kitchen environment. Respect the temperature changes, use proper landing zones, and never put your glass under the broiler. You are the master of your kitchen—now go bake something spectacular without the fear of an explosion.


