The Anatomy of a Brunch Disaster: Why Your French Toast is Crying
Let us set the scene. It is Sunday morning. You have invited friends over, you have brewed a pot of unnecessarily expensive artisanal coffee, and you are ready to present a towering, glorious platter of French toast. You envision a crisp, golden-brown exterior giving way to a rich, pillowy, perfectly set custard interior. Instead, what you slide onto the plates looks like a structural tragedy. The center is weeping a milky, eggy puddle, the crust is simultaneously burnt and soggy, and the entire slice collapses under the weight of a single drop of maple syrup. Your guests smile politely as they chew on what essentially amounts to a wet kitchen sponge.
Welcome to the absolute misery of structural bread failure.
If this sounds familiar, take a deep breath. You are not alone, and you are certainly not a lost cause in the kitchen. Ruining weekend breakfast is one of those classic beginner cooking mistakes that practically every home cook experiences before they learn the underlying food physics of what is actually happening in that pan. Yes, I said physics. We are not just blindly tossing bread into a bowl of dairy and hoping for the best; we are orchestrating a delicate thermal and chemical reaction.
You see, French toast is not just a recipe; it is a dynamic system governed by starch kinetics, protein coagulation thresholds, and the thermodynamics of your griddle. When it fails, it fails because we treat it as an afterthought rather than a precise culinary formula. I am here to tell you that you do not need a culinary degree or a commercial kitchen to achieve absolute perfection. You just need to understand the science of your ingredients and the thermal mass of your cookware. By the end of this masterclass, you are going to possess the exact metrics and techniques required to build a flawless, mindful brunch bar that practically runs itself, leaving you free to actually enjoy your own party.
The Science of Starch Retrogradation (Or: Why Fresh Bread is the Enemy)
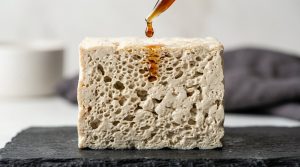
To understand why your French toast turns into a soggy nightmare, we first have to understand the anatomy of bread. At its core, a loaf of bread is a solid foam. It is a fragile matrix of gluten proteins and gelatinized starches that trap air pockets, giving the crumb its structure. When you take a slice of freshly baked, warm, squishy bread and submerge it in a liquid custard, you are effectively destroying that matrix. The fresh starches instantly absorb the moisture, lose their structural integrity, and dissolve.
This is where a brilliantly nerdy concept called “starch retrogradation” comes into play. It sounds like a terrible 1980s synth-pop band, but it is actually the biochemical process of bread staling. As bread ages, the starch molecules (specifically amylose and amylopectin) begin to realign and crystallize, expelling water and creating a firmer, more rigid structure.
This restructuring is your greatest ally. Retrograded starch acts like a highly engineered sponge. Because the molecules have crystallized, the bread can absorb the heavy liquid of your custard without immediately disintegrating into a useless paste.
The Brioche and Challah Supremacy
Not all stale breads are created equal. If you try to make French toast with a stale, lean dough—like a crusty sourdough or a French baguette—you are going to run into a different set of problems. Lean doughs have a very open, irregular crumb (large air holes) and a tough, chewy crust. The custard will fall right through the giant air pockets, and the crust will become aggressively hard when pan-fried, requiring a chainsaw to cut through.
Instead, we demand enriched doughs. Brioche and Challah are the undisputed royalty of the brunch griddle. These breads are heavily enriched with butter, eggs, and sugar. This enrichment results in a remarkably tight, uniform crumb structure that acts as a perfect capillary network for absorbing custard evenly. Furthermore, the high fat content in the bread itself repels just enough moisture to prevent total saturation, acting as a structural buffer.
The Stale Bread Myth vs. Moisture Evaporation
There is a massive misconception that you should just leave your sliced brioche on the kitchen counter overnight to “go stale.” While this does encourage starch retrogradation, it also invites ambient humidity and potential mold, depending on your climate.
We do not just want stale bread; we want low-moisture stale bread. The most reliable, scientifically sound method to prep your bread is to slice it a full inch thick, place the slices on a wire cooling rack, and bake them in a 250°F (120°C) oven for about 15 to 20 minutes. This gently evaporates the surface moisture and accelerates the firming of the starch matrix without toasting the bread. You are engineering the perfect canvas for your custard.
The Golden Ratio: Formulating the Perfect Custard
If your bread is the architectural framework, your custard is the concrete that fills it. The second most common reason your French toast fails is because you are eyeballing your egg-to-dairy ratio. If you have ever been frustrated watching your scrambled eggs leak water onto your plate, you already know what happens when egg proteins are mishandled or diluted incorrectly. When you arbitrarily splash milk into a bowl of eggs, you are playing a dangerous game of culinary roulette.
Too much milk, and the bread becomes hopelessly waterlogged. The egg proteins will be too diluted to form a stable gel network when heated, resulting in a soggy, weeping center that never fully cooks. Too much egg, and you are essentially serving your guests a slightly sweet, bread-stuffed omelet with an aggressively sulfurous flavor.
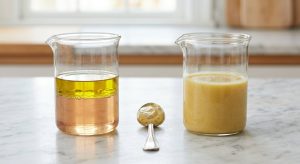
Dairy Mechanics: Why Fat Matters
Before we discuss the ratio, we must establish a hard rule about dairy: you must use whole milk. I have zero patience for skim milk in this application. Skim milk is essentially just water that is lying about its resume. It lacks the necessary milk fat to coat the starches and tenderize the coagulating egg proteins.
When you use whole milk (or a blend of whole milk and a splash of heavy cream), the milk fat physically coats the gluten and starch molecules in the bread, slowing down the rate of moisture absorption. This gives you a wider margin of error during the dipping process. The fat also contributes to a richer, more velvety mouthfeel once the custard sets.
The 1-to-120 Rule: Precision in Egg-to-Milk Ratios
Throw away your guesswork. The definitive, scientifically optimal ratio for a French toast custard is exactly 1 large egg per 120ml (approximately 1/2 cup) of whole milk.
This specific metric provides the exact volume of albumin (egg white protein) needed to create a stable, coagulated matrix within the bread, balanced perfectly by the fat and water content of the milk to keep the interior soft and pudding-like. For a standard weekend batch serving four people, your baseline formula should be:
- 3 large eggs
- 360ml (1.5 cups) of whole milk
- A pinch of kosher salt (absolutely mandatory to balance the sweetness)
Whisk this mixture aggressively. You must completely homogenize the egg whites and yolks into the milk. If you leave rogue strands of egg white floating in the bowl, they will fry up as unappealing white rubber bands on the exterior of your toast.
Flavor Enhancers and Aromatic Additions
Once your base metric is established, you can introduce aromatics. Vanilla extract is standard, but the real secret to a professional flavor profile is freshly grated nutmeg and a splash of dark rum or bourbon. The alcohol acts as a solvent, carrying the fat-soluble flavor compounds from the vanilla and nutmeg deep into the bread’s crumb before evaporating off on the griddle.
Thermal Control: The Thermodynamics of the Griddle
You have perfectly dried brioche. You have a mathematically flawless custard. Now, you can still ruin everything if you disrespect the thermal dynamics of your cooking surface.
Ditching Toxic Teflon for High-Mass Metals
Let us have a brutally honest conversation about your cookware. If you are still using a warped, scratched, lightweight aluminum non-stick pan, we need to stage an intervention. I despise cheap, toxic kitchenware. Not only are you actively ruining your nonstick pans with high heat, but you are also setting yourself up for culinary failure. Lightweight aluminum has terrible thermal mass. It heats up quickly, but the second you drop a slab of cold, wet, custard-soaked bread onto it, the temperature of the pan plummets. Instead of searing, your bread sits in a tepid pool of butter, slowly steaming and absorbing grease until it turns into a flaccid sponge.
To achieve a shatteringly crisp exterior, you need cookware with massive thermal retention. You must utilize traditional carbon steel cookware or heavy cast iron. These high-mass metals take longer to heat up, but they store a tremendous amount of thermal energy. When the cold bread hits the surface, the metal punches back, maintaining its temperature and immediately initiating the crust-building process.
Hitting the 350°F Sweet Spot
Temperature control is not a guessing game; it is a precise science. The absolute ideal surface temperature for your carbon steel or cast iron griddle is exactly 350°F (175°C).
Why 350°F? It comes down to the delicate balancing act between the exterior and the interior. If the griddle is too hot (400°F+), the sugars in your custard and the butter in the pan will violently burn before the heat can penetrate the center of the bread, leaving you with a charred exterior and a raw, weeping interior. If the griddle is too cold (under 300°F), the egg proteins will not set fast enough to form a protective barrier, causing the custard to leak out and the bread to stick to the pan. 350°F is the thermodynamic sweet spot. Use an infrared surface thermometer to verify your griddle’s temperature before you even think about adding the butter.
The Maillard Reaction and Custard Coagulation
At exactly 350°F, you unlock the magic of the Maillard reaction. This is the complex chemical cascade between amino acids (from the egg proteins) and reducing sugars (from the milk and bread) that produces hundreds of volatile flavor compounds and that gorgeous, deep mahogany-brown crust.
Simultaneously, the heat penetrates the thick slice of bread, raising the internal temperature to roughly 150°F to 160°F. At this exact internal temperature, the egg proteins inside the bread gently coagulate. They transition from a liquid state into a soft, semi-solid gel. Because you used the correct 1:120 ratio, the gel is tender and creamy, not rubbery or dry. You have achieved the holy grail: a crisp, caramelized shell protecting a lush, warm pudding center.
Execution: Dipping, Flipping, and Resting
The prep is done. The griddle is at 350°F. It is time to execute.
The Soak: Timing is Everything
Do not let your bread loiter in the custard. Because you are using thick, one-inch slices of structurally sound, low-moisture brioche, you want to utilize capillary action effectively. Gently press the slice into the custard, count to exactly 12 seconds, flip it, and count to 12 again.
Lift the bread and hold it over the bowl for a few seconds to let the excess liquid drain off. If you skip this draining step, the excess custard will pool around the base of the bread on the griddle, creating an ugly, scrambled-egg “foot” that ruins the aesthetic of the dish.
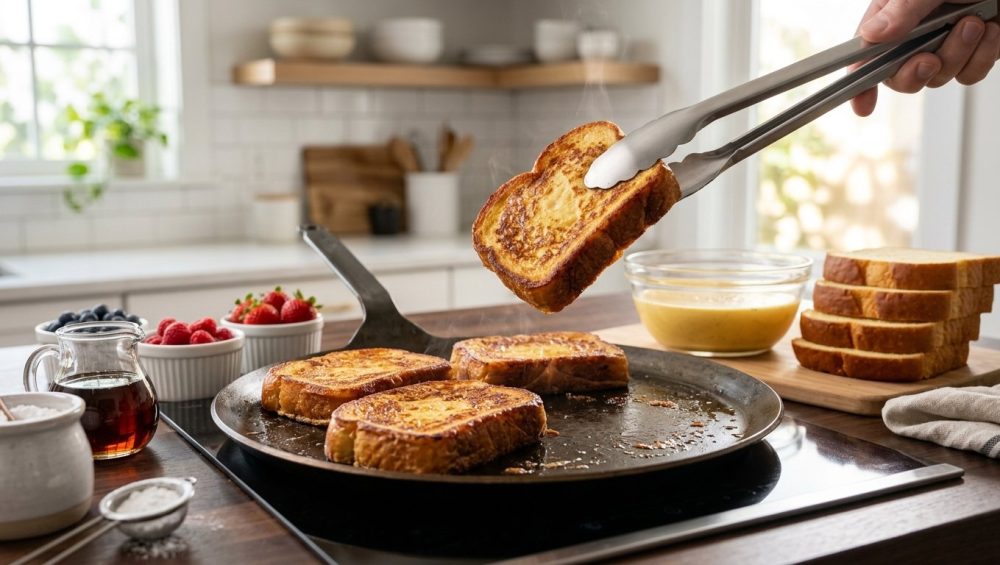
The Sear and the Flip
Melt a generous knob of unsalted butter on your 350°F griddle. The water in the butter will immediately sizzle and evaporate. Lay your soaked bread down gently. You should hear a distinct, aggressive sizzle—the auditory confirmation that surface moisture is evaporating and the Maillard reaction is underway.
Leave it alone. Do not poke it, do not press it, and absolutely do not constantly check the bottom. Let it sear undisturbed for about 3 to 4 minutes. When it is time to flip, use a thin, flexible slotted spatula. If your pan is properly maintained, the bread will release effortlessly. If you find yourself violently scraping and feel like you need a bench scraper just to pry your breakfast off the metal, your heat was too low, or you have been neglecting the maintenance of your cookware. Proper, deeply polymerized seasoning cast iron or carbon steel is what guarantees a frictionless flip.
Cook the second side for another 3 to 4 minutes until equally golden and crisp.
Building a Mindful Brunch Bar: Stress-Free Hosting
I am a firm believer that chaotic, stressful cooking should be banished from your life. Frantic, last-minute panicking is the enemy of good hospitality. You rely on clever hacks and simple weeknight dinners to survive Monday through Friday, so your weekend gatherings should be a sanctuary of calm, mindful execution.
You cannot be a relaxed host if you are standing over a hot stove, flipping single slices of bread while your guests eat in awkward, staggered shifts. The secret to a phenomenal morning gathering is the Mindful Brunch Bar.
Pre-Gathering Prep and Holding Temperatures
The beauty of properly formulated, structurally sound French toast is that it holds magnificently. You are going to cook the entire batch of French toast before your guests even sit down.
Preheat your oven to 200°F (95°C). Place a wire cooling rack inside a rimmed baking sheet. As each slice of French toast comes off the griddle, transfer it immediately to the wire rack in the oven.
Do not stack the slices on a plate! If you stack them, the residual steam escaping from the hot centers will get trapped between the slices, completely obliterating that beautiful, crisp Maillard crust you just worked so hard to build. The wire rack allows air to circulate around the bread, keeping the exterior shatteringly crisp while the gentle 200°F ambient heat keeps the custard center perfectly warm and fully coagulated. You can hold French toast this way for up to 45 minutes without any degradation in texture or flavor.
Customization Station: Toppings That Make Sense
While the toast stays warm in the oven, you can set up your interactive griddle station. The goal here is to empower your guests to build their own plates. This interactive element is the ultimate cheat code to help you host a beautiful dinner party or brunch gathering without breaking a sweat.
Create a visually stunning spread of toppings. Move beyond the basic bottle of cold maple syrup. Offer a spectrum of textures and temperatures:
- The Syrups: Warm your pure maple syrup in a small saucepan. Cold syrup instantly kills the heat of the toast. Offer a secondary option, like an infused berry syrup or a dark amber agave.
- The Crunches: Toasted pecans, sliced almonds, or a quick homemade oat streusel. The crunch provides a necessary textural contrast to the soft, pillowy custard.
- The Creams: Freshly whipped mascarpone or a lightly sweetened vanilla bean crème fraîche. These offer a tangy, rich counterpoint to the heavy sweetness of the syrup.
- The Acids: Fresh berries, macerated strawberries, or a bright citrus compote. Acid is crucial to cut through the heavy fat of the butter and egg yolks.
Arrange these in small, uniform ceramic bowls down the center of your island or dining table. A clean, modular setup like this looks incredible and functions perfectly within a beautifully organized dream kitchen. Your guests can pull a hot, crisp slice of toast from the oven rack and customize it exactly to their liking, while you pour yourself a well-deserved mimosa.
The Final Verdict on Flawless French Toast
Soggy, weeping, structurally compromised French toast is a choice, not an inevitability. It is the result of using fresh, wet bread, eyeballing your dairy ratios, and cooking on flimsy, low-mass pans that cannot hold a proper temperature.
By taking a step back and applying a little bit of food science, you completely eliminate the chaos. You now know to seek out thick slices of enriched brioche and dry them out so the retrograded starches can act as a sponge. You know the non-negotiable metric of 1 large egg to 120ml of whole milk to create a stable, tender custard. Most importantly, you understand the thermodynamics of wielding a heavy carbon steel or cast iron griddle at exactly 350°F to trigger the Maillard reaction, resulting in a perfectly caramelized crust.
Cooking for friends and family should never be an exercise in anxiety. If you can master the patience required to make perfectly fluffy pancakes, you can absolutely master the structural physics of the ultimate brunch bar. Equip your kitchen with the right heavy-duty tools, respect the chemistry of your ingredients, and banish soggy bread from your weekends forever. Now go preheat that griddle, whisk your custard like you mean it, and prepare to serve the greatest breakfast your guests have ever experienced.