Let us talk about the universal weekend morning ritual that inevitably turns your stovetop into a hazardous material zone. You want bacon. You deserve bacon. But what you usually get is a violently sputtering pan of molten grease, painful oil burns on your forearms, and a final product that somehow manages to be both burnt to a crisp and unpleasantly flabby at the exact same time. It is a culinary tragedy, and frankly, I am tired of watching home cooks suffer through it.
I am here to tell you that you do not need a culinary degree to achieve mind-blowing food, but you do need to understand a little bit of basic physics. If you have been following my advice, you know that the true secret to mastering the art of the kitchen is understanding the fundamental science behind your ingredients. Throwing cold pork into a ripping hot, dry skillet is one of those seven rookie kitchen mistakes that will guarantee a frustrating morning before you have even had your first cup of coffee.
The secret to perfectly flat, evenly cooked, shatteringly crisp bacon is going to sound completely unhinged the first time you hear it: you need to drown it in water. Yes, you read that correctly. You need to mix water and hot fat. While your survival instincts are probably screaming at you right now, I promise you that this is a completely foolproof, science-backed technique that will upgrade your breakfast routine forever. We are going to dive deep into the thermodynamics of rendering fat, banish your toxic cookware, and transform you into a breakfast master.
The Anatomy of Bacon: Why It Hates You (and Your Pan)
To understand why the traditional method of frying bacon is so deeply flawed, we first have to look at the anatomy of the meat itself. Bacon is fundamentally a lesson in opposing forces. It is cut from the pork belly, which means it is heavily marbled. A standard strip of streaky bacon is roughly fifty percent tough, dense fat and fifty percent lean muscle.
These two distinct components require entirely different cooking environments. Lean muscle cooks incredibly fast. When exposed to high heat, the proteins contract rapidly, expelling moisture and browning in a matter of minutes. The thick ribbons of white fat, however, are a completely different story. Fat takes a significant amount of time and gentle, sustained heat to properly render (melt) and break down the connective collagen.
When you throw a slice of bacon into a preheated, hot skillet, you are setting up a structural failure. The lean meat immediately begins to sear and tighten. Meanwhile, the fat has not even begun to warm through, let alone melt. Because the lean meat is contracting rapidly while the fat remains stubborn and solid, the entire strip of bacon violently curls up into a deformed, rubbery corkscrew.
Once the bacon curls, only the absolute lowest points of the wave are actually making contact with the hot pan. Those specific contact points burn to a bitter, black crisp, while the rest of the strip hovers above the pan, suspended in the air, remaining pale and flabby. You are left trying to forcefully press the bacon down with a spatula, playing a miserable game of culinary whack-a-mole while hot grease shoots directly into your eyes. It is inefficient, it is messy, and it ruins the food.
The Thermodynamic Science of the Water Trick
This brings us to the simple magic of adding a splash of water to your skillet. This is not just a quirky internet hack; it is a brilliant manipulation of basic thermodynamics.
When we cook meat, we are generally chasing the Maillard reaction. This is the complex chemical process between amino acids and reducing sugars that gives browned food its distinctive color and deeply savory flavor. The catch is that the Maillard reaction does not kick into high gear until the surface temperature of the food reaches between 280°F and 330°F (140°C to 165°C).
However, the tough fat running through your bacon needs to reach an internal temperature of about 130°F to 140°F (54°C to 60°C) to begin rendering properly. If your pan is already sitting at 350°F, the lean meat burns long before the fat has a chance to melt.
Water changes this entire thermodynamic equation. Under normal atmospheric pressure, water cannot exceed its boiling point of 212°F (100°C). When you add a small amount of water to the pan with your bacon, you effectively cap the maximum temperature of the cooking environment. As long as there is liquid water simmering in that skillet, the temperature cannot rise above 212°F.
This creates a protective thermal window. The 212°F environment is perfectly hot enough to slowly and efficiently render the fat, but it remains well below the 280°F threshold required for the Maillard reaction. The meat is physically protected from burning while the fat slowly melts away into the pan.
Because the fat is rendering gently and the lean meat is not aggressively seizing up from thermal shock, the bacon stays perfectly flat. No curling. No corkscrews.
Furthermore, this method completely eliminates the dreaded grease splatter. Splattering occurs when the natural water content inside the bacon rapidly seeps out into a pool of screaming hot, already-rendered fat. The water instantly vaporizes into steam, expanding violently and launching microscopic missiles of boiling oil all over your kitchen. By starting with water in the pan, the water evaporates slowly and gently. By the time the pan is dry, the bacon is frying in its own pure, rendered fat, and there is no residual moisture left to cause those violent explosions.
The “No-Go” Rule on Toxic Gear: Stop Poisoning Your Breakfast
Before we get into the step-by-step masterclass, we need to have a serious conversation about your equipment. As part of my ongoing crusade for banishing toxic kitchen gear from your life, I must insist that you throw away your cheap, scratched, peeling non-stick pans.
I have zero patience for mystery metals and toxic coatings. For decades, manufacturers coated their pans in Per- and Polyfluoroalkyl Substances (PFAS), specifically utilizing processing aids like PFOA. These are commonly referred to as “forever chemicals” because they do not break down in the environment or in the human body. When you heat a cheap non-stick pan over medium-high heat, that chemical coating degrades, releasing toxic fumes into your kitchen and leaching directly into your food.
The health risks associated with these chemicals are so severe that the government is finally stepping in. In 2024, the FDA announced the phase-out of grease-proofing PFAS agents in food packaging. By 2025 and 2026, multiple US states, including Maine, Minnesota, and Washington, have implemented outright bans and strict reporting requirements on the manufacture and sale of products containing intentionally added PFAS, specifically targeting cookware. The EPA has even established legally enforceable Maximum Contaminant Levels for these chemicals in public drinking water.
Despite this, millions of home cooks are still frying their morning bacon on flaking Teflon. Stop doing this immediately.
If you want professional results, you need professional, durable materials. A heavy-duty cast iron skillet is a classic choice for bacon, as its massive thermal retention provides an incredibly even sear. Alternatively, a high-quality carbon steel skillet will give you perfect polymerization and nonstick cooking without the chemical hazard.
If you choose to use a multi-clad stainless steel pan, you absolutely can, but you must know how to prevent protein adhesion using proper temperature control. The beauty of the water method is that it naturally prevents the bacon from sticking to stainless steel during the initial rendering phase. By the time the water evaporates, enough fat has melted into the pan to provide a natural, slick barrier for the final crisping stage. And please, remember that aerosolized cooking spray is the enemy of any quality skillet; rely on the bacon’s natural fat instead.
The Sassy Sous-Chef’s Step-by-Step Masterclass
Now that we understand the science and we have thrown our toxic pans into the garbage where they belong, let us walk through the exact method for executing the perfect water-cooked bacon. When you are rushing to make simple weeknight dinners, you need efficiency, but on a weekend morning, you have the five extra minutes required to do this right.
Step 1: The Cold Pan Setup
This is the most crucial step, and the one that most home cooks get wrong. You must start with a completely cold pan. Do not turn on the burner yet. Lay your strips of bacon flat across the surface of the skillet. It is perfectly fine if they are touching or slightly overlapping at the very edges, because they will shrink slightly as the fat renders. However, do not pile them on top of each other in a chaotic mountain. They need direct contact with the bottom of the pan.
Step 2: The Splash
Pour cold tap water directly over the bacon. How much water? You do not need to submerge the meat entirely like you are boiling pasta. You just need enough water to completely cover the bottom of the skillet. For a standard 10-inch or 12-inch skillet, this usually equates to about a quarter cup to a half cup of water. The water should come up about halfway up the sides of the bacon strips.
Step 3: The Simmer and Render Phase
Place the skillet on the stove and turn the burner to medium-high heat. As the pan heats up, the water will come to a vigorous simmer. Do not panic; this is exactly what you want. As the water bubbles away, it is holding the pan at that perfect 212°F (100°C) sweet spot. You will notice that the bacon begins to turn opaque and the white fat will start to turn translucent. This is the visual confirmation that the tough collagen is breaking down and the fat is melting into the water. Let it boil. You do not need to flip the bacon during this phase. Just let the physics do the work.
Step 4: The Evaporation and Crisp Phase
After a few minutes, the sound in the pan will drastically change. The rolling, bubbling sound of boiling water will suddenly transition into the sharp, aggressive crackle of frying oil. This auditory cue tells you that all the water has evaporated.
Immediately reduce your burner heat to medium or medium-low. This is critical. Now that the protective water barrier is gone, the temperature in the pan is going to skyrocket, and the Maillard reaction is about to begin. Because you have already rendered out a beautiful pool of liquid fat, the bacon is now shallow-frying in its own juices.
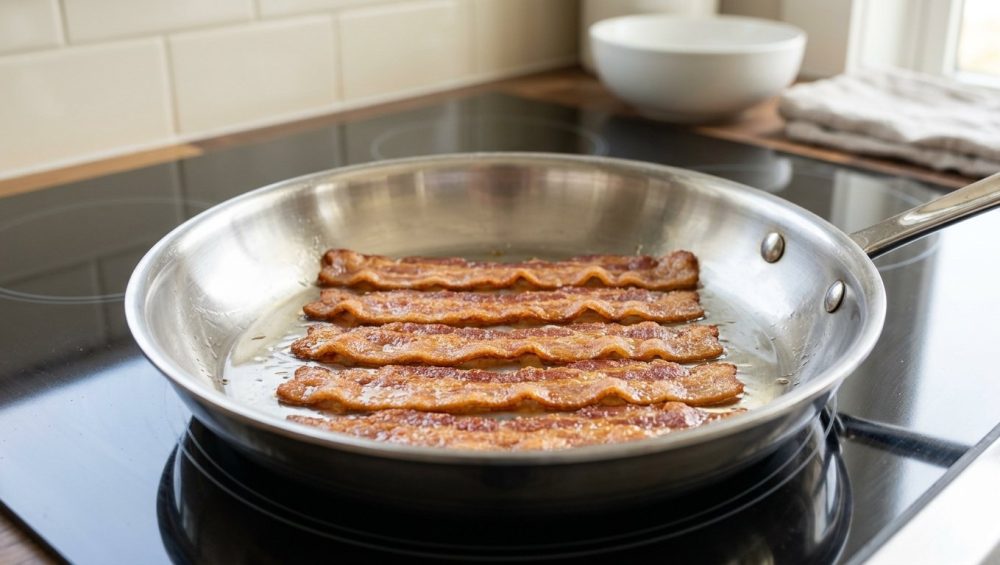
Now is the time to flip the strips. You will notice they are perfectly flat and pliable. Let them fry in the rendered fat until they reach your desired level of crispness. Because the fat has already been softened and rendered, the meat will crisp up incredibly evenly, resulting in a texture that shatters perfectly when you bite into it, yet remains tender in the center.
Step 5: The Drain
Once the bacon is deeply browned and crispy, remove it from the pan immediately. Do not just throw it onto a flat plate. Transfer the strips to a wire cooling rack set over a baking sheet, or a plate lined with multiple layers of paper towels. The residual heat will continue to cook the bacon for about thirty seconds after it leaves the pan, and draining the excess surface oil ensures the final product does not become soggy as it cools.
Comparing Cooking Methods: Stovetop vs. Oven vs. Microwave
While the stovetop water trick is my absolute favorite method for achieving diner-style perfection, it is important to understand how it stacks up against other popular techniques.
The Stovetop Water Method
Best for: 1 to 4 servings.
This method provides the absolute best texture, hands down. The combination of slow rendering followed by a shallow fry creates a complex, shatteringly crisp exterior with a perfectly tender chew. It requires a bit of active monitoring once the water evaporates, but the results are unmatched.
The Oven Baking Method
Best for: Feeding a large crowd.
If you are hosting a brunch party and need to cook two entire pounds of bacon at once, the stovetop method is too tedious. Baking bacon in the oven is the undisputed champion of bulk cooking. You lay the strips on a wire rack set inside a rimmed baking sheet and bake at 400°F (200°C).
The oven works similarly to the water method because the ambient air heats the bacon much more slowly and evenly than the direct conductive heat of a dry skillet. However, be warned: commercial ovens are notoriously inaccurate, especially if your cheap digital meat thermometer is lying to you about the ambient temperature inside the cavity. Furthermore, putting a cold aluminum pan into a 400°F oven causes rapid thermal expansion; this massive temperature swing is exactly why your flimsy baking sheets keep warping with a loud “pop.” Invest in heavy-duty aluminized steel half-sheet pans if you plan to use the oven method.
The Microwave Method
Best for: Absolutely no one.
Cooking bacon in the microwave between layers of paper towels is a culinary crime. Microwaves heat food by exciting water molecules, which causes the meat to essentially steam itself to death while simultaneously dehydrating the edges into rock-hard shards. You lose all the rendered fat into the paper towel, and you are left with a sad, dry, unevenly cooked strip of pork. Have some self-respect and use a pan.
Troubleshooting Your Breakfast
Even with a foolproof method, things can occasionally go sideways. Here are the most common questions and issues home cooks run into when trying the water trick for the first time.
“I added too much water, and now I am making bacon soup.”
Do not panic. If you accidentally poured a whole cup of water into the pan, you have not ruined the bacon; you have just added ten minutes to your cooking time. The bacon will continue to simmer until all that water evaporates. The meat might become slightly more tender than usual, but once the water finally boils off, it will still fry and crisp up perfectly. Just be patient.
“Does this work with thick-cut bacon?”
Yes, and in fact, it works even better with thick-cut bacon. Thick-cut bacon is notoriously difficult to cook in a dry skillet because the outside burns to ash before the heat can penetrate the thick center. The water method gives that thick slab of meat the time it needs to gently cook all the way through before the crisping phase begins. You may need to add a slightly heavier splash of water to accommodate the extra thickness.
“Can I do this with turkey bacon?”
The Sassy Sous-Chef is judging you for eating turkey bacon, but I will answer the question anyway. No, the water method does not work well with turkey bacon. This entire scientific technique relies on the presence of dense pork fat rendering out to eventually fry the meat. Turkey bacon is highly processed, incredibly lean, and contains almost no natural fat. If you boil turkey bacon in water, you will just end up with wet, gray poultry. If you insist on eating it, cook it in a dry skillet with a splash of added oil.
“My bacon still curled up at the very end.”
If your bacon stayed flat during the water phase but suddenly curled up into a ball the second the water evaporated, your heat is too high. Remember Step 4: the moment the water is gone, you must reduce the burner to medium-low. If you leave the burner on high, the sudden spike in temperature will shock the meat, causing the proteins to violently contract. Control your heat.
Liquid Gold: Harvesting and Storing Rendered Bacon Fat
One of the greatest secondary benefits of the water method is the sheer volume of pristine, unburnt bacon fat you are left with at the end of the process. Because the water regulated the temperature, the fat did not scorch or degrade into bitter, black sludge. You are left with a pan full of pure, smoky, liquid gold.
Whatever you do, absolutely do not pour this hot grease down your kitchen sink. Hot fat will travel down your pipes, hit the cold plumbing, solidify into a concrete-like blockage, and cost you thousands of dollars in plumbing bills.
Instead, you need to harvest it. Let the fat cool in the pan for about five to ten minutes so it is no longer dangerously hot, but remains in a liquid state. Place a fine mesh sieve over a clean glass mason jar (or a dedicated grease keeper). Pour the liquid fat through the sieve to catch any stray, burnt bits of meat or peppercorns.
Once strained, this fat is an incredibly valuable cooking medium. It has a high smoke point and is packed with deep, savory flavor. Use it to roast potatoes, sear steaks, fry eggs, or even substitute it for butter in savory baking recipes like cornbread or biscuits.
Proper storage is key. While bacon fat is highly stable, leaving your bacon fat out in direct sunlight is just like ruining your olive oil—it will eventually oxidize and go rancid. Keep your sealed jar of strained bacon fat in the refrigerator, where it will solidify into a beautiful, creamy white spread and easily last for up to six months.
The Final Bite
Cooking should not be an exercise in pain tolerance or smoke alarm management. By simply understanding the thermodynamic differences between lean muscle and dense fat, you can completely eliminate the stress, the splatter, and the burnt edges from your morning routine.
Adding a splash of water to your bacon is the perfect example of how working with the science of your food, rather than fighting against it, yields professional-level results in a standard home kitchen. So, throw out those toxic non-stick pans, grab a heavy skillet, turn on the tap, and go make the best breakfast of your life. You have officially graduated from the bacon struggle bus.


