Let’s be honest: there is no kitchen tragedy quite as infuriating as dropping a small fortune on a beautiful, jewel-toned pint of organic raspberries, placing them lovingly in your refrigerator, and returning forty-eight hours later to find they have sprouted a fuzzy grey sweater. It is a universal betrayal. You feel like you have literally set a ten-dollar bill on fire, and the sheer audacity of that mold to ruin your healthy eating aspirations is enough to make anyone order a greasy pizza out of spite.
As a home cook who has ruined more produce than I care to admit, I completely understand the frustration. You are trying to eat healthy, you are trying to elevate your weekend culinary projects, and your reward is a plastic container of mushy, moldy despair. But here is the hard truth, delivered with a side of tough love: your berries are not failing you. You are failing your berries.
Most weekend culinary hobbyists treat delicate fruit the same way they treat a bag of carrots, tossing them into the fridge and hoping for the best. That stops today. Consider this your essential kitchen survival guide for navigating the treacherous waters of produce preservation. We are going to dive deep into the actual science of why your berries rot, how fungal spores operate, and the exact, foolproof methods you need to implement to extend their shelf life by weeks. No pretentious chef-speak, no fluff—just hard science, practical techniques, and a rigorous defense of your grocery budget.
The Great Berry Betrayal: Why Your Expensive Fruit Demands Respect (and Science)
Berries are not apples. They do not have a thick, waxy skin to protect them from the harsh realities of the world, nor do they possess the structural density of a melon. Think of a berry as a tiny, fragile balloon filled with sugary water. Its skin is a microscopically thin, permeable membrane that practically rolls out the welcome mat for microbial invaders. Every single time a berry is jostled in transit, squeezed by a shopper, or dropped into a grocery bag, that delicate outer layer sustains microscopic bruising. Each tiny, invisible nick becomes an open door for decay.
The Microscopic Enemies Already Living on Your Fruit
Here is the most unsettling fact you will learn today: your berries are already contaminated before you even put them in your shopping cart. The primary culprit behind your fuzzy strawberries is a ubiquitous necrotrophic fungus called Botrytis cinerea, commonly known as gray mold. This pathogen is naturally present in the fields where the berries are grown. The mold spores blow in the wind, settle on the blossoms of the fruit, and embed themselves into the plant tissue long before the berry is even formed.
These spores are patient. They lay dormant, hitching a ride from the farm, to the packing facility, to the grocery store, and finally into your kitchen. They are simply waiting for the optimal environmental conditions—specifically, moisture and a slight increase in temperature—to awaken, germinate, and begin digesting your expensive fruit from the outside in.
The Moisture Trap: Why the Grocery Store Clamshell is a Death Sentence
If you want to know why your berries die so quickly, look no further than the container they are sold in. I am notoriously passionate about banishing toxic kitchen gear from my home, and those flimsy plastic clamshells are enemy number one. They are engineered for one purpose: retail transit. They are not designed for long-term refrigerated storage.
Even after they are picked, berries are still very much alive. They continue to “breathe” through a biological process called respiration, burning through their internal sugars and oxygen, and releasing heat, carbon dioxide, and water vapor in the process. Berries have one of the highest respiration rates of all fruits. When you trap that respiring fruit inside a standard plastic clamshell—which typically has ventilation holes covering a measly 0.8% of its surface area—you create a stagnant microclimate with 95% to 98% relative humidity.
The moisture released by the berries hits the cold plastic lid, condenses, and drips right back down onto the fruit. This constant dampness acts as a trigger for the dormant Botrytis cinerea spores, signaling that it is time to feast.
The Botany of Botrytis: Understanding the Fuzzy Grey Enemy
To defeat your enemy, you must understand how it operates. Tossing a sealed plastic clamshell straight into the fridge without a second thought is one of the seven rookie kitchen mistakes that practically guarantee a fuzzy, expensive disaster. Botrytis cinerea is a necrotroph, which means it secretes toxic enzymes that actively kill the host plant’s cells, turning the firm cellular structure into a soft, liquid mush. It then absorbs the nutrients from the dead tissue to fuel its own rapid growth.
How Botrytis cinerea Infiltrates Your Fridge
Once the mold begins to grow, it spreads through direct contact. This is why the “one bad apple” rule applies exponentially to berries. A single infected raspberry resting against a healthy raspberry will transfer the aggressive fungal mycelium within hours. If left unchecked, a single moldy berry can turn an entire pint into a biohazard within 48 hours. This means that immediate triage upon returning from the grocery store is absolutely non-negotiable.
The Ethylene Factor: Are Berries Actually Ripening or Just Rotting?
Adding insult to injury is the presence of ethylene gas. Ethylene is a natural plant hormone that triggers the ripening process. While berries do not produce as much ethylene as bananas or apples, they are highly sensitive to it. In the enclosed, poorly ventilated space of a clamshell, the trace amounts of ethylene gas become concentrated. This gas signals the berries to soften further, breaking down their structural integrity and making it even easier for the mold spores to penetrate the skin. You are essentially dealing with a ticking biological time bomb.
The Foolproof, Science-Backed Vinegar Wash Method
If you want to stop this cycle of decay, you must intervene immediately. Incorporating a proper, science-backed washing protocol will seamlessly transform your chaotic cooking routine into a streamlined, money-saving operation. We are going to use chemistry to neutralize the spores before they have a chance to germinate.
Why Water Isn’t Enough (and Why Baking Soda is for Potatoes, Not Berries)
Many home cooks simply rinse their berries under cold tap water. This is a mistake. Water does not kill mold spores; it merely moves them around, and worse, it introduces the very moisture the mold needs to thrive. Some internet trends suggest using a baking soda soak. While baking soda (sodium bicarbonate) is highly alkaline and excellent for breaking down surface pesticides on hearty vegetables like apples or potatoes, it lacks the specific antifungal properties needed for delicate fruit.
Fungal spores are highly susceptible to sudden drops in pH. To destroy the protein structures of the spore walls, you need an acid. Specifically, you need acetic acid, which is the primary active component in household vinegar.
The Optimal Vinegar-to-Water Ratio for Spore Destruction
Extensive testing and food science principles dictate that the optimal ratio for a berry wash is one part vinegar to three or four parts cold water. You do not need expensive specialty produce washes. Standard distilled white vinegar or apple cider vinegar works perfectly. The acidity is strong enough to shock and neutralize the dormant Botrytis spores, but diluted enough that it will not pickle your fruit or leave a lingering salad-dressing flavor.
The Step-by-Step Execution: Washing Without Bruising
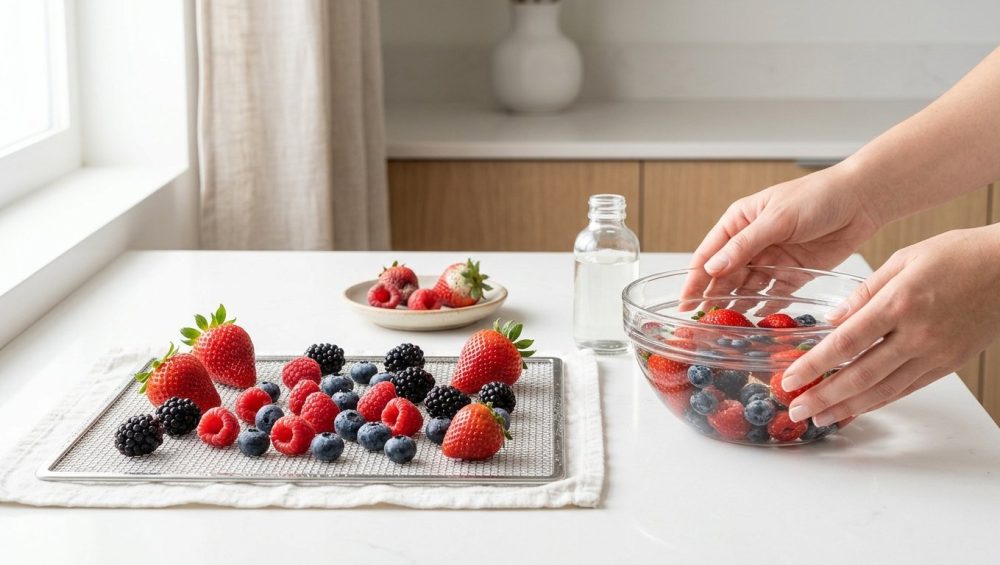
- The Triage: Dump your berries onto a clean baking sheet. Ruthlessly inspect them. If a berry is already showing signs of mold, oozing juice, or looking severely bruised, throw it away immediately. Do not try to save it. Remove any stems or leaves that are already rotting, but leave the healthy green caps on strawberries intact to protect their core.
- The Bath: In a large, clean bowl, combine 3 cups of cold water with 1 cup of white vinegar. Submerge the healthy berries in the solution.
- The Soak: Gently swish the berries with your hands for a few seconds to ensure the acidic water penetrates the tight clusters and crevices. Let them sit undisturbed for 2 to 5 minutes. Do not leave them longer than 5 minutes, or the acid will begin to break down the delicate fruit walls.
- The Rinse: Carefully transfer the berries to a colander. Rinse them thoroughly under a gentle stream of cold water for at least 30 seconds. This washes away the neutralized spores, any lingering dirt, and the residual vinegar flavor.
The Crucial Drying Phase: Where Most Home Cooks Fail
If you execute the perfect vinegar bath and then put your berries away while they are still wet, you have completely wasted your time. Moisture is the catalyst for decay. A salad spinner is one of those beginner kitchen tools that pays for itself in a matter of weeks, precisely because it is the ultimate weapon in the war against wet produce.
Capillary Action and the Hidden Moisture in Berry Crevices
Water is a stubborn molecule. Thanks to high surface tension and capillary action, water aggressively clings to the microscopic hairs on a raspberry, the deep ridges of a blackberry, and the leafy green calyx of a strawberry. If you just pat the top of the fruit with a towel, you are leaving behind hidden pockets of water that will create localized 100% humidity microclimates the second they go into a container.
Salad Spinners and Towel Tents: Getting Them Bone Dry
To break that surface tension, you need centrifugal force. Line the basket of your salad spinner with a double layer of paper towels. Place the rinsed berries inside, ensuring you do not overfill the basket. Spin them gently. The centrifugal force pulls the water out of the hidden crevices without crushing the fragile fruit, while the paper towels provide a soft cushion to prevent bruising.
Once spun, transfer the berries to a wire cooling rack lined with fresh, dry paper towels. Spread them out in a single layer so they are not touching. Let them air dry on the counter for a few hours until they are absolutely, unequivocally bone dry. If you are in a rush, you can use a hairdryer set to the “cool” setting to gently blow air over them, accelerating the evaporation process.
Upgrading Your Storage: Ventilation, Temperature, and Ditching Toxic Plastic
Now that your berries are pristine and dry, putting them back into their original clamshell is a cardinal sin. If you use cheap, single-use plastic bins, you already know how hard it is to actually clean them once they absorb odors, grease, and microscopic bacteria. It is time to upgrade your storage hardware.
The Danger of Flimsy Polystyrene and Mystery Plastics
I have zero tolerance for mystery metals and peeling non-stick coatings, and I apply that same strict philosophy to food storage. Flimsy, single-use plastics often contain endocrine-disrupting chemicals like BPA, BPS, and phthalates, which can leach into your food over time. Furthermore, these cheap plastics warp in the dishwasher, creating micro-abrasions that harbor bacteria.
Instead, invest in high-quality, durable storage. Glass containers are the gold standard for safety and longevity, but they must have a vented lid. If you prefer plastic for its lighter weight, ensure it is a high-quality, BPA-free Polypropylene (PP#5) container explicitly designed for produce storage.
Airflow is King: Creating the Perfect Microclimate
The ideal berry storage container strikes a delicate balance: it must allow the carbon dioxide and ethylene gas to escape while retaining just enough humidity to prevent the fruit from shriveling into raisins. Advanced produce containers feature adjustable ventilation membranes. According to recent thermodynamic testing, a vented PP#5 container maintains an Oxygen Transmission Rate (OTR) of 13.2 ± 0.4 cm³/m²/day. This specific metric perfectly matches the respiration quotient of most berries, allowing the fruit to breathe without suffocating in its own exhaust.
Line the bottom of your vented container with a single, dry paper towel. This acts as an insurance policy, absorbing any residual moisture or juice that might leak from a bruised berry. Place the fruit in a single layer if possible, or stack them very loosely. Do not pack them in tightly.
Fridge Geography: Stop Putting Berries in the Crisper Drawer!
Maintaining a permanently organized kitchen means knowing exactly which thermodynamic temperature zones belong to which ingredients. The biggest mistake you can make is putting your berries in the crisper drawer.
Crisper drawers are designed to maintain high humidity to keep leafy greens like lettuce and spinach crisp. High humidity is a death sentence for berries. Furthermore, the ideal storage temperature for berries is between 32°F and 36°F (0°C to 2°C). Most home refrigerators are calibrated to sit around 37°F to 40°F in the main cabin. The warmest part of the fridge is the door, and the crisper drawers are often insulated from the coldest air.
To maximize shelf life, store your vented berry containers on the middle or lower shelf, pushed toward the back of the fridge where the air is coldest and the temperature fluctuations are minimal when the door is opened.
Berry-Specific Triage: Strawberries, Blueberries, Raspberries, and Blackberries
Not all berries are created equal. They each have distinct botanical structures that require slight modifications to the master storage technique. When prepping strawberries, remember that hacking at them with a dull knife will crush their delicate cell walls, causing them to bleed juice and rot faster. Always use a freshly honed paring knife if you must trim them. Treating each variety with respect is one of the simple steps to culinary artistry that elevates a basic fruit salad into a vibrant, texture-perfect masterpiece.
Strawberries: The Sponges of the Fruit World
Strawberries are incredibly porous and will absorb water like a sponge if left submerged for too long. When washing strawberries, work quickly. Never remove the green leafy stems (the calyx) before washing or storing them. The stem acts as a natural plug; once it is removed, you expose the soft, fleshy interior to water and air, drastically accelerating decay. Only hull your strawberries immediately before you plan to eat them.
Blueberries: Protecting the “Bloom”
If you look closely at a fresh blueberry, you will notice a cloudy, white, powdery coating on its skin. This is not pesticide residue; it is called the “bloom,” or epicuticular wax. It is a naturally occurring, waterproof barrier that the plant produces to protect the fruit from moisture loss and insect damage.
Because blueberries have this built-in armor, they are slightly more resilient than other berries. The vinegar bath will remove some of this protective wax. For optimal longevity, some food scientists recommend holding off on washing blueberries until right before consumption. However, if you prefer to meal-prep and have your fruit ready to eat, the vinegar bath is still highly effective at killing surface spores—just ensure they are dried with absolute perfection before storing.
Raspberries and Blackberries: The Fragile Divas
Raspberries and blackberries are aggregate fruits, made up of dozens of tiny, juice-filled sacs called drupelets clustered around a central core. When a raspberry is picked, the core (the receptacle) is left behind on the plant, leaving the berry completely hollow.
This hollow center is a nightmare for moisture management. Water easily gets trapped inside the cavity during the washing process. When dealing with these fragile divas, you must be incredibly gentle during the vinegar bath to avoid crushing the drupelets. The salad spinner technique is mandatory here, as it uses gravity and centrifugal force to pull the hidden water out of the hollow cores. Do not skip the air-drying phase.
What to Do When You Inevitably Buy Too Many Berries (The Freezer Strategy)
Despite your best efforts, there will be times when you simply buy more produce than you can consume in a week. Just as you should stop throwing away sad veggies when they can be easily roasted or pureed into a soup, you should never toss slightly soft berries. When berries lose their firm snap but have not yet developed mold, they are prime candidates for the freezer.
Flash Freezing Like a Pro
If you take a pint of fresh berries and dump them directly into a zip-top freezer bag, you are going to end up with a massive, impenetrable brick of frozen fruit that requires an ice pick to separate. To freeze berries correctly, you must utilize the flash-freezing method.
After your berries have been washed and completely dried, line a rimmed baking sheet with parchment paper. Arrange the berries in a single layer, ensuring they are not touching each other. Place the baking sheet in the freezer for two to four hours, or until the berries are frozen solid.
Avoiding the Dreaded Berry Ice Block
Once the individual berries are frozen hard as marbles, you can quickly transfer them into a heavy-duty, reusable silicone freezer bag or a vacuum-sealed bag. Because they were frozen individually first, they will remain loose in the bag, allowing you to reach in and grab exactly a half-cup for your morning oatmeal or weekend smoothie without having to chisel them apart. Squeeze out as much ambient air as possible before sealing the bag to prevent freezer burn and ice crystal formation.
Final Thoughts: Reclaiming Your Grocery Budget and Your Sanity
Mastering the art of produce preservation is not about being a perfectionist; it is about working smarter, not harder. By understanding the biological enemies at play—namely Botrytis cinerea and trapped moisture—you can take simple, proactive steps to defend your food.
Yes, the vinegar bath and the meticulous drying phase require ten extra minutes of your time on a Sunday afternoon. But that ten-minute investment yields massive returns. It means opening your refrigerator on a Thursday morning and finding plump, pristine strawberries waiting for your yogurt, rather than a fuzzy, rotting mess demanding to be thrown in the compost bin. It means honoring the ingredients you buy, respecting the money you spend, and proving that a standard home kitchen is more than capable of professional-level efficiency.
Ditch the toxic clamshells, embrace the power of acetic acid, and never let your expensive fruit fall victim to the fuzzy grey enemy again. You have the science, you have the strategy, and now, it is time to go save your berries.


