Listen up, weekend culinary hobbyists. We need to have a serious talk about the absolute tragedy that is happening in your kitchens on a Saturday night. You invite your friends over, you drop an embarrassing amount of money on beautiful, sashimi-grade salmon, you source the crispiest, darkest sheets of premium nori you can find, and then… you ruin the entire experience by serving a dense, gummy, lukewarm brick of rice that has the textural appeal of mildly acidic wallpaper paste.
I have seen enough ruined dinner parties to know that making sushi at home is the ultimate stress test for the amateur cook. But here is the brutal, unvarnished truth: making restaurant-quality sushi rice (known as shari) does not require a decade of apprenticeship in a Tokyo basement. It requires a fundamental understanding of basic starch chemistry, a refusal to cut corners, and the right technique. Today, we are going completely scorched-earth on your bad habits. We are going to dismantle the science of short-grain rice, expose the exact reasons why your attempts turn into a clumpy disaster, and teach you the traditional techniques to achieve those distinct, glossy, perfectly seasoned grains. By the time we are done, you will have the foundation to host an interactive, DIY hand-roll (temaki) dinner that will make your guests weep with joy.
The Anatomy of Short-Grain Rice: A Starchy Situation
If you want to understand why your rice behaves the way it does, we have to zoom in on a microscopic level. You cannot just grab whatever dusty bag of long-grain white rice is sitting in the back of your pantry and expect it to magically transform into sushi rice just because you splashed some vinegar on it. True sushi rice is a specific cultivar of short-grain Japanese rice (Oryza sativa japonica).
Amylose vs. Amylopectin: The Culprits Behind the Clump
All rice is primarily composed of two different types of starch molecules: amylose and amylopectin. The ratio of these two starches dictates everything about how the grain will behave when introduced to heat and water.
Amylose is a linear, straight-chain molecule. It sets up firm when cooked and does not like to bind to its neighbors. Long-grain varieties, like basmati or jasmine, have a much higher percentage of amylose (around 25%), which is exactly why they cook up into fluffy, separate grains that tumble apart on the plate.
Amylopectin, on the other hand, is a highly branched, bushy molecule. When it hydrates and cooks, those branches reach out and tangle with the branches of neighboring grains, creating a sticky, cohesive network. Short-grain sushi rice contains roughly 15 to 20 percent amylose and a massive 80 to 85 percent amylopectin. This specific, naturally high amylopectin ratio is the biological reason why sushi rice is sticky enough to hold a shape, yet structured enough to not turn into porridge.
The Gelatinization Process
When you apply heat and water to these raw, hard little grains, you trigger a process called gelatinization. At roughly 60 to 78 degrees Celsius, the semi-crystalline matrix of the starch granules begins to swell. They absorb the surrounding water, expanding up to three times their original volume, and transform into a soft, viscous gel.
This is a delicate, highly sensitive state. The grains have softened, the amylopectin is fully activated, and the rice is incredibly vulnerable to physical damage. If you do not handle the rice with the utmost respect during and immediately after this gelatinization window, you are going to trigger a catastrophic release of starch.
Why Your Sushi Rice Turns Into Wallpaper Paste
So, why does it go wrong? Why do you end up with a solid, impenetrable block of starch instead of a bowl of beautifully distinct, glistening grains? It usually comes down to a few very specific, physics-driven errors that home cooks make because they are impatient or misinformed.
The Cardinal Sin: Stirring Hot Rice
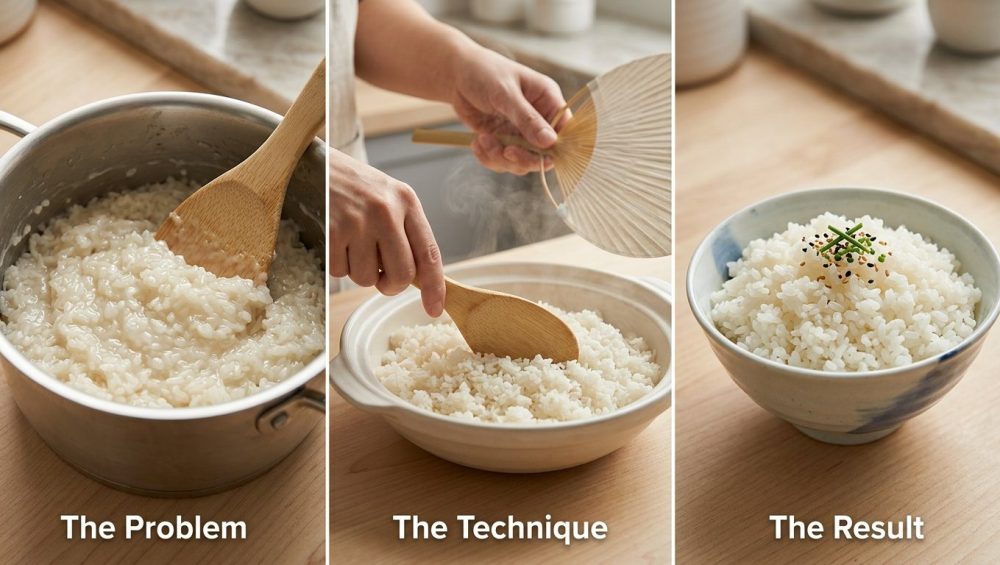
I need you to burn this into your brain: short-grain rice is not risotto. You do not agitate it. You do not coax it. You do not aggressively stir it while it is hot.
When rice is in its fully gelatinized state, those swollen amylopectin granules are fragile. If you take a spoon and start vigorously stirring the pot, the mechanical stress literally ruptures the swollen starch granules. When those granules burst prematurely, they violently expel soluble free amylopectin directly into the cooking environment.
This creates a thick, starchy slurry that coats the outside of every single grain. As the rice cools, this slurry acts like an industrial adhesive, binding the grains together irreversibly. This is exactly why your DIY sushi always gets soggy before it even reaches your mouth; the compromised structural integrity of the rice releases excess moisture into the nori, turning a crisp bite into a chewy nightmare.
The Temperature Trap: Why Cooling Matters
The other major reason your rice fails has to do with how you handle the temperature after it finishes cooking. Once rice cools, it undergoes a process called starch retrogradation. This is the scientific term for the starch molecules reorganizing themselves and recrystallizing into a hard, firm structure.
If you leave your cooked rice sitting in a hot pot for an hour, it will overcook in its own residual steam, becoming mushy. But if you panic and throw your hot sushi rice directly into the refrigerator to cool it down quickly, you trigger rapid, aggressive retrogradation. The rice will instantly seize up, becoming hard, opaque, and crumbly. In fact, laboratory testing using FDA BAM Chapter 19 protocols has shown that storing cooked sushi rice in the refrigerator degrades its textural integrity by a staggering 63 percent.
Perfect sushi rice exists in a fleeting, beautiful state of thermodynamic balance. It must be cooled rapidly enough to stop the cooking process, but it must be held at room temperature to maintain its pliable, tender bite.
The Essential Gear: Ditch the Toxic Non-Stick
Before we get into the actual masterclass of preparing the rice, we need to talk about your equipment. I am absolutely militant about banishing toxic kitchen gear from your home, and the world of rice preparation is fraught with chemical landmines.
What to Cook It In (And What to Throw Away)
If you are currently using a twenty-dollar, big-box-store rice cooker with a deeply scratched, peeling Teflon insert, unplug it and throw it in the trash immediately. I have zero patience for forever chemicals leaching into my dinner. You are sacrificing your health for the minor convenience of a non-stick surface.
You have three acceptable options for cooking perfect sushi rice:
- A High-End, Safe Rice Cooker: Look for models with uncoated ceramic inner pots, or high-grade stainless steel. Yes, they are an investment, but they provide flawless thermal management.
- A Heavy-Bottomed Stainless Steel Pot: A high-quality, fully clad stainless steel saucepan with a tight-fitting lid is brilliant for stovetop cooking. It provides even heat distribution and prevents scorching.
- A Traditional Ceramic Donabe: This is the ultimate flex. A Japanese clay pot retains heat beautifully, cooks the rice with a gentle, enveloping far-infrared heat, and looks stunning on your stove.
The Hangiri (And Why a Large Bowl Will Also Work)
To properly season and cool your rice, you need a vessel. Traditionally, Japanese chefs use a hangiri (also called a sushi-oke), which is a wide, shallow, flat-bottomed wooden tub typically made from cypress wood bound with copper bands.
The hangiri is not just for aesthetics; it serves a crucial scientific function. The unvarnished wood actively absorbs excess moisture from the hot rice as you mix in the vinegar, preventing the grains from becoming waterlogged. Furthermore, the wide, shallow surface area allows the rice to be spread out in a thin layer, facilitating rapid, even cooling.
If you do not own a hangiri, do not panic. You can use a very wide, shallow glass, ceramic, or enamel bowl. Whatever you do, do not use a reactive metal bowl like bare aluminum or cast iron. The acetic acid in the sushi vinegar will react with the metal, giving your rice a horrifying metallic taste and a dingy gray color.
The Masterclass: How to Make Perfect Sushi Rice at Home
We have covered the science, and we have covered the gear. Now it is time to execute. This is my definitive, no-nonsense method for achieving flawless shari. Follow these steps to the letter.
Step 1: The Rinse (Do Not Skip This)
If you want to experience the true magic of rinsing your grains, you have to understand that you are not just washing away dust; you are performing a vital textural intervention. When white rice is milled, the friction leaves a fine coating of starch powder on the exterior of every grain. If you do not wash this off, that powder will instantly gelatinize into a gummy paste the second it hits hot water.
You don’t strictly need a Japanese wash bowl to get the job done, but a fine-mesh strainer or a large mixing bowl is mandatory. Place your measured rice (let’s say, two cups) into the bowl and cover it with cold water. Form your hand into a “claw” and gently swirl the rice in a circular motion. Do not crush, squeeze, or grind the grains against each other—remember, we want to maintain their structural integrity.
Pour off the cloudy, milky water. Repeat this process three to four times. You are not looking for the water to be crystal clear. In fact, over-rinsing can actually leach up to 20 percent of the surface amylose, which weakens the rice’s ability to cohere later. You just want the water to be mostly clear. Once washed, drain the rice thoroughly in a colander for at least 15 minutes to remove all excess surface water.
Step 2: The Soak and The Cook
Transfer your drained rice to your cooking vessel. For short-grain sushi rice, the ideal water-to-rice ratio is incredibly precise. You want a 1:1 or 1:1.1 ratio of water to rice by volume. Add cold, filtered water to the pot.
Now, you must let the rice soak for 20 to 30 minutes before you turn on the heat. This allows the water to penetrate the dense, crystalline core of the grain, ensuring that the rice cooks evenly from the inside out. If you skip the soak, you risk ending up with rice that is mushy on the outside and crunchy in the center.
Once soaked, bring the pot to a boil over medium-high heat. The second it reaches a vigorous boil, drop the heat to the absolute lowest setting possible, cover the pot with a tight-fitting lid, and set a timer for 15 minutes.
Do not lift the lid. Do not peek. Do not stir. Let the physics happen.
After 15 minutes, turn off the heat entirely. Again, do not touch the lid. Let the pot sit undisturbed for another 10 to 15 minutes. This crucial resting period allows the steam to evenly redistribute throughout the pot, gently finishing the cooking process and allowing the starches to set up structurally.
Step 3: The Seasoning (Sushi-zu)
While your rice is resting, prepare your sushi vinegar (sushi-zu). For two cups of dry rice, you will need approximately 1/4 cup of high-quality unseasoned rice vinegar, 2 tablespoons of granulated sugar, and 1 teaspoon of fine sea salt.
Combine these in a small saucepan over very low heat. Stir gently just until the sugar and salt have completely dissolved. Do not let this mixture boil. Boiling will evaporate the delicate acetic acid, destroying the bright, tangy flavor profile you need to balance the rich fish you will be serving later. Once dissolved, remove it from the heat and let it cool slightly.
Timing is everything here. You want to introduce the vinegar mixture to the rice when the rice has cooled slightly to around 104°F (40°C). If you pour the seasoning over boiling hot rice, the intense heat will cause the starches to over-gelatinize and turn gummy. If you wait until the rice is cold, the starches will have already retrograded, and the grains will completely refuse to absorb the seasoning.
Step 4: The Cut and Fan Technique (Shari-kiri)
This is the most critical mechanical step in the entire process. This is what separates the masters from the amateurs.
Gently invert your pot of cooked rice into your hangiri or wide, shallow bowl. Do not scrape the bottom of the pot aggressively; if there is a crust of slightly browned rice stuck to the bottom, leave it. You only want the pristine, fluffy grains.
Hold a wooden rice paddle (shamoji) over the rice, and slowly pour your warm sushi vinegar over the paddle so it distributes evenly across the surface of the rice.
Now, you must perform the shari-kiri (cutting the rice). Do not stir the rice in circles. Do not mash it flat. Hold the paddle at a sharp 45-degree angle and use quick, sharp slicing motions to gently separate the grains and fold the vinegar into the rice. You are literally slicing through the clumps, lifting, and folding.
Simultaneously, you need to cool the rice rapidly. Traditionally, this is done by vigorously waving a paper fan (uchiwa) over the rice while you cut it. The rapid airflow from fanning serves three vital purposes:
- It halts the cooking process immediately, preventing the residual heat from turning the rice into mush.
- It rapidly evaporates the excess surface moisture from the vinegar, which concentrates the flavor and gives every single grain a breathtaking, jewel-like glossy finish.
- The combination of the rapid cooling and the introduction of the acetic acid actively slows down the starch retrogradation process. This is the scientific secret to why properly seasoned sushi rice stays beautifully tender and pliable at room temperature for hours, instead of turning into a hard brick.
Once the rice is glossy, evenly seasoned, and has reached body temperature, stop mixing. Cover the hangiri with a damp kitchen towel to prevent the surface from drying out while you prepare your fillings.
Orchestrating a Mindful Hand-Roll Night
Now that you have conquered the most intimidating part of the meal, you can focus on why you are doing this in the first place. The whole point is to host a relaxed dinner party without losing your mind, and a DIY hand-roll (temaki) night is the undisputed champion of low-stress, high-impact entertaining.
Prepping the Fillings: Keep It Simple and Communal
You do not need to spend hours meticulously rolling perfect maki cylinders or pressing delicate nigiri. Temaki is rustic, interactive, and endlessly customizable. It’s a massive step toward conquering weeknight cooking anxiety when you realize that your guests actually enjoy building their own food.
Focus your energy on sourcing the absolute best ingredients you can find. Visit a reputable fishmonger for sashimi-grade salmon, tuna, or yellowtail. Slice the fish into thick, satisfying matchsticks.
Prepare a vibrant array of vegetables and textural elements. Julienned cucumbers, creamy slices of ripe avocado, crisp daikon radish sprouts, and perhaps some spicy mayonnaise or a sweet soy glaze. Arrange everything on beautiful platters.
Do not forget the nori. Buy the highest quality, crispiest roasted seaweed sheets you can afford, and cut them into halves or quarters. If your nori has been sitting in the pantry for six months, it will be chewy and stale. Fresh, crisp nori that shatters when you bite into it is non-negotiable.
Setting the Table for Interactive Dining
When your guests arrive, the hard work is entirely finished. Place the covered hangiri of perfect, body-temperature sushi rice in the center of the table alongside the platters of fish and vegetables.
Food is ultimately about creating meaningful moments together around the table, and there is something incredibly intimate about passing platters, sharing flavor combinations, and eating with your hands. Show your guests how to cup a square of nori in their palm, spread a thin, gentle layer of rice (remind them not to smash it!), layer in their chosen fillings, and roll it into a casual cone.
When you learn how to plan mindful gatherings around interactive food, you completely eliminate the bottleneck of the host sweating over a hot stove while everyone else is having fun in the living room. You get to sit down, pour a glass of crisp Junmai sake, and actually enjoy the incredible meal you have curated.
Troubleshooting Your Sushi Rice Disasters
Even with the best intentions, things can occasionally go sideways. If you ever wonder why your kitchen knives get dull so incredibly fast (hint: it’s your terrible cutting board), you probably also wonder why your rice sometimes misbehaves despite following the rules. Let’s troubleshoot the most common failures.
The Rice is Gummy and Mushy:
You committed one of three sins. You either used too much water during the cooking phase, you failed to drain the rice properly after washing it (adding hidden water volume to the pot), or you panicked and stirred the rice while it was boiling, rupturing the amylopectin granules. Next time, trust the ratios and keep your hands off the spoon.
The Rice is Hard and Crunchy in the Center:
You skipped the soaking step. Short-grain rice is dense. If you do not give it 20 to 30 minutes to hydrate in cold water before applying heat, the outside will cook and gelatinize before the heat can penetrate the dry, starchy core.
The Grains are Broken and Mashed:
You used a heavy hand during the shari-kiri phase. You treated the rice like you were mashing potatoes. Remember, you must use a sharp slicing motion with the edge of the paddle to separate the grains. Also, check your equipment. Not only are cheap boards ruining your knives, but using a heavy metal spoon instead of a proper wooden shamoji will crush the delicate grains.
The Rice Lacks Flavor:
You were timid with the seasoning. Sushi rice requires a surprisingly aggressive amount of vinegar, sugar, and salt to properly balance the raw fish. Also, ensure you are using genuine, high-quality Japanese rice vinegar, not harsh white distilled vinegar or apple cider vinegar.
Making exceptional sushi rice at home is a testament to the power of precision. It is a quiet, mindful process that demands your attention and rewards you with a culinary foundation that rivals your favorite local restaurant. Put down the takeout menu, respect the starch chemistry, and get ready to host the best dinner party of the year. You’ve absolutely got this.


