Welcome back to my kitchen, where we deal in hard truths, sharp knives, and the absolute refusal to eat bad food. Let’s paint a picture that I know you are intimately familiar with. You have spent your entire Saturday afternoon carefully creaming expensive European butter, zesting organic lemons until your knuckles are raw, and folding in premium vanilla bean paste. You slide your masterpiece into the oven, pour yourself a well-deserved glass of Pinot Noir, and wait for the magic to happen. But an hour later, you pull out a cake that could legitimately double as a medieval doorstop. It is dense. It is dry. It requires a gallon of milk just to force down a single bite.
You immediately blame the oven. You blame the recipe. You might even blame the humidity. But I am here to tell you, with all the love and snark in my heart, that the culprit is staring right back at you from inside your pantry. You sabotaged your own bake before the oven even preheated.
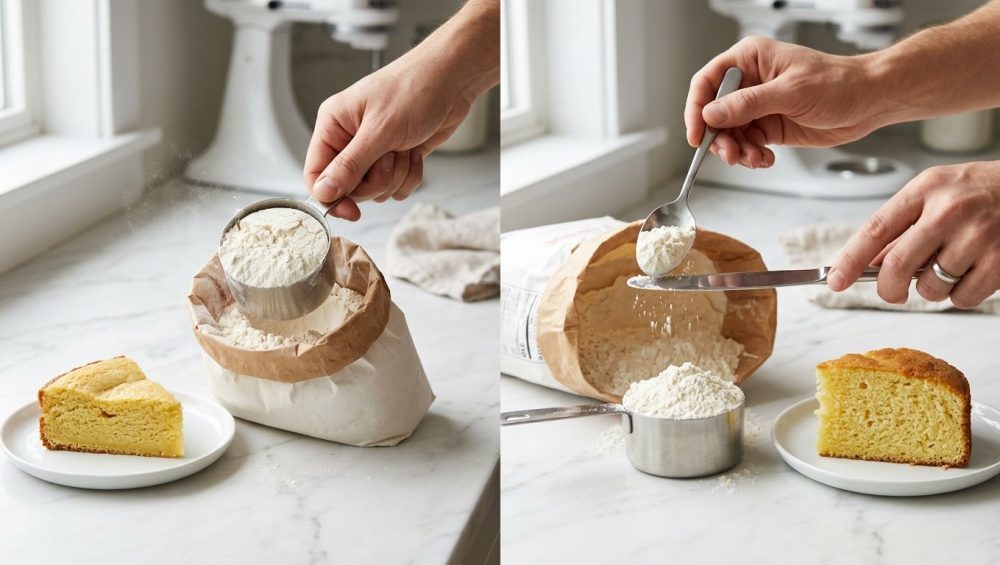
You scooped your flour directly out of the bag.
I know, I know. You’ve been doing it this way since you were a kid helping your grandmother make chocolate chip cookies. But unless your grandmother was secretly a pastry chef with a penchant for precise hydration ratios, she was probably doing it wrong, too. Today, we are going to dive deep into the absolutely ruthless physics of baking. We are going to permanently fix the single most common mistake that ruins baked goods, and we are going to do it without resorting to pretentious, unapproachable chef-speak.
The Physics of Flour: Why Volume is a Pathological Liar
Let’s get one thing straight right out of the gate: baking is not cooking. Cooking is an art; baking is a science. When you are making a Tuesday night stir-fry, you can throw in a handful of this and a splash of that, and it will probably be fine. But when you are baking, you are essentially conducting a highly volatile chemistry experiment in your kitchen. And in chemistry, precision is the difference between a soaring, fluffy triumph and a dense, inedible brick.
The fundamental problem with American recipes is our stubborn reliance on measuring cups. Volume measurements are inherently flawed when it comes to dry ingredients, and flour is the worst offender. Why? Because flour is highly compressible. It is not a liquid that naturally levels itself out and maintains a constant density. Flour is composed of millions of microscopic particles of pulverized wheat endosperm.
When you plunge a metal or plastic measuring cup directly into a bag or canister of flour, you are committing an act of “mechanical compaction”. The sheer force of shoving the cup into the densely packed bag forces the microscopic air pockets out of the flour, compressing the particles tightly against one another. You are effectively packing the flour into the cup the way you are supposed to pack brown sugar.
Let’s look at the cold, hard data. According to extensive test kitchen standards, one cup of properly aerated, correctly measured all-purpose flour should weigh exactly 120 grams. However, when you aggressively scoop that same measuring cup directly into a settled bag of flour, you can easily cram anywhere from 140 to over 160 grams of flour into that single cup.
Do the math. If you are scooping, you are accidentally adding up to 30% more flour than the recipe developer intended. If a cake recipe calls for three cups of flour, your scooping habit just secretly added an entire extra cup of flour into your batter. It is a mathematical guarantee for failure.
The Chain Reaction of Too Much Flour
In the professional baking world, everything revolves around something called “Baker’s Math” or “Baker’s Percentages”. In this system, the total weight of the flour in a recipe is always represented as exactly 100%. Every single other ingredient—the water, the milk, the eggs, the butter, the yeast, the salt—is calculated as a specific percentage of that flour weight.
This creates a highly specific “hydration ratio”. The hydration ratio is the delicate balance between dry mass and liquid moisture that dictates the final texture of your bake. When you scoop your flour and accidentally increase the dry mass by 30%, you violently skew that hydration ratio. You have starved your dough of the moisture it desperately needs to function. Here is exactly how that hidden excess flour chemically ruins your favorite treats.
The Tragedy of Dense, Brick-Like Cakes
Cake batter relies on a very fragile suspension of fats, liquids, and proteins. When wheat flour mixes with water or milk, two specific proteins—glutenin and gliadin—bind together to form gluten. In bread, we want lots of strong gluten. In cakes, we want as little gluten development as humanly possible, which is why we gently fold cake batter instead of aggressively kneading it.
When you pack too much flour into your measuring cup, you are introducing a massive surplus of gluten-forming proteins into a batter that doesn’t have enough liquid to properly hydrate them. The result is a hyper-dense, heavy crumb structure. The cake won’t rise properly because the chemical leaveners (baking powder and baking soda) cannot generate enough lift to push through the heavy, over-floured matrix. You end up with a dry, heavy sponge that tastes vaguely like raw flour.
The Mystery of Dry, Crumbly Cookies
Cookie dough is notoriously finicky because it has a very low hydration ratio to begin with. The moisture in a standard chocolate chip cookie recipe comes almost entirely from the eggs and the water content found in the butter.
When novice bakers try to figure out why your cookies spread too much, they often assume the dough was too wet. While temperature plays a huge role in spreading, the opposite problem is just as common: cookies that refuse to spread at all. When you scoop your flour and accidentally add an extra 40 grams of dry powder to your cookie dough, the dough becomes stiff, crumbly, and impossible to roll.
Ironically, in a desperate attempt to stop baking flat cookies, many people will intentionally pack extra flour into their measuring cups. This is a massive mistake. The resulting cookies will bake up into tall, dry, hard little mounds that crumble into dust the second you bite into them. They will lack that coveted chewy center and crispy edge because the excess flour has absorbed all the fat that was supposed to melt and create texture.
The Muffin and Quick Bread Disaster
Quick breads and muffins are supposed to be tender, moist, and springy. But because they are mixed so quickly, an over-floured batter is a death sentence. Before you start tearing your hair out wondering why your banana bread sinks or turns out incredibly tough, you have to look at your flour measurement.
Excess flour in a quick bread batter forces you to overmix the dough just to get the dry streaks to disappear. Overmixing develops tough gluten strands, and the lack of relative moisture means the steam cannot properly expand the crumb during baking. You are left with a rubbery muffin top and a dry, choking interior.
The Pretentious Chef Solution vs. The Real World Solution
If you go to culinary school, or if you read the aggressively pretentious introductions of high-end pastry cookbooks, the chefs will tell you that measuring cups are the devil and that you must exclusively weigh all of your ingredients on a digital scale using the metric system.
And look, scientifically speaking, they are absolutely right. Weighing your ingredients in grams is the only foolproof way to ensure 100% accuracy every single time. A gram is a gram, whether the flour is sifted, compacted, or sitting in a solid block.
But I am a realist. I am a busy professional who advocates for the everyday home cook. I know for a fact that when it is 7:00 AM on a chaotic Tuesday morning and your kids are screaming for breakfast, you are not going to pull out a digital scale, zero out a bowl, and meticulously weigh 240 grams of flour just to make a quick batch of pancakes. You are going to grab a measuring cup.
And when you aggressively scoop that flour, creating a thick, cement-like batter, it is exactly why your pancakes burn on the outside while remaining a gooey, raw mess on the inside. The batter is too dense to cook through before the exterior scorches.
So, how do we bridge the gap between professional precision and weekday practicality? We use the “Spoon-and-Level” method.
Mastering the Spoon-and-Level Technique
The spoon-and-level technique (sometimes called the spoon-and-sweep method) is the ultimate weekday kitchen hack. It allows you to use your familiar measuring cups while drastically reducing the risk of mechanical compaction. It takes exactly five extra seconds, and it will fundamentally transform the quality of your baked goods. Here is the strict, non-negotiable protocol:
Step 1: Fluff the Flour
Flour settles as it sits in your pantry. The sheer weight of gravity compresses the particles over time. Before you measure, take a spoon or a whisk and vigorously stir the flour inside its container. You want to introduce air back into the powder, lightening it up and breaking apart any dense clumps.
Step 2: Spoon It In
Do not let your measuring cup touch the flour inside the canister. Hold your dry measuring cup in one hand, hovering it over the container. With your other hand, use a large spoon to gently scoop the fluffed flour and drop it into the measuring cup. Continue spooning the flour until it forms a generous, snowy mountain that piles high above the rim of the cup.
Crucial Warning: Do not tap the cup on the counter. Do not shake the cup to settle the flour. Do not press the flour down with the back of the spoon. The moment you apply pressure or vibration, you are forcing the air out and ruining the measurement.
Step 3: Level It Off
Take a straight, flat edge—the back of a butter knife or the straight side of a bench scraper works perfectly. Starting at the handle of the measuring cup, gently sweep the flat edge straight across the rim, pushing the excess mountain of flour back into the canister.
Congratulations. You have just measured a cup of flour that weighs approximately 120 grams, exactly as the recipe intended. Your cakes will be lighter, your cookies will be chewier, and your breads will be tender.
The Right Tools for the Job (And the Toxic Trash to Avoid)
Now, we need to have a serious conversation about your kitchen gear. I have a strict “no-go” rule when it comes to cheap, toxic, poorly manufactured kitchenware. Your technique can be absolutely flawless, but if your tools are garbage, your food will suffer.
If you are currently using a set of flimsy, warped, dollar-store plastic measuring cups, I need you to walk into your kitchen right now and throw them in the recycling bin. Cheap plastic measuring cups are a culinary hazard. Over time, the heat from your dishwasher warps the plastic, physically altering the volume the cup can hold. Furthermore, cheap plastics are notorious for containing BPA and other endocrine-disrupting chemicals that can leach into your ingredients.
It is the exact same infuriating phenomenon as when your silicone spatulas taste like soap because they were manufactured with cheap, porous filler materials that absorb dish detergent. You deserve better than toxic, unreliable gear.
Similarly, just as cheap metal baking sheets keep warping and popping in a hot oven, thin aluminum measuring cups will dent and bend, completely ruining their volumetric accuracy. If your “one cup” measure has a massive dent in the side, it is no longer holding one cup.
You need to invest in a set of heavy-duty, 18/8 stainless steel dry measuring cups. They should be forged from a single piece of metal so the handles don’t snap off into your brown sugar. They should have engraved measurements that will never wash off in the dishwasher. They will not warp, they will not dent, and they will not leach mystery chemicals into your organic flour. High-quality measuring cups are absolutely one of the essential tools every beginner needs to guarantee success. Buy them once, take care of them, and leave them to your grandchildren.
The Digital Scale: The Ultimate Weekend Baking Upgrade
While the spoon-and-level method is your weekday savior, I highly encourage you to embrace the digital kitchen scale when you have the luxury of time on the weekends. When you are tackling an elaborate Saturday afternoon baking project—like a towering layer cake or a complex laminated pastry—the digital scale is your best friend.
Using volume measurements for highly technical pastry is a massive gamble. It is as reckless and unpredictable as the day your glass baking dish shattered because you didn’t understand the physics of extreme thermal shock. Science doesn’t care about your good intentions; it only cares about the math.
A good digital scale is cheap, sleek, and takes up less space than a hardcover book. Not only does it guarantee absolute precision (120 grams of flour is 120 grams of flour, every single time), but it also saves you from washing a mountain of dishes. You simply place your mixing bowl on the scale, hit the “tare” button to zero out the weight, and pour your flour directly from the bag into the bowl until you hit the magic number. Zero measuring cups to wash. Time is money, my friends.
Flour Types and Their Unique Measuring Quirks
Before you run off to bake a victory cake, we need to address the fact that not all flours behave the same way. The physics of compaction change depending on the specific milling process and the protein content of the grain.
All-Purpose Flour vs. Cake Flour
All-purpose flour is the middle-of-the-road workhorse. It has a moderate protein content (around 10-11%) and measures relatively consistently with the spoon-and-level method. Cake flour, on the other hand, is milled to an incredibly fine, powdery texture and is often bleached to weaken its proteins. Because the particles are so microscopic, cake flour is highly susceptible to extreme compaction. If you scoop cake flour, you can easily end up with 40% more mass than intended. You must heavily aerate cake flour before spooning it.
Whole Wheat Flour and the Bran Factor
Whole wheat flour contains the entire wheat berry, including the fibrous bran and the nutrient-rich germ. Bran is essentially tiny, sharp shards of fiber. Not only do these shards physically slice through delicate gluten strands during mixing, but bran also acts like a microscopic sponge. Bran can absorb up to three times its weight in water. Because whole wheat flour is already so thirsty, accidentally scooping too much of it will result in a dough that is catastrophically dry.
Almond Flour and Gluten-Free Blends
If you are baking with almond flour or complex gluten-free blends, throw your measuring cups out the window and use a scale. Almond flour is heavy, oily, and clumps together violently. It does not aerate well, making the spoon-and-level method highly inaccurate. Gluten-free blends often contain heavy starches (like potato or tapioca) and hydrocolloids (like xanthan gum) that pack down tightly in storage. Weighing is the only safe path forward here.
Common Baking Myths Busted
While we are dismantling bad kitchen habits, let’s quickly execute a few persistent baking myths that refuse to die.
Myth 1: Sifting is the same as the spoon-and-level method.
False. Sifting flour through a fine-mesh sieve introduces a massive amount of air, making the flour incredibly light. A cup of sifted flour weighs significantly less than a cup of spooned-and-leveled flour (often around 100 grams compared to 120 grams). If a recipe calls for “1 cup of flour, sifted,” you measure the flour first using the spoon-and-level method, and then you sift it. If the recipe calls for “1 cup of sifted flour,” you sift a pile of flour first, and then gently spoon it into the cup. Wording matters.
Myth 2: You should pack flour to get a “full” cup.
Absolutely not. The only dry ingredient you should ever intentionally pack into a measuring cup is brown sugar, and that is because brown sugar contains sticky molasses that requires mechanical pressure to force the air pockets out. Flour should be treated like delicate, freshly fallen snow.
Myth 3: Humidity ruined my cake, not my measuring technique.
I hear this excuse all the time. Yes, extreme ambient humidity can slightly affect the moisture content of flour stored in a paper bag. However, the scientific consensus is clear: the changes in mass due to atmospheric humidity are minuscule compared to the massive, 30% error margin caused by violently scooping a measuring cup into a compacted bag. Stop blaming the weather for your heavy-handed scooping.
Stop Sabotaging Your Own Hard Work
Baking does not have to be an intimidating, tear-inducing chore. You do not need a degree from Le Cordon Bleu to make a mind-blowing batch of perfectly chewy chocolate chip cookies or a tender, towering birthday cake. You simply need to respect the basic chemistry of the ingredients you are working with.
If you truly want to cure cooking anxiety, you have to stop leaving your results up to chance. By controlling the hidden variables—like the invisible mechanical compaction of your dry ingredients—you take the power back into your own hands. You stop crossing your fingers and hoping for the best, and you start baking with the quiet, smug confidence of someone who knows exactly what they are doing.
The easiest way to fix your food is to start at the very beginning. Ditch the toxic plastic cups, stop treating your flour bag like a sandbox, and embrace the simple, elegant power of the spoon-and-level method. Your cakes will rise higher, your cookies will chew perfectly, and your family will finally stop politely hiding their half-eaten muffins in napkins.
Now, pour yourself that glass of wine, preheat your oven, and let’s get back to baking the right way. You’ve got this.


