Listen up, my fellow culinary weekend warriors. We need to have a serious, unfiltered conversation about the state of your side dishes. You spend hours meticulously marinating your proteins, carefully balancing the acidity in your pan sauces, and perfectly julienning your vegetables, only to serve them alongside a mound of rice that looks—and tastes—like a solid, unyielding block of industrial wallpaper paste. If you are tired of ruining your dinners with gluey, unpredictable, clumped-together grains, you have come to the right place.
I firmly believe that absolutely anyone can cook like an expert without dropping thousands of dollars on a pretentious culinary degree. You do not need a Michelin star to master the basics; you just need to understand the underlying science of your ingredients. Today, we are tackling the most frustrating, universally botched staple in the home kitchen: white rice. The secret to achieving perfectly separated, light, and fluffy grains every single time does not require expensive gadgets or hours of your precious weeknight. It requires exactly thirty seconds of your time and a stream of cold tap water.
We are going to dive deep into the botanical anatomy of the rice grain, the molecular chemistry of starch, the surprising health benefits of a good cold-water rinse, and the absolute best techniques to guarantee foolproof rice. Grab your favorite mixing bowl, banish your cooking anxiety, and let us finally fix your mushy rice problem for good.
The Botanical Breakdown: What Exactly Is a Grain of Rice?
Before we can fix the problem, we need to understand the anatomy of the ingredient we are working with. A grain of rice, in its natural, unprocessed state right out of the paddy, is a complex little botanical marvel. It consists of several layers. On the very outside is the inedible hull or husk, which is stripped away to produce brown rice. Just beneath that hull lies the bran layer and the germ, which contain the grain’s fiber, vitamins, and minerals.
When we talk about standard white rice—the kind most of us are cooking on a busy Tuesday night—we are talking about a grain that has been aggressively milled and polished. The milling process strips away the bran and the germ, leaving behind only the endosperm. This endosperm is essentially a dense, highly concentrated packet of pure carbohydrate energy.
Here is where the trouble begins. The journey from the rice paddy to the milling facility, into bulk burlap sacks, onto cargo ships, and finally into the plastic bag sitting in your pantry is a long, highly abrasive one. Throughout this journey, millions of polished rice grains are constantly rubbing against one another. This relentless friction acts like microscopic sandpaper, grinding down the exterior of the endosperm and creating a fine, powdery dust that coats every single grain.
This dust is not dirt. It is not a chemical preservative. It is pure, highly reactive, unadulterated starch. And if you do not wash it off before you apply heat and water, it is going to sabotage your entire meal. Understanding this fundamental concept is one of those crucial beginner cooking essentials that will instantly elevate your daily cooking routine.
The Chemistry of the Clump: Amylose vs. Amylopectin
To truly understand why your rice is turning into a gummy nightmare, we have to drop the pretentious chef-speak and look at the molecular chemistry of starch. Not all starches are created equal. The starch inside a grain of rice is composed of two entirely different types of carbohydrate molecules: amylose and amylopectin.
The Role of Amylose
Amylose is a long, straight-chain polymer of glucose. Because of its linear structure, amylose molecules pack tightly together. They do not easily break down or absorb water when heated. Rice varieties that are naturally high in amylose—such as basmati and long-grain jasmine—tend to cook up light, fluffy, and with distinct, separate grains. They have a firmer bite and are much more forgiving if you accidentally overcook them by a minute or two.
The Role of Amylopectin
Amylopectin, on the other hand, is a highly branched, bushy molecule. Because of its sprawling, tree-like structure, it cannot pack together tightly. When exposed to hot water, amylopectin rapidly absorbs moisture, swells, and breaks down, creating a sticky, viscous, gel-like substance. Short-grain and medium-grain rice varieties—like the kind used for Japanese sushi or Korean sticky rice—have a much lower percentage of amylose and a very high percentage of amylopectin. This is exactly why they naturally cling together, allowing you to easily pick them up with chopsticks.
So, what does this have to do with rinsing? Remember that fine powdery dust we talked about earlier? That friction-created dust on the outside of the grain is almost entirely composed of pure amylopectin. It does not matter if you bought the most expensive, high-amylose basmati rice on the market; if it is coated in a thick layer of loose amylopectin dust, it is going to turn into glue the second it hits boiling water.
The Anatomy of a Mushy Disaster: What Happens When You Skip the Rinse
Let us walk through the exact, tragic sequence of events that occurs when you dump a cup of unwashed rice directly into a pot of water and turn on the stove. Whether you are serving it alongside pan-seared salmon or a quick weeknight chicken stir-fry, the physics of the failure remain exactly the same.
When water heats up, the starch molecules begin a process called gelatinization. Gelatinization is the culinary term for what happens when starch granules absorb water, swell, and eventually burst, releasing their sticky contents into the surrounding liquid. For rice starch, this process begins at relatively low temperatures, usually around 140°F to 160°F (60°C to 70°C).
If you have not rinsed your rice, that loose layer of amylopectin dust on the surface of the grains is the very first thing to gelatinize. Long before the heat and moisture can actually penetrate the core of the rice grain, the surface dust instantly transforms into a thick, viscous paste.
This paste creates a catastrophic chain reaction in your pot. First, the sticky gel acts like a physical glue, instantly binding the individual grains together into a solid mass. Second, this thick, starchy liquid significantly alters the boiling dynamics of the water. Instead of bubbling cleanly and creating natural convection currents that evenly distribute heat throughout the pot, the thickened water traps the heat at the bottom.
The result? The rice at the very bottom of the pot scorches and burns against the metal. The rice in the middle becomes trapped in a gummy, impenetrable block of starch paste. And the rice at the top, starved of evenly circulated steam, remains crunchy and undercooked. You are left with a textural nightmare that no amount of soy sauce can fix.
Beyond Starch: The Hidden Health Benefits of Rinsing
While preventing a gummy culinary disaster is my primary motivation for demanding that you wash your rice, there is an equally compelling, science-backed health reason to make this a non-negotiable habit. Maintaining a safe, non-toxic environment and a permanently organized kitchen means knowing which daily habits actually protect your family from hidden contaminants.
Rice, by its very botanical nature and the way it is cultivated, is a sponge for heavy metals. Because cultivated rice is primarily grown in continually flooded paddies, the plant’s root system is highly efficient at absorbing water-soluble elements from the soil and surrounding environment. Unfortunately, this includes naturally occurring and agriculturally introduced heavy metals like arsenic, cadmium, and lead. In fact, rice accumulates arsenic at a rate nearly ten times higher than other cereal grains like wheat or oats.
Arsenic exposure, even at low levels over a long period, is linked to serious neurological effects, cardiovascular disease, and various forms of cancer,. The arsenic tends to concentrate most heavily in the outer bran layer of the grain.
Here is the good news: rigorous scientific studies have proven that the simple act of washing your rice significantly mitigates this risk. A comprehensive 2018 study published in the National Library of Medicine demonstrated that the mechanical action of washing rice significantly reduced the concentrations of cadmium, arsenic, and lead before the cooking process even began.
Further research published in Science of the Total Environment by the University of Sheffield found an even more effective method for those highly concerned about heavy metals. By parboiling the rice for five minutes, draining the water, and then cooking it using the standard absorption method, you can remove up to 74% of naturally occurring arsenic in white rice, and over 50% in brown rice, all without losing the essential micronutrients inside the grain. Another study found that simply washing commercial rice brands five times with water resulted in an average removal of 33% of arsenic, 35% of cadmium, and 27% of lead.
You are not just washing away starch dust; you are literally washing away toxic heavy metals. It is a thirty-second investment in both the texture of your dinner and your long-term health.
The Great Rice Debate: Are There Exceptions to the Rule?
Now, because the culinary world is full of nuances, we must address the inevitable exceptions. Are there times when you should actively avoid washing your rice? Yes, but they are highly specific scenarios.
If you are hosting a relaxed dinner party and you have decided to impress your guests with a rich, creamy, authentic Italian risotto, you must step away from the sink. Risotto relies on short-grain, high-amylopectin varieties like Arborio, Carnaroli, or Vialone Nano. The entire technique of making risotto—slowly ladling hot broth into the pan and aggressively stirring—is designed to intentionally shear off that surface starch and coax it into the cooking liquid,. That loose starch is exactly what creates the luxurious, velvety emulsion that binds the dish together. If you wash Arborio rice, you wash away the creamy texture, and you will be left with a sad, watery bowl of wet grains.
The same rule generally applies to Spanish paella made with Bomba rice, where the starch helps form the prized socarrat (the crispy crust at the bottom of the pan), and to certain types of rice puddings where a thick, cohesive texture is the ultimate goal,.
Finally, there is the matter of enriched rice. In the United States, many commercial brands of highly processed white rice are “enriched.” Because the milling process strips away the nutrient-dense bran and germ, manufacturers artificially spray the polished grains with a powdery coating of synthetic vitamins and minerals (like iron, niacin, and thiamin) to meet nutritional standards. If you buy enriched rice and wash it, you are washing those sprayed-on vitamins straight down the drain,. However, as many culinary experts argue, if you are eating a balanced diet full of fresh vegetables and proteins, the loss of these synthetic vitamins is negligible compared to the massive textural improvement of the rice. My advice? Skip the heavily processed enriched rice entirely, buy high-quality standard jasmine or basmati, and wash it thoroughly.
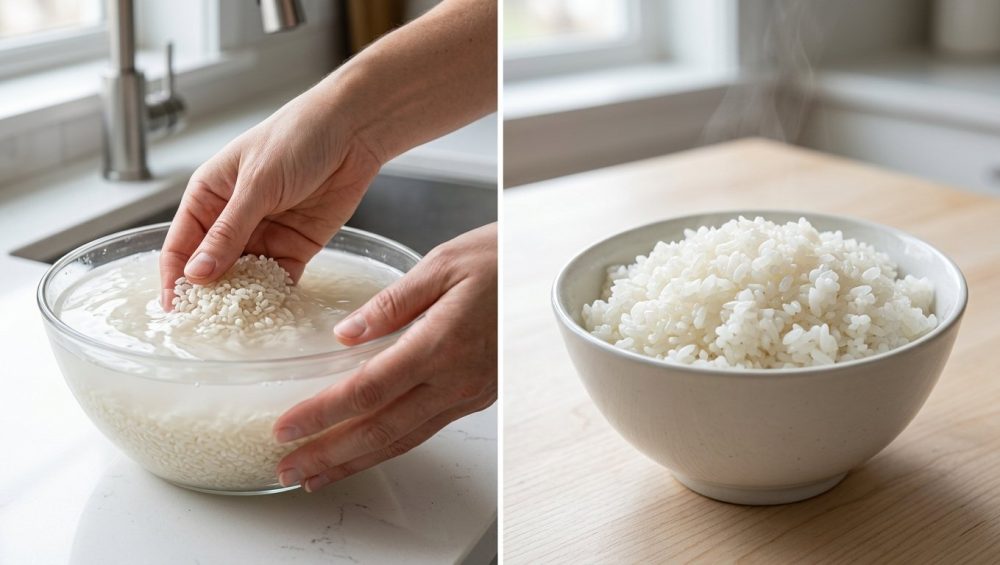
How to Actually Wash Your Rice (You’re Probably Doing It Wrong)
Washing rice is not about just running it under the tap for three seconds and calling it a day. It requires a specific, gentle mechanical agitation to effectively scrub the grains without breaking them. You do not need any fancy equipment; your hands are the best beginner kitchen tools for this job. Here is the foolproof, step-by-step masterclass on how to wash your grains properly.
Step 1: Measure and Submerge
Measure your desired amount of dry rice into a large mixing bowl or the heavy inner pot of your rice cooker. Immediately cover the rice with an abundance of cold tap water. The temperature here is critical. Do not use warm or hot water. Hot water will trigger premature gelatinization, causing the grains to instantly absorb the starchy water and become gummy before you even turn on the stove. Cold water keeps the starch inert.
Step 2: The “Claw” Technique
Plunge your hand into the cold water and form your fingers into a loose claw shape. Vigorously, but gently, swirl the rice around in a circular motion. You want the grains to rub against each other and against the sides of the bowl. This friction is what lifts the stubborn amylopectin dust off the surface of the endosperm. Do not squeeze, crush, or grind the rice between your palms. Raw rice is brittle, and if you snap the grains in half, they will release the starches trapped inside their core, completely defeating the purpose of washing them.
Step 3: Observe the Cloud
After ten to fifteen seconds of swirling, stop and look at the water. It should look like thick, opaque milk. That cloudy liquid is the enemy. That is the glue that ruins your side dishes.
Step 4: Drain and Repeat
Carefully tilt the bowl to pour off the starchy water. You can use your hand to hold the rice back, but a fine mesh strainer is one of those must-have tools that makes draining infinitely easier and prevents precious grains from slipping down the drain.
Once drained, add fresh cold water and repeat the clawing process. The second wash will be cloudy, but slightly less opaque. Drain and repeat again. You generally need to wash the rice three to five times. You are not looking for crystal-clear, bottled-water perfection—a slight haze is perfectly acceptable—but you want to wash it until the water is significantly less murky and you can clearly see the individual grains resting at the bottom of the bowl,.
The Water-to-Rice Ratio Myth: Adjusting for Hydration
Here is where most home cooks stumble, even if they have dutifully washed their grains. If you look at the back of almost any bag of white rice in the supermarket, the instructions will confidently tell you to use a 1:2 ratio. One cup of dry rice to two cups of water.
Listen to me very carefully: If you are washing your rice (which you now are), that 1:2 ratio is a lie that will result in soggy, overcooked mush.
Why? Because the act of washing your rice introduces hydration before the cooking process even begins. As the rice sits in the cold water during those three to five washes, the porous grains absorb a small but significant amount of moisture. Furthermore, even if you drain the rice meticulously in a fine mesh sieve, a thin film of water remains physically clinging to the surface of every single grain. Culinary tests have shown that one cup of thoroughly washed and drained rice can hold onto roughly 1/8 to 1/4 cup of residual water.
If you take that pre-hydrated, water-coated rice and add the full two cups of cooking water recommended by the bag, you are drastically over-hydrating the pot.
For perfectly cooked, distinct grains of standard long-grain white rice (like jasmine or basmati) that have been thoroughly washed, you need to reduce your cooking liquid. A ratio of 1 cup of washed rice to 1.5 cups of water is the universally recognized sweet spot for the stovetop absorption method,. If you are using a dedicated electric rice cooker, the machine’s sealed environment prevents almost all evaporation, meaning you need even less water—often closer to a 1:1.2 or 1:1.25 ratio,.
This is also why the traditional Asian “knuckle method” is so brilliant. By placing your index finger so the tip touches the top of the leveled, washed rice, and filling the water until it reaches your first knuckle, you are measuring the depth of the water relative to the volume of the rice in that specific pot. It naturally accounts for the residual moisture from washing. It is an ancient, intuitive, and highly accurate way to bypass measuring cups entirely.
Gear Talk: Stop Cooking Rice in Toxic Peeling Pots
As your resident sassy sous-chef, I have a strict, uncompromising “No-Go” rule when it comes to toxic, low-quality kitchen equipment. Transforming your daily routine from a stressful chore into kitchen artistry requires gear that you can trust. I have absolutely zero patience for cheap, mystery-metal rice cookers lined with thin, peeling non-stick coatings.
If you open your rice cooker right now and see that the black Teflon or PTFE coating is bubbling, flaking, or heavily scratched, showing the raw aluminum underneath, you need to throw that insert into the garbage immediately. When cheap non-stick coatings degrade, not only do they lose their stick-resistant properties, but you also risk ingesting flakes of fluoropolymers with your dinner. Furthermore, if these cheap pots overheat, they can release toxic fumes. You do not need forever chemicals in your perfectly washed jasmine rice.
If you prefer the convenience of an electric rice cooker, invest in a model that features an uncoated, surgical-grade stainless steel inner pot, or a high-quality, naturally non-toxic ceramic insert. Yes, stainless steel requires a tiny bit more effort to clean than a brand-new non-stick pan, but it will last a lifetime, it will not poison your food, and it provides superior, even heat distribution.
If you are cooking your rice on the stovetop, the vessel you choose dictates the success of the absorption method. You need a heavy-bottomed pot with exceptional thermal mass. A flimsy, thin aluminum pot will create brutal hot spots, scorching the bottom layer of your rice before the top layer even begins to steam. I highly recommend a fully clad stainless steel saucepan (where an aluminum or copper core is sandwiched between layers of steel) or a traditional Japanese donabe (an unglazed clay pot). A donabe is a brilliant piece of culinary engineering; the thick clay absorbs heat slowly and evenly, and retains it beautifully, ensuring a gentle, uniform steam that treats your freshly washed grains with the respect they deserve.
Troubleshooting: You Rinsed, But It’s Still Mushy
Okay, let us say you followed my advice. You washed the rice until the water ran clear. You adjusted your water ratio down to 1:1.5. You used a heavy-bottomed, non-toxic stainless steel pot. But when you took the lid off, the rice was still slightly gummy or broken. What went wrong?
Cooking is an ecosystem, and there are a few other variables that can sabotage your grains. These troubleshooting tips are the secrets for kitchen artistry that separate the pros from the amateurs.
Mistake 1: You Boiled It Too Violently
When bringing your pot to a boil, do not let it sit at a rolling, aggressive boil for too long. Violent, turbulent water physically throws the rice grains against the walls of the pot and against each other. This rough treatment can shatter the brittle grains, releasing the internal amylose and amylopectin directly into the water, re-creating the exact starchy paste you just spent five minutes washing away. Bring it to a gentle boil, and immediately drop the heat to the lowest possible simmer.
Mistake 2: You Peeked
The stovetop absorption method relies entirely on trapped steam. When you lift the lid to check on the rice, you instantly release a massive cloud of pressurized steam and drastically drop the ambient temperature inside the pot. This halts the cooking process. To compensate, the rice has to sit on the heat longer, which usually leads to a burnt bottom and a mushy, waterlogged top. Put the lid on, set a timer for 12 to 15 minutes, and walk away. Trust the process.
Mistake 3: You Skipped the Resting Phase
This is the most common impatience-driven error. When the timer goes off and all the water has been absorbed, the rice is technically cooked, but it is incredibly fragile. The starches are fully swollen and highly susceptible to mashing. If you immediately dig in with a spoon, you will crush the delicate grains into a paste.
You must remove the pot from the heat and let it sit, undisturbed, with the lid securely on, for a minimum of 10 minutes. During this critical resting phase, the temperature slowly drops, and a process called starch retrogradation occurs. The starches gently firm up and restructure themselves, the remaining surface moisture redistributes evenly throughout the pot, and the grains become robust and distinct. After ten minutes, gently fluff the rice with a wooden paddle or a fork—never a metal spoon, which acts like a trowel and smashes the food.
Advanced Techniques: Toasting, Soaking, and Elevating Your Grains
For weekday survival, a quick wash, a proper water ratio, and a ten-minute rest are all you need. But for those weekend cooking projects where you have the time to be an absolute perfectionist, there are a few advanced techniques to take your rice from a simple side dish to the star of the table.
The Art of the Soak
If you are cooking brown rice, wild rice, or even aged, high-quality basmati, soaking the grains after washing them can dramatically improve the final texture. As rice ages in the pantry, it becomes drier and more brittle. Soaking the washed rice in cold water for 30 minutes before cooking allows the grains to slowly and gently hydrate without the violent stress of boiling water,. This ensures that the rice expands to its maximum length without splitting or breaking, resulting in an incredibly elegant, elongated grain. If you choose to soak, remember to drain the soaking water thoroughly and slightly reduce your final cooking water to account for the deep hydration.
Toasting for Flavor
If you want to build incredible depth of flavor, try toasting your washed and thoroughly dried rice before boiling it. Heat a tablespoon of high-quality butter, ghee, or olive oil in your heavy-bottomed pot. Add the dry, washed rice and stir it constantly over medium heat for about two to three minutes until the grains become slightly translucent at the edges and smell faintly nutty. This toasting process initiates a mild Maillard reaction, developing complex, roasted flavor compounds. The fat also lightly coats each grain, providing a secondary barrier against sticking and ensuring an incredibly fluffy, separated final dish. This is also the perfect time to bloom whole spices—like a pod of star anise, a cracked cardamom pod, or a cinnamon stick—in the hot fat before adding your measured water.
The Final Fluff
Cooking is not magic; it is simply applied physics and chemistry wrapped in delicious aromas. You do not need to be intimidated by a pot of boiling water and a cup of dried grains. By taking just thirty seconds to wash away that friction-milled amylopectin dust, adjusting your water ratios to account for hydration, and giving the starches the time they need to rest and retrograde, you have completely engineered the failure out of the process.
Throw away your peeling, toxic non-stick pots, embrace the simple elegance of stainless steel, and treat your ingredients with a little bit of scientific respect. You now possess the definitive knowledge to guarantee perfectly distinct, fluffy, restaurant-quality rice every single time you turn on the stove. So go ahead, measure out a cup, turn on the cold water tap, and reclaim your confidence in the kitchen, so you can get back to enjoying meaningful moments together around the table, rather than stressing over a pot of glue. Happy cooking, weekend warriors.


