The Tragedy of the Homemade Hockey Puck
Picture this: You have invited your favorite people over for a relaxed, interactive dessert night. You thought a DIY mochi-wrapping station would be endlessly charming—a mindful, hands-on culinary activity that requires no culinary degree, just good vibes and a little elbow grease. You mix some glutinous rice flour with water, blast it in the microwave, and attempt to wrap it around beautiful scoops of artisanal ice cream.
Fast forward exactly one hour. Your kitchen looks like the aftermath of a powdered sugar explosion. Your hands are webbed together with an impenetrable layer of edible cement. And the mochi? By the time your guests actually bite into the fruits of their labor, the delicate, pillowy dough you envisioned has mutated into a rubbery, dense hockey puck. If you happen to put the leftovers in the fridge, by the next morning, they possess the structural integrity of a premium golf ball.
Welcome to the home cook’s mochi dilemma.
I have zero patience for the myth that you cannot make bakery-level mochi in a standard home kitchen. You absolutely can. But you cannot do it by blindly following a viral sixty-second video that skips over the fundamental physics of starch gelatinization. Making mochi that stays pillowy, stretchy, and workable is not about having a magic touch; it is entirely about food science, precise hydration ratios, and thermodynamic management. We are going to strip away the mystery, decode the pretentious recipe jargon, and break down the exact molecular mechanics of why your mochi gets hard—and exactly how to stop it.
The Molecular Autopsy of a Mochi Brick: Understanding Starch Retrogradation
To understand why your mochi turns into a weaponized disc of hardened dough, we have to look at the microscopic architecture of rice starch.
Standard white rice (like jasmine or basmati) contains two primary types of starch molecules: amylose and amylopectin. Amylose is a straight, linear chain of glucose molecules, while amylopectin is a highly branched, bushy structure. When you cook standard rice, the linear amylose chains easily line up and crystallize as the rice cools, which is why leftover white rice in your fridge gets hard and crumbly almost overnight.
Glutinous rice—also known as sweet rice, sticky rice, or mochigome—is a genetic mutant in the best possible way. It contains virtually zero amylose; its starch content is almost 100% amylopectin. Because those bushy, branched amylopectin chains cannot easily pack tightly together, glutinous rice yields a sticky, stretchy, and highly elastic texture when heated and hydrated.
However, nature always seeks order. When you heat your mochi dough (a process called gelatinization), the amylopectin branches relax, swell, and absorb water. But the moment you remove that dough from the heat, a ticking clock begins. As the dough cools, those branched chains slowly begin to realign and form double helices, literally squeezing the trapped water out of the gel matrix. This process is known as short-term starch retrogradation.
If you put your mochi in the refrigerator—which is the natural instinct when you are filling it with ice cream—you are actually accelerating this staling process exponentially. Refrigerator temperatures (around 39°F or 4°C) are the absolute optimal environment for starch retrogradation. The water gets pushed out, the starches crystallize, and your once-soft dough becomes a rigid, leathery shell.
The Flour Hierarchy: Why Mochiko and Shiratamako Are Not Created Equal
If you walk into a generic grocery store and buy the first box labeled “glutinous rice flour,” you are already setting yourself up for a frustrating evening. The milling process dictates the destiny of your dough. There are two primary flours used for making mochi in the home kitchen, and understanding the difference is the secret to a soft, workable wrapper.
Mochiko: The Dry-Milled Compromise
Mochiko is produced through a dry-milling process. The raw glutinous rice is washed, dried, and then ground into a fine powder. Because it is ground while dry, the physical friction heavily damages the starch granules. This damaged starch absorbs water very quickly, but it also releases it just as fast. Mochiko dough is relatively easy to make, but it is far less elastic, tears easily when stretched, and falls victim to starch retrogradation incredibly quickly. If you use Mochiko, your mochi will likely harden within twenty-four hours.
Shiratamako: The Wet-Milled Gold Standard
If you want professional, bakery-level results that stay soft for days, you must seek out Shiratamako. This flour is produced through a traditional wet-milling process. The glutinous rice is washed, soaked in water, and then ground while submerged in liquid into a fine paste. This paste is then pressed, dehydrated, and dried into coarse, irregular granules.
Because the rice is ground wet, the starch granules remain largely intact and undamaged. When you hydrate and cook Shiratamako, it forms a highly cohesive, incredibly elastic gel with significantly slower retrogradation kinetics. It stretches beautifully without tearing, making it an absolute dream for amateur hosts trying to wrap delicate fillings. Yes, it is slightly more expensive, but it is the non-negotiable secret to flawless daifuku. Do yourself a favor, pull out your digital kitchen scale, and measure out Shiratamako.
The Golden Ratio: Why You Cannot Cut the Sugar
Here is where the weekend culinary hobbyist usually sabotages themselves: the sugar ratio. I see it all the time. A home cook looks at a traditional mochi recipe, gasps at the amount of sugar, and decides to halve it to make a “healthier” dessert.
Listen to me very carefully: sugar in mochi is not a flavor enhancer. It is a structural necessity.
In the realm of food science, sugar acts as a highly effective humectant. Because sugar molecules are highly hydrophilic (water-loving), they bind tightly to the water molecules inside your cooked dough. By locking the water into the gel matrix, the sugar physically prevents the amylopectin chains from realigning and crystallizing. If you drastically reduce the sugar, there is nothing to hold the moisture in place, and your mochi will revert to a hard starch puck almost immediately.
For traditional gyuhi (the incredibly soft, sweet mochi dough used specifically for wrapping), the ideal ratio is 1 part glutinous rice flour, 1 part water, and at least 0.5 to 1 part sugar by weight. Commercial mochi manufacturers take this a step further by utilizing specialized sugars like trehalose, glucose syrup, or hydrogenated starch hydrolysates. Trehalose, in particular, is a disaccharide that inhibits starch retrogradation far more effectively than standard sucrose. While you don’t need industrial hydrocolloids in your home kitchen, you absolutely must respect the sucrose ratio. Do not cut the sugar.
The “No-Go” Rule on Toxic Cookware for Sticky Doughs
Before we discuss the thermal application, we need to have a brutally honest conversation about your kitchen gear. Mochi dough, in its transitional state between liquid slurry and cooked gel, is arguably the stickiest culinary substance on the planet. You will have to stir, scrape, and fold this dough aggressively.
I have a strict “no-go” rule on toxic, cheap kitchenware, and mochi-making is exactly where these cheap tools will poison your food. If you attempt to cook this sticky dough in a scratched, peeling non-stick pan, the aggressive scraping required to pull the dough together will flake forever chemicals (PFAS/PTFE) directly into your pristine dessert. Stop ruining your nonstick pans and poisoning your guests.
Similarly, if you choose the microwave method, do not use those flimsy plastic takeout containers. When subjected to the intense, localized thermal energy of microwaving dense starches, cheap plastic containers stay greasy because their porous surfaces degrade, leaching microplastics and endocrine disruptors into your food.
Your Safe Gear Arsenal:
- For Microwaving: Use heavy-duty, tempered borosilicate glass bowls or high-quality, lead-free ceramics. These materials offer excellent thermal mass and will not warp or leach under high heat.
- For Steaming: A traditional bamboo steamer lined with unbleached parchment paper or a reusable silicone steaming mat.
- For Stirring: You must use a seamless, pure silicone spatula with a rigid core. If you buy cheap, filler-laden utensils, you will quickly discover why your spatulas taste like soap. Pure silicone can withstand the heat and the immense physical resistance of the dough without snapping or absorbing odors.
Thermal Dynamics: Steaming vs. Microwaving
Achieving the perfect gelatinization of your mochi dough (reaching a moisture content of roughly 58–62%) requires precise thermal management. There are two primary ways to get there in a home kitchen.
The Traditionalist’s Choice: The Steaming Method
Steaming is the gentlest, most forgiving way to cook mochi dough. Because steam provides a constant ambient temperature of 212°F (100°C) along with 100% relative humidity, the dough cooks evenly without the edges drying out or forming a crust.
- Whisk your Shiratamako, water, and sugar in a heat-safe bowl until completely smooth.
- Place the bowl into your bamboo steamer over a pot of rapidly simmering water.
- Wrap the lid of your steamer in a clean kitchen towel to catch condensation—if water drips back into your dough, it will throw off the hydration ratio and create a sloppy mess.
- Steam for 15 to 20 minutes. Halfway through, open the steamer and aggressively fold the dough with your wet silicone spatula. The dough is ready when it transitions from opaque white to a slightly translucent, glossy, cohesive mass.
The Modern Shortcut: The Microwave Method
Time is money, and sometimes you just want dessert without building a bamboo sauna on your stovetop. The microwave method is highly efficient, but it is volatile. Microwaves heat water molecules via dielectric heating, which can create extreme hot spots. If you overcook the dough, you trigger irreversible moisture loss, resulting in a rubbery texture.
- Whisk your ingredients in a tempered glass bowl.
- Cover the bowl tightly with a microwave-safe silicone lid or high-quality plastic wrap, leaving a tiny vent for steam to escape.
- Microwave on high for exactly 1 minute.
- Remove the bowl and stir vigorously with a wet silicone spatula. The mixture will look lumpy and partially cooked. This is normal.
- Cover and microwave for another 1 minute. Stir aggressively again. The mechanical sheer force of your stirring is what develops the elasticity.
- Microwave for a final 30 seconds. By now, the dough should be shiny, translucent, and incredibly elastic. If there are still opaque, raw pockets of white flour, microwave in 15-second bursts until fully gelatinized.
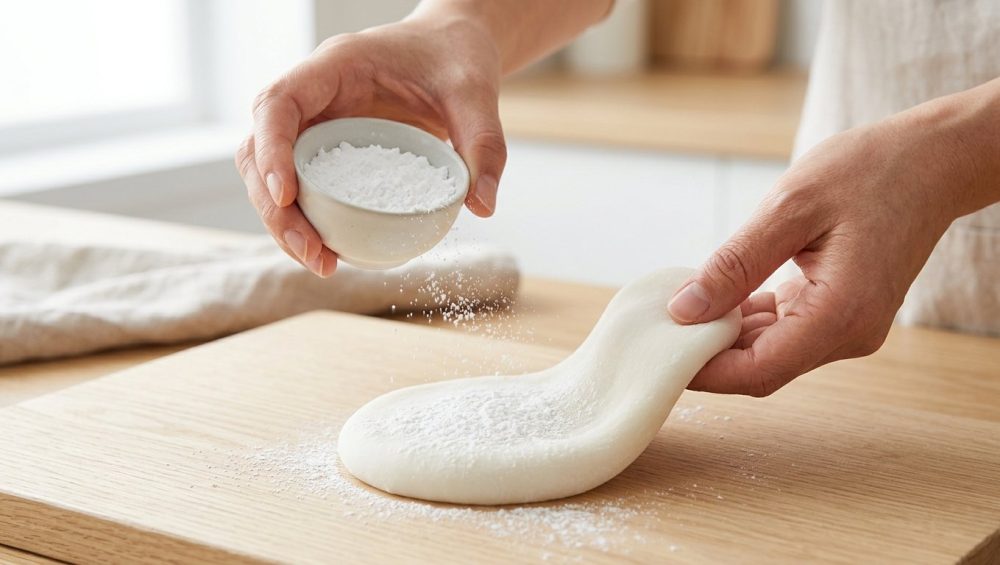
The Dusting Dilemma: Katakuriko vs. Cornstarch
Once your dough is cooked, you face the final boss of mochi making: handling it. Hot mochi dough will instantly bond to your hands, your cutting board, your knife, and your soul. You must use a dusting starch to create a barrier.
In traditional Japanese wagashi making, katakuriko (potato starch) is the undisputed king of dusting. Potato starch granules are significantly larger than other starches. Because of their size, they sit cleanly on the surface of the moist dough, creating a silky, frictionless barrier that prevents sticking without immediately absorbing into the mochi and drying it out.
Cornstarch is the most common Western substitute, but it comes with distinct drawbacks. Cornstarch granules are very fine; they absorb into the dough faster, leaving a chalky, powdery mouthfeel that masks the delicate flavor of the sweet rice.
Furthermore, we need to talk about food safety. Raw flour and raw cornstarch are agricultural products that have not been treated to kill pathogens like E. coli or Salmonella. Dusting your ready-to-eat dessert in raw cornstarch carries a minor but real microbial risk. If you absolutely cannot find potato starch and must use cornstarch, you should technically toast it first. Spread the cornstarch on a high-quality baking sheet—and if you are wondering why your baking sheets keep warping in the oven, it is because cheap, thin metal cannot handle thermal expansion—and bake it at 350°F (175°C) for 5 to 7 minutes to eliminate any potential pathogens. Let it cool completely before using it to dust your mochi.
Staging a Mindful DIY Mochi Night
Now that you understand the science, it is time to host. The goal here is a stress-free folding night. If you are frantically trying to scoop soft ice cream into hot mochi dough while your guests watch, you have already failed. The secret to the art of effortless hosting is staging and temperature control.
Step 1: Pre-Portion the Fillings
Mochi dough must be wrapped while it is still warm and pliable. If you put warm dough over room-temperature fillings, it will turn into a sloppy disaster. You must pre-portion your fillings the night before.
- Ice Cream: Use a small melon baller to scoop bite-sized spheres of matcha or black sesame ice cream onto a parchment-lined tray. Freeze them until they are rock solid.
- Anko (Red Bean Paste): Roll small, 15-gram balls of sweet red bean paste and freeze them.
- Ganache: If you are making a rich chocolate center, ensure your chocolate never melts prematurely by whipping the ganache, piping it into small mounds, and freezing it solid.
Frozen fillings buy you crucial time during the wrapping phase. They instantly chill the inner layer of the warm mochi dough, halting the melting process and allowing you to pinch the seams closed without a mess.
Step 2: Prepare the Workstation
Clear your kitchen island or dining table. Give each guest a small, flexible silicone mat or a piece of parchment paper. Heavily dust the center of each mat with your roasted cornstarch or katakuriko. Provide a small bowl of starch for guests to dust their fingertips.
Step 3: The Wrapping Technique
Unlike traditional baking where you are used to resting your dough to relax the gluten, mochi contains zero gluten and must be worked immediately. Once it cools, it loses its elasticity and will refuse to seal.
- Scrape the hot, cooked dough out of your bowl and directly onto a massive pile of potato starch.
- Dust the top of the dough generously. Use a plastic bench scraper or a knife dusted in starch to divide the dough into equal portions.
- Instruct your guests to dust their hands, pick up a piece of warm dough, and gently stretch it into a flat, 3-inch disc. The center should remain slightly thicker than the edges.
- Take a frozen filling ball directly from the freezer and place it in the center of the dough disc.
- Bring the opposite edges of the dough up and over the filling, pinching them together at the top. Because the dough is still warm, it will stick to itself and seal seamlessly.
- Place the finished mochi seam-side down in a paper cupcake liner.
Troubleshooting the Sticky Mess
Even with the best preparation, the kitchen can throw curveballs. Here is how to save your dessert night if things go sideways:
The dough keeps tearing when stretched:
You either used Mochiko instead of Shiratamako, you didn’t cook the dough long enough to fully gelatinize the starches, or the dough has cooled down too much. If it has cooled, you can pop the unshaped dough back into the microwave for 15 seconds to re-warm it, but you only get one chance at this before moisture loss ruins the texture.
The dough is an unworkable, soupy puddle:
You likely allowed too much condensation to drip into the bowl while steaming, or you mismeasured your water. Put the bowl back in the microwave (uncovered) and heat in 30-second bursts, stirring aggressively, to evaporate the excess moisture.
The mochi won’t seal at the bottom:
You got starch on the inside of the seam. Mochi will only stick to itself if the surface is completely clean and sticky. If you get potato starch on the inner lip of the dough, it acts as a barrier and the seam will pop open. Tell your guests to only dust the outside of the dough, keeping the inside sticky enough to seal around the filling.
Final Thoughts from the Sous-Chef
Making mochi at home does not require years of apprenticeship in a Kyoto wagashi shop. It requires respect for the ingredients, an understanding of starch retrogradation, and the foresight to freeze your fillings. By utilizing wet-milled Shiratamako, maintaining a proper sugar-to-hydration ratio, and choosing safe, high-quality cookware, you can easily bypass the rookie mistakes that lead to rock-hard rice cakes.
Invite your friends over. Set up the dusting stations. Embrace the chaotic, powdery fun of wrapping your own desserts. When you arm yourself with the right science and the right tools, you transform a potentially disastrous cooking chore into a mindful, deeply rewarding culinary triumph. Now go wash that sticky silicone spatula before it dries.


