
The Brunch Dilemma: Why Poached Eggs Break Our Hearts
Let’s have a brutally honest conversation about the most intimidating item on the weekend brunch menu: the poached egg. You know exactly what I’m talking about. You wake up on a Sunday morning, feeling ambitious. You’ve got some beautiful sourdough bread, a perfectly ripe avocado, and a vision of a golden, runny yolk cascading over the top like a culinary waterfall. You decide today is the day you conquer the poach.
You bring a pot of water to a rolling boil. You crack your egg. You drop it in. And then, tragedy strikes.
Instead of a tight, beautiful, restaurant-quality teardrop, your egg instantly explodes into a chaotic, wispy, ghostly cloud of despair. It looks less like a gourmet breakfast and more like a tragic bowl of egg drop soup. You fish out a rubbery, overcooked yolk surrounded by a few pathetic shreds of white, slap it on your toast, and eat your failure in silence. It’s enough to make anyone want to throw in the towel and just make cereal.
If you are tired of this cycle of disappointment, I am here to tell you that it is not your fault. You do not lack talent, and you certainly don’t need a degree from Le Cordon Bleu to pull this off. You just need to understand the science of your ingredients and stop relying on outdated, overly complicated parlor tricks. As a home cook who has survived my fair share of culinary disasters, I have zero patience for methods that don’t work in a real-world kitchen. My goal is to help you decode pretentious recipe jargon and give you the actual, practical tools to succeed.
Today, we are going to completely dismantle the myths surrounding poached eggs. We are going to dive deep into the anatomy of the egg itself, explore the thermodynamics of simmering water, and introduce you to the absolute magic of the fine-mesh strainer. This single, brilliant hack will transform your chaotic cooking routine into a streamlined, stress-free operation. Get ready to master the definitive, foolproof method for achieving perfect poached eggs, every single time.
The Anatomy of an Egg: The Science Behind the Wisps
To fix a broken system, you first have to understand how the system works. When it comes to poaching, the egg itself is the most critical variable. Most people think an egg white is just one uniform, gelatinous blob of protein. This is entirely incorrect, and this misconception is exactly why your eggs are falling apart.
The Two Types of Albumen
An egg white, scientifically known as the albumen, is actually composed of distinct layers. If you crack a fresh egg onto a flat plate, you will notice two very different structures surrounding the yolk.
First, there is the thick albumen. This is the tight, viscous, jelly-like layer that sits immediately around the yolk, holding it firmly in place. This thick white is rich in a glycoprotein called ovomucin, which gives it that sturdy, cohesive structure. When you see a perfectly round, tight poached egg at a high-end café, you are looking at coagulated thick albumen.
Second, there is the thin albumen. This is the watery, runny liquid that spreads out far away from the yolk, pooling across the plate. It has a much lower concentration of ovomucin. When you drop an egg into a pot of hot water, it is this thin, watery albumen that instantly separates, floating away to form those ugly, stringy white tentacles that ruin your poaching water.
The Aging Process and pH Levels
Here is the frustrating reality: eggs degrade very quickly. The older an egg gets, the more thin albumen it contains.
When an egg is freshly laid, it has a slightly acidic pH, and the ovomucin proteins are tightly bound together. However, eggshells are porous. As an egg sits in your refrigerator for days or weeks, moisture and carbon dioxide slowly escape through those microscopic pores, while ambient air moves in. This loss of CO2 causes the pH of the egg white to rise, making it more alkaline.
As the pH rises, the ovomucin structural bonds begin to break down. The tight, thick albumen literally degrades and liquefies into thin albumen. This means an older egg will have a massive amount of watery white, making it almost impossible to poach cleanly using traditional methods. The science is simple: fresh eggs equal lower pH, tighter proteins, and a better poach.
The Water Test for Freshness
Before you even think about boiling water, you need to know what kind of eggs you are working with. You can perform a simple buoyancy test. Fill a glass with cold water and gently drop your raw (un-cracked) egg inside.
- The Flat Floater: If the egg sinks to the bottom and lies completely flat on its side, it is incredibly fresh. The thick albumen is intact. This is your prime poaching candidate.
- The Stand-Up: If the egg sinks but stands upright on one end, it is aging. The air cell inside has expanded. You can still poach it, but you will absolutely need the mesh strainer trick.
- The Bobber: If the egg floats to the surface, it is old. The air pocket is huge, and the thick albumen has largely degraded into water. Do not attempt to poach this egg. Save it for baking, or better yet, read up on why your scrambled eggs leak water when you use old, degraded eggs.
Debunking the Culinary Myths: The Vortex and the Vinegar
For decades, pretentious chefs and outdated cookbooks have peddled two massive lies about how to poach an egg: the swirling vortex and the vinegar bath. It is time to aggressively debunk both of these techniques, because they are actively setting you up for failure.
The Chaos of the Swirling Vortex
The “vortex” method instructs you to take a spoon and vigorously stir your pot of boiling water in a circle to create a whirlpool. You are then supposed to drop your egg directly into the eye of the storm. The theory is that the centrifugal force of the spinning water will wrap the loose egg whites around the yolk, creating a neat little spherical package.
In reality, this is one of the most frustrating rookie kitchen mistakes you can make. First of all, if your water is spinning too fast, the sheer physical force will rip the delicate egg apart, separating the yolk from the white completely. Secondly, the vortex method only works if you are cooking exactly one egg at a time. If you try to drop three or four eggs into a spinning vortex, they will violently crash into each other, creating a massive, tangled knot of undercooked egg whites. If you are hosting a brunch for four people, you do not have the time to stand over a stove and individually vortex-poach eight separate eggs. It is wildly inefficient.
The Vinegar Fallacy
The second great myth is the acid bath. Traditionalists insist that you must pour a heavy splash of white vinegar into your poaching water.
Is there science behind this? Yes, technically. Adding an acid like vinegar or lemon juice lowers the pH of the cooking water. This highly acidic environment causes the ovalbumin (the primary protein in the egg white) to denature and coagulate at a much faster rate. The idea is that the acid “shocks” the exterior of the egg white into setting instantly, trapping the rest of the egg inside a protective shell before it can drift away.
But here is the brutal truth: vinegar ruins the eating experience. Even a small amount of vinegar will permeate the porous egg white, leaving your delicate poached egg tasting faintly of salad dressing. Worse, because the acid forces the proteins to seize up so aggressively, the exterior texture of the egg becomes tough, rubbery, and squeaky, rather than soft and silky. We want a luxurious, melt-in-your-mouth texture, not a bouncy ball that tastes like acetic acid. You can achieve a perfectly tight poach without ever opening your pantry for vinegar.
The Magic of the Fine-Mesh Strainer
If we are tossing out the vortex and banning the vinegar, how do we stop the egg from turning into a wispy mess? The answer was popularized by culinary scientists like Heston Blumenthal and J. Kenji López-Alt, and it is brilliantly simple: you physically remove the problem before the egg ever hits the water.
Enter the fine-mesh strainer.
How the Strainer Hack Works
As we established earlier, the wispy tentacles that ruin your poach are caused exclusively by the thin, watery albumen. If you remove the thin albumen, the wisps cannot form.
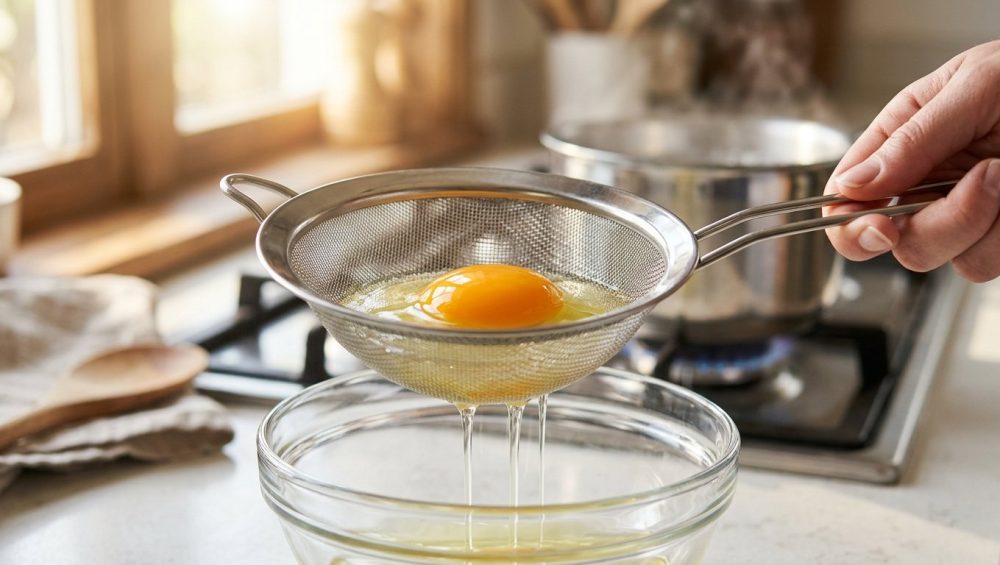
By cracking your raw egg directly into a fine-mesh sieve or strainer, gravity does all the hard work for you. The tight, viscous thick albumen—the part that actually holds its shape—will remain securely cradled in the mesh, clinging to the yolk. Meanwhile, the watery, degraded thin albumen will drip right through the tiny holes and down the drain.
What you are left with inside the strainer is the purest, tightest core of the egg. When you gently lower this strained egg into your simmering water, there is no loose liquid left to drift away. The thick white immediately coagulates around the yolk, resulting in a pristine, perfectly round, restaurant-quality poached egg. No swirling, no vinegar, no stress.
The Incredible Scaling Power
The true beauty of the mesh strainer technique is that it scales effortlessly. Because you aren’t relying on a spinning vortex to shape the egg, you can poach multiple eggs simultaneously in calm water. You can crack four eggs into four small ramekins (after straining them), and gently slip them all into a wide skillet of water at the same time. This is how you reclaim your weekend mornings and actually get to sit down and eat with your guests.
Thermodynamics: Mastering Temperature Control
Now that we have the preparation technique locked down, we need to talk about the actual cooking environment. The temperature of your water is the difference between a silky masterpiece and a tragic rubber puck.
The Danger of the Rolling Boil
Water boils at 212°F (100°C) at sea level. A rolling boil is characterized by large, violent bubbles rapidly churning from the bottom of the pot to the surface. Never, under any circumstances, drop a delicate egg into a rolling boil. The physical turbulence of those massive bubbles will violently thrash the egg, tearing the proteins apart and instantly overcooking the exterior while leaving the yolk ice cold.
The Perfect Poaching Zone
You want a gentle, lazy simmer. The water should be hot enough to coagulate the proteins, but calm enough not to disturb the shape of the egg. The ideal temperature range for poaching is between 180°F and 190°F (82°C to 88°C). For the absolute perfectionists out there, some food scientists argue that exactly 172°F ±2°F allows for the most uniform heat penetration without denaturing the ovalbumin too aggressively.
Visually, a 180°F simmer looks like tiny, champagne-like bubbles gently rising to the surface, with very little surface agitation. If you struggle to gauge temperature visually, do not guess. Knowing when your meat thermometer is lying to you is crucial, so invest in a high-quality, fast-reading digital thermometer to monitor your water bath.
The Thermal Shock Factor
Another crucial thermodynamic element is the starting temperature of the egg itself. If you take a freezing cold egg straight from the refrigerator (around 36°F) and plunge it into 180°F water, you induce massive thermal shock. The extreme temperature differential causes the outer layers of the egg white to contract violently, which can rupture the delicate vitelline membrane surrounding the yolk.
To prevent this, let your eggs sit on the counter at room temperature for about 15 to 20 minutes before you plan to poach them. A room-temperature egg will cook much more evenly, ensuring that the white sets beautifully by the time the yolk reaches that perfect, jammy consistency.
The Anti-Toxic Gear Rant: Stop Using Cheap Kitchenware
As your resident sassy sous-chef, I have a strict, non-negotiable rule in my kitchen: we do not use toxic, cheap, or gimmicky gear. The kitchenware industry has invented countless useless gadgets designed to “help” you poach eggs, and almost all of them are garbage.
The Horror of Silicone Poaching Pods
In recent years, silicone “poaching pods” have flooded the market. These are little rubber cups that you float in boiling water. You crack the egg into the cup, put a lid on the pot, and essentially steam the egg.
I despise these with every fiber of my being. First of all, steaming an egg in a rubber cup is not poaching. It produces a dense, flat-bottomed egg that lacks the delicate, water-kissed texture of a true poach. Secondly, cheap silicone is notorious for absorbing odors and chemicals. If you wash your pods in the dishwasher, the silicone will absorb the harsh alkaline detergents. The next time you cook, the heat will cause those chemicals to leach into your food, which is exactly why your silicone spatulas taste like soap. Do not cook your delicate, organic eggs in cheap rubber.
The Danger of Peeling Non-Stick Pans
Some people attempt to shallow-poach in cheap, scratched non-stick skillets. This is a massive health hazard. When cheap Teflon or mystery-metal coatings begin to degrade and peel, those toxic flakes end up directly in your simmering water and, consequently, in your food. This is the exact same reason why aerosol spray ruins nonstick pans over time.
The Gear You Actually Need
You only need three pieces of high-quality, lifetime-durable equipment to execute this technique perfectly:
- A Stainless Steel Skillet or Saucier: Use a wide, shallow, high-quality stainless steel pan. The wide surface area makes it easy to poach multiple eggs, and the shallow depth makes extraction a breeze. If you know how to perform the water drop test, you already know that high-quality stainless steel offers unparalleled temperature control. It also resists thermal shock, which is vital because cheap frying pans keep warping when exposed to sustained simmering temperatures.
- A Fine-Mesh Strainer: Look for a small, stainless steel sieve with a very tight, fine mesh weave. Do not buy cheap tin or aluminum strainers that will rust after three washes.
- A Slotted Extraction Tool: To gently lift the cooked eggs out of the water without taking a puddle of liquid with them, you need a proper tool. A slotted spoon works, but if you want to upgrade your arsenal, a stainless steel spider skimmer is the absolute best tool for the job. Its wire basket drains water instantly and cradles the egg perfectly.
The Masterclass: Step-by-Step Foolproof Poaching
We have covered the science, debunked the myths, and assembled the right gear. It is time to execute. Follow this masterclass step-by-step, and you will achieve absolute perfection.
Step 1: The Setup
Fill a wide, stainless steel skillet or shallow saucepan with about 2 to 3 inches of fresh, filtered water. (Tap water can contain high levels of chlorine and chloramines that affect the egg’s flavor when boiled). Place the pan over medium heat and bring it to a gentle, bubbling simmer (180°F to 190°F). Do not add vinegar. Add a generous pinch of kosher salt to the water; salt subtly seasons the egg and slightly increases the density of the water, providing better buoyancy.
Step 2: The Strain
Place your fine-mesh strainer over a small bowl. Crack your room-temperature egg directly into the strainer. Gently swirl the strainer in a circular motion for about 10 seconds. Watch as the watery, thin albumen drips through the mesh into the bowl below.
Step 3: The Transfer
Once the watery whites have drained away, you have two options. You can either gently tip the egg directly from the strainer into the simmering water, or, for maximum control, you can transfer the strained egg into a small ramekin or a lightly oiled ladle first. Using a ramekin allows you to prep three or four eggs in advance so you can drop them into the water in quick succession.
Step 4: The Drop
Bring the lip of the strainer or ramekin as close to the surface of the simmering water as physically possible. Do not drop the egg from a height, or the impact will shatter the yolk. Gently tip the vessel and let the egg smoothly slide into the calm water.
Step 5: The Timing
Once the egg is in the water, do not touch it. Let the heat do its job. The cooking time dictates the final texture of the yolk:
- 3 Minutes: The gold standard. The whites are fully opaque and set, but the yolk is completely liquid, warm, and runny.
- 4 Minutes: The medium poach. The whites are firm, and the outer edges of the yolk have begun to turn jammy and thick, with a slightly runny center.
- 5 Minutes: The hard poach. The yolk is fully set and firm, similar to a soft-boiled egg.
Step 6: The Extraction
When your timer goes off, gently slide your spider skimmer or slotted spoon underneath the egg. Lift it out of the water and hold it over the pan for a few seconds to let the excess water drain through the slots.
Crucial Pro-Tip: Never put a wet poached egg directly onto a piece of toasted bread, unless you enjoy eating a soggy, disintegrating sponge. Briefly dab the bottom of the skimmer onto a folded paper towel to wick away the residual surface water before plating.
Advanced Moves: The Restaurant Make-Ahead Secret
If you are hosting a Sunday brunch for eight people, you absolutely cannot stand at the stove poaching eggs to order while your guests are drinking mimosas in the living room. You will lose your mind.
Professional kitchens do not poach to order during a brunch rush. They use a brilliant make-ahead technique called “par-cooking and shocking.” Here is how you do it at home:
- Par-Poach: Strain and poach your eggs in batches, but undercook them slightly. Pull them out of the simmering water at exactly the 2.5-minute mark. The whites will be mostly set, but very delicate.
- The Ice Bath Shock: Immediately plunge the slotted spoon holding the egg into a large bowl of ice-cold water. The freezing temperature instantly halts the residual cooking process, locking the yolk in its liquid state.
- Store: You can leave the eggs in the cold water bath in your refrigerator for up to 48 hours.
- The Reheat: Right before you are ready to serve your guests, bring a pot of water to a hot simmer. Drop the cold, pre-poached eggs into the hot water for exactly 60 seconds. This is just enough time to warm them all the way through without cooking the yolk any further. Extract, drain on a paper towel, and serve a flawless brunch for eight people in under two minutes.
Troubleshooting Your Poach
Even with the best techniques, the kitchen is a dynamic environment. If things go slightly sideways, here is how to diagnose the problem:
- The Yolk Broke in the Water: Your water was either boiling too violently, causing physical trauma to the egg, or you dropped the egg from too high above the surface. Lower the heat and lower your hands.
- The Egg Flattened Out Like a Pancake: Your water was too cold. If the water is below 160°F, the proteins won’t coagulate fast enough, and gravity will pull the egg flat against the bottom of the pan before it sets. Turn the heat up slightly.
- I Strained It, But I Still Got Wisps: Your mesh strainer might have holes that are too large, allowing the thick albumen to slip through, or the egg was so incredibly old that the thick albumen had completely liquefied. Buy fresher eggs and a finer sieve.
- The Egg Stuck to the Bottom of the Pan: This happens occasionally if the pan is too shallow. Wait about 15 seconds after dropping the egg in, then use a wooden spoon to very gently nudge the water around the egg to ensure it is floating freely.
The Final Bite
Cooking should never be a source of anxiety. The difference between a stressful kitchen failure and a triumphant, restaurant-quality meal usually comes down to understanding the basic science of your ingredients and refusing to cut corners with cheap gear.
By ditching the chaotic swirling vortex, pouring your vinegar down the drain, and embracing the simple, elegant physics of a fine-mesh strainer, you have completely neutralized the hardest part of brunch. You no longer have to cross your fingers and pray to the culinary gods every time you drop an egg into hot water. You are in total control.
So, this weekend, skip the overpriced café line. Buy a beautiful loaf of artisanal bread, whip up a quick hollandaise or smash an avocado with a heavy pinch of flaky sea salt, and put your new skills to the test. You are going to crack, strain, drop, and serve the most breathtakingly perfect poached eggs of your life.
Stay sassy, stay sharp, and happy cooking.






