
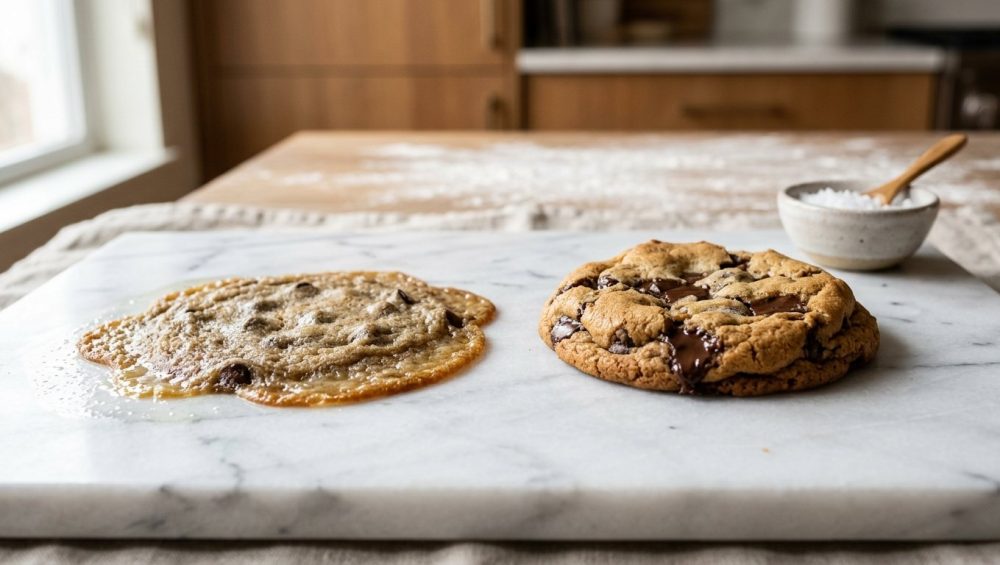
Listen up, weekend warriors. We have all been there. You spend your precious Saturday afternoon carefully measuring flour, creaming butter, and folding in expensive, artisan chocolate chips. You slide the baking sheet into the oven, dreaming of thick, chewy, bakery-style perfection. But when the timer dings, you open the door to a tragedy. Instead of towering, craggy mounds of joy, you are staring at a sad, greasy, interconnected sheet of flat cookie puddles.
It is infuriating. You followed the recipe. You didn’t substitute anything weird. So why do your cookies keep spreading into puddles when you bake them?
The answer, my friends, is not a lack of talent. It is a lack of temperature control.
I firmly believe that anyone can cook and bake like a seasoned expert without setting foot in a culinary institute. You just need to understand the basic food science governing your ingredients. Today, we are going to brutally dissect the anatomy of a chocolate chip cookie. We are going to explore the precise thermodynamic reactions that happen the second your dough hits a 350°F oven. Most importantly, we are going to unlock the absolute, non-negotiable secret to thick, chewy, professional-level cookies: the simple, transformative magic of chilled dough.
If you are tired of wasting good chocolate and premium butter on thin, crispy disappointments, grab your whisk and pay attention. We are diving deep into the chemistry of baking, and we are not cutting any corners.
The Food Science of Cookie Structure: What Actually Happens in the Oven?
To stop baking flat cookies, you have to understand what a cookie actually is. A cookie dough is essentially an emulsion of fat (butter) and water (from the eggs and butter), bound together by a web of starches and proteins (flour). When this complex mixture goes into a hot oven, a chaotic symphony of chemical reactions occurs in a matter of minutes.
The Role of Butter Temperature and Fat Melting Points
Let’s talk about the main culprit behind your spreading issues: butter. Butter is an emulsion of butterfat, water, and milk solids. According to food science, the melting point of standard dairy butter is between 90°F and 95°F (32°C to 35°C).
When you put room-temperature cookie dough into a hot oven, the butter begins to melt almost immediately. As the butter melts, the dough loses its structural integrity and begins to spread outward. This spreading is a race against time. The dough will continue to spread into a puddle until the heat of the oven causes the proteins in the eggs to coagulate and the starches in the flour to gelatinize. Once those proteins and starches set, the cookie’s structure is locked in place.
If your dough is too warm when it goes into the oven, the butter melts way too fast, long before the flour and eggs have a chance to set and build a structural wall. The result? A flat, greasy pancake. By chilling the dough, you are artificially lowering the starting temperature of the butter. When cold dough hits the oven, it takes significantly longer for the butter to reach its melting point. This delay gives the outer edges of the cookie time to bake, dry out, and firm up, creating a physical barrier that prevents the center from spreading outward.
Flour Hydration: Why Thirsty Dough is Good Dough
Chilling your dough is not just about keeping the fat cold. It is also about giving your flour the time it needs to hydrate.
Flour is surprisingly slow to absorb moisture. When you first mix your dough, the flour is simply suspended in the wet ingredients. But as the dough rests in the refrigerator, the starches and proteins in the flour slowly absorb the water from the eggs and the butter. This hydration process does two incredible things.
First, it dries out the dough. As the flour drinks up the available free water, the dough becomes noticeably thicker, stiffer, and more robust. A stiffer dough is far more resistant to spreading in the oven. If you stop scooping your flour directly from the bag and start weighing it properly, combined with a long hydration period, you will instantly notice a massive improvement in texture.
Second, hydration leads to a chewier final product. When flour is fully hydrated, it promotes better enzymatic activity. The enzymes in the flour break down complex carbohydrates into simple sugars, and proteins into amino acids. This concentration of flavor compounds means that fully hydrated, rested dough will taste richer, more complex, and significantly more buttery than dough baked immediately after mixing.
Sugar Dissolution and Caramelization
The third scientific pillar of chilling dough involves the sugar. In a freshly mixed batch of dough, the sugar crystals are largely intact. As the dough rests in the fridge, the liquid in the eggs and butter slowly dissolves those sugar crystals.
Why does this matter? Because dissolved sugar behaves differently in the oven than crystallized sugar. Dissolved sugar caramelizes faster and more evenly. When you bake rested dough, you will notice that the cookies develop a gorgeous, deeply golden-brown color and a complex, toffee-like flavor profile. This is the Maillard reaction firing on all cylinders, thanks entirely to the resting period.
Why Your Cookies Keep Spreading into Puddles (The Culprits)
Before we get to the exact chilling timeline, we need to address the common rookie mistakes that are sabotaging your weekends. Even if you chill your dough, these missteps can still result in a flat, unappealing mess.
The “Room Temperature” Butter Lie
Nearly every baking recipe on the internet starts with the same infuriatingly vague instruction: “Cream the softened, room-temperature butter.”
Here is the brutally honest truth: “Room temperature” is a lie. If you live in Phoenix in July, your room temperature might be 80°F. If you live in Maine in January, it might be 62°F. According to baking science, the optimal temperature for creaming butter is exactly 62°F to 68°F.
At this temperature, the butter is cool to the touch but yields slightly when pressed with a finger. It is pliable enough to trap air bubbles when beaten with sugar, but firm enough to hold those air bubbles without collapsing. If your butter is warmer than 68°F (which is what most people consider “room temperature”), the fat crystals are already beginning to break down. The butter will turn greasy, it will fail to aerate properly, and your cookies will spread into oblivion, regardless of how long you chill them later.
(Note: There is a separate camp of recipes that utilize melted butter. It is true that melted butter makes cookies chewier and denser, but recipes utilizing melted butter rely even more heavily on a long chilling period to re-solidify the fat before baking).
Hot Baking Sheets and Crowded Ovens
Time is money, and I know you want to get your baking done quickly so you can get back to relaxing. But rushing the process by placing cold dough onto a hot baking sheet is a guaranteed recipe for disaster.
If you are baking multiple batches of cookies, you must let your baking sheets cool completely between rounds. Putting dough onto a warm pan jump-starts the butter-melting process before the pan even goes into the oven. The bottom of the cookie will spread instantly, resulting in a thin, burnt edge. Run your pans under cold water and dry them thoroughly, or invest in multiple heavy-duty pans so you can rotate them.
The Hidden Flaw in Silicone Baking Mats
We need to have a serious talk about your kitchen gear. I absolutely despise cheap, toxic, poorly designed kitchenware, and I will not let you ruin your hard work by using it.
For years, silicone baking mats were touted as the ultimate eco-friendly alternative to parchment paper. But when it comes to cookies, there is a massive flaw in silicone baking mats that nobody talks about. Silicone is a thermal insulator. It resists heat transfer. When you bake cookies on a silicone mat, the mat prevents the heat of the pan from efficiently transferring to the bottom of the dough.
Because the bottom of the cookie isn’t getting enough direct heat to set quickly, the dough has more time to spread outward. Furthermore, silicone is inherently slippery, giving the dough zero grip as it expands. The result? Wider, flatter cookies with pale, underbaked bottoms. Ditch the silicone mats. Use unbleached parchment paper on a bare aluminum baking sheet for superior heat conduction and perfect, crispy edges.
The Simple Magic of Chilled Dough: Your Fail-Proof Solution
Now that we know why cookies spread, let’s talk about the ultimate fix. The secret power of chilling dough is not just an optional suggestion; it is a mandatory step for anyone who wants bakery-quality results at home. But how long is long enough? Let’s break down the timeline.
30 Minutes vs. 24 Hours: The Chilling Timeline Breakdown
The 30-Minute Chill (The Bare Minimum):
If you are in a massive rush and you absolutely must have cookies today, 30 minutes in the fridge is the bare minimum. This is just enough time to cool the butter back down to a solid state, which will marginally prevent excessive spreading. However, 30 minutes is not enough time for the flour to hydrate or the sugar to dissolve. You will get a thicker cookie than if you baked it immediately, but the flavor will be one-dimensional and the texture will be standard.
The 24-Hour Chill (The Game Changer):
This is where the magic truly begins. After 24 hours in the refrigerator, the dough has undergone a significant physical transformation. The flour has absorbed the free moisture, making the dough noticeably drier and firmer. The sugar has begun to dissolve, creating a more uniform sweetness. Cookies baked after 24 hours will be visibly thicker, boast a gorgeous chewy center, and feature a beautiful golden-brown color.
The 72-Hour Sweet Spot: Bakery-Style Perfection
If you want to blow people’s minds and make them think you secretly graduated from Le Cordon Bleu, you need to exercise some patience.
In a now-legendary food science experiment, culinary expert J. Kenji López-Alt tested chocolate chip cookie dough at various chilling intervals, ranging from zero hours to several days. The conclusive, science-backed result? The absolute sweet spot for flavor, texture, and thickness is between 48 and 72 hours.
During this two-to-three-day window, the enzymatic breakdown of the starches reaches its peak. The dough develops deep, complex, butterscotch-like notes that are simply impossible to achieve on day one. The hydration is absolute, meaning the cookies will bake up incredibly thick, with craggy, textured tops and a fudgy, dense interior.
However, do not push it past 72 hours. After three days, the dough begins to dry out too much, resulting in a crumbly, unpleasantly crispy cookie that lacks the necessary moisture for a chewy center.
The Sassy Sous-Chef’s Blueprint for Thick, Chewy Cookies
Alright, it is time to put this science into practice. Cooking should be an art form, but baking is a hard science. If you want consistent, repeatable perfection without the stress, follow my ruthlessly efficient blueprint.
Step 1: Nailing the Butter Temperature
As we established, your butter needs to be between 62°F and 68°F. Do not microwave it. Do not leave it on top of a hot oven. If you forgot to take your butter out of the fridge, here is my favorite time-saving hack: cut the cold butter into small, half-inch cubes and leave them on a plate for 15 minutes. The increased surface area will bring the butter to the perfect cool room temperature rapidly without melting the edges.
Step 2: The Art of the Mix (Don’t Overdo It)
When creaming your butter and sugar, give it a solid 3 to 4 minutes on medium speed until it is light, fluffy, and noticeably paler in color. This aerates the dough and provides lift.
However, once you add your dry ingredients, you must immediately dial back your enthusiasm. Overmixing flour develops gluten, and too much gluten will turn your cookies into tough, bread-like pucks. Mix the dry ingredients just until the last streak of flour disappears, and then stop. Fold in your chocolate chips manually with a spatula.
Step 3: Portioning Before Chilling
Here is a rookie mistake that will ruin your weekend: chilling a massive, solid bowl of dough for 72 hours, and then trying to scoop it. Cold, fully hydrated dough is literally as hard as a rock. You will bend your spoons and pull a muscle trying to portion it out.
Always portion your dough before you chill it. Using a spring-loaded cookie scoop is non-negotiable here. It ensures that every single cookie is exactly the same size, which means they will all bake at the exact same rate. Scoop the dough into balls, place them closely together on a small tray or in an airtight container, and then put them in the fridge to rest for 48 to 72 hours.
Step 4: The Bake and the “Pan Bang”
When it is time to bake, preheat your oven thoroughly. Do not just wait for the beep; let the oven heat for a full 20 minutes to stabilize the ambient temperature. Place your cold, pre-portioned dough balls directly onto a parchment-lined baking sheet, spacing them a few inches apart.
Bake them until the edges are golden brown but the centers still look slightly pale and underdone. If you want that ultra-craggy, bakery-style wrinkly edge, employ the famous “pan bang” method. Halfway through the baking time, open the oven, lift the baking sheet a few inches, and drop it firmly onto the oven rack. This forces the puffed-up center of the cookie to collapse outward, creating beautiful, chewy ripples around the edges.
Essential Gear for the Perfect Cookie (No Toxic Junk Allowed)
You cannot build a masterpiece with broken tools. I have zero patience for flimsy, peeling, toxic kitchenware that actively fights against you. If you want professional results, you need reliable, durable gear.
Ditching Cheap Non-Stick for Bare Aluminum
I will shout this from the rooftops until I lose my voice: stop buying cheap, dark, non-stick baking pans. Dark finishes absorb heat aggressively, which causes the bottoms of your cookies to burn before the centers are even cooked. Furthermore, cheap pans are notorious for thermal shock. If your baking sheets keep warping and popping loudly in the oven, they are too thin and are distributing heat unevenly.
You need heavy-gauge, bare aluminum half-sheet pans. They are inexpensive, practically indestructible, and they reflect heat, ensuring a gentle, even bake that browns the bottom of your cookies perfectly without scorching them. Pair them with unbleached parchment paper, and you will never have a sticking issue again. And please, avoid glass bakeware for high-heat cookie baking, as the risk of thermal shock means your glass bakeware shatters when exposed to sudden temperature changes. Stick to aluminum.
The Magic of a Digital Kitchen Scale
If you are still measuring your flour with a plastic measuring cup, we need to have an intervention. Volume measurements are wildly inaccurate. One cup of flour can vary anywhere from 120 grams to 160 grams depending on how densely you packed it. That variance is the difference between a perfect cookie and a dry, crumbly rock.
Baking is chemistry, and chemistry requires precision. A digital kitchen scale is the single most important tool a home baker can own. Weighing your ingredients guarantees that your dough has the exact correct ratio of fat to flour every single time. It also saves you from washing a dozen measuring cups. Just put your bowl on the scale, zero it out, and pour.
The Simple Oven Thermometer
Your oven is lying to you. I don’t care if it is a brand-new, top-of-the-line model; the digital display is almost certainly inaccurate. Most home ovens are off by anywhere from 15 to 25 degrees. When you are baking cookies, a 25-degree variance is catastrophic. If the oven is too hot, the cookies will burn on the outside and stay raw inside. If it is too cold, the butter will melt slowly and the cookies will spread into puddles before they set.
Do not leave your hard work to chance. A simple oven thermometer costs less than a fancy coffee and will save you from a lifetime of ruined desserts. Hang it from the center rack and trust its reading over your oven’s digital display.
Troubleshooting Common Cookie Disasters
Even with the best science and the highest-quality ingredients, things can occasionally go sideways. Here is how to diagnose and fix the most common cookie catastrophes.
Why Are My Cookies Still Flat After Chilling?
If you chilled your dough for 48 hours and your cookies still spread into thin puddles, you have a ratio problem, not a temperature problem.
The most likely culprit is that you didn’t use enough flour. If your dough lacks the necessary starches to absorb the melting fat, the structure will collapse. This is exactly why you need a digital scale. If you measured your flour by volume, you likely scooped it too lightly, resulting in a wet, fat-heavy dough.
Another potential issue is your baking soda. Baking soda is a leavening agent, but it also promotes spreading by altering the pH of the dough, which weakens the gluten structure. If you used too much baking soda, or if you accidentally used baking soda instead of baking powder, your cookies will spread excessively.
Finally, check your butter. If you used a cheap, generic brand of butter, it might have a higher water content than premium European-style butter. More water means more steam and more spreading. Spend the extra two dollars on good butter; it makes a world of difference.
Why Are My Cookies Too Puffy (Like Little Cakes)?
On the opposite end of the spectrum, you might end up with cookies that look like inflated, cakey domes that refuse to flatten out. While some people like a cakey cookie, it is usually not the goal when making a classic chocolate chip.
If your cookies are too puffy, you likely committed one of three sins. First, you might have used too much flour. Again, weigh your ingredients. A dough that is too dry will not spread at all.
Second, you might have over-creamed your butter and sugar. While creaming is essential for aeration, beating the mixture for ten minutes will trap too much air. When that air heats up in the oven, the cookies will puff up like balloons and take on a cake-like texture.
Third, your dough might have been too cold. While we want chilled dough, placing rock-hard, 72-hour-chilled dough balls directly into the oven can sometimes prevent them from spreading entirely, depending on the recipe. If your recipe produces overly puffy cookies after a long chill, try letting the portioned dough balls sit at room temperature for 10 to 15 minutes before baking to take the extreme chill off.
The Long Game of Flavor Development
We live in a culture of instant gratification. We want our dinners cooked in 15 minutes, our groceries delivered in an hour, and our cookies baked the second the craving hits. But true culinary artistry requires patience.
When you take the time to chill your dough, you are doing more than just preventing a flat cookie. You are engaging in a deliberate, scientific process of flavor maturation. You are allowing the enzymes to do their work, the flour to hydrate, and the sugars to dissolve. You are transforming a basic, hastily thrown-together snack into a deeply complex, texturally perfect masterpiece.
Recent statistics from home baking trends over the last few years show a massive shift toward quality over quantity. Home cooks are no longer satisfied with mediocre, overly sweet baked goods. They want the rich, nuanced flavors of an artisanal bakery, and they want to achieve it in their own kitchens. By mastering the art of the chill, you are elevating yourself from a casual hobbyist to a serious home baker.
Conclusion: Embrace the Chill
Baking doesn’t have to be a stressful, tear-inducing chore. You don’t need a culinary degree, and you certainly don’t need to accept flat, puddle-like cookies as your inevitable fate.
All you need is a basic understanding of how fat, water, and flour interact under heat. You need the discipline to step away from the kitchen and let the refrigerator do the heavy lifting. You need to toss out your toxic non-stick pans, invest in a scale, and respect the laws of thermodynamics.
The next time you whip up a batch of dough on a Friday night, do not preheat the oven. Scoop that dough, pack it away, and go pour yourself a glass of wine. Let the science happen. By Sunday afternoon, you will be pulling the most magnificent, thick, chewy, golden-brown cookies out of your oven, and you will never, ever go back to the instant-bake method again.
Stay sassy, stay patient, and happy baking.






