
Look, I get it. You finally decided to upgrade your kitchen. You bought a gorgeous, heavy-bottomed stainless steel skillet, excitedly threw a beautiful cut of meat into it, and ten minutes later, you were aggressively scraping a shredded, burnt disaster into the trash while questioning your life choices. You are likely wondering why your chicken breasts are dry, torn to pieces, and permanently fused to the metal.
You are not alone. The transition from cheap, disposable cookware to professional-grade stainless steel is the single biggest hurdle for the everyday home cook. Without a culinary degree—or a basic understanding of thermodynamics—cooking on bare metal feels like wrestling a bear grease-fire. But I am here to tell you that you can absolutely master this. You do not need to be a Michelin-starred chef to achieve a flawless, stick-free sear on a stainless steel pan. You just need to understand a little bit of kitchen science.
Once you learn how to control your heat, your stainless steel pan will become the most reliable, durable, and high-performing tool in your kitchen. It will outlive you. More importantly, it will save you from the toxic nightmare of cheap nonstick coatings. Let us break down exactly why your food is acting like superglue, the molecular science of protein adhesion, and the foolproof temperature hack that will change your weeknight dinners forever.
The Toxic Truth: Why We Are Finally Ditching Nonstick
Before we dive into the mechanics of stainless steel, we need to address the elephant in the room: why you are making this transition in the first place. For decades, the cookware industry sold us the illusion of the “easy” kitchen. They convinced us that we needed slick, chemically coated pans to make a simple egg. But that convenience came with a massive, hidden cost to our health and our environment.
I have a strict, non-negotiable rule in my kitchen: absolutely no toxic gear. I despise cheap, peeling nonstick coatings, and you should too. The vast majority of traditional nonstick pans are manufactured using PFAS (per- and polyfluoroalkyl substances). These are widely known as “forever chemicals” because the carbon-fluorine bonds that give them their slick properties are virtually indestructible. They do not break down in the environment, and worse, they bioaccumulate in the human body.
As of 2026, the regulatory landscape has thankfully caught up with the science. States like Minnesota, Colorado, Maine, Connecticut, and Vermont have enacted strict, enforceable bans on the sale of cookware containing intentionally added PFAS. Scientific research has directly linked widespread PFAS exposure to a terrifying laundry list of health issues, including kidney and testicular cancers, liver damage, thyroid disease, and immune system suppression. When you heat a cheap nonstick pan past its safe threshold, or when that coating inevitably scratches and begins to flake into your food, you are directly ingesting these compounds.
Furthermore, nonstick pans are inherently disposable. They are designed to fail. Even with perfect care, a nonstick coating will lose its slip after a year or two of regular use, destined to sit in a landfill for eternity. Stainless steel, on the other hand, is a lifetime investment. It is non-toxic, non-reactive, and capable of handling the blistering high heat required to develop deep, complex flavors. It is time to break the cycle of disposable cookware and learn how to cook on real metal.
The Molecular Battlefield: Why Food Sticks to Bare Metal
To stop your food from sticking, you first have to understand why it sticks in the first place. When you look at a high-quality stainless steel pan, the surface appears perfectly smooth and reflective. But your eyes are deceiving you.
At a microscopic level, bare metal is a jagged landscape of peaks, valleys, crevices, and pores. When the metal is cold or only lukewarm, these microscopic pores are static. If you drop a cold, raw piece of protein—like a steak, a chicken thigh, or an egg—into a cold pan and turn on the heat, you are setting the stage for a molecular disaster.
As the pan heats up, the metal expands. Those microscopic valleys actually constrict and clamp down, physically grabbing onto the food. But the physical trapping is only half the battle; the real enemy is a chemical reaction.
Proteins are made up of complex, three-dimensional structures of amino acids. When raw, protein-rich foods come into contact with a heated metal surface, the heat causes those proteins to denature. They unfold, unravel, and expose highly reactive side chains and amino groups. These exposed groups aggressively seek out something to bond with. Stainless steel contains iron atoms, and the denatured proteins in your food will eagerly form strong chemical bonds—specifically Van der Waals forces and covalent bonds—directly with those metallic atoms.
In simple terms: your food is literally forming a chemical weld with your cookware. This is why tearing a stuck piece of meat leaves half of it cemented to the pan. The bond between the protein and the metal is structurally stronger than the meat itself.
So, how do we stop this chemical welding? We have to create a barrier. We have to prevent the raw proteins from ever making direct, static contact with the reactive metal atoms. And we do that by manipulating temperature and moisture.
The Physics of Searing: Demystifying the Leidenfrost Effect
If you want to cook like a pro without spending thousands of dollars on culinary school, you need to understand the Leidenfrost effect. This is not pretentious chef-speak; it is a fundamental principle of thermodynamics that will save your weeknight meals.
The phenomenon is named after Johann Gottlob Leidenfrost, a German physician and theologian who first described it in his 1756 publication, A Tract About Some Qualities of Common Water. Leidenfrost observed a curious behavior when water interacted with objects heated well beyond water’s boiling point.
We all know that water boils at 100°C (212°F). If you drop water onto a pan heated to 150°C (300°F), it will simply sizzle, rapidly evaporate, and disappear. But if you heat that pan significantly higher—to a specific threshold known as the Leidenfrost point—something magical happens.
When a liquid comes into contact with a surface that is drastically hotter than its boiling point, the bottom layer of that liquid instantly vaporizes. This rapid vaporization creates a microscopic, insulating cushion of steam between the liquid and the hot surface. Because steam conducts heat much slower than liquid water, this vapor barrier prevents the rest of the liquid from boiling away immediately. The liquid literally hovers and glides across the surface on a frictionless cushion of its own steam.
How does this apply to your Tuesday night pork chops? All raw proteins contain water. When you place a piece of meat into a pan that has achieved the Leidenfrost point, the moisture on the very surface of the meat instantly vaporizes. This micro-layer of steam lifts the food just enough to prevent those denatured proteins from chemically bonding with the iron atoms in the steel.
By harnessing this 18th-century physics discovery, you are turning a bare metal skillet into a naturally nonstick surface. This is particularly crucial when cooking fragile proteins, as fish always sticks if the vapor barrier fails to form. The key to success is hitting that exact temperature window.
The Foolproof Water Drop Test: A Step-by-Step Masterclass
Knowing about the Leidenfrost effect is great for winning trivia night, but how do you actually execute it on a busy weeknight? You do not have time to guess, and you certainly do not have time to scrub burnt fond off a pan at 8:00 PM.
This is where the “water drop test” (also known as the mercury ball test) comes in. It is the single most important technique you will ever learn for stainless steel cooking. It allows you to perfectly calibrate your pan’s temperature using nothing but a few drops of tap water.
Here is the exact, step-by-step masterclass on how to do it.
Step 1: The Dry Heat
Place your clean, completely dry stainless steel pan on the stove over medium heat. Do not add oil yet. Do not add butter. Do not add food. Just bare metal. The reason preheating the pan completely dry is so critical is that oil degrades and smokes if left alone over high heat for too long. We want the metal to reach its thermal capacity first.
Step 2: The Testing Phase
After about two to three minutes of heating, wet your fingers under the sink and flick a few drops of water into the center of the pan. You are looking for a very specific reaction, and you will likely see one of four phases:
- Phase 1: The Fizzle (Too Cold). If the water drops hit the pan and immediately sizzle, bubble, and evaporate into nothing within a second or two, the pan is too cold. It has likely reached the boiling point of water (100°C / 212°F), but it is nowhere near the Leidenfrost point. If you add food now, it will chemically weld to the pan. Keep waiting.
- Phase 2: The Split and Spatter (Getting There). Flick water again. If the drops split into dozens of tiny, angry micro-beads that aggressively spit and evaporate, you are getting closer. The pan is likely around 175°C to 200°C (350°F to 390°F). The vapor barrier is trying to form, but it is failing. Wait another 30 to 60 seconds.
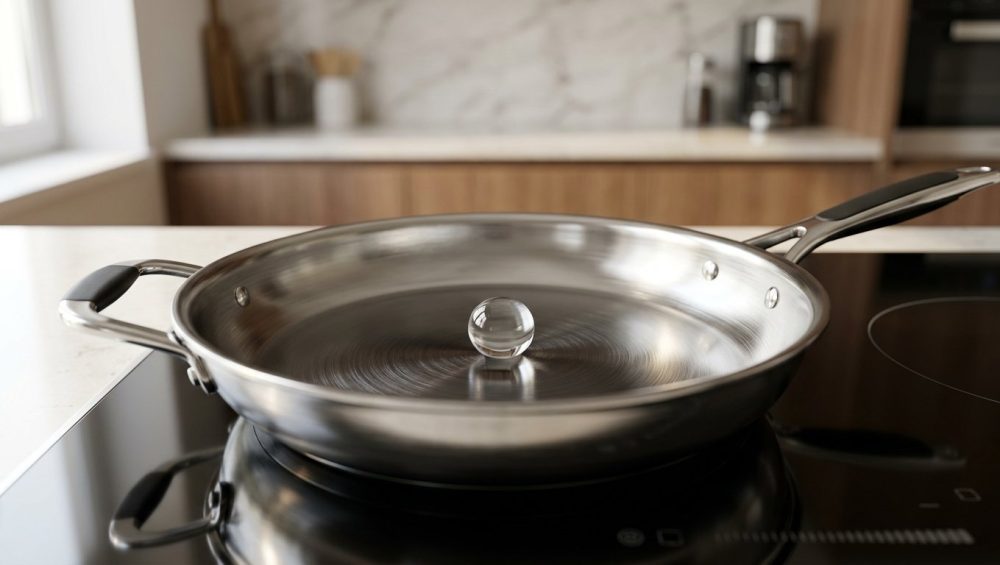
- Phase 3: The Mercury Ball (Perfection). Flick water one more time. Suddenly, the water drops will hit the pan, refuse to evaporate, and instantly merge into a perfect, cohesive sphere that glides and dances around the surface of the metal like a bead of liquid mercury. It will look like it is floating. Congratulations. You have hit the Leidenfrost point. Extensive testing shows this occurs right around 220°C to 225°C (430°F to 440°F). Your pan is now naturally stick-resistant.
- Phase 4: The Tiny Explosions (Too Hot). If you walk away and forget your pan, it will get too hot. If you flick water and the drop instantly shatters into a violent explosion of tiny droplets that zip around erratically, your pan is overheated. If you add oil now, it will instantly burst into acrid smoke and ruin the flavor of your food. Remove the pan from the heat for 60 seconds to let it cool down, then test again.
Unless you own an expensive infrared laser thermometer—which is helpful because sometimes your meat thermometer is lying to you regarding surface temps—this simple water test is the only gauge you need.
The Final Barrier: Temperature Control and the Role of Oil
Once you have achieved the dancing mercury ball, your pan is thermally ready. But we still need one final layer of protection: fat.
Wipe out the water drop with a quick swipe of a paper towel (do not leave water in the pan when adding oil, or it will violently splatter). Now, add your cooking fat. The golden rule of stainless steel cooking is: Hot Pan, Cold Oil.
Why do we wait to add the oil? Because hot oil is significantly less viscous than cold oil. When you pour room-temperature oil into a perfectly preheated 225°C pan, the oil heats up almost instantaneously. As it heats, it thins out, becoming highly fluid. This allows the oil to immediately flow into all of those microscopic valleys and crevices that expanded during the preheating phase. The oil acts as a physical sealant, creating a perfectly smooth, lubricated barrier over the jagged metallic landscape.
You must choose your fat wisely. Because the pan is sitting at over 200°C (400°F), you need a fat with a high smoke point. Avocado oil, ghee (clarified butter), grapeseed oil, or refined olive oil are excellent choices. Extra virgin olive oil or whole butter will instantly burn, turning bitter and filling your kitchen with smoke.
Furthermore, you must avoid aerosol cooking sprays at all costs. Commercial cooking spray is the enemy of high-quality cookware. These sprays contain soy lecithin as an emulsifier. When exposed to the high heat of a stainless steel pan, lecithin rapidly polymerizes, baking into a sticky, invisible, varnish-like residue that is nearly impossible to scrub off. Over time, this buildup will completely ruin the thermal conductivity and surface integrity of your pan. Stick to pure, liquid fats.
Once the oil is in the pan, wait just a few seconds. You are looking for the oil to shimmer and form slight ripples (often called “dimpling”). If you see the first wisp of white smoke, it is time to add your food. Do not delay, otherwise your scrambled eggs are rubbery before they even hit the plate due to burnt, degraded fat.
Step-by-Step Execution: Searing Proteins Like a Pro
We have the science. We have the temperature. We have the oil. Now, let us execute the perfect sear. Time is money, especially on a weeknight, so follow this workflow to guarantee you aren’t spending your evening soaking a ruined pan.
1. Dry Your Protein
Moisture is the mortal enemy of the Maillard reaction (the chemical reaction between amino acids and reducing sugars that gives browned food its incredible flavor). If you throw a wet piece of meat into a hot pan, the pan’s thermal energy will be wasted boiling off that surface water instead of searing the meat. The temperature of the pan will plummet, the Leidenfrost vapor barrier will collapse, and the proteins will chemically weld to the metal. Pat your chicken, steak, or tofu aggressively dry with paper towels before it ever goes near the stove.
2. The Drop and the Sizzle
Carefully lay your dried, seasoned protein into the hot oil, laying it away from you so the oil doesn’t splash back onto your hands. You should immediately hear a loud, aggressive sizzle. That sound is the surface moisture instantly vaporizing, creating the Leidenfrost steam cushion.
3. Do Not Touch It
This is where home cooks panic. Once the meat is in the pan, step back. Do not poke it. Do not nudge it. Do not try to lift it. Let the heat do its job.
4. The Natural Release
As the meat cooks, the Maillard reaction is rapidly transforming the surface. The amino acids and sugars are breaking down and recombining into complex flavor compounds. As this browning crust forms, the physical structure of the meat changes. The newly formed crust becomes structurally stronger than the chemical bond it initially formed with the metal.
The food will literally tell you when it is ready to flip. After 3 to 5 minutes (depending on the protein), give the meat a gentle nudge with your tongs. If it resists and feels stuck, it is not ready. The crust has not fully formed. Leave it alone. When the Maillard reaction is complete, the meat will naturally release itself from the pan, allowing you to flip it effortlessly. If you are prepping multiple ingredients on your cutting board while waiting, grab a stainless steel bench scraper to transfer your diced onions or garlic to a prep bowl so you can stay organized and keep your eyes on the stove.
The Art of the Pan Sauce: Liquidating the Fond
If you executed the sear correctly, your meat is resting on a cutting board, and your stainless steel pan is covered in a sticky, dark brown glaze. Do not put this pan in the sink! You have just created culinary gold.
Those browned bits stuck to the bottom of the pan are called fond (the French word for “base” or “foundation”). They are highly concentrated flavor compounds left behind by the Maillard reaction. Because you are using stainless steel—which can handle aggressive temperature changes and metal utensils—you can easily extract this flavor to make a mind-blowing pan sauce in under three minutes.
Place the pan back over medium heat. Pour in a splash of cold liquid—white wine, chicken broth, or even a splash of vinegar. The thermal shock of the cold liquid hitting the hot pan will instantly rapidly boil, lifting the fond right off the metal. Use a flat-edged wooden spoon to gently scrape the bottom of the pan, dissolving all those browned bits into the liquid.
Let the liquid reduce by half, turn off the heat, and vigorously whisk in a tablespoon of cold butter to emulsify the sauce. If your pan sauce separates, it is usually because the pan was still too hot when you added the butter, causing the fat to break. Whisk off the heat. And please, use a high-quality whisk. Using a cheap, degrading silicone utensil that makes your food taste like soap will completely ruin the delicate balance of your hard-earned sauce. Pour this rich, glossy reduction over your perfectly seared protein, and you have just elevated a basic weeknight dinner into a restaurant-quality meal.
Cleaning, Restoring, and Maintaining Your Stainless Steel
One of the greatest advantages of stainless steel is that it is virtually indestructible. You do not have to baby it like a nonstick pan. However, to keep it performing flawlessly, you need to maintain its microscopic surface integrity.
The Golden Rule of Cleaning: Never Shock the Pan
Never, ever take a screaming hot stainless steel pan and plunge it under cold sink water. This causes severe thermal shock. The rapid contraction of the metal will cause the pan to permanently warp. A warped pan will not sit flat on your stove, leading to uneven heating and hot spots that will burn your food. Always let the pan cool to room temperature before washing.
Everyday Cleaning
For daily messes, warm water, dish soap, and a standard sponge are all you need. Because you deglazed the pan to make a sauce, most of the stuck-on bits should already be gone.
Deep Cleaning and Polymerized Oil
Over time, you will inevitably end up with stubborn, yellowish-brown stains on the sides or bottom of your pan. This is polymerized oil—fat that has baked into a plastic-like resin. Dish soap will not remove this. You need a mild abrasive and an acidic cleaner.
Enter Bar Keepers Friend. This powdered cleaner contains oxalic acid, which breaks down polymerized fats and removes mineral deposits on a molecular level. Sprinkle it into a damp pan, make a paste, let it sit for 60 seconds, and scrub with a non-scratch pad. Your pan will look brand new. Just as a simple oven thermometer is required to keep your baking temperatures accurate, Bar Keepers Friend is mandatory for keeping your stainless steel calibrated and clean.
Preventing Pitting Corrosion
There is only one thing that can permanently damage the cooking surface of a stainless steel pan: undissolved salt. If you dump raw salt into a pot of cold water to boil pasta, the salt crystals will sink to the bottom and sit directly on the metal. As the heat rises, a chemical reaction occurs that causes “pitting corrosion”—tiny, permanent microscopic craters eaten into the steel. Always wait until your water is at a rolling boil before adding salt. The violent agitation of the boiling water will dissolve the salt instantly, protecting your cookware.
The Final Verdict
Cooking on stainless steel is not a dark art reserved for professional chefs. It is simply a matter of respecting the physics of heat. By ditching your toxic, peeling nonstick pans, you are making a permanent upgrade to your health and your culinary capabilities.
Remember the core tenets: preheat the dry pan, look for the dancing mercury ball, add your cold oil, thoroughly dry your proteins, and let the Maillard reaction do the heavy lifting. The food will release when it is ready. Master these foundational techniques, and you will never fear a bare metal skillet again. Now get into the kitchen, heat up that pan, and start searing with confidence.






