
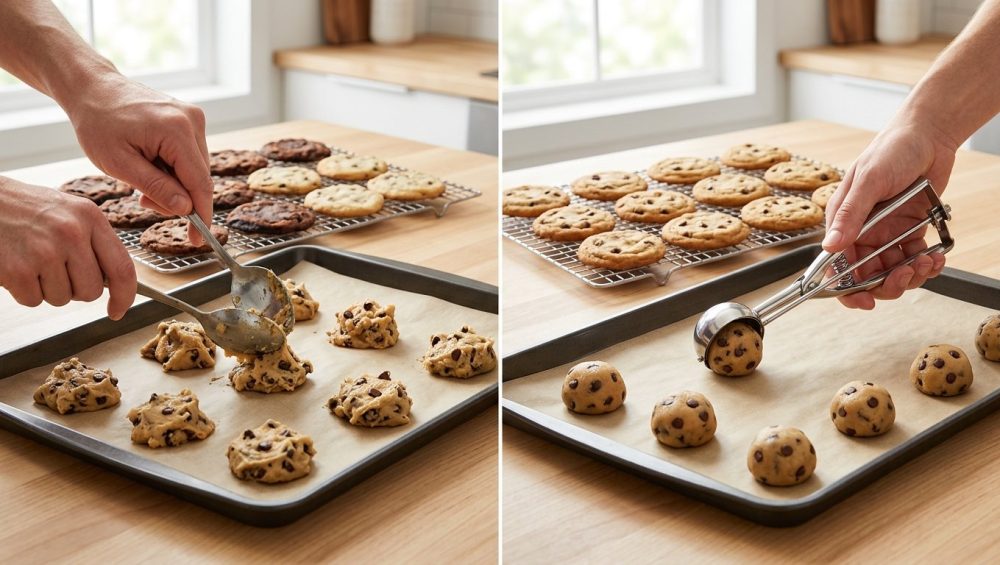
Listen to me. We have all been there. It is 8:00 PM on a random Tuesday, you have a desperate craving for freshly baked chocolate chip cookies, and you are rushing through the recipe. You whip up the dough, grab two random tableware spoons out of your silverware drawer, and start haphazardly scraping jagged, uneven blobs of dough onto a baking sheet. You throw them in the oven, set a timer, and walk away to check your emails.
Twelve minutes later, you pull out a culinary disaster. The small, marble-sized blobs have turned into blackened charcoal briquettes. The medium ones are decent but oddly shaped, resembling mutated amoebas rather than perfect circles. The massive, golf-ball-sized chunks are beautifully browned on the outside but are practically raw batter in the center. You stare at the pan, wondering why the baking gods have forsaken you and why you cannot seem to master a simple dessert.
Let’s get one thing straight right now: you are not a bad baker. You are just committing one of the most common rookie kitchen mistakes known to mankind. You are relying on the notorious “two-spoon” method, a chaotic, imprecise habit that completely ignores the fundamental physics of baking.
I firmly believe that any home cook can achieve bakery-level perfection without spending thousands of dollars on a culinary degree. But you absolutely cannot do it if you are actively sabotaging your own thermal dynamics. The magic bullet to perfectly baked, perfectly round, uniformly chewy cookies isn’t a secret, expensive ingredient or a mystical, high-end convection oven. It is a simple, mechanical portion disher—more commonly known as a spring-loaded cookie scoop.
The “Two-Spoon” Method is Ruining Your Life (and Your Cookies)
The Illusion of Eyeballing Volume
When you use two spoons to portion your dough, you are relying entirely on your eyes to gauge volume. Let me be brutally honest: humans are notoriously terrible at eyeballing volume. What looks like a “tablespoon” of dough to you might actually be 1.2 tablespoons on the first scoop, 1.8 tablespoons on the second, and a measly 0.9 tablespoons on the third. You are creating a pan full of volumetric chaos.
You might think a fraction of an ounce doesn’t matter. But in the highly sensitive, enclosed ecosystem of an oven, a difference of just five grams of dough completely alters the required baking time. When you have wildly varied sizes on the exact same pan, you are forcing your oven to play an impossible game of favorites. The smaller cookies will finish baking rapidly and immediately begin to burn, while the larger cookies are still struggling to push their internal temperature past the gelatinization point. You cannot bake a small cookie and a large cookie on the same pan and expect both to survive. It defies the laws of physics.
Time is Money: The Efficiency Factor
As a busy professional, I live by one strict, non-negotiable rule during the week: time is money. Weekday cooking and baking must be rigorously prioritized for efficiency. We do not have the luxury of spending three hours on a Tuesday night painstakingly molding dough.
The two-spoon method is agonizingly, painfully slow. You dig into the bowl with one spoon, scrape the sticky mass off with the other, try to mold the tacky dough into a vague sphere, get it all over your fingers, and eventually drop it onto the pan. It takes minutes to fill a single sheet, and you end up needing to aggressively scrub your hands afterward.
With a mechanical, spring-loaded scoop, you plunge, squeeze, and release. That is it. You can portion an entire batch of three dozen cookies in under sixty seconds. It is a rapid-fire, assembly-line process that gets your cookies into the oven faster and gets you onto the couch with a glass of wine sooner. You don’t need a massive, expensive arsenal of beginner kitchen tools to succeed in the kitchen, but you absolutely, unequivocally need this one specific tool for your baking sanity.
The Physics of Baking: Why Size Actually Matters
The Groundbreaking Science of Cookie Kinetics
If you think I am being overly dramatic about the importance of cookie size, let us consult the scientific literature. Baking is not a mystical art; it is an exact science governed by the strict laws of thermodynamics. In an impressively detailed study published in the Journal of Food Science, a team of researchers led by Dr. Maria Corradini at the University of Guelph set out to mathematically model the cookie baking process. They didn’t just bake cookies; they mapped the reaction kinetics of heat and mass transfer phenomena.
By measuring the morphological changes—shape expansion, color development, and moisture loss—every two minutes using infrared thermometers and precision scales, the researchers proved that the baking process is a highly complex, interconnected series of physical and physicochemical changes. They baked batches at three different temperatures (185°C, 205°C, and 225°C) and found that variations in dough mass and surface area completely disrupt the optimal parameters of baking. When you alter the volume of the dough, you alter the entire kinetic model. The heat cannot penetrate the dough at the expected rate, the moisture does not evaporate predictably, and the browning index becomes chaotic. In short, science has definitively proven that eyeballing your dough is a guaranteed recipe for failure.
Thermal Mass and Heat Transfer Mechanisms
Let us break down exactly what happens when that cold dough hits a 350°F (175°C) environment. Heat transfers to your cookies via three primary mechanisms: conduction, convection, and radiation. Conduction is the direct transfer of thermal energy from the hot metal baking pan into the bottom of the cookie dough. Convection is the transfer of heat via the hot air circulating throughout the oven cavity, cooking the top and sides of the dough. Radiation is the infrared energy emitted by the glowing heating elements of your oven.
The dough’s “thermal mass”—its ability to absorb and store heat energy—dictates how quickly these three forces can raise the internal temperature of the cookie to the crucial 212°F (100°C) threshold where water turns to steam. If you use spoons to drop a 15-gram blob next to a 35-gram blob, you have created a thermodynamic crisis. The 15-gram cookie has a low thermal mass and a high surface-area-to-volume ratio. It absorbs heat rapidly. Its internal moisture flashes into steam, its starches gelatinize, and its edges begin to brown almost immediately.
Meanwhile, the 35-gram cookie is acting like a stubborn thermal sink. Its dense, heavy core is still sitting at a sluggish 120°F (49°C). If you wait for the 35-gram cookie to finish baking, the 15-gram cookie will be subjected to prolonged conductive heat, turning its bottom into a charred, bitter disc. If you pull the pan early to save the small cookie, the large one remains a puddle of raw flour and unpasteurized egg. Uniform scooping guarantees that every single cookie on the pan possesses the exact same thermal mass, allowing them to absorb heat at an identical, highly predictable rate.
Anatomy of a Spring-Loaded Cookie Scoop: Not Just an Ice Cream Tool
Sizing Decoded: What Those Tiny Numbers Mean
If you have ever looked closely at a professional portion disher, you will notice a tiny number stamped on the inside of the sweeper arm or the handle. This number is not arbitrary; it is a standardized volume measurement used rigorously in the commercial restaurant industry to maintain food costs and portion control.
The number indicates exactly how many level scoops it takes to fill one standard quart (32 fluid ounces or 946 milliliters).
Let us do the culinary math so you can understand your tools:
- Size #16: Yields 16 scoops per quart. This holds about 2 ounces (4 tablespoons) of dough. This is your massive, gourmet, bakery-window cookie.
- Size #20: Yields 20 scoops per quart. Holds about 1.6 ounces (3 tablespoons) of dough. This is the ideal size for a generous, substantial homemade chocolate chip cookie.
- Size #40: Yields 40 scoops per quart. Holds about 0.8 ounces (1.5 tablespoons). This is the standard, everyday workhorse size for most drop cookies.
- Size #60: Yields 60 scoops per quart. Holds about 0.5 ounces (1 tablespoon). Perfect for delicate shortbreads, snickerdoodles, or rolling truffles.
By utilizing this standardized volume system, you completely eliminate the chaos of estimation. If your recipe yields exactly one quart of batter, and you use a #40 scoop, you will produce exactly 40 cookies. You can calculate your baking times and yield with absolute, unwavering certainty.
The Mechanical Engineering of a Portion Disher
To appreciate the genius of the spring-loaded scoop, you have to understand its mechanics. This is not a cheap plastic novelty; it is a precision-engineered tool that utilizes principles of mechanical physics dating back to the 17th century. The handle relies on a heavy-duty compression spring, governed by Hooke’s Law of elasticity, which states that the force needed to extend or compress a spring by some distance is proportional to that distance.
When you squeeze the handle, you apply kinetic energy that compresses the internal spring. This action engages a rack-and-pinion gear system hidden within the handle. The “rack” (a linear gear) pushes against the “pinion” (a circular gear), converting your linear hand squeeze into a powerful rotational force. This rotational force drives the sweeper arm—a curved metal blade precisely calibrated to sit mere millimeters from the inner wall of the hemispherical bowl.
As the sweeper arm rotates, it cleanly severs the adhesive bonds between the sticky dough and the metal bowl. When you release your grip, the potential energy stored in the compressed spring aggressively snaps the handle and the sweeper arm back to their starting positions. The result is a seamless, frictionless release of a perfectly symmetrical dome of dough.
The Food Science of Uniformity: A Deep Dive
Spread Dynamics and Fat Melting Points
Let’s dive deeper into the chemistry of what happens when that perfectly scooped dome enters the oven. Butter is an emulsion of butterfat (usually around 80%), water (around 15%), and milk solids (around 5%). When the dough enters the hot oven, the butterfat begins to melt between 90°F and 95°F (32°C – 35°C). As the fat liquefies, the dough loses its structural integrity and gravity takes over, causing the dough ball to flatten and spread across the pan.
If your dough is portioned uniformly, the butter in every single cookie reaches that critical 90°F melting point simultaneously. They all spread outward at the exact same velocity. If you have wildly varied sizes, the smaller cookies melt and spread rapidly, while the larger ones remain tall and dense. This is exactly why you sometimes see a baking sheet where cookies spread into giant puddles and completely fuse together into a monstrous, unbaked sheet cake. Uniform volume ensures a uniform spread radius, keeping your cookies distinct and perfectly circular.
Maillard Reaction and Caramelization Pacing
As the internal temperature of the uniform cookies continues to rise, the water content from the butter and eggs reaches 212°F (100°C) and converts into steam. This steam expands the air pockets created during the creaming process, leavening the cookie. Once the moisture evaporates from the surface of the dough, the surface temperature is finally able to exceed the boiling point of water and climb higher.
At approximately 285°F (140°C), the Maillard reaction initiates. This is a complex cascade of chemical reactions between amino acids (from the flour and eggs) and reducing sugars. It produces hundreds of distinct flavor compounds, providing the rich, nutty, butterscotch notes we associate with expertly baked goods. Shortly after, at 356°F (180°C), the sucrose undergoes caramelization, deepening the color to a beautiful mahogany.
These flavor-building reactions are exponentially sensitive to time and temperature. A uniform batch guarantees that the Maillard reaction triggers across the entire baking sheet in perfect synchronization. Every cookie achieves that coveted crispy, golden-brown edge and a tender, slightly underbaked center at the exact same moment. You are no longer playing a stressful guessing game; you are conducting a synchronized chemical symphony.
Buying Guide: How to Avoid Cheap, Toxic Junk
The “No-Go” Rule: Say No to Peeling Chrome and Mystery Metals
If you have read my blog before, you know I have a strict, uncompromising “No-Go” rule in my kitchen regarding cheap, toxic equipment. I absolutely despise poorly manufactured gear. The market is currently flooded with inexpensive, five-dollar cookie scoops imported by no-name brands. These inferior tools are typically cast from cheap zinc alloys or mystery aluminum blends, and then coated in a thin layer of electroplated chrome to make them look shiny and professional.
Do not fall for this trap. Throw them in the trash immediately. The friction generated by the sweeper arm aggressively grinding against the inside of the bowl will inevitably cause that cheap chrome plating to blister, flake, and peel. When that happens, microscopic shards of heavy metals are deposited directly into your cookie dough. You are unknowingly feeding your friends and family toxic metal flakes because you wanted to save a few dollars on a kitchen tool.
Furthermore, the internal components of these cheap scoops are disastrous. The gears strip under the slightest resistance, and the weak springs are prone to sudden, violent failure. It is a safety hazard and a massive waste of money. I have seen cheap kitchenware fail catastrophically before—like the time a glass baking dish shattered into a thousand pieces in my oven due to poor thermal shock resistance. Do not compromise on the metallurgical integrity of your tools.
18/8 Stainless Steel: The Only Acceptable Material
When purchasing a portion disher, you must verify that the entire tool—bowl, sweeper, handle, and gears—is constructed entirely from 18/8 or 18/10 food-grade stainless steel.
What do those numbers actually mean? They represent the alloy composition: 18% chromium and 8% (or 10%) nickel. The chromium binds with oxygen to form a passive, microscopic layer of chromium oxide that protects the steel from rust and corrosion. The nickel provides structural strength, durability, and a brilliant polished finish.
An 18/8 stainless steel scoop is virtually indestructible. It is non-reactive, meaning it won’t impart a metallic taste to acidic batters. It is completely dishwasher safe, and most importantly, there is no toxic plating to peel off into your food. Brands like Vollrath, Zeroll, and OXO engineer their scoops for the grueling demands of commercial kitchens, where they are expected to portion thousands of servings a week. Spending twenty dollars on a professional-grade stainless steel scoop is an investment that will easily outlast your oven.
Advanced Scoop Techniques for Bakery-Level Results
The Scrape-and-Level Technique
Owning the proper tool is only half the battle; you must use it correctly. You cannot just aggressively stab the scoop into the bowl and rip out a jagged mountain of dough. If the dough extends past the rim of the scoop, you have defeated the entire purpose of volume control.
To achieve true, gram-for-gram uniformity, you must utilize the scrape-and-level technique. Plunge the scoop deep into the chilled dough, ensuring the hemispherical bowl is completely packed, leaving no hidden air pockets. Then, drag the flat opening of the scoop firmly against the inner wall of your mixing bowl. This shears off the excess dough, leaving a perfectly flat, flush surface.
For the absolute perfectionists among us, I highly recommend periodically ejecting a leveled scoop of dough directly onto a digital kitchen scale. If you are using a #40 scoop, your leveled dough balls should consistently weigh in at exactly 22 to 24 grams, depending on the density of your mix-ins. Verification is the hallmark of a master baker.
Temperature Control After Scooping
Here is a brilliant workflow hack that will change your baking life: portion your dough immediately after mixing, while the butter is still soft and pliable at room temperature. Eject the leveled hemispheres onto a parchment-lined tray, packing them shoulder-to-shoulder (they are not baking yet). Then, wrap the tray tightly in plastic wrap and place it in the refrigerator.
The food science behind chilling dough is irrefutable. It solidifies the butterfat, ensuring that the cookies hold their shape longer in the hot oven, leading to a thicker, chewier center. But trying to force a mechanical scoop through rock-hard, refrigerated dough is a miserable experience that can sprain your wrist and strip the gears of your tool. Scooping while the dough is soft, and chilling it afterward, is the ultimate professional compromise.
Additionally, resting your dough in the cold environment for 24 to 72 hours works enzymatic magic. The flour fully hydrates, absorbing the moisture from the eggs, which prevents a dry, crumbly texture. The enzymes naturally present in the flour begin to break down complex starches into simple sugars, resulting in a darker Maillard reaction and a profound, complex, toffee-like flavor profile.
Beyond Cookies: The Multi-Tasking Powerhouse
Muffins, Meatballs, and Pancakes
If you think I am advocating for a single-use unitasker taking up precious real estate in your kitchen drawers, you clearly do not know my philosophy. A high-quality spring-loaded disher is one of the most versatile tools you can own, saving you immense time on weeknight dinners.
- Muffins and Cupcakes: Use a large #16 scoop to transfer wet batter into your lined tins. It delivers the exact same volume to every single well, guaranteeing that your muffins bake evenly and develop identical, picturesque, domed tops. No more messy drips across the pan.
- Meatballs and Falafel: Use a medium #40 scoop for forming meatballs. Hand-rolling raw meat is a sticky, unhygienic nightmare that compresses the meat, resulting in tough, dense meatballs. A mechanical scoop gently portions the meat mixture without overworking the proteins. You can rapidly eject perfectly uniform meatballs directly into a hot skillet, ensuring they sear evenly and reach a safe internal temperature simultaneously.
- Pancakes and Waffles: Use a massive #10 scoop for pancake batter. Pouring batter directly from a heavy mixing bowl is a recipe for chaotic, asymmetrical blobs that cook at wildly different speeds. One squeeze of the scoop yields one perfect, circular pancake that flips beautifully.
Troubleshooting Common Scoop Disasters
Sticky Dough and Mechanical Jams
Even armed with the best tools and techniques, you will occasionally encounter a highly hydrated, incredibly sticky dough that refuses to release cleanly from the sweeper arm. This is especially common if you are utilizing modern techniques where melted butter makes cookies chewier. Melted butter doughs are notoriously loose and tacky before they are chilled.
If the dough is clinging stubbornly to the metal, do not panic. Keep a tall mug of very hot water next to your workstation. Dip the empty scoop into the hot water, tap it firmly against the rim to remove excess drips, and then scoop your dough. The residual thermal energy in the heated metal, combined with the microscopic lubricating layer of water, creates a temporary non-stick barrier. The dough will glide right out of the bowl.
I must reiterate: never, under any circumstances, spray your mechanical scoop with aerosol cooking sprays. The chemical propellants and emulsifiers in those sprays will build up a polymerized, sticky resin inside the rack-and-pinion gear system. Over time, this invisible gunk will jam the mechanism, rendering the spring entirely useless.
Pan Warping and Insulation Issues
Finally, you must remember that uniform scooping is only effective if your baking environment is stable. You can have perfectly portioned, gram-matched dough balls, but if you drop them onto a flimsy, low-quality baking sheet, you will still experience uneven baking.
Thin aluminum pans cannot handle the thermal shock of a hot oven. They buckle and twist under high heat. If your baking sheets keep warping, they break direct physical contact with the oven racks, disrupting the conductive heat transfer. The cookies sitting on the raised, warped sections of the pan will severely underbake, while the ones in the sunken valleys will burn. Invest in heavy-gauge, aluminized steel half-sheet pans with rolled edges.
Similarly, be hyper-aware of the surface you bake on. While parchment paper is the undisputed champion of the bakery, many home cooks rely on thick silicone mats. I frequently warn my readers that silicone baking mats are highly effective thermal insulators. They slow down the conductive heat transfer from the pan to the dough, which can prevent the bottoms of your cookies from achieving that deeply caramelized, crispy texture. If you want a perfectly crispy edge, stick to unbleached parchment paper.
The Final Word on Precision
Baking is a science, but it absolutely shouldn’t be a stressful one. By understanding the simple thermodynamics of your oven and respecting the physics of thermal mass, you can eliminate the frustrating guesswork that leads to burnt edges and raw centers.
Ditch the two-spoon method. Stop relying on your eyes to measure volume. Invest in a heavy-duty, 18/8 stainless steel spring-loaded cookie scoop, and start treating your kitchen like the precision environment it is. Your time is too valuable, and your ingredients are too expensive, to leave your weekend baking projects up to chance. Grab your scoop, level your dough, and bake with absolute confidence. You’ve got this.






