Listen up, my weekend culinary warriors. We need to have a serious conversation about your breakfast game. You invite your friends over for a Sunday brunch, envisioning a beautiful, Instagram-worthy spread. You want to serve a stunning, interactive parfait station. But when you pull your homemade granola out of the pantry, it looks like the tragic, dusty remnants at the bottom of a commercial cereal box. It is sad. It is clumpless. It is essentially hamster food.
Why does this happen? Because most home cooks fundamentally misunderstand the baking mechanics of a proper oat cluster. They treat granola like a stir-fry rather than a delicate baked good. We are going to fix this right now. You don’t need a pastry degree from Le Cordon Bleu to make granola that looks like it costs eighteen dollars a bag at an artisanal farmer’s market. You just need to understand a little bit of thermal dynamics and ingredient chemistry.
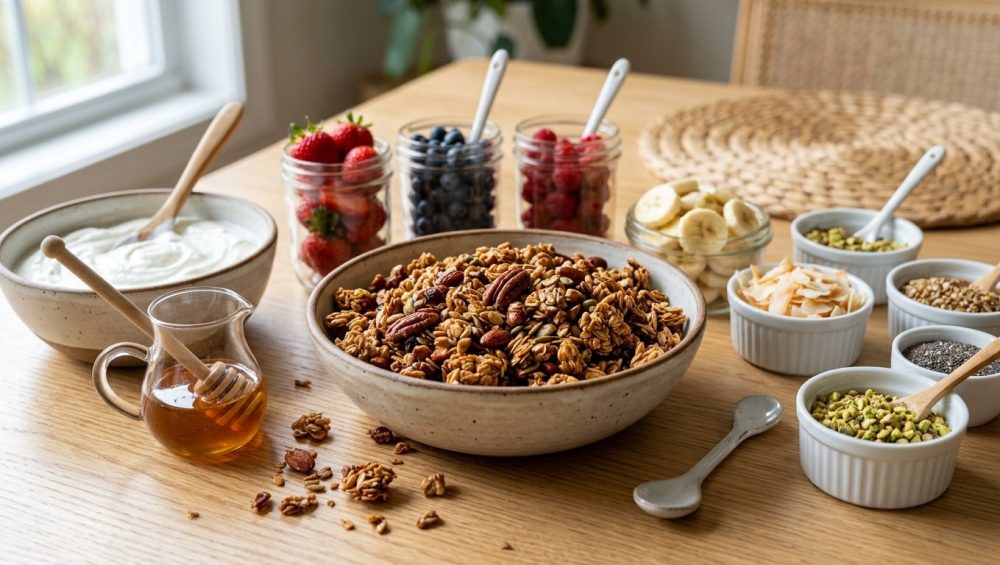
Weekday mornings are for survival—you grab a protein shake and run out the door. But the weekend? The weekend is when we play. When you plan relaxed weekend gatherings, the ultimate goal is to actually enjoy the company of your friends, not to be trapped sweating over a hot stove while everyone else sips your prosecco. A prep-ahead, highly customizable yogurt bar featuring massive, crunchy boulders of homemade granola is the ultimate host’s secret weapon.
Here is your definitive, no-nonsense masterclass on the science of the perfect granola cluster and the blueprint for executing a flawless, stress-free morning gathering.
The Anatomy of a Granola Cluster: The Science of the Clump
Getting those gorgeous, bakery-style clusters isn’t about luck; it is entirely about science. If your granola is constantly falling apart into a fine dust, you are failing to respect the binders and the bonds.
The Golden Ratio of Wet to Dry
Granola is essentially a matrix of dry ingredients (oats, nuts, seeds) suspended in a web of crystallized sugars and fats. The golden ratio for perfect granola is generally six parts dry ingredients to one part wet ingredients (a combination of your fat and your liquid sweetener). If you skew this ratio and drown your oats in oil, they will fry rather than bake, leaving you with a greasy mess. If you skimp on the sweetener, there is no physical glue to hold the oats together. Just like how carelessly measuring your pantry staples easily ruins your baked goods, eyeballing your binders here will leave you with a crumbly disaster.
The Thermodynamics of Sugars
Let’s look at what is actually happening inside your oven. When you use a liquid sweetener like honey or pure maple syrup, you are relying on their specific chemical properties to form structural bonds. Honey, which is roughly 55% fructose and 40% glucose, caramelizes cleanly at around 250°F. As the mixture heats up in the oven, the water content in the syrup evaporates, and the natural sugars begin to melt, creating a sticky, viscous coating around every single oat and nut.
When the granola is removed from the oven and begins to cool, those melted, caramelized sugars undergo a phase change. They harden into an edible glass, permanently cementing the adjacent oats together. If you use a granulated sugar without enough liquid, or if you bake at too high of a temperature, the sugar simply burns instead of forming that crucial structural web.
The Secret Weapon: The Egg White
Even with the perfect ratio of oil to maple syrup, sometimes you want clusters the size of golf balls without having to make the granola sickeningly sweet. Enter the ultimate culinary secret: the egg white.
Adding one lightly beaten, frothy egg white to your wet mixture before tossing it with the dry ingredients changes the game entirely. The proteins in the egg white act as a powerful, invisible binder. As the granola bakes, the egg white proteins denature and coagulate, creating a microscopic, rigid scaffolding that holds massive chunks of oats together. It adds zero flavor, zero extra sugar, and an unparalleled, shattering crunch. If you take nothing else away from this masterclass, remember the egg white.
The Baking Mechanics: Temperature and Technique
You can have the best ingredients in the world, but if your technique is flawed, your granola will still fail. The actual physical process of baking and cooling is where most rookie cooks sabotage their own efforts.
The Low and Slow Mandate
Granola must be baked at a low temperature. Period. We are aiming for 300°F (150°C). Why? Because oats are dense, and nuts contain volatile, delicate oils. If you crank your oven to 375°F or 400°F, the exterior sugars will scorch and turn bitter long before the moisture in the center of the oat mixture has a chance to evaporate. You are not searing a steak; you are gently dehydrating and toasting a delicate grain. Patience is not just a virtue here; it is a culinary requirement.
The Crowding Factor
In almost every other roasting application, crowding the pan is a cardinal sin. If you crowd vegetables, they steam instead of caramelizing. Granola is the absolute exception to this rule. You want the oats to be touching. In fact, you want them packed together as tightly as possible.
Once you transfer your raw, sticky oat mixture to your baking sheet, you must press it down firmly into a single, compact, even layer. Use a heavy, flat object to compress the mixture. If your spatulas taste like soap because you bought cheap, porous silicone, ditch them immediately and use the flat bottom of a heavy glass measuring cup or a metal bench scraper. Compressing the oats ensures that the sugar bonds form across the entire surface area of the pan, effectively baking the granola into one giant, solid cookie.
The Golden Rule: Do Not Touch It
I am about to contradict 90% of the recipes you will find on the internet. Most mainstream recipes will instruct you to open the oven every ten minutes to stir the granola. This is a malicious lie propagated by people who hate joy and clusters.
Every single time you stir that pan, you are violently breaking the fragile sugar and protein bonds that are trying to form between the oats. You are actively destroying your clusters. Put the pan in the oven, rotate it once halfway through the baking time if your oven has hot spots, and otherwise, leave it alone.
The Cooling Phase
When the timer goes off, the granola will still feel slightly soft and pliable to the touch. Do not panic, and do not put it back in the oven. The hardening process happens entirely during the cooling phase. As the ambient temperature drops, the melted sugars crystallize and the egg white proteins set firmly. You must let the pan sit, completely undisturbed, on a wire rack for at least 45 minutes to an hour. Only when it is entirely cool to the touch should you go in with your hands and fracture that beautiful, solid sheet into massive, satisfying clusters.
Ingredient Deep Dive for Maximum Crunch
A masterpiece is only as good as its raw materials. Let’s break down exactly what belongs in your mixing bowl.
The Grain Foundation
You must use thick-cut, old-fashioned rolled oats. Do not use quick oats, which have been rolled too thin and pre-steamed; they will disintegrate into a mushy, powdery paste when mixed with the wet ingredients. Do not use steel-cut oats, which are too dense and will literally break your teeth if baked without boiling. While toasting your oats first is a brilliant, flavor-enhancing hack for a cozy bowl of stovetop porridge, it is unnecessary here, as the low-and-slow oven time does all the heavy lifting for you.
The Fat Matrix
Fat conducts heat evenly and creates the satisfying, rich crunch we crave. You have two primary options that yield professional results:
- Unrefined Coconut Oil: This provides a subtle, sweet, tropical note and helps the clusters harden beautifully because coconut oil is solid at room temperature.
- Extra Virgin Olive Oil: If you want a more sophisticated, slightly savory, deeply complex flavor profile, olive oil is your best friend. It pairs exceptionally well with maple syrup and a heavy pinch of sea salt.
The Mix-Ins: Timing is Everything
Nuts and seeds (pecans, walnuts, almonds, pepitas, sunflower seeds) should be added to the raw mixture before baking. You want them to absorb the sweetener and toast gently in the oven, releasing their essential oils.
Dried fruit, however, is a completely different story. The cardinal rule of granola is that dried fruit must be added after the granola has finished baking and cooling. Dried fruit has already been dehydrated. If you subject raisins, dried cherries, or chopped apricots to 45 minutes in a 300°F oven, they will lose their remaining moisture, carbonize, and turn into bitter, inedible rocks. Fold them in at the very end.
The “No-Go” Rule on Toxic Bakeware
We need to pause the recipe talk for a moment because it is time for a brutally honest reality check about your kitchen equipment. I do not care how perfectly you measure your egg whites or how expensive your organic maple syrup is; if you are baking on cheap, toxic trash, you are sabotaging your food and your health.
I have zero patience for flimsy, dark-coated, non-stick baking sheets. Most commercial non-stick bakeware is coated with PTFE (polytetrafluoroethylene), commonly known as Teflon, which is manufactured using PFAS—a class of highly toxic “forever chemicals.” When these cheap pans are heated, especially if they are scratched or aging, they can degrade and leach microscopic chemical compounds into your food.
Furthermore, the chemical nightmare of ruining your nonstick pans with aerosol cooking sprays only exacerbates the issue, creating a sticky, polymerized residue that is impossible to clean and completely ruins the thermal conductivity of the pan.
Beyond the toxicity, cheap baking sheets are structurally pathetic. They are made from incredibly thin, low-gauge metal that cannot handle thermal expansion, which is exactly why your baking sheets keep warping and violently popping in the oven. When your pan twists and warps mid-bake, it cracks your carefully pressed granola sheet, destroying your clusters and causing uneven browning.
And please, avoid shattering your glass bakeware by mistakenly using it for dry, high-heat roasting where severe thermal shock can turn your kitchen into a dangerous hazard zone. Glass is for casseroles, not for dry-roasting oats.
What you actually need: You need heavy-duty, uncoated, commercial-grade equipment. Invest in thick, 10-gauge bare aluminum half-sheet pans, or 5-ply surgical stainless steel baking sheets. To prevent sticking, simply line the heavy metal pan with a sheet of high-quality, unbleached parchment paper. It is safe, it provides an incredible, even heat distribution, and your granola will slide right off in one beautiful, cohesive slab.
The Masterclass Granola Blueprint
Here is your foolproof, definitive recipe for the ultimate clumpy granola.
The Dry Mix:
- 3 cups old-fashioned rolled oats (certified gluten-free if necessary)
- 1 ½ cups raw nuts (a mix of roughly chopped pecans, walnuts, and sliced almonds)
- ½ cup raw seeds (pepitas or sunflower seeds)
- 1 teaspoon kosher salt (do not skip this; salt makes the sugar taste complex, not cloying)
- 1 teaspoon ground cinnamon
- ½ teaspoon ground cardamom (optional, but highly recommended for a sophisticated edge)
The Wet Mix:
- ½ cup extra virgin olive oil or melted unrefined coconut oil
- ½ cup pure maple syrup or high-quality honey
- 1 teaspoon pure vanilla extract
- 1 large egg white, whisked until frothy and opaque
The After-Bake Mix-ins:
- 1 cup dried fruit (tart cherries, golden raisins, or chopped dried apricots)
- ½ cup toasted coconut flakes (if using, toast them separately in a dry skillet)
The Execution:
- Preheat your oven to 300°F (150°C). Line a heavy-duty, uncoated metal baking sheet with unbleached parchment paper.
- In a massive mixing bowl, toss together all of the dry ingredients (oats, nuts, seeds, salt, and spices).
- In a separate smaller bowl, thoroughly whisk together the oil, maple syrup, and vanilla extract.
- Pour the wet mixture over the dry mixture. Use a sturdy wooden spoon to fold everything together until every single oat is glossy and coated.
- Pour the frothy egg white over the coated oat mixture. Fold it in gently but thoroughly.
- Dump the mixture onto your prepared baking sheet. Using the bottom of a measuring cup, press the granola down aggressively until it forms a tight, even, flat layer across the entire pan.
- Bake on the middle rack for 40 to 45 minutes. Do not stir it. Rotate the pan 180 degrees at the 20-minute mark if your oven heats unevenly.
- Remove from the oven when the edges are deeply golden brown. It will feel soft. Leave it completely alone for at least 45 minutes until it is entirely cool.
- Break the solid sheet into massive, glorious clusters. Toss with the dried fruit and coconut flakes. Store in an airtight glass jar.
Setting Up the Mindful Yogurt Bar
Now that you possess the ultimate artisanal granola, it is time to talk about the gathering itself.
Industry statistics and food market research for 2026 show a massive shift in how people want to eat breakfast. The heavy, carb-loaded, sit-down brunch of the past decade is fading. Today’s consumers, heavily influenced by functional nutrition, gut-health awareness, and high-protein dietary trends, want meals that make them feel energized, not lethargic. The customizable, high-protein yogurt bowl is currently dominating the culinary landscape.
A DIY yogurt parfait bar is the perfect intersection of these modern health trends and brilliant hosting strategy. It is inherently interactive, visually stunning, and requires absolutely zero active cooking while your guests are in your home.
The Base: Curating the Yogurt
Do not buy giant tubs of cheap, sugary, artificially flavored yogurt. You want to provide a blank, high-quality canvas that allows your majestic granola to shine.
Offer two distinct bases. First, a high-protein dairy option. Icelandic Skyr or a full-fat, plain Greek yogurt are the best choices. They are incredibly thick, luxuriously creamy, and pack upwards of 15 to 20 grams of protein per serving, satisfying the modern brunch-goer’s nutritional desires.
Second, you must offer an inclusive, plant-based alternative. A high-quality, unsweetened cashew yogurt or a thick coconut cream yogurt ensures that your dairy-free or vegan guests are fully accommodated without feeling like an afterthought.
The Toppings Matrix
Aside from your masterclass granola, the toppings are what elevate a yogurt bar from a weekday breakfast to a weekend event.
Fresh Fruit: Provide a vibrant array of fresh berries (raspberries, blueberries, blackberries) and sliced stone fruit or bananas. To prep ahead so that the tragic phenomenon where berries mold so fast doesn’t ruin your Sunday morning, wash your berries in a diluted vinegar bath (one part white vinegar to three parts water) on Friday, rinse them thoroughly, and dry them completely on a paper towel-lined tray before storing them in the fridge. They will look pristine all weekend.
The Compote: For a truly elevated touch, take 15 minutes the day before to make a simple fruit compote. Simmer two cups of frozen mixed berries in a saucepan with a squeeze of fresh lemon juice and a tablespoon of maple syrup until it breaks down into a thick, jammy sauce. Serve it chilled. It swirls beautifully into the thick yogurt.
The Drizzles: Set out small, attractive jars of raw honey, high-quality maple syrup, and runny almond or macadamia nut butter.
Food Staging and Spatial Flow
The physical layout of your yogurt bar is critical. If you just throw everything onto a tiny kitchen island in a random order, people will cross arms, drop spoons, and create a chaotic traffic jam.
You must arrange the station linearly, mimicking the exact chronological steps of building a parfait. This specific order is crucial to eliminate awkward serving bottlenecks and keep the line moving smoothly:
- The Foundation: Start with the bowls and spoons at the far left (or right, depending on the room’s flow).
- The Base: Next, place the large, chilled serving bowls of yogurt, nestled in a larger tray of crushed ice if they will be sitting out for over an hour.
- The Fruit: Follow the yogurt with your fresh berries and the homemade compote.
- The Crunch: Next comes the star of the show—your massive glass jar of clumpy, homemade granola.
- The Finishers: End the line with the drizzles (honey, nut butters) and perhaps a small bowl of chia seeds or bee pollen for garnish.
The Philosophy of Mindful Hosting
The true beauty of this entire menu is the timeline. You can bake the granola on Thursday evening. You can wash and prep the berries on Friday. You can simmer the berry compote on Saturday afternoon. You can even set out the bowls, spoons, and serving jars on your dining table on Saturday night before you go to sleep.
When Sunday morning arrives, there is no bacon grease splattering on your stove. There are no delicate poached eggs threatening to overcook. There is no frantic whisking of hollandaise sauce. You simply pull the chilled items out of the refrigerator, place them on the table, pour yourself a large cup of premium coffee or a mimosa, and actually sit down to talk with the people you invited over.
That is how you beat the system. That is how you stop treating your kitchen like a chaotic diner line. By understanding the science of your ingredients and prepping intelligently, you step out of the role of the stressed-out short-order cook. Sunday morning, you just pull the yogurt out of the fridge and master the art of effortless hosting. Now go preheat your oven, grab your oats, and let’s build some clusters.


